As much as we like to promote moving your flash off-camera, there are times when using that little pop-up flash can be really fun! One such time can be when it’s snowing outside! A little wind to help kick things up also helps. Here’s a few shots I took earlier today on an outing to Keystone, CO when the weather conditions were just about perfect for these fun effects!
Using Flash in the Snow - #1
Using Flash in the Snow - #2
Using Flash in the Snow - #3
Using Flash in the Snow - #4
Now granted, these are nothing that would ever been usable for fine art or stock type work, but it’s always fun to experiment, and this is one such case where on-camera flash works particularly well. There’s other times when using on-camera built-in flash can also be useful though, so don’t be afraid to experiment. Where have you had success with on-camera flash? Share your own thoughts, perspectives and shots in the insight
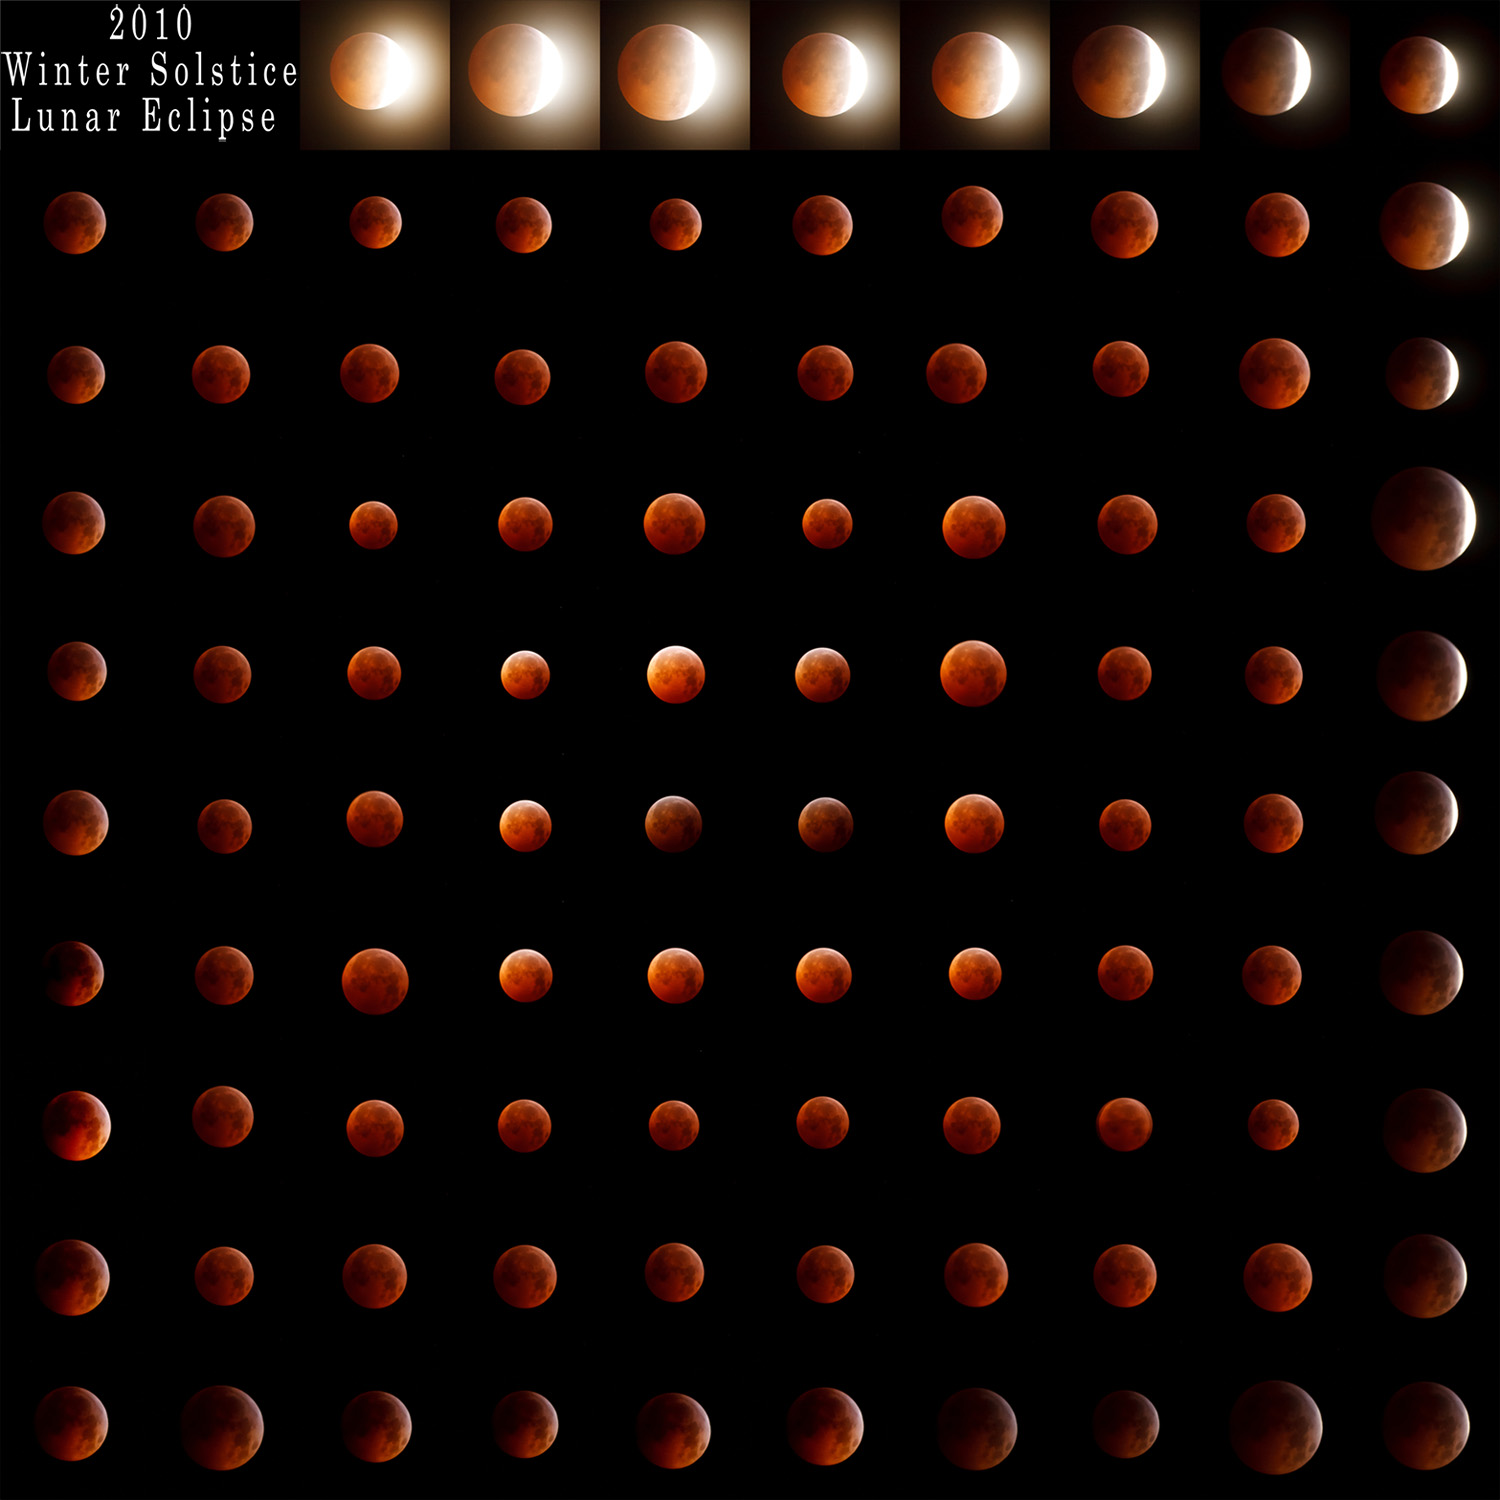
As you may recall from yesterday’s post, I did not get the entire solstice eclipse from beginning to end due to cloud cover. But, from the halfway point forward, the clouds cleared and I was able to get some adequate coverage. After wrestling both mentally and processor-ily with the amount of images (98) and trying to figure out a good way to present the series, I decided on the spiral approach…
2010 Winter Solar Eclipse
What kinds of shots did you get? How are you presenting them? I debated on a video showing the movement across the sky, but that was very labor intensive, so decided on the above. Thoughts, comments, feedback? Share your shots too!
It’s that time of year again, and many have already covered the tips and tricks that surround shooting Christmas Lights. Here’s just a few tips and sample photos to help you along the way, and give you some ideas for your own creative vision and inspiriation:
Keep your shutter speed around 3-7 seconds. Much longer than 7 seconds and the lights will start getting blown out, losing detail. Much shorter than 3 seconds and your lights won’t have enough detail.
Shoot at twilight (or early morning if the lights are still on). This avoids the problem of needing longer exposures in darker night shots, which can cause #1. Also, the dark blues in twilight can add some real nice depth and appeal that would otherwise be lacking in darker sky photos. If you time it right and get clear enough skies, you can also get stars in your images!
It should go without saying, but use a tripod – these long exposures are impossible without it. To this end though, if you don’t have your tripod wrapped in foam, now is the time to do it. Colder temps can make it downright painful to touch.
Don’t try to capture too much – you have a limited window of twilight, so once that’s gone, just enjoy the rest of the evening – most of your shots after twilight won’t be “keepers”
Try shooting low to get a different angle, or from above looking down – to get a better “aerial” approach.
For the starburst effect without the star filter, drop your aperture down to f16 or smaller – lights will start to exhibit the starburst effect at these smaller apertures.
There’s my 5 tips – but there’s always more where that came from. What about the rest of the audience? What tips, tricks, and advice do you have for shooting the holiday lights? Share ’em in the comments! Here’s my sample (there’s more also up on my Flickr photo stream). Happy shooting and we’ll see you back here again tomorrow!
Christmas Lights at Chatfield 1Christmas Lights at Chatfield 2Christmas Lights at Chatfield 3Christmas Lights at Chatfield 4Christmas Lights at Chatfield 5Christmas Lights at Chatfield 6
Editor Note: These were taken at Chatfield, part of the Denver Botanical Gardens, which are decorated every year. A nice change of pace from shooting the downtown Denver area, and tickets go for $9.50 (adults) and $6.50 (kids). With lots of lights and diversions for kids including hot chocolate, hay rides and more, it’s definitely worth the price of admission. Maps, schedules, and additional information are available here.
I’ve talked about bokeh before, so the concept shouldn’t be new for long-time readers of the blog. In fact, you may remember I’ve broached this subject several times, here, here, and here. Continue reading “The nature of bokeh”→
HDR, or High Dynamic Range, imagery refers to the process of representing a wider range of colors and light in a photo than what can be traditionally captured in a single image with a camera. There are several ways to produce this HDR-effect. The most common way to produce HDR imagery is to take several exposures, by both under and over-exposing the same scene by several stops, and then combining them in post-production. This process brings out details that would traditionally be lost in both highlights and shadows from normal photography. There are two schools of thought here really on HDR:
1. The first school of thought is that we should adhere to the accuracy of what it is the sensor is capturing. By allowing for interpretation and manipulation of the pixels, photography is no longer the means of reporting things – life, as we know it!
2. The other school of thought is that pixels and cameras are simply a means of capturing a limited portion of the world around them, and that even the human eye is capturing more in a single instant than any single still image could ever hope to capture. With that in mind, it is the job of the photographer to bring to life what it is they see, and use the tools available to them to bring that image to life, whether it means performing HDR, sharpening, white balance corrections, or anything!
Now, keep in mind that there are always exceptions to the above two schools of thought. Journalism for instance, requires accuracy and not making adjustments as it really is meant as a reporting mechanism not an interpretation or individual perception of what is scene. While I am not sure where my own line of thinking really ends up on this very polarizing issue, it does seem that perhaps there is a time and place for it. Again, with all subjective work, there is a certain degree of personal preference and bias – and this also speaks to the second point, because some HDR can be really really good, while others can be really really bad. Nevertheless, for my two cents, it does seem that occasionally, there is both a time and a place for HDR. During such times, I’ve tried a variety of approaches to utilize HDR while also keeping some measure of reality in my photos. Take for example, the three images below taken at different shutter speeds, while keeping ISO and aperture constant – thus creating several different exposures of the same scene:
HDR base Images
By combining and basically “stacking” each of these images inside our post production work flow, we can bring out the details in the shadows from the first image (down in the golf course area), bring out the details from the highlights (the clouds), while maintaining the clarity of the neutrally lit areas in the middle of the photos (the rocks and pool). While there are several ways to do this, including Photomatix, HDR Pro (the one native to CS5) and several other Photoshop and Lightroom plugins like what Topaz Labs, Lucis, and OnOne’s plugin Suite), here I am using the HDR Pro function inside of Photoshop CS5.
HDR Pro Sample
I did choose the option inside the HDR Pro menu to select a more saturated image than what was originally created in camera, and it is more reminiscient of what I actually saw. So, am I cheating at what I created? Is this a “real” photo? What if I were to take another approach, and simply make some adjustments on a single image? Back to the digital work flow I go…and here is a single shot edited in Lightroom:
Lightroom HDR
Now, while there are clearly some slight differences in tonal range, saturation, and such, there are two things to keep in mind: 1 – I was making these edits pretty quick, and 2 – this is the Internet, which makes color accuracy a difficult thing to achieve. It does serve to illustrate that you don’t necessarily have to stack images in Photoshop to achieve the HDR look. Simple slider adjustments in Lightroom can approximate the same thing. As mentioned above, there are also a number of third-party plugins and add-ons that can bring this effect to life. Regardless of what the consensus is, HDR is likely a technique that is here to stay, and it’s simply a matter of experimenting and finding a technique that works for you, and that your clients, or colleagues, or friends and family, will find appealing.
This is, of course, just my personal take on HDR. What about the rest of the readership? Any thoughts on the legitimacy or validity of HDR? Does it work? Can it work? Or should we stick to trying to capture it all in-camera – on a single frame? Sound off in the comments or via email! Thanks for sharing your own thoughts, and we’ll see you back here tomorrow!
ETA: Don’t forget – a couple contests are going on through November and the rest of the year:
1. Monthly LDP Giveaway – Share your own “POP” themed photos for a chance to win a pack of pearl metallic paper from the folks at Red River – this paper is awesome for HDR-styles of work!
2. The Nations Photo Lab Family Photo Day – Upload your images to their Flickr Page for a chance to win a pretty impressive set of prizes including autographed books, free printing certificates, and much more!
One of the best tips I’ve ever received is to look all around for photos – even in your own back yard. Over the weekend, while on the daily dog walk, a few scenes happened to catch my eye. Not satisfied with what the camera phone could do, I quickly came back to the house and got the SLR out. A few minutes later, started capturing some of the scenery that remained of the fall foliage that is still present at the lower elevations. The next thing I knew, I was looking up, looking down, looking behind me, and poof – I had a whole new set of images for a “fall foliage” collection! These are the types of images that definitely benefit from some subtle HDR processing both to enhance the colors, as well as bring some light to shadowed areas while allowing for the lighter whites of the clouds. Here’s some of the scenes I captured from just this one outing:
Yellow and Blue
Iydillic SceneOrange, Red, and Blue
Yellow, Green, and Blue
Colors CollidingGoing Low
As you can see, the subtle HDR processing really added something to the photos. Is it good? Is it bad? As in most things artistic, there is something of a judgment call involved. Perhaps an important side note here in learning more about composition is to realize that something came out of an otherwise normal exercise (taking the dog for a walk), and in looking all around yourself, images are available everywhere. Where should you look for your next photo? Right there! You just have to know to look for it!
Happy shooting and we’ll see you back here again tomorrow!
A while back I had approached a few companies about putting together an article on how to create panoramas. One of those companies was PTGui – and I’ve finally had a chance to put together a few images through their software to take a look at the processing and stitching quality. First impressions are good…what I especially liked is that the software has the ability to render both panoramas as well as HDR processing algorithms. While a dedicated work flow that addresses panoramas and then a separate work flow to address HDR work may yield better results, I’ve gotta say that PTGui does an impressive job for a multi-function program: Continue reading “Creating HDR Panos with PTGui”→
A common question I get here is how to deal with harsh or low light situations. This is a great question, and for event photographers, it’s simply part of the job to recognize various lighting conditions and address them accordingly. Today, I’d like to share Five Ways to Deal with Harsh/Low Lighting:
1. Cranking the ISO and hoping to fix in post
With advancements in technology, noise handling both in camera and in post production has resulted in some astonishing results that in previous years would have been literally unrecoverable. While we should always endeavor to make our images shine as best we can in camera – advancements in tools of the trade simply give us more options and we would be foolish not to use them.
Here’s a good example of a shot that was done at a high in-camera ISO setting, that was recoverable to a good quality image. It may not necessarily be of “stock photography” caliber (you really need every pixel to be perfect for stock photography), but for event photography, I would consider this acceptable quality.
2. Implementing additional light sources (Flash, video lights, etc.)
3. Using a tripod/monopod in conjunction with longer exposures to increase odds of sharp captures
4. Use a gray card to get good white balance/off-set the ambient lighting conditions.
Having your subject hold a color balance card (or even just a gray card) in the scene for one shot is a great way to counter-act the effect of difficult lighting, including everything from halogen lights, to fluorescent, tungsten-florescent mixes, and the garish hue from sodium vapor lightscommon in locales like stadiums and street light settings.
Gretag Macbeth Color WheelSample Graycard Shot
5. Use supports from the surroundings to brace your camera
Using a tree, a wall, or even the ground to help stabilize your camera can reduce the shutter speed considerably to help when shooting in low light situations.
As much as we may try to hand hold our cameras, blur is unavoidable due to our heartbeats, finger tremors, breathing, and a host of biological factors, the best we can do is help to minimize that blur by using supporting mechanisms and techniques to get as stable a shot as we can. Even when we can hand-hold, matching that color from the scene is much easier to do when you start from a known vantage point, whether it be your own flash, or a controlled ambient scene. So much to think about and so little time…where do you want to go from here?
Hint: Sound off in the comments – would love to hear others thoughts, tips, and tricks for dealing with low and/or harsh lighting! Special thanks to Kerry Garrison of Kerry Garrison Photography for sharing a sample image from his own portfolio when I couldn’t track my own down in the library (bad me for not keywording fully!)…
On this week’s show, we’ve got a lot to talk about including a couple of particular news stories to note, with a little insight from the crew, we’ll be taking your questions and answers on the show and the special guest of the week for this show is none other than the well-reknowned Martin Bailey!
Photo News
3rd Annual Worldwide Photo Walk has been announced by Scott Kelby, and details are here.
Lightroom 3 was announced last week Monday – and is available to purchase and download…you can also download a 30 day trial for free from Adobe here (or buy via the sponsored link in the sidebar!)
New Plugins available for LR – Pro Show Gold, a popular slideshow and movie creation software set. Info here
Martin Bailey
Photography and Culture in Japan: Laws or hassles shooting in public?
Martin was also kind enough to share a sample selection of his portfolio with us here on the show. These are the low res versions, to see things super nice, head on over to his folio link provided above. In the meantime, enjoy the photos, the show, and we’ll see you back here tomorrow for the latest in photography reviews!