Three Tips to Blur Water

After posting about exposure triangle and how blurring water means decreasing aperture, I got a few questions about other ways to blur the water in your composition. So, here you go. 

It seems that water always seems to attract attention in photography…whether it’s an ocean at sunrise, dew on a flower, or waterfalls gushing through a mountain stream, the impact that water can have on our imagery is very powerful.  Harness that power to your own creative ends by recognizing 5 ways to blur it to your advantage:

Slow Down!

1.  Slow that shutter speed down! Your shutter speed is the best way to blur water…taking things down to at least 1/4 of a second, if not longer. This is what I did in my last post about the exposure triangle. It’s still my favorite way of blurring water to a creamy smooth texture in photography.

Use a Tripod

2.  Steady those shots – even without slowing your shutter speed, to seconds, keeping the camera stable to prevent shake when hand holding is near impossible, so please take and use your tripod!  Of course, it goes without saying that when shooting at slower shutter speeds, it helps immensely to be solidly mounted on a good set of legs.  Without getting into the pros and cons of various features and qualities of various tripods, if you are shooting a 10 second exposure of a beach at sunrise, you need legs!

Palmetto Statue
Palmetto Statue

ND Filters

3.  Sometimes even with slowing shutters and using tripods, it’s just not enough. So, you need to find another way to control the light. ND filters are the answer. I’ve seen a lot of people run into an invariably brighter exposure… and to combat extra ambient light in the scene, they use ND filters. These filters essentially prevent those extra rays of light from hitting your sensor.  Polarizers can work too, but they are less effective as they can have some downsides to them including elimination of reflections, casting a specific tone on your entire image, and more.  When in doubt, always use ND filters.

SC Pier at sunrise
SC Pier at sunrise

As always, there’s more than one way to skin a can (or blur water)!  More involve shutter dragging with fill flash, and lots of others.  What ways do you use to blur and control waters’ appearance in your images?  Sound off in the comments with tips and tricks of your own! Happy shooting all, and we’ll see you back here again next time with more photo goodness!

Photo Technique of the Week

Yeah, okay, I don’t do this a lot, but every once and a while it’s fun to put together a quick technique or tip to share with the reading/listening community, so here’s one that’s very helpful when using Lightroom. More of a tip than a technique, this is simply a suggestion to enable the Auto Advance feature.  When you check this feature, it makes your work flow go a lot quicker when making picks or rejects from catalogs. After I’ve completed an import, I’ll go through and tag the picks and rejects with my keyboard shortcuts (P) and (X) respectively. Because the Auto Advance feature is enabled, simply making a”tag” or flag selection on a picture, advances me to the next one in the current catalog or collection.


After I do this, I simply look up at the top of Lightroom while in Library mode to filter my collection for either picks or rejects. From my approach, I do the rejects first, then CMD/CTRL A to select all and delete! Then from the picks, I’ll go through and make whatever edits I need, even including round trips to Photoshop, Photomatix, or whatever 3rd party software I happen to need or be using at the time.  This is always so much easier with Auto Advance enabled. I can fly through a shoot of 500+ images in about 20 minutes both to clean up the catalog, and make the picks of what will likely be in the final published album. Give it a whirl and see if it improves your work flow!

Got your own tips or tricks for Lightroom, Photoshop, or simple camera techniques? Share the love and sound off in the comments! Either that or share your own thoughts on what you think of the techniques I share here. Regardless, tips tricks and techniques like these are always designed to help you get through post production and do what we all love to do – get out and shoot some more! Happy shooting and we’ll see you back here next time!

Did You Know…

This last week has been kind of rough – after teaching in Minnesota on Sat., my whole time schedule was thrown off and I never really have been able to get my body clock back in sync.  (I don’t know how traveling types do that…)  That, combined with a little out-patient surgical procedure on Friday made for a lot of distractions.  So, apologies in advance for being a little hit and miss with the blog posting.

Today though, I thought I’d share a little-known (or at least not-often-discussed) tip about the Canon EOS camera line.  Did you know that there is a silent shooting mode?  To enable this mode of shooting, simply switch your camera to the live shooting mode (where you compose your image using the LCD instead of the viewfinder), and when pressing the shutter, it’s much quieter than when normally pressed!  I knew about this, but honestly had not used it in quite a while.  It’s one of those “Oh yeah…..!” moments and when reviewing some material, I came across this from the owner’s manual.  Here’s the page directly from the 40D guide:

Silent

This is a very handy feature to have if you don’t want to interrupt an emotional moment during an event (say a bride and groom kissing, a baby sleeping, or some other such occasion).Got your own unknown or not-often-mentioned feature to share about your own gear?  Sound off in the comments!  Have a great weekend all and we’ll see you back here next week!

Subscribe to CanonBlogger by Email

Did You Know…

Over the weekend I was down in Tucson, spending some time with the in-laws, and during the getaway, had a chance to catch up on some overdue reading in my monthly magazine stack (it has been growing steadily lately as other stuff has gotten in the way. I emerged from my readings with several “Eureka!’s” and “What a great idea!” so, figured to pass on the new-found or re-kindled knowledge here on the blog. (In the spirit of giving and all that…) So, without further ado, here’s a new feature on the blog:

Did You Know…?

1.  Fog is about 1 stop brighter than what cameras detect as 18% gray?  To compensate for shots taken in foggy conditions, adjust your exposure settings up by about 1/2 – 1 1/2 stops to compensate, otherwise you’ll get underexposed shots.

2.  Cameras are designed for right-handed people…the ergonomics are made to grip and adjust controls with your right hand.  Left-handed shooters have it twice as hard as the rest of us so double kudos to you!

3.  Pentax was actually the first camera vendor slated to release a full-frame DSLR camera, not Canon or Nikon!

4.  As you move light away from your subject, the output drops off by a factor of almost 2 to 1?  (It’s actually technically “double the distance, 3/4ths the output…)  Which means if you move your subject away, you need twice as much light at double the distance to equal the same output…

5.   To shoot a picture of the moon, use the Moony 11 Rule, just like the Sunny 16, but use f/11 and match the ISO to shutter speed

And since I was in Tucson this past weekend, here’s a couple holiday photos to tickle your funny bone…Christmas Tucson-Style:

Santa Turtle
Santa Turtle

Cactus Cap
Cactus Cap

Got your own DYK tips or photo nuggets?  Share ’em here on the blog.  I’ll likely start doing this as a monthly feature and would love to hear the ideas, tips and tricks that others have to share as well.  In the meantime, keep on shooting, and we’ll see you back here again tomorrow!

6 Tips for Shooting Christmas Lights

It’s that time of year again, and many have already covered the tips and tricks that surround shooting Christmas Lights.  Here’s just a few tips and sample photos to help you along the way, and give you some ideas for your own creative vision and inspiriation:

  1. Keep your shutter speed around 3-7 seconds.  Much longer than 7 seconds and the lights will start getting blown out, losing detail.  Much shorter than 3 seconds and your lights won’t have enough detail.
  2. Shoot at twilight (or early morning if the lights are still on).  This avoids the problem of needing longer exposures in darker night shots, which can cause #1.  Also, the dark blues in twilight can add some real nice depth and appeal that would otherwise be lacking in darker sky photos.  If you time it right and get clear enough skies, you can also get stars in your images!
  3. It should go without saying, but use a tripod – these long exposures are impossible without it.  To this end though, if you don’t have your tripod wrapped in foam, now is the time to do it.  Colder temps can make it downright painful to touch.
  4. Don’t try to capture too much – you have a limited window of twilight, so once that’s gone, just enjoy the rest of the evening – most of your shots after twilight won’t be “keepers”
  5. Try shooting low to get a different angle, or from above looking down – to get a better “aerial” approach.
  6. For the starburst effect without the star filter, drop your aperture down to f16 or smaller – lights will start to exhibit the starburst effect at these smaller apertures.

There’s my 5 tips – but there’s always more where that came from.  What about the rest of the audience?  What tips, tricks, and advice do you have for shooting the holiday lights?  Share ’em in the comments!  Here’s my sample (there’s more also up on my Flickr photo stream).  Happy shooting and we’ll see you back here again tomorrow!

Christmas Lights at Chatfield 1

Christmas Lights at Chatfield 2

Christmas Lights at Chatfield 3

Christmas Lights at Chatfield 4

Christmas Lights at Chatfield 5

Christmas Lights at Chatfield 6

Editor Note:  These were taken at Chatfield, part of the Denver Botanical Gardens, which are decorated every year.  A nice change of pace from shooting the downtown Denver area, and tickets go for $9.50 (adults) and $6.50 (kids).  With lots of lights and diversions for kids including hot chocolate, hay rides and more, it’s definitely worth the price of admission.  Maps, schedules, and additional information are available here.

Is HDR really cheating?

HDR, or High Dynamic Range, imagery refers to the process of representing a wider range of colors and light in a photo than what can be traditionally captured in a single image with a camera.  There are several ways to produce this HDR-effect.  The most common way to produce HDR imagery is to take several exposures, by both under and over-exposing the same scene by several stops, and then combining them in post-production.  This process brings out details that would traditionally be lost in both highlights and shadows from normal photography.  There are two schools of thought here really on HDR:

1.  The first school of thought is that we should adhere to the accuracy of what it is the sensor is capturing.  By allowing for interpretation and manipulation of the pixels, photography is no longer the means of reporting things – life, as we know it!

2.  The other school of thought is that pixels and cameras are simply a means of capturing a limited portion of the world around them, and that even the human eye is capturing more in a single instant than any single still image could ever hope to capture.  With that in mind, it is the job of the photographer to bring to life what it is they see, and use the tools available to them to bring that image to life, whether it means performing HDR, sharpening, white balance corrections, or anything!

Now, keep in mind that there are always exceptions to the above two schools of thought.  Journalism for instance, requires accuracy and not making adjustments as it really is meant as a reporting mechanism not an interpretation or individual perception of what is scene.  While I am not sure where my own line of thinking really ends up on this very polarizing issue, it does seem that perhaps there is a time and place for it.  Again, with all subjective work, there is a certain degree of personal preference and bias – and this also speaks to the second point, because some HDR can be really really good, while others can be really really bad.  Nevertheless, for my two cents, it does seem that occasionally, there is both a time and a place for HDR.  During such times,  I’ve tried a variety of approaches to utilize HDR while also keeping some measure of reality in my photos.  Take for example, the three images below taken at different shutter speeds, while keeping ISO and aperture constant – thus creating several different exposures of the same scene:

HDR base Images
HDR base Images

By combining and basically “stacking” each of these images inside our post production work flow, we can bring out the details in the shadows from the first image (down in the golf course area), bring out the details from the highlights (the clouds), while maintaining the clarity of the neutrally lit areas in the middle of the photos (the rocks and pool).  While there are several ways to do this, including Photomatix, HDR Pro (the one native to CS5) and several other Photoshop and Lightroom plugins like what Topaz Labs, Lucis, and OnOne’s plugin Suite), here I am using the HDR Pro function inside of Photoshop CS5.

HDR Pro Sample
HDR Pro Sample

I did choose the option inside the HDR Pro menu to select a more saturated image than what was originally created in camera, and it is more reminiscient of what I actually saw.  So, am I cheating at what I created?  Is this a “real” photo?  What if I were to take another approach, and simply make some adjustments on a single image?  Back to the digital work flow I go…and here is a single shot edited in Lightroom:

Lightroom HDR
Lightroom HDR

Now, while there are clearly some slight differences in tonal range, saturation, and such, there are two things to keep in mind:  1 – I was making these edits pretty quick, and 2 – this is the Internet, which makes color accuracy a difficult thing to achieve.  It does serve to illustrate that you don’t necessarily have to stack images in Photoshop to achieve the HDR look.  Simple slider adjustments in Lightroom can approximate the same thing.  As mentioned above, there are also a number of third-party plugins and add-ons that can bring this effect to life.  Regardless of what the consensus is, HDR is likely a technique that is here to stay, and it’s simply a matter of experimenting and finding a technique that works for you, and that your clients, or colleagues, or friends and family, will find appealing.

This is, of course, just my personal take on HDR.  What about the rest of the readership?  Any thoughts on the legitimacy or validity of HDR?  Does it work?  Can it work?  Or should we stick to trying to capture it all in-camera – on a single frame?  Sound off in the comments or via email!  Thanks for sharing your own thoughts, and we’ll see you back here tomorrow!

ETA:  Don’t forget – a couple contests are going on through November and the rest of the year:

1.  Monthly LDP Giveaway – Share your own “POP” themed photos for a chance to win a pack of pearl metallic paper from the folks at Red River – this paper is awesome for HDR-styles of work!

2.  The Nations Photo Lab Family Photo Day – Upload your images to their Flickr Page for a chance to win a pretty impressive set of prizes including autographed books, free printing certificates, and much more!

The TEN stop Filter DIY Project

As promised in the monthly newsletter (you can sign up for it free, by visiting this link here), the article on creating your own 10-stop filter is finally here!  Delays with some tripod issues have prevented the final shots showing the effects, but the principles will hold, so without the end results (I should have my tripod fixed by next month, and will share a supplemental post then with the resulting shots and work ups.)  So, today, I give you:

The TEN stop filter project

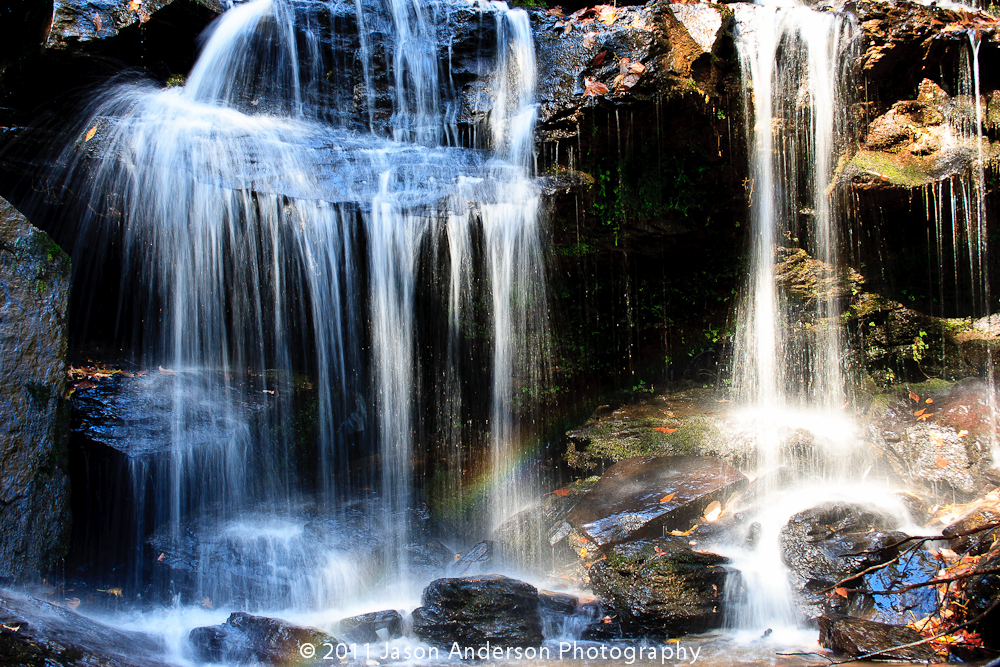
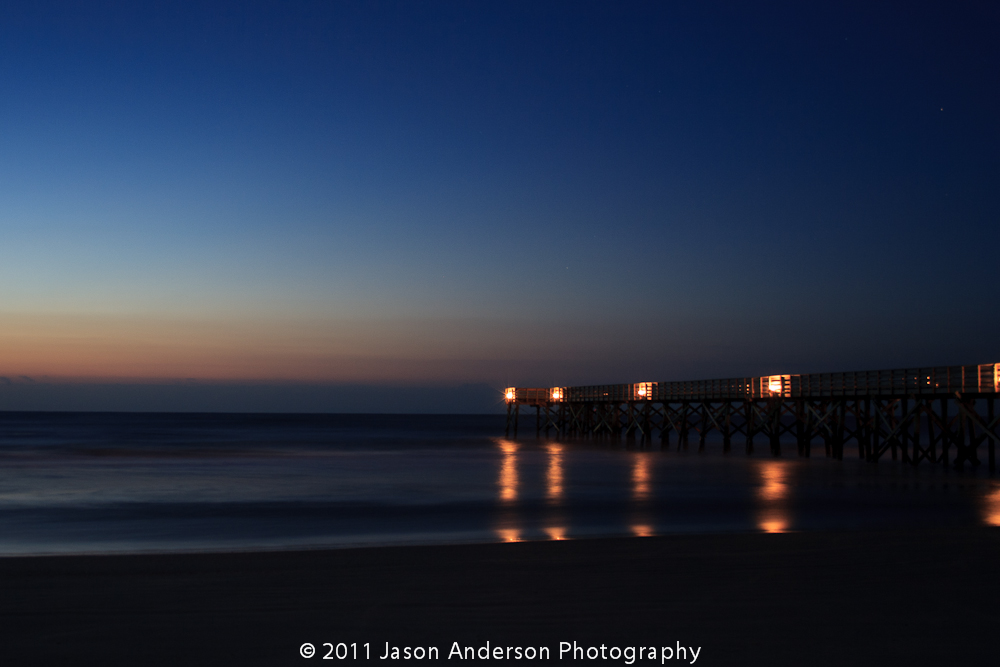
A common problem with shooting landscape photos is that we are limited by the hours of available shoot times.  We all know that the best times to shoot are morning and evening for the best light.  The overhead light in the middle of the day just does not allow you to drop your shutter speeds much to get flowing water, or a sense of motion in clouds without assistance.  Another possible use could be a kissing engagement couple with some blurred motion behind them (like a train, the clouds, or whatever – suggesting a really long kiss!) 🙂

The only way to address that is through stacking MANY neutral density filters (ND).  They are made in various stops (defined by the stops of light they block), and stacking can get pretty costly.  There are some though that you can get that address multiple stops of light in one filter, like the Lee 10-stop filter.  Problem?  Cost!  (It’s $160 at B&H).  I learned a while ago about a way to make one yourself for as little as $20.00 though.  Here’s the process I used (let me also apologize for the image quality – some of these were taken with the Droid in low light and studio level shots wasn’t where my attention was…but you can hopefully get the gist from these):

Step One – Find a cheap filter at your local camera store.  These can be found for a dollar or so.  The one I used was found at a camera store for 50 cents.  A Hoya 85B orange filter (77mm).

2010-06-10 20.07.38

Step Two – Place it on a paper towel, and wrap a second one over the top (this is for your protection and easier cleanup)

2010-06-10 20.08.06

Step Three – Get your favorite hammer out…

2010-06-10 20.08.29

Step Four – Do not just go to town….whacking away crazily is not needed.  Just a couple firm taps until you hear the glass give way…

2010-06-10 20.09.08

Step Five – Once the glass is broken, a few strategic taps around the edges should pop most of the glass out of the filter ring:

2010-06-10 20.11.39

Step Six – Wrap up paper towels of broken glass and discard.  Then check the filter ring and make sure it  is free of any glass shards (I used canned air)…

2010-06-10 20.12.31

Step Seven – Buy a welder’s replacement lens from your local hardware/tool store, or perhaps a local welder shop.  If you prefer, there are online retailers that sell this stuff too.  The problem there is that the cost of shipping quickly ratchets up the price.  I found some Hobart #9 at a local store for under $2.50 per pack and some Lincoln Electric #10 at Lowe’s for $5 a piece.

Steps 8a – I tried first to mark a circle with tape and use a Dremel with a regular cutting wheel to slowly cut to the ring dimension.  It resulted in a pretty bad crack through the center of the glass, rendering it unusable, so I had to start over.

Step 8b – I tried a second piece of glass with a scoring hand tool.  Since the welding glass is about 1/4” thick, it takes several score to make it weak enough at this breakage point to snip off cleanly.  My efforts did not result in clean snips, and ultimately, the glass cracked from my impatience (so, add patience to the list of materials needed!).

Step 8c- I went to purchase a 3rd piece of the cheap stuff.  This time, I called around and found a place willing to try to cut the glass (everyone will ask and believe the glass is tempered, when in my case – neither was).  I took a sheet of the cheap stuff into them and explained what I was trying to do, then asked what size they could cut to.  They had a 2 1/2” hole saw and a 3” whole saw with diamond tips for glass cutting.  We did the calculations and realized that 77mm is almost 3 inches exactly.  He warned me that the saw itself would take a portion out.  Thinking there was a lip on the interior of the filter, I said go ahead (after all, it’s only $2.50 here right? 🙂 )

He was able to cut it into a nice circle.  I knew it would be close so thanked him and asked how much I owed.  He smiled and said “No charge – give me a plug or a print if it works out!”.  Since I am happy to either way, the name of the place is CNC Glassworks in Arvada CO! Super nice folks and great attitude toward customer service!  I am sad to admit though that the hole he cut out was just a shade too small.  I may possibly attempt to sand this down to the next filter size in my gear bag  glass and on testing, but it did prove to be too small.

Step 9 – I now knew that I needed to either find a diamond-tipped hole saw and cut it myself, or find someone that had a 3 1/2” hole saw that would be willing to use it on my glass.  A little bit of Google research showed that Bosh makes a Diamond Hole Saw in the 3 1/8” size.  Problem?  None, if you want to pay $60 or more for the tool itself  (the cheapest I found was around $60 at Ohio Power Tool, and locally through a company called Tool King for $70).  Even if it was half this price, the DIY cost saving approach is quickly ratcheting up.  So, a little more in-depth research was required.

Step 10 – Sure enough, after I did some more research via telephone and email, I found a manufacturer  online (THK Diamond Tools) that sold the equipment.  I was able to purchase the diamond coated hole saw bit for $10 (+ $10 shipping).  Since I don’t own a table drill, a quick trip back to CNC Glassworks with a 4th piece of the cheap stuff resulted in in a good cut.  I have a piece of the good welder’s glass (the #10 Hobart one for $5 at Lowe’s), but wanted to test the results first.  The end result of the cut now fit perfectly into the filter ring!

Step 11 – Now, I just took a little clear silicon glue applied to the inner circle of the filter ring and snugged the new “filter” into place.  After letting it dry for about a day, it is now ready to shoot!  (Unfortunately, my tripod is still pending repairs, so the final results will have to wait a while longer – but the project is officially complete!

Supplies/Tools Used:

  • Filter Ring ($1-$10 depending on where you get them)
  • Welder’s Replacement Glass (ranges in price from $2.50 – $5 depending on market – ymmv)
  • Paper Towels (50 cents)
  • Hammer (??? had this forever)
  • Safety Glasses (required for any DIYer – but $3 from Lowes if you dont own a pair)
  • Safety gloves (again, required for any DIYer – but $3-$5 from Lowes if you dont own a pair)
  • Glass Cutter ($3)
  • *Dremel with cutting bit (ETA – if you have the time and $, get the diamond cutting bit – you may have more success than I did… and sanding bit)
  • Strong glue (to hold glass in filter ring after completion – $5)
  • Masking tape ($2)
  • *If you want to go the more “professional route” and have a table drill, or know someone who does, the cost for the$20 for the diamond tipped 3″ bit from THK is $20.)

*You don’t need both of these, but you should have either one or the other.

Project Time Frame – 1-4 hours total work time, 2-4 days total project time.

So, in totaling all the costs of the project, I probably invested $40.  This did involve multiple test cuts which you can avoid though, and if your area has a glass cutting shop with a 3″ diamond tipped bit, then another $20 can be saved.  This could drop your cost to less than $20 if you only need one cut and already have the materials.  Either way, considering the cost of a Lee 10 stop $160 filter, I’ve saved $120 in my project by going the DIY Route!!

Keep in mind that these filters will leave a green tint, so you’ll have to do a little bit of post processing, but if I spend ten minutes in post, that’s worth the savings to me – especially since this is an extremely unusual type of use piece of glass, and hard to justify that kind of expense.  Give it a whirl and share your own shots in the LDP Flickr pool!  Happy shooting and we’ll see you here again tomorrow!

Can You Shoot Stock?

Several readers have asked me about what it takes to be a stock photographer, and not being a stock photographer (at least not a very good one), I had to honestly say, “I don’t know”! I wanted to find out though, partly to satisfy not only reader interest, but also my own interest, so I signed up to become a contributor at iStockphoto – one of the premiere stock photo agencies around.  I also picked up a copy of “Taking Stock“, by Rob Sylvan to give it a read and prepare for my foray into stock photography.  For regular readers, you may remember an interview I had with him a while back, and the contest giveaway where 3 lucky readers won a copy of the book.

So, for starters – I’d suggest that you educate yourself on how to shoot stock, which means reading resources like Rob’s book.  You also need to practice, and be aware of trends in the market place.  You also need to be prepared for something else, and that is rejection! Even the best photographers have images rejected from iStock.  It’s going to happen, so get used to it.  Images can be rejected for any one of a number of reasons.  By far, one of the most common ones I’ve seen is worded as follows:

“This image appears to be over-filtered/over-processed which has affected the image quality. This may include Photoshop filters & effects (over-sharpening, excessive adjustments to levels, curves, contrast, hues, gaussian blurs, saturation, added textures, noise reduction…) or other manipulations.”

What can be frustrating about this is that you may have applied very minimal processing, and applied no filters whatsoever, but your images are still rejected.  The reason?  The next part of the rejection description:

“Inspectors judge images based on quality, composition and usability.”

The key is not to worry if this happens – it can happen to anyone, and images can be rejected for any of many reasons.  Here’s a couple examples of photos I’ve had rejected from iStock during this test phase:

Blue Water Slide
Blue Water Slide

Prescriptions
Prescriptions

Beach Therapy
Beach Therapy

One thing I’ve always tried to do when assembling work for stock is to make sure there is negative space available.  This allows buyers to have their text or content overlay on the image.  Plus, it’s a pretty effective compositional technique – which I’ve talked about in the past…for more details, you can read that full article here.

Here are some other suggestions and approaches for shooting stock:

  1. Try and avoid brand names.  If someone is wearing Nike shoes, a Champion sweatshirt, or other easily recognizable logos, forget it.  First off, you can’t use them without permission, second, the clean-up work required in post degrades the image quality, and third, it’s just not worth the time to remove when you consider that stock is not just about the quality of photos, but to make any decent revenue, it’s also about quantity of photos!
  2. Incorporate people into your work.  This doesn’t mean having someone put on a headset and pretend to be a customer service rep (because this has been done too much already).  It does mean to be creative and use people to demonstrate things – like lifting weights, or singing into a microphone, or repairing a computer.  These are the types that typically will do well in sales.
  3. Plan ahead.  If you are thinking of shooting your Halloween themed photos now and getting them online for sales possibilities, then expect the purchases to start happening around August or September of next year.  Buyers of stock work usually are working ahead of schedule to line up ad campaigns, and other uses well in advance, so you need to be publishing your work on their schedule, not in real time.
  4. Make sure you get model releases if people are recognizable in the images.  Stock work requires it, and if you don’t have it – then forget even submitting.  For more details on what model releases are appropriate and what should be included, visit this location where iStock gives you one to use!

That’s just a couple tips for how to get started in stock photography.  For more information, go to the pros that already do it, and know the industry much better than I.  As mentioned at the beginning – Rob Sylvan is a great resource as an iStock reviewer and author.  Other people you may want to keep tabs on include Nicolesy (who I’ve talked to here on the podcast series!).

Got your own tips and ideas on how to shoot stock?  I’d love to hear what others think too, so sound off in the comments.  Happy shooting and we’ll see you back here again tomorrow!

Five Ways to Deal with Harsh/Low Lighting

A common question I get here is how to deal with harsh or low light situations.  This is a great question, and for event photographers, it’s simply part of the job to recognize various lighting conditions and address them accordingly.  Today, I’d like to share  Five Ways to Deal with Harsh/Low Lighting:

1.  Cranking the ISO and hoping to fix in post

With advancements in technology, noise handling both in camera and in post production has resulted in some astonishing results that in previous years would have been literally unrecoverable.  While we should always endeavor to make our images shine as best we can in camera – advancements in tools of the trade simply give us more options and we would be foolish not to use them.

Here’s a good example of a shot that was done at a high in-camera ISO setting, that was recoverable to a good quality image.  It may not necessarily be of “stock photography” caliber (you really need every pixel to be perfect for stock photography), but for event photography, I would consider this acceptable quality.

Removing Noise

2.  Implementing additional light sources (Flash, video lights, etc.)

Adding light

3.  Using a tripod/monopod in conjunction with longer exposures to increase odds of sharp captures

Long Shutter Speed

4.  Use a gray card to get good white balance/off-set the ambient lighting conditions.

Having your subject hold a color balance card (or even just a gray card) in the scene for one shot is a great way to counter-act the effect of difficult lighting, including everything from halogen lights, to fluorescent, tungsten-florescent mixes, and the garish hue from sodium vapor lights common in locales like stadiums and street light settings.

http://www.drycreekphoto.com/images/Charts/MacbethCC-sRGB.jpg
Gretag Macbeth Color Wheel

Sample Graycard Shot

5.  Use supports from the surroundings to brace your camera

Using a tree, a wall, or even the ground to help stabilize your camera can reduce the shutter speed considerably to help when shooting in low light situations.

Use a wall for support

As much as we may try to hand hold our cameras, blur is unavoidable due to our heartbeats, finger tremors, breathing, and a host of biological factors, the best we can do is help to minimize that blur by using supporting mechanisms and techniques to get as stable a shot as we can.  Even when we can hand-hold, matching that color from the scene is much easier to do when you start from a known vantage point, whether it be your own flash, or a controlled ambient scene.  So much to think about and so little time…where do you want to go from here?

Hint:  Sound off in the comments – would love to hear others thoughts, tips, and tricks for dealing with low and/or harsh lighting! Special thanks to Kerry Garrison of Kerry Garrison Photography for sharing a sample image from his own portfolio when I couldn’t track my own down in the library (bad me for not keywording fully!)…

kL2HNZVO

Five Tips to Better Photos

With the sudden surge and swell in the blogosphere, Twittersphere and Photosphere over Lightroom 3 hitting the streets (and a nice combo discount is available in the sidebar by the way), let’s not forget that this software is all meant to be doing one thing – letting us get back to the business of taking photos instead of spending our time in our computer.

With that in mind, I’m bringing back a popular concept of “Top Tips”.  Today, I give you…(drum roll please):

“Five Tips to Better Photos”

  1. Be Ware of Exposure Values – No matter how good your camera is, if you under or over expose too much, you’ll be losing detail which either takes too long to recover in post production or is unrecoverable.  Check your histogram for “blinkies” (meaning stay away from the edges), and you’re in a much better zone to start!
  2. In keeping with watching exposure values, don’t rely on new-fangled features lie “content aware fill” or “clone tools” to fix things afterward.  If it takes ten more seconds to get it right in camera, do it, because it means you are still shooting and not stuck behind a monitor at 2am fixing stuff for tomorrow’s delivery deadline!
  3. Avoid increasing Noise.  It’s like a broken record at this point, but would you rather keep noise down in camera or address it because you were shooting at ISO 64000 in camera?  Yeah, the reduction features are amazing, but it’s even better if you don’t even have to touch that slider.  Swap lenses, check settings, and heck, maybe even add a fill flash.  It helps to keep noise down, which ultimately means your shots are cleaner.
  4. Look for the Light – the direction of the light, the intensity of light, and the shape of the light all can impact your photos.  As a general rule, keep the light to your side and behind you, and try to keep the intensity down as you don’t want to over-expose your subject (see Tip #1).  Don’t forget, you can shape and modify even ambient light with diffusers, reflectors,  and umbrellas.  It’s all part of the larger principle that photography is about “writing with light”.
  5. Shy away from shadows – Just as the quality of light can make or break a photo, so too can shadows.  Watch for overhead lights as this can have nasty effects on things like portraiture (shadows under eyes).  Coming at your subject from the wrong angle can also lead to nasty and unwanted shadows of yourself in the picture.  For instance, if you are shooting a building at sunset with the sun directly behind you, your own shadow can creep into the scene, making for some not-so-fun post production work in Photoshop.

There you have it – 5 easy tips to better photos!  Lightroom?  We don’t need no stinkin’ Lightroom!  (Well, we do, but it made for a good quote! 🙂 )

What sorts of tips have you come up with to make and take better photos in camera?  Share your own in the comments!  Happy shooting and we’ll see you back here again tomorrow!

P.S.  Remember, there are two contests going on right now – if you stop over to the podcast day (Monday) where I talked with Rob Sylvan and share a comment you are entered to win a free copy of his upcoming “Taking Stock” book – courtesy of Peachpit Press.  Also, the monthly giveaway for 2 4GB Lexar Pro 300x CF cards is rolling and you can submit your photos to the Flickr thread here!  Enjoy and good luck to all!