The Rule of Thirds Really Does Work!

When it comes to composing our images – we are always looking for new ways and angles to capture things.  Often though, sometimes the traditional methods work too though.  In fact, I would venture to guess that if shown 100 pictures where the standard rules of composition were followed, and then 100 pictures where standard rules were deviated from, the former would have more shots that found a widespread appeal.  The rationale?  Standard rules usually will work – that’s why they are the standards.  Things like the Golden Mean, the Rule of Thirds, and Sunny 16 are all basic rules of composition and exposure, and if you want to ensure things “just work” – traditional rules really will work the majority of the time.

For the purposes of this post, I am going to talk about one of the most basic rules – the Rule of Thirds.  The Rule of Thirds (or ROT) basically says that if you divide your image area up into a grid, where the horizontal andvertical areas are divided equally into thirds – you will get cross-sections that define where your points of interest should be – often called hot points.  Here’s a diagram to help demonstrate:

rotgrid1a

So, here the frame is divided (roughly) into thirds both vertically and horizontally.  Where the lines intersect, I’ve created red circles to indicate the “hot points”.  These are your points of interest.  If all else fails, placing your subject matter in these areas (or close to them) will dramatically improve your composition.  Here’s a great example:

rotgrid2

Here’s a shot of a carriage girl I took back in Charleston.  See where the cross-sections are?  I changed the color of the grid to make it easier to view – so you can tell that her eye is right on the marker for the right-most third grid line.  This really helps the composition that her eye is there instead of elsewhere (often times, there is a tendency to place the eyes closer to the center of the frame – resist that temptation to give your shots that extra oomph!).

In fact the ROT concept s such a well-known standard, the folks over at Adobe have incorporated that element into their crop tool – so that you can crop your images to adhere to this rule.  Since I will likely get someone to ask – you can create this ROT grid in other variants of Photoshop (CS family), but going to your application preferences and selecting the Grids, Guides, and Slices option.  In there, change your grid size to display lines every 33.3% and number of grids to 1.  Then choose a strong color so that when you display the grid – you can see it!  Click OK and you are done – from now on, to show the ROT grid when cropping or editing in the CS family – simply use the CMD/CTRL key and the apostrophe ( this doohickey  ‘   ) to toggle the grid on and off.  Here’s a capture of the area you need to make the changes:

rotgrid4

There you have it – the Rule of Thirds grid – what it means and how to use it!  Any other rules of composition you would like explained?  Feel free to email, share your thoughts, ideas, suggestions and feedback in the comments or privately (if you rather would preserve anonymity).  In the meantime, go out, take some shots and practice visualizing that ROT grid in camera – that’s what will turn your snapshots into great shots!  Getting it right in camera!  Happy shooting and we’ll see you back here again tomorrow!

Experimenting with Photomatix and HDR

For a while now I’ve been meaning to devote some time to experimenting with HDR – specifically comparing Photomatix and Photoshop in their production of HDR photographs.  The industry preference toward the former is there for a very good reason.  Photomatix produces much better results.  Just look at this final shot (be sure to click the image for a larger view – the blog restrictions on size really don’t do it justice):

final_hdr_blog

Now, in the interests of full disclosure, I did do some additional post processing work even after the HDR processing to get the above results.  But Photomatix was superior for a number of reasons.    For starters – Photomatix gives you options in what type of output you want.  Here are the two results, side-by-side, that I got from Photomatix:

sidebyside

The first was the result of  processing from the Tone Compressor tab and the latter of Details Enhancer tab processing.  As you can see, the first produced a smoother sky, but left the foreground a little flat, while the latter had more texture and, well… dynamic range to it.  So, I decided to go with the latter in my post processing.  The Photoshop alternative, however, produced something even less desirable than either of the above.  Take a look:

ps_hdr

Not only are the luminosity levels less interesting, but there’s literally no tone curve application.  No color, no tone curve mapping, and decidedly no interest when you consider the options from Photomatix.  I am in the process of putting together a tutorial of how I got the final result, so be on the lookout for that in the next few days.  In the meantime though, I’d like to take a moment to say “Thanks” to fellow NAPP member,  Elizabeth Gast (a.k.a. Firgs,) for the kind thoughts she has over on her blog – Design by Firgs – where she talks up a shot I took a while ago that is premiering on hew new series “Accidentally Awesome” today, so be sure to stop over there and give her a shout-out!  Until tomorrow – Happy Shooting!

Portraits, Promotions, and Planning

This week’s podcast episode should be available shortly over at Personal Life Media.   You’ll want to listen when you really can dedicate the 25 minutes as it’s a pretty rapid fire show this week.  A couple learning opportunities presented themselves to me recently and I wanted to share these before they got too fuzzy.  As a result, I didn’t really get into the news of the last week, or address any listener questions.

So, the show notes will be pretty short and sweet, but here they are:

First up, I took a moment to challenge the listening audience to take a whirl at self portraiture.  In the interests of sharing efforts in that vein myself, here was one of the better ones from last night:

selfportrait

I also took a look at the idea of self-promotion, and that the listening audience should not be following my example thus far.  Use your blog to promote your work!  That’s what blogs are for – and never sell yourself short!  For all the details, make sure to catch that segment.

Last but not least, when you are involved or asked to participate in a photo shoot of some sort, take ownership to the extent that you are able in the planning and logistics – it will only help you in the long run.

It’s a busy day, so not much time for the other incidentals – happy shooting and we’ll see you back here again tomorrow!  Diggs, reviews, and such (as always) are appreciated and encouraged!

Thursday Thoughts with Kevin Mullins

For those of you that visit the blog regularly, you know that Kevin has been a regular supporter through his kind, thoughtful, and well, supportive comments for the last few months.  We all know that reading blogs of others and commenting there is a good way to not only learn but to also generate traffic for your own interests.

Well, this week I am calling Kevin out, because he definitely is worthy of your traffic.  Kevin Mullins is an outstanding photographer, based out of Malmesbury Wiltshire (that’s in England, across the pond, or the UK for the geographically challenged…)  He’s had reviews done by friend-of-the-blog, Jason Moore, and most recently has launched a photography website for his wedding photography.  So, first off, welcome Kevin, and thanks for agreeing to come on the Thursday Thoughts Series.

Thanks’ very much for inviting me on here Jason.  It’s a great privilege.

Q:  I don’t know why people keep saying that, but thanks I guess.  It’s just fun to be learning from everyone thus far that’s been willing to contribute, yourself included.  But anyway, I digress…starting things off, I’d like to talk a little about your Wedding Photography – as you stated on your blog, wedding photography is your passion, and that is evidenced by the work you have put in thus far.  With so many areas to choose from, why did wedding photography stand out for you as a career path?  Well, it kind of “just happened”. 

A:  I have been taking photographs for a long time but around two years ago I knew that I wanted to make a career from photography.  I’ve often looked at wedding photos and thought “I could do that”, or, more often “If I was taking that shot, I would do it like this…”.  The interest continued to grow and I started forming my own style of shots in my head.  Contemporary artists such as Crash Taylor and Jeff Ascough really inspire me and I am in awe of the way they deal with light and composition in a wedding shoot.  Having your own style is key, and whilst those guys inspire, its building my own style that is really important to me.  I really want to give the bride (and groom) some photographic memories that they will cherish and will become a family focus point for years to come, but don’t just look like all the other photographs out there.

Q:  You have a definite journalistic flair in how you create your images, specifically as evidenced by the series from Andrew and Katherine’s photos, as well as those from Marie’s wedding (I love that shot of her under the arched trees).  You’ve mentioned Cartier-Bresson, Crash Taylor and Jeff Ascough as inspirational sources.  Any particular insights you’ve gained from these folks?

A:  Cartier-Bresson’s imagery is just astounding.  His use of geometry and shape in photography is out-of-this-world.  I have read his biography recently and to get an insight into his thought process is intriguing to say the least.  The “modern masters”, such as Crash and Jeff are the people I look to now for inspiration and technique. Both of them run very informative blogs with great great images that people like me can look at, disseminate, and learn from.  They are somewhat different in styles themselves so I look to Jeff’s work more for the documentary and natural-light experiences, and Crash for his awesome signature portrait shots of the bride and groom.  There are so many talented photographers out there and the internet opens up such a huge avenue for learning from them.

Q:   So, how have you adapted techniques from these resources to come up with your own “look”?  Or, better yet, do you have any particular images that you feel uniquely define your approach and/or style?

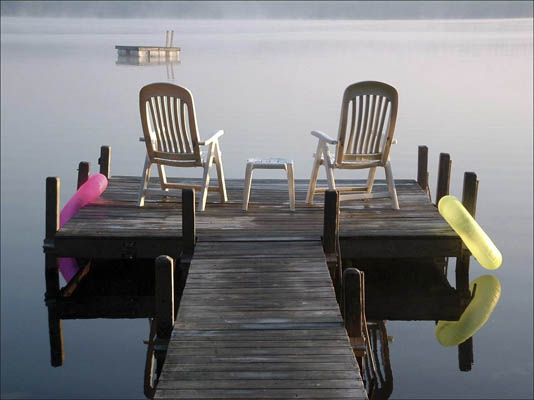
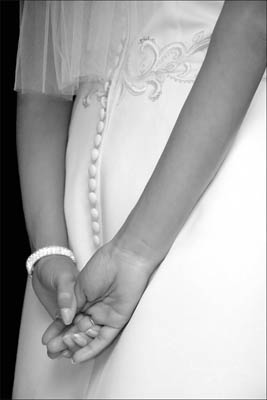
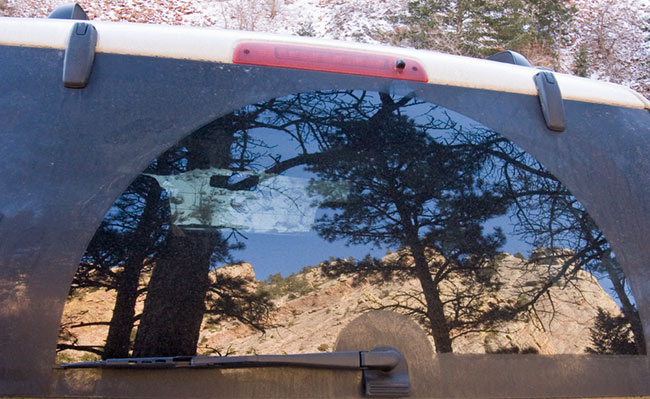
I aim to develop my own style of wedding photography and the new 5D MK II helps me do that to some extent.  I’m using purely natural light (the high ISO capability of the modern cameras lends to this type of photography.) and I try and use my 85mm lens as much as possible.  This lens is so sharp and the style I am trying to achieve uses a lot of depth of field.  This lens is f1.2 at its widest point and so it really helps in that respect.  Here are a few of my favorites:

portrait

bridge

wedding-3

Q:  As a fellow member of NAPP, how much have you developed your style from the support content and materials in sites like NAPP and other photography communities?

A:  To be honest, whilst I am a member if NAPP, I don’t use their forums as much as I should.  It is a great resource though, and the magazine and techniques online are very useful – especially when new versions of Adobe software come to the market.  I do use Kelby Online Training and I think that is a great resource.  I try and put aside an afternoon a week to “train myself” – although this isn’t always practical as I also run my own web development firm.  I find the POTN (Photography on the net) forum useful when researching gear and also for keeping an eye on other peoples work.  I also find the SWPP forum in the UK extremely useful as there are a lot of very knowledgeable people there too.  I really find most of my inspiration from trawling the net and finding great wedding photography.

Q:  I already know the answer to this, but I would imagine the readers may want to know – what kind of gear do you shoot with?

A:  I was lucky enough to get a Canon EOS 5D MkII back in December last year.  It arrived on the 2nd December just in time for a big family birthday celebration which was great as I got a chance to practice with it.  I have a number of Canon and Sigma lenses too but my favorite lens of them all is the 85mm f/1.2.  It is simply magical.  I also have a 100mm macro, 16-35mm, 24-105mm and 70-200mm which hopefully covers all my bases.  I haven’t really looked at the HD video on Mk II yet, but I am beginning to see some “fusion” wedding photography out there which is a mix of video and stills and this is something I would like to look at in more depth as the technology progresses.  That said, stills will always be my No1. priority.

Q:  Since your style journalistic in nature you obviously will take a large number of photos during any event, whether pre-wedding or the actual wedding day.  What kinds of numbers do you typically return from an event with?  How do you handle your post processing? (Computer/software/etc.?)

A:    I actually did a wedding shoot recently and I took in excess of 1500 shots, of which I will probably sift down to 250-300.  I would expect the Bride and Groom to select anything between 50 and 150 for their package.  I do all my first phase processing in Lightroom now.  It’s such a good tool for cataloguing and doing bulk adjustments.  Anything more detailed such as spot removal I will still do in Photoshop.  I would love to see Adobe integrate Lightroom and Photoshop to truly marry the non-destructive workflow experience.  I am off to a two day seminar with Jeff Ascough at the end of the month and hopefully I will gain an insight into his post-processing workflow as I know he uses Photoshop heavily to create his stylized shots.

Q:  Could you also explain a little more about the idea behind the “pre-wedding” shoot you discuss on your website?

Pre-wedding shoots are quite common here (I’m not sure about in the U.S).  Typically you spend an afternoon or so with the bridge and groom a couple of months before the wedding taking some natural portraiture shots of them.  The idea, really, is to get to know the couple more.  The last thing anybody wants on the big day is for any uncomfortable scenes between the photographer and the bride and groom.  The pre-wedding shoot gives us a chance to get to know each other more and also to go through some ideas of poses and how to work in front of the camera.  It gives me a chance to identify what types of shots I can encourage them to do on the day, and what will be the limits.  Some couples are outgoing and excitable in front of a camera and some simply want to get the process out of the way so it is important to gain that knowledge well before the big day.  If we can, I intend to do the pre-wedding shoots at the venue of the wedding.  That way, we can all scout the area together and look for great places and light at the venue and, essentially, rehearse for the big day!  The pre-wedding shoot is part of the wedding package, but if the bride and groom want to buy any prints or a frame or even a mini-album after, then even better!

Q:  Oh, and since we talked about photo gear and computer/software preferences, I would be remiss if I didn’t ask this:  Chocolate, Vanilla or Strawberry?

A:  Chocolate every time.  My wife bought our nieces some Easter Eggs and they lasted less than 24 hours in our house.  We ate them and will have to buy the kids more now!

Q:  We all know you’re a regular contributor to Canon Blogger – what about other online resources?  Are there any that you find particularly useful that you’d like to share with the blogosphere?

A:  I”ve mentioned a few in the article already, but I think some of the sites that are great are:

I have quite a few blogs in my reader (such as Canon Blogger, Michael Palmer, Jen Rinaldi etc), that I like to visit each day.  I comment when I think it’s appropriate and appreciate it when people comment on my blog too.  All of these blogs are part of the fabric of my learning and I’m always on the lookout for other blogs that inspire and keep me focused.

Q:  Last but not least – any final thoughts you’d like to share on the state of the industry, thoughts on the future of photography, or other “words of wisdom”?

A:  Well, I rely on others to give me wisdom, but if I had to look to the future I would say that we will be seeing a lot more video and still fusion work going on over the next five years or so.  The latest Canon announcement (the EOS 500D) will bring HD video to the consumer level DSLRs which infers that it is here to stay.  Oh, and I definitely recommend moving out of London to the countryside!  It has a great effect on your well being  😉

Excellent advice, thanks Kevin! That about wraps things up here so don’t forget to stop over at Kevin’s blog.to see and enjoy his particular vision and style of work.  In the meantime, tomorrow might be another “no-blog” day because I am doing a little bit of travelling – depends on how soon I can get home.  So, happy shooting all, and if I don’t get home in time for another post, have a great weekend!

The train rides again (take two)…

For today’s post you’ve got a special treat coming, because the train rides again!  If you recall, earlier this week I posted the results of a little miniature project where I tried some varying depth of field, angles, and such on a model train.  The project results didn’t yield anything breath-taking in picture, but I did learn where the best areas for focusing are on trains.  I found out what appealed to me, what appealed to others, and filed it away.

Then, as luck would have it – I had my camera with me today on the way home from work (there were some other trains I wanted to capture on my way in – but the clouds and lighting weren’t as conducive as I’d hoped – plus I would have been late…).  A now-defunct set of boxcars were sitting on an unused rail near the house, and as I was driving down the access road, I saw this scene with new appreciation. I felt compelled to stop and try my hand at a life-sized model!

The results are much better in my opinion.  The new problem – post processing.  As I always try to keep an open mind, after a little post work on exposure, sharpness and levels I said to myself “Wonder how this would look as a black and white…”  How is this a problem, you ask?  I like both!  So, it’s the new poll here – which do you like?

bwtrain

colortrain

Feel free to share your thoughts on which should be the “keeper” and why in the comments!  Meanwhile, enjoy my latest choice from WTD as we head into the weekend…

Happy Friday and Happy shooting!  We’ll see y’all back here on Monday! 🙂

Come on Ride the Train

It’s somewhat fitting this week that yours truly is making serious use of the mass transit in Denver because a project that has finally come to fruition is a photo-themed shoot of trains.  I’ve always found them quite interesting, and only recently did I come into possession of a very high quality model train to pose as I desired for specific types of compositional and focal impressions.  Since the podcast isn’t quite finished, I figured now would be as good a time as any to share with you a sampling of my Train project…

_mg_8969

_mg_8959

_mg_8964

_mg_8966

_mg_8967

So, there’s the “Train Series”.  I tried various lighting scenarios, depth of field, and compositional approaches to see the effect each has.  I know which one(s) I like the best – what about you?  Any favorites, thoughts, feedback, criqitues?  What about your own themed projects?  Any sources of inspiration?  feel free to share them in the comments section!   Happy shooting, and we’ll see you back here tomorrow!

Thursday Thoughts with… Scott Eccleston

I am happy to report that the weekly series where I interview fellow photographers and share their thoughts and perspectives here on the blog.  This week, I’d like to welcome Scott Eccleston to the stage.  Scott has his own blog and shares his thoughts and ideas on a regular basis so be sure to stop over at his site where he shares Weekly Photo Tips!

Without further ado, here’s the latest in the revived Thursday thoughts series, with Scott Eccleston!

Q:  Hi Scott, welcome and thanks for agreeing to participate in the latest edition of the Thursday Thoughts series.  Since everyone always wants to know some of the basics, so let’s get a few things out of the way at once here…first up, ow long have you been a photographer?

A:  I got my first digital point and shoot in 2003…

Q:  So, that means you’ve been shooting digital for about 6 years now.  What kind of gear do you shoot with (i.e. Canon, Nikon, Sony, Olympus, Pentax)?

A:  Nikon, not to feed into the “Nikon vs. Canon” feud, it was because of familiarity. My first camera was a Nikon, then I upgraded to a Nikon 8700 (looking back, it was not much of an upgrade), then a D70, then to a D200, and now a D300 (but there is this persistent fantasy that involves a D3x)…

Q:  No worries about brand wars here – I think the CB readership knows it’s about the person behind the lens (and in front).  What about film?  Ever dabbled in that prior to digital?

A:  No film, never shot film – as Vincent Versace says “film is what you grows on your teeth when you don’t brush”  😉

Q:    Who’s Vincent Versace?  Just kidding!  What about post production – do you work on a mac, PC, Linux, or some combo?

A:  PC…

Q:  And let’s go completely off topic for a moment:  Chocolate, Vanilla or Strawberry?

A:  STRAWBERRY!

Q:  Nice!  Well, now that we’ve gotten the basic sundry stuff out of the way, I like to get others insights on various aspects of your work – and this often starts with the critique.  Photographers often enjoy hearing helpful and constructive critiques of their work, as we are aware of how much we can grow from it.  However, we’ve also all had the “nice shot” and “cool” comments when we’ve shared our work.   With that setup, what would you say was the singular most useful critique or comment you’ve ever had on work you’ve shared publicly?

A:  It was a critique about composition – “cinematic approach to photography”. Film makers (and film shooters) do not have the luxury of cropping; thought and planning are an important part of their image composition. Because I started shooting digital I adopted the “I’ll crop that out” that evolved into the “I’ll fix that in Photoshop” mindset that is too common with digital shooters. Confession, I began as a lazy photographer, I used Photoshop as a sledgehammer, now I use it as an emery board. I use it so infrequently now that when I do, it takes me a moment to orient myself to the workspace. And I don’t use it to “fix” an image, I use it for a black and white conversion or to edit something I had no control over at the time of the shoot (like blemish removal). I learned that if I spent more time getting it right in camera not only did I spend less time in post production, I was getting better quality images.

Sorry, I was rambling, but this is fundamental building block in my evolution as a photographer (and I could ramble on, and on, and…).

Q:  Heh, again, no worries – I’ve been known to wax on and on myself.  Speaking of waxing, just the other day I was…oh, wait, sorry, getting off topic there.  Back on the subject of critique… if someone was asking you for an honest critique of their work, what 3 factors would you look at most (excluding friendships or family relatives, we’re talking professional or fellow photographer-types here)?

A:  The first thing would be to determine if they really want an “Honest Critique”. 😉

  1. Intent
  2. Technique
  3. Execution

Q:  What happened to the rambling nature?  Again, just kidding, but I like the approach – it shows how you approach capturing your own images!  Speaking of capturing your own images, as we’ve seen the post process mature in programs like Photoshop and other software options,  new ways to create images are presenting wider options and possibilities. If you had to choose between the gear or the software as the only way to create, which would it be and why?

A:  GEAR! The software should be used to complement your work, not create it.

Q:  Heh, well, it shows in your skillwith which you execute your imagery.  Speaking of which, you’ve got a great body of work!  In that vein, if you had to pick three pictures out of your entire portfolio to represent your approach to photography, or your artistic vision, which ones would you pick and why?

A:  Each of these images represents a first for me…

Scott Eggleston

This was taken with my point and shoot and was the first image that said something to me, that evoked an emotion. It was the image that made me want to learn more about photography (and spend a ton of money on gear in the process).

Scott Eggleston

This was the first of my images that said something to others. I was new to the Portland (Maine) Camera Club and had just started submitting to print competitions, during the critique one of the judges (who is a well established professional photographer) said “this is one of the best black and whites I have seen here”.

Scott Eggleston

This is the first time I had an idea for an image that came out exactly as I had envisioned it.

Q:  Wow!  These are great ones, and I can see why you chose them.  Thanks so much for taking the time to share your thoughts, work, and input here on the blog.  Are there any final thoughts you’d like to share about the state of photography or any catch phrases that you keep in mind when shooting?

A:  There are two things about the state of photography that have drawn me in and make me want to stay:

  • When photographers discover new things, new techniques, instead of hiding it like a closely guarded secret; they share it with the rest of the world. Sites like Strobist and people like you are great examples of this.
  • In keeping with that theme, most photographers seem to have little interest or desire in being better than another photographer, they just have a desire to be a better photographer.

Thank you for inviting me here Jason.

Thank you Scott, the pleasure has been all mine (as is the same for the readers of the blog)!  Remember, you can find out more about Scott, his Weekly Photo Tips, and his professional body of work on the web too, so be sure to stop over and enjoy everything he has to offer!

Black and White Conversion Options

About a year ago, I put together a list of my top five favorite ways to convert images to black and white.  As technology has advanced though, more options have become available, and I have learned a lot more.  So, in the spirit of keeping the blog topics up-to-date and current, I would like to re-visit this here today.  (This is also coming on the heels of the Black-and-White issue I finally finished of Rangefinder Magazine!)

  1. Camera Raw Conversion – If you aren’t working in camera raw, here is a big reason to think about it – converting images to black and white in camera raw allows you to make a conversion while retaining access and malleability to all image data. The camera raw dialogs that you should use to make conversions here include the saturation slider, then exposure and shadow sliders, followed by the Brightness slider. Don’t forget to play with the contrast slider a little to enhance the effect as desired. Last but not least, for advanced adjustments, the calibration tab can have effects similar to the Channel Mixer.
  2. Black and White Conversion – With Photoshop CS3 and now in CS4, the good folks over at Adobe have added a Black and White conversion  option in the image adjustments menu.  This is pure gold because you can duplicate the image before making adjustments and apply the effect to it’s own layer.  You can also add back in tonal values for specific b/w effects that previously were pretty much out of reach without many many edits, layer adjustments, masks and much much more.
  3. Channel Mixer – with your image open in Photoshop (7.0 or higher), you can select a specific color set you want to remove from or add emphasis to in an image. The traditional color sets or red, green and blue are available, as well as a constant (think brightness), and a check box for monochrome.
  4. Hue/Saturation Adjustment – whether as a dedicated layer, or directly to an image, the Hue/Saturation allows you to account for different intensity levels of a wide range of colors, from Red, Yellow, Green, Cyan, Blue, and Magenta. You can also adjust the range of color within one of the default ranges for each set by adjusting the left and right limiters of the color wheel at the bottom of the dialog window.
  5. Grayscale Conversions – most black-and-white images aren’t true black and whites, because a little color from a specific range is added back in for emphasis. To make an image truly a b/w, it would only have a range of black and white. This can be done using the grayscale option in Photoshop. Often, this is used as the last step in a digital approach to black and white photography so that saturation and brightness level loss is minimized.

So, what have I added and what have I removed?  The Black and White conversion method is the latest addition, and I jettisoned in-camera conversions.  While pretty much all cameras have the in-camera option to take images in black-and-white, as I have crawled my way up the learning curve, I am cognizant of the fact that if you lose image data in-camera, there is no getting it back afterward.

Well, that’s it – the new and improved post on Black and White conversion options!  If you’d like to read the original post, that can be pulled up from the archives here.  In the meantime, feel free to share your favorite techniques for black and white conversions here in the comments or via email.  As always, Happy Shooting and we’ll see you back here again tomorrow!

The Lensbaby Composer

For those of you that are regular podcast listeners, you know I talked recently about the Lensbaby Composer and what it can do for your photos.  In the podcast you heard the terms “selective focus” but the term is kind of hard to explain without a visual, so I thought I might be able to do it better justice with a visual here today.  Take a look at this setup:

lensbaby1

So, if you are looking at a scene from camera view 1, and you want the sharpness of your image (your viewers attention) to focus on something at point B, it’s easy to do this.  Simply drop your aperture wide open and the depth of field will throw points A and C out of focus naturally.  Pretty easy, no photo editing, no trickery or anything involved – the mechanics of apertures and depth of field handle this for you.

Well, take a moment to consider things from the viewpoint of Camera Two.

lensbaby2

You still want the focus to be at point B, but because both A and C are also positioned relative to the camera at the same place (they are not in front of or behind the point of focus, they are merely off to the sides of the point of focus), dropping your aperture wide open will not throw A and B out of focus – they still there, just as sharp as point B.  Well, up until now, you’ve always had to take images taken under situation 2 and bring them into image editing software to blur, dodge, burn, and otherwise minimize the attention that points A and C got from the viewer eye.

Well, what the Lensbaby does, through it’s unique combination of lens elements that include an actual curved optic and a curved field of focus, giving you a round spot of focus, so that it allows you to set point B as a single point of focus, so that A and C will fall off in sharpness, bringing the viewer back to your desired point of what to look at.  (The eye will almost always naturally look for sharpness and light in images…)

So now, dodging, burning, blurring and other darkroom and software techniques are no longer needed!  The Lensbaby allows you to create these visions in camera, not afterward in post processing.  What does this mean for you?  More time shooting, and less time photo editing!  Who doesn’t want that?

The coolest part of the new partnership with Lensbaby is that they’re also offering anyone reading the blog or listening to the show an opportunity to get a 0.6x wide-angle/macro conversion lens for the Composer lens totally free! Imagine taking your creative visions to a whole new level with the Composer lens from Lensbaby – and then add the macro capabilities, and literally, the sky is the limit!  Your creativity knows no boundaries with lens-work like this!  So, if you are looking at adding the Composer lens to your gear bag (and you can purchase it from any retailer), then look no further, because from here you can get a free 0.6x wide-angle/macro-conversion lens from Lensbaby as a way of saying thanks.

Expanded creativity + Free gear = lots of fun

Sounds like a perfect equation for me!  So, stop on over to the partner website they made just for Canon Blogger listeners and readers to get your free lens today.  This is a limited time offer, and I am not sure when it will end, but the Composer and the companion 0.6x wide-angle/macro conversion lens (which you can get for free) would have been very useful this last weekend on the Eldorado shoot.  Remember the rock fissure?  Imagine if I had a chance to fade the DOF out away from the rock completely?  What about the rear window reflection?  Imagine if I could have faded the front window part out of focus completely?  Both of these shots might have ended up in my portfolio!  As they are, I’ve got two snaps that while interesting, will likely never get added to the print portfolio…

Does this help clarify how the Lensbaby works and what it does?  I know it’s a very simplified version, and the folks at Lensbaby have a lot more resources to help explain it than I do so be sure to visit their partner landing page here to learn more about it!  If you’d like to see some samples of the lens at work, (my lens hasn’t arrived yet) make sure to stop over to the gallery page here too!  Got some pics you’d like to share?   Link them here in the comments section (or even share then with the good folks at Lensbaby – they like to hear feedback from the field so share your thoughts and shots with them too!)  Finally, to learn all the details about this promotional offer, stop over to the page the folks at Personal Life Media have set up here.

If you do have pics and thoughts to share here, feel free as always to drop me an email, and you could be on the show!    For those interested in buying the composer, make sure to visit this link here to get the free macro conversion lens!  Questions, comments, feedback and ideas are welcome at my email address (as always) is jason <at> canonblogger <dot> com!

Check them out today – then get back out and keep on shooting!  Hope all your shots are good ones and we’ll see you back here tomorrow!

Look out behind you!

We’re always looking forward, upward and downward to find a unique perspective or angle on things – to create something unique and interesting.  Well, today, I’ve got an example of how sometimes the interesting shots are behind you!  In this particular case, it’s doubly true.

This is also from the photo walk out in El Dorado from last weekend, and what makes it doubly true is because we were out looking to capture the beuaty of the mountains, the trees, and the amazing Colorado skies.  At one waypoint between hiking trails, we took a rest stop and used some of the provided *ahem* facilities.  On returning to the vehicle, I saw this reflection in the rear window of the Expedition:

Rear View

So, the view was created from the back window reflection, and I only caught it by turning my eyes away from the mountains, landscapes, and opportunities in front of me!  When’s the last time you turned 180 degrees to get a shot?  Got any fun stories of when it did?  Share them in the comments!

Don’t forget to stop over and pick up the new feed in iTunes for the podcast and share your thoughts about the new show format!  Here’s the link:  iTunes feed Happy shooting all and we’ll see you back here tomorrow!