Creating templates

Hey all, today is tutorial Tuesday, and I share a technique I used recently in creating a calendar template to import client photos in. I could only get about half way through the tutorial before I had to stop (I am trying to keep video tutorials at or under 5 minutes), so this will be part 1 of a two part series. Today I show you how I created the graphics with some guides, and keeping things all manageable on just a couple levels. As usual, the tutorial is linked in both Flash (web based) and QuickTime (iPod/iTunes friendly) formats at the end of the post.

Additionally, I’ve got a few rather unique shots (I think anyway) from my outing to Magnolia Gardens this weekend. There was a heavy thunderstorm the previous day, so lots of opportunities for some macro and water works. Here’s two I thought that the viewing audience might enjoy:

dewdrops21.jpg

reflectoin.jpg
That’s about it for today…a few photos and a tutorial for your viewing pleasure. A multimedia blowout this week thus far, with an article yesterday, photos and videos today, and who knows what tomorrow has in store…more articles, and maybe….an audio podcast *gasp!* (Likely not with the latter though – so no promises!) Until then, happy shooting and watch those apertures! 🙂

CB Episode 038: Calendar Template

PlayPlay

PlayPlay

Meaningful Monday Materials

Yeah yeah, I know, sometimes the alliteration gets old, but it really is a disease for someone who enjoys to write! Anyway, resuming the content on how to create web galleries, I thought that today would be a good day to share the next chapter draft with the reading/listening/viewing audience.

This go around, it’s Chapter 3 which talks about some of the basic coding concepts. If you are going to be customizing your web galleries from software like Lightroom or Photoshop, some basics of coding concepts are helpful to get the end results you need. Thus, I’ve put together a very basic, but detailed article that talks about the most basic of coding, being HTML and CSS. I also include some useful resources for those interested. Anyway, not much else to report today. For some news and events from around the web, stop over to Jason D’ Moore’s site for his Monday P&P Blogroll. (Thanks for the linkback Jason, and helping out last week was a lot of fun, let me know if you ever need any assistance – it really kept me on my proverbial toes!) 🙂

Happy shooting all, and watch those apertures! Here’s the link to the PDF article:  Coding Basics.pdf

Friday Night Lighting…(and a funny)

Normally Frida posts are filled with humor, funny and generally stuff that is trivia to help keep us all grounded in reality and realize that there is more to life with photography. I am starting to get a little of a backlog with the projects I’ve been working on though, so I am goig to lighten the load by one project here today – and that is a DIY lighting project.

Before I continue, the DIY lighting concept is not something that comes easily to me, as I fully admit that I am no lighting pro. If you want pro advice, the best place to go is to Strobist where David Hobby hosts an excellent lighting blog that has become pretty much the place to go for lighting tutorials. What I have learned from that site would take days to rattle off here. So, rather than regale you with all of that, I’ll just say that Strobist has given me new insight into uses for everyday objects.

Here’s the lighting project – a while back David talked on his blog about using household items to create lighting peripherals such as reflectors, bounce lights, light stands, and has been a common theme for quite a while. So, the inspiration for this came from what to use to make your own DIY snoot. A snoot is a device that focuses the light from your flash (which you know of course to take off the camera if you want really good light).

Well, at work I noticed one day that a commercial industrial sized roll of TP had been used and the cardboard roller that it was on was just sitting on top of the paper towel dispenser. I picked it up, looked it over and it seemed to be close to the size of my 550EX flash. I took it home and tried it out – bingo! The only problem was, it really wasn’t long enough. Well, no biggie, I just waited another few weeks and sure enough, another TP roller appeared on top of the towel dispenser. I snaked that one away, and brought them home. A few pieces of scotch tape to attach the two devices together and I was ready for my test shot:

snoot1.jpg

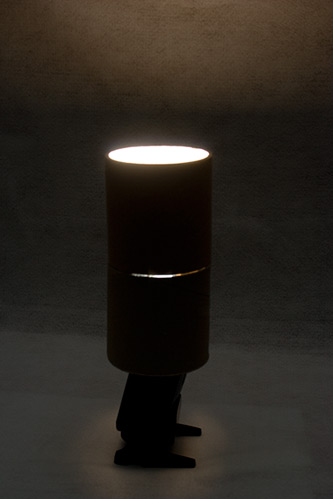
Notice the light leaking through the side though? Well, I decided good old duct tape might be able to fix that. So, a few tears and strips later, and I got this shot:

snoot2.jpg

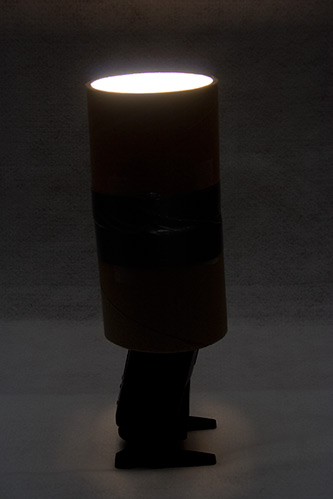
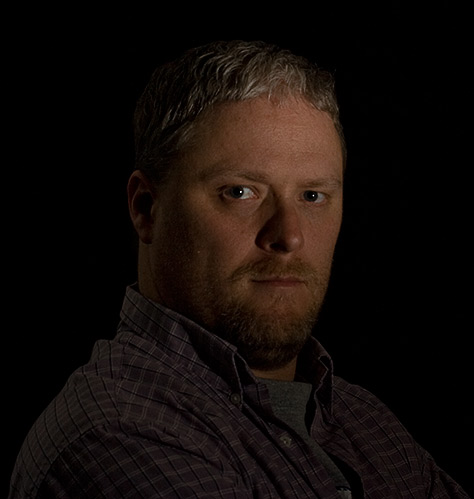
Looking a lot better now, but now I am noticing a little light seeping through the back end still – any ideas how to eliminate that, or is that there in most snoots? Not sure, but this cost me a grand total of probably 05 ¢ of tape. So, I played around with the distance, as David suggests over at the Strobist site, and I finally am happy to announce that this snoot works best at a distance of about 4′ from the subject, and (surprise surprise) at about a 45 degree angle to the subject. I was hamming it up for the camera just to give a little variety while I figured this out, and actually came out of the lighting test with a self-portrait I am not too ashamed of. It’s end-of-week scruff, so that will be gone come Monday, but I thought the lighting effect of a snoot (concentrated light) is pretty useful.

me.jpg

So, there it is – the Friday Night Light experiment. I know it’s late, but better late than never right? Anyone else have any DIY lighting experiments they want to share? If so, all are welcome to join in the comments area. Otherwise, have a great weekend, happy shooting, and watch those apertures! (mine was a little soft – but I think that may have been oof, not dof softness)…

Oh yeah, I almost forgot, Fridays always feature a WTD cartoon, so here’s my fave of the week:

What The Duck, Monday April 14th

How well do you score?

First off, let me state that I am aware I missed a post and did not really give much advance warning.  Now that it’s done, and at least ready to see a beta response, I guess I can announce it here.  Well, before I make any announcements, let me back up a little bit.  Since inception about 6 months ago, I have endeavored to put forth meaningful and thoughtful comments and ideas on this blog – mostly about photography.  Sometimes I have presented things from as professional a perspective as I can muster, and at other times, I have been admittedly personal in my expressions.  Either way, it’s probably fair to say that I have been putting a lot of time, thought, and energies into posting articles, content, and interesting materials for all to enjoy.  This got me thinking about the constantly changing nature of blogs.  Something new each and every day – the time and energies to putting new and fresh content out on such a regular basis can be overwhelming, to say the least.

So, with that little nugget, I was thinking – what if I were to put together something more constant, but still with the ability to change and improve?  Not articles mind you (and my set of web gallery articles is still progressing – almost there, I promise!)…but an online, interactive approach to sharing and offering resources to help people learn more about photography.  Now that would be cool, right?  Well, here it is!  It’s the brand, new, just been born, never-been seen before:

The Online Photography Test

That’s right – I’ve been putting some time into setting up a site that can give people a place to go and see how they are doing with their photography.  Right now, it’s in a beta form, with only 20 questions, but I am hoping to add more with time, and also to add various types of tests.  Eventually, I see the site as having a set of metrics where people can go to see where they’ve improved, what they need to work on, and where they are pretty solid in their knowledge base.  Naturally I am starting with the basics and intermediate material here, with more advanced stuff to come later.  There will hopefully also be a comment section eventually, where people can submit ideas for new questions, and discuss the material or see some dialog there within the photographic community.  That clearly is “just a dream” right now, but should be fairly easy to implement if there is sufficient interest.

So, without further ado:  stop over at the beta test site and take what I am affectionately calling the OPT Test.  Take the test and see how you score!  Did you do well?  Any material you would like to see added?  Dropped?  Changed?  What do you think of the wording and format?  Since comments aren’t enabled there – please come on back here to CB and share your thoughts on the newest and latest addition to the CB set of resources.  I’ll put forwarding on at the final site once things are more cleaned up and there are various versions for people to explore.  So, take the test, and see how well you score!  Happy shooting and see you back here again tomorrow (watch those apertures!

Adobe Creative Suite 4?

There have been a couple of references in the past few weeks to the next iteration of the Creative Suite for Adobe. Now in its third edition, recent web searches have seen a few alleged leaks of a beta called Stonehenge on various torrent sites. Since no public beta has been released by Adobe thus far – the recommendation is to stay clear of these “leaked” versions. With the extensive proliferation of spyware, malicious viruses, rootkits and all other sorts of destructive code commonly referred to as “malware”, this practice does make sense.

However, rest assured, a CS4 is going to happen eventually. Some are obviously in the know already as they work hand-in-hand with Adobe in beta testing software even before it gets to public release beta versions. (Case in point, a coy reference from Dave Cross on a video blog entry a week or two ago.) It’s no secret that the industry leaders like Dave and others are definitely insiders as well, and get to sneak a peak at upcoming software before it ever gets to anyone else. How else could these guys get up to speed on it so quickly? Sure, they’re quite adept at their craft, and are obviously not mental slouches by any means, but knowing everything they know as soon as betas hit the web simply means they are privileged individuals, whether they care to publicize it or not.

There is other evidence though as some of the screenshots posted in various web forums and blogs seem to indicate that the next version of CS4 should be forthcoming (at least in beta) before the end of the year. While the veracity of these resources is unknown to me, there does seem to be some credence to the legitimacy of a beta already in the works, both by the historical time line Adobe takes with new product releases, as well as similarities in the names to boot! (Adobe has a product out that uses a Stonehenge theme already, called Atmosphere and you can download an EPS version of the graphic here: Stonehenge EPS File) While it’s not really all that similar to the graphic found for the “beta screen shot” seen on CybernetNews, the mere fact that the naming scheme is repeating itself suggests that something is definitely in the works.

So, does anyone else have any thoughts on the CS4 time frame, and when it might be released. Thus far, the only news I’ve seen is what you see posted above. Feel free to share your thoughts and predictions in the comments section! Tomorrow is likely a “no blog Thursday” for me as I am having my first even root canal done. Not looking forward to that! Until Friday then, happy shooting, watch those apertures!

Creating Web Galleries

In keeping with my latest project of putting together instructional materials on how to create web galleries, I took advantage of the video tutorial this week to go through some of the basics of how to do the task in Photoshop. It’s not as smooth as Lightroom as some of the CSS doesn’t work right in Firefox (Firefox 2.x is not W3C compliant.) Nevertheless, it does get you through the bare bones of it, and addresses some of the issues that you should consider while putting together a set of images for displaying in a web gallery. It’s a little longer than your average tutorial (11:22) but the content I think makes it worth the time spent. As always, it’s in both Flash and Quicktime varieties for both web and iTunes/iPod viewing. Enjoy!

Oh yeah – anyone know how to cure hiccups?

ETA:  Posting some of these on YouTube now, so adding links back as they go live on there as well:

<object width=”425″ height=”350″> <param name=”movie” value=”http://www.youtube.com/v/4Ueuc4hHyCc”> </param> <embed src=”http://www.youtube.com/v/4Ueuc4hHyCc” type=”application/x-shockwave-flash” width=”425″ height=”350″> </embed> </object>

Monday Mental Challenge

This week I am taking a different tack on my blogging for two reasons. First, I’d like to start featuring more articles, both as individual segments that can stand on their own, but that also could become part of a larger work. Based on feedback I’ve received from family and friends, it seems I do sometimes have a knack for the written word. I’d like to share some of these articles with the blogging community i the hopes of receiving more critical and objective feedback on their usefulness. Second, the thrust behind this initial thrust of articles is based on some repeated questions I’ve received in both the blogging community and the photography community of local and online brethren. So, in at least a tangential sense, the larger scope of this is not only to compile a series of articles that is publishable, but also as independent topics that can serve as tips and helpful resources for those that do read this with any regularity. Continue reading “Monday Mental Challenge”

The Canon ST-E2

As a follow-up to my post from yesterday, let me back up a little and set the stage for a multi-faceted question, in the hope that perhaps someone will know some of (or ideally all of) the answers. Recently I purchased an ST-E2 from Canon which allows you to trigger a flash without cables or wires. It uses a radio signal an infra-red signal and when mounted on your camera, pressing the shutter, trips the sensor in the ST-E2 which in turn fires the flash. This ST-E2 uses a fairly common battery type, the 2CR5, and is readily available through any number of vendors. Continue reading “The Canon ST-E2”

Thursday Thoughts

Well, I am still not back to 100% but am heading to bead early tonight.  Just a short thought on rechargeable batteries.  I bought some Energizer 2500 NiMH (Nickel Metal Hydride) AA’s for my 550 EX last fall when I bought the flash.  Having recently acquired an ST-E2, I was excited to put it to use.  It worked for a while, and then died rather quickly.  Thinking it was the batteries, I recharged them last night and tried again this evening with very little success (one flash then kaput.) Continue reading “Thursday Thoughts”

Tuesday Tricks and Treats (and a tutorial)

This Tuesday, I’d like to share some neat tricks I came across online. First, How to Light a Shot on Two Planes – this came courtesy of The Strobist (one of my regular reads) – plus it includes a really cool-looking shot of some Turkish Delight! Apparently he (David Hobby, Strobist author) did this workshop in Florida last weekend with industry folks like Scott Kelby and others from NAPP in the room – no, that wouldn’t be at all intimidating!

Another neat treat I read about through PhotoJoJo was a blog where two friends who live a fair distance (3191 miles to be exact) from each other and they each share an image a day on their blog, one from each region. A definite cornucopia of inspiration as sometimes it’s the regular snapshot-types while others it’s truly breathtaking scenes…and when the two complement each other, it’s just too cool (February 7th is my favorite day so far)! Stop over when you get a minute and comment on their work – they deserve the accolades. The blog name, coincidentally, is titled 3191!

And last, but not least, the tutorial for the week – my inspiration for this came from (surprise surprise), NAPP contributor Matt Kloskowski. He had done this trick on the show (and in the NAPP member space) for Macs, with a little verbal instruction set at the trailer for Windows users. After sharing a few msgs with him – I decided to do the counterpart tutorial this week for Canon Blogger – the Windows version of creating a Desktop Calendar. So…to Matt, thanks for the creative idea, and to the rest of the world, here’s how to create a desktop calendar for Windows. Enjoy!

Windows Desktop Calendar