Five Ways to Deal with Harsh/Low Lighting

A common question I get here is how to deal with harsh or low light situations.  This is a great question, and for event photographers, it’s simply part of the job to recognize various lighting conditions and address them accordingly.  Today, I’d like to share  Five Ways to Deal with Harsh/Low Lighting:

1.  Cranking the ISO and hoping to fix in post

With advancements in technology, noise handling both in camera and in post production has resulted in some astonishing results that in previous years would have been literally unrecoverable.  While we should always endeavor to make our images shine as best we can in camera – advancements in tools of the trade simply give us more options and we would be foolish not to use them.

Here’s a good example of a shot that was done at a high in-camera ISO setting, that was recoverable to a good quality image.  It may not necessarily be of “stock photography” caliber (you really need every pixel to be perfect for stock photography), but for event photography, I would consider this acceptable quality.

Removing Noise

2.  Implementing additional light sources (Flash, video lights, etc.)

Adding light

3.  Using a tripod/monopod in conjunction with longer exposures to increase odds of sharp captures

Long Shutter Speed

4.  Use a gray card to get good white balance/off-set the ambient lighting conditions.

Having your subject hold a color balance card (or even just a gray card) in the scene for one shot is a great way to counter-act the effect of difficult lighting, including everything from halogen lights, to fluorescent, tungsten-florescent mixes, and the garish hue from sodium vapor lights common in locales like stadiums and street light settings.
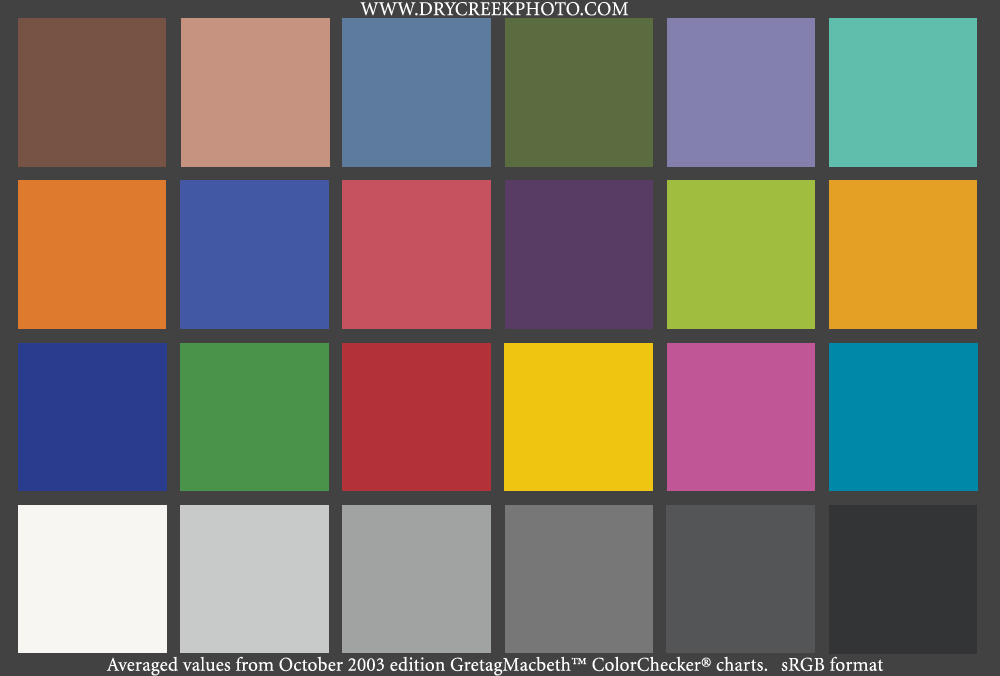
http://www.drycreekphoto.com/images/Charts/MacbethCC-sRGB.jpg
Gretag Macbeth Color Wheel
Sample Graycard Shot

5.  Use supports from the surroundings to brace your camera

Using a tree, a wall, or even the ground to help stabilize your camera can reduce the shutter speed considerably to help when shooting in low light situations.

Use a wall for support

As much as we may try to hand hold our cameras, blur is unavoidable due to our heartbeats, finger tremors, breathing, and a host of biological factors, the best we can do is help to minimize that blur by using supporting mechanisms and techniques to get as stable a shot as we can.  Even when we can hand-hold, matching that color from the scene is much easier to do when you start from a known vantage point, whether it be your own flash, or a controlled ambient scene.  So much to think about and so little time…where do you want to go from here?

Hint:  Sound off in the comments – would love to hear others thoughts, tips, and tricks for dealing with low and/or harsh lighting! Special thanks to Kerry Garrison of Kerry Garrison Photography for sharing a sample image from his own portfolio when I couldn’t track my own down in the library (bad me for not keywording fully!)…

kL2HNZVO

Five Tips to Better Photos

With the sudden surge and swell in the blogosphere, Twittersphere and Photosphere over Lightroom 3 hitting the streets (and a nice combo discount is available in the sidebar by the way), let’s not forget that this software is all meant to be doing one thing – letting us get back to the business of taking photos instead of spending our time in our computer.

With that in mind, I’m bringing back a popular concept of “Top Tips”.  Today, I give you…(drum roll please):

“Five Tips to Better Photos”

  1. Be Ware of Exposure Values – No matter how good your camera is, if you under or over expose too much, you’ll be losing detail which either takes too long to recover in post production or is unrecoverable.  Check your histogram for “blinkies” (meaning stay away from the edges), and you’re in a much better zone to start!
  2. In keeping with watching exposure values, don’t rely on new-fangled features lie “content aware fill” or “clone tools” to fix things afterward.  If it takes ten more seconds to get it right in camera, do it, because it means you are still shooting and not stuck behind a monitor at 2am fixing stuff for tomorrow’s delivery deadline!
  3. Avoid increasing Noise.  It’s like a broken record at this point, but would you rather keep noise down in camera or address it because you were shooting at ISO 64000 in camera?  Yeah, the reduction features are amazing, but it’s even better if you don’t even have to touch that slider.  Swap lenses, check settings, and heck, maybe even add a fill flash.  It helps to keep noise down, which ultimately means your shots are cleaner.
  4. Look for the Light – the direction of the light, the intensity of light, and the shape of the light all can impact your photos.  As a general rule, keep the light to your side and behind you, and try to keep the intensity down as you don’t want to over-expose your subject (see Tip #1).  Don’t forget, you can shape and modify even ambient light with diffusers, reflectors,  and umbrellas.  It’s all part of the larger principle that photography is about “writing with light”.
  5. Shy away from shadows – Just as the quality of light can make or break a photo, so too can shadows.  Watch for overhead lights as this can have nasty effects on things like portraiture (shadows under eyes).  Coming at your subject from the wrong angle can also lead to nasty and unwanted shadows of yourself in the picture.  For instance, if you are shooting a building at sunset with the sun directly behind you, your own shadow can creep into the scene, making for some not-so-fun post production work in Photoshop.

There you have it – 5 easy tips to better photos!  Lightroom?  We don’t need no stinkin’ Lightroom!  (Well, we do, but it made for a good quote! 🙂 )

What sorts of tips have you come up with to make and take better photos in camera?  Share your own in the comments!  Happy shooting and we’ll see you back here again tomorrow!

P.S.  Remember, there are two contests going on right now – if you stop over to the podcast day (Monday) where I talked with Rob Sylvan and share a comment you are entered to win a free copy of his upcoming “Taking Stock” book – courtesy of Peachpit Press.  Also, the monthly giveaway for 2 4GB Lexar Pro 300x CF cards is rolling and you can submit your photos to the Flickr thread here!  Enjoy and good luck to all!

Creating a Monthly Desktop Calendar

I alluded to it yesterday, and have already had several people inquire about the procedure to create this desktop calendar.  It’s really quite clever, and kudos go out to Jeffrey Friedl over on his site for the script:  http://regex.info/blog/photo-tech/calendar He does a decent job at the basic explanation, but since we are a visual world, here are some step-by-step instructions on how to run things from beginning to end!  Fair warning – this does require Photoshop as the script (I don’t believe anyway) will run in Lightroom because it uses layers…

1.  Download the script from the link above (I downloaded to my desktop on Windows XP)

Step 1 - Download the script

2.  Copy the script from your desktop (or whatever download location you configured for your browser) to your Photoshop folder, as indicated in the screen shot.

Step 02 - Copy script to Photoshop Folder

3.  Open Photoshop (if it was already open, you should probably close PS and restart it)

Step 03 - Open Photoshop

4.  Open the picture you want to apply the script to (I started with the largest size desktop I wanted to configure it for, in this case 1600 x 1200.

Step 04 - Open the image to apply the calendar

5.  Navigate to the Presets option in Photoshop and open the script

Step 05 - Locate the Script from Photoshop Menu

6.  The interface lets you select certain information such as the month it will run for, when the week starts, etc.

Step 06 - Configure Calendar Options

7.  Special mention here to include certain holidays – if you have custom days (say birthdays, anniversaries, etc) to add, create a text file for reference and point the script to that txt file location.  If you don’t want certain days highlighted,you can leave this option un-checked and proceed with the script.

07 - Specify dates to highlight if desired

8.  It may take the script some time to run (it took me about 58-61 seconds to run it on my computer, but I was multitasking with other things at the time…).  When it’d done, you’ll get a stack of a lot of layers that looks like this, with the default layer selected of “Picture Mask”.  Note:  I’d also recommend checking the option to rasterize most text layers otherwise you’ll have up to 30 additional layers of text (one for each day of the month)! The layers underneath this are where all the really cool stuff is, and the other layers are dates and effects that you can change to suit your own tastes.

Step 08 - Customize Layers to taste

9.  Once you have tailored the layers to suit your needs, simply flatten, save as a jpg and configure your desktop to use that image!  Since I typically will save to multiple desktop dimensions, I start with the original and re-size to each output, from largest to smallest saving each as a jpg then letting the script use that to create the desktop calendar.

Step 09 - Save and distribute your new desktop calendar!

There you have it!  The nitty gritty details on how to create a really slick looking desktop calendar for you and your clients.  Simply print as pictures through your favorite venue if you like and watch the sales come in!

One final little news note that is time sensitive – DIY Photography has a very creative approach to contests and the prize package is worthy of a nod (don’t know how he/she/they managed to come up with this big bag of goodies!), so stop over here and throw your hats in the ring:  http://bit.ly/aRQa9l

See you back here tomorrow for the latest in photo goodness!  I’ll also bring up a couple tips on how to tweak the layers to your own ends, but feel free to begin exploring your own creative approaches! 🙂

Traveling and Photography – Episode #40

So, the weekend was spent on lots of photography stuff – we had the February edition of our Creativty Workshop Series here with the Denver Photo Meetup group and that was a lot of fun.  The theme for this outing was contrast, and the group came up with a lot of great examples.  For a peek at some of the member shots, be sure to stop over there and look at the photo gallery: Denver Photowalk Creativity Workshop Series Continue reading “Traveling and Photography – Episode #40”

5 Tips to Better Landscapes

The most common questions I get here on the blog center around the idea of how to take better pictures.  Whether those “better pictures” are better landscapes, or portraits, wildlife or events, everyone wants suggestions on how to approach the practice of taking pictures better.  Esoteric and creative considerations aside, there are some fundamental “tricks of the trade” that, by and large, will almost always improve your craft in pretty much any genre.  So, today, I thought I would take a moment to share 5 “tricks” I’ve learned that always lead to better landscapes: Continue reading “5 Tips to Better Landscapes”

How Low Can You Go?

In episode #34 of Learning Digital Photography, we  look at the subject of low light photography.  In these shooting circumstances, you often need to drop your shutter speed pretty low, while shooting with apertures that are relatively open, and high ISO’s in order to get the scene with enough light.  Whether you are shooting night photography, concert photography, or foggy weather, these are all things to look at and think about.

To help shed some light on the subject (get it? 🙂 ), we talked to Becky Thomas (aka BecThomasPhoto on Twitter) on the show.  A great conversation, and lots was covered so be sure you give it a listen.  Thanks to Bec for her time – it was a lot of fun.  Make sure you stop over to her site as well for a great dose of inspiration.

Photo News

  • Panasonic Sound System NW-10
  • Facebook Automated Photo Tagging (Face Detection)
  • Price Cuts on Photo Storage from Google ($4096 for 16 TB)

Photo Technical Tips

  • Pros and cons of increasing ISO
  • Pros and cons of opening your aperture
  • Pros and cons of slowing the shutter

Listener Questions and Answers

  • Camera Prices/Lines – What camera should you get?
  • Difference between a Lightroom catalog versus photo backups
  • Which stock agency to use?

[display_podcast]

Creating Compelling Captures

We always are striving to make our images more compelling – to bring the viewer in closer, and to connect better wit our audience.  I have had people ask me pretty much the same thing, but in may different ways and it basically comes down to the something like this: “I get the technical, but it’s the creative side of making compelling images that gets me stuck – what can you suggest?”

It’s the age-old question, and if I had all the answers, well, I’d be filthy rich!  The reason this is the case is because what is compelling or inspiring for one person will be different for another, and yet another, and even a fourth or fifth person.  The truth of the matter is that there is no magical silver bullet of what to do to create compelling images…but there are some things that we, as photographers, can rely on as starting points in our search for compelling captures.  Here’s 5 compelling capture tips that I’ve come up with:

  1. Color – striking colors are always noticeable.  We see the world in shades, tones and nuances of color, so seek out those types of images where color is powerful.  D0 this, and your chances of creating compelling captures increases exponentially!
  2. Light – Surprise surprise!  I’ve talked about light before, and it’s influence in photography (it’s all about light in photography, even the word itself translates partially as light).  Find powerfully lit scenes and you’ve found a compelling moment.
  3. Emotion – Photo journalism relies on this more than any other genre, but if you want to tell a story with your images, one way to do so is to evoke a sense of emotional connection.  Bringing out the emotion in the viewer by presenting scenes that are filled with emotionally charged elements – whether it’s a controversial image of a war zone, or the passion of a mother and her unborn child, these types of scenes stay wit us for a reason, because of the emotion tied to it.
  4. Action – In the words of Joe McNally, “action trumps everything.”  Action shots also connect with the viewer because it speaks to a particular moment in time more than anything else.  That moment a soccer player connects their foot wit a ball, or the moment a bullet shatters a wine glass – it’s something that sparks interest in the viewer, and cannot be ignored as a source of compelling interest.
  5. Eyes – Spoken from the rulebook of a true portraitist, when you have the faces of people or animals in an image – make sure you can see their eyes.  Remember, like the old saying goes, “The eyes are the windows to the soul”, and if you want viewers to connect with an image, one of the most compelling ways to connect with a portrait is to give a hint of what’s inside, and that is almost always done through the eyes of the subject.

So, there you have it – 5 ways to create compelling images.  These are, of course, adages, and there will be exceptions to these rules at times, but as a general rule of thumb, these tips can help you create compelling captures.  There’s also more to it than these 5 ideas, because you know that no single person can completely encompass the ideas behind what creates compelling captures.  So, I would invite you to share your own ideas for what you look to in creating those decisive moments?  Is it something here?  Is there something else you look to for inspiration or to capture something compelling?  What captures your interest when you look at pictures?  Sound off in the comments!

Don’t forget, the November contest has started and a literal bundle of prizes is at stake for some lucky participant so get your creative caps on and throw an image (or two or three) in the Flickr thread.  If you don’t play, you can’t win!  🙂 Until tomorrow then, keep on shooting those compelling images.  Thanks for stopping in and we’ll see you then!

Tuesday Top Five Nuggets

In lieu of a software review, today instead just a couple news nuggets for you.

  • First up, the finalists of the $500 giveaway have been determined.  These six finalists are being considered to win a pretty impressive package of stuff including a Thinktank Photo Multimedia Bag System and a complete set of the Topaz Labs Photoshop Bundle.  View the finalists gallery here.
  • Next up, a recommendation:  Even if you aren’t a subscriber to the Rangefinder Magazine (although you should be), you can read the current issue online here, (it’s a PDF download) which includes in the most recent issue an interview of none other than David Hobby, founder and author of the world-famous Strobist blog.
  • From Scott over at one of my favorite daily reads (Weekly Photo TIps), there is a new PBS series starting this week on National Parks.  I am definitely setting the DVR for this series!
  • As a longtime fan of DIY-projects, this one on making a tripod for your P&S (or iPhone) out of a paperclip was just too cool to leave out of the list.
  • And finally, for those that just insist on getting a photo fix regularly, visit former contest winner John Dunne’s blog, My Chi to see a great dilemma as he is torn between a color and a black and white version of a sunrise scene on the Promenade (psst….I like the black and white version!)…

Well, that’s it for today, be sure to stop back tomorrow for another dose of inspiration as we hit the midway point of the week (a.k.a. hump day)!  Happy shooting and we’ll see you then…

For the Love of Gravy Focus on the Eyes …. Please

I hear a lot of chatter out there about how many photographers are in the market, and how soccer moms with a camera are taking your clients. Are you sure they are taking your clients, or are you losing them because you are not trying to be the best photographer you can be? (sounds like the army!) Just because Digital SLR cameras are affordable doesn’t mean everyone can be an amazing photographer.  Your job is to be the best photographer you can be, and stand out among the others.  How, you ask?  Well, start with the basics as it builds a solid foundation:

1.  Focus on the eyes…please!

I see so many portraits where the focus is on someone’s arm, knee, elbow. Until the elbow is the window into the soul let’s try focusing on the eyes (yes there are exceptions… but the elbow usually isn’t it). By learning how to control your focus on your camera you can stop your camera from focusing on the closest thing to it (like the nose not the eyes)

2.  You look like your brother Yoda

Skin tones are usually not green, or orange. Proper white balance and exposure will fix this issue most of the time. I personally use a target to calibrate my white balance card (it has black/white/18% grey on it).  If you are still catching a color reflection from a nearby object or clothing, you can fix this in post processing. Some of the ways I suggest are MCP actions or PictoColor iCorrect Portrait

3.  Reach out and touch your neighbor

We have heard it over and over and over again: get closer to your subject. Unless you are photographing a wild animal, chances are they won’t bite. If you are capturing a family, they want to see their faces, not everything around them.  Same goes for product, the client is trying to sell the product, so show it off!

4.  Target called…they want their sign back

A.K.A. bulls-eye syndrome. Your image will be more interesting if the subject is not smack dab in the middle of the image. Play with the rule of thirds (hint, the focus points in your camera are conveniently placed in one of the thirds). What is the rule of thirds, you ask? Divide the area into thirds from side to side and top to bottom.  Place the subject on an intersection of the lines at one side or the other. Go try it!

5.  Get it right in camera

There is this cute little book that came in the same box as your camera. Read it. Learn it. Live it!  Knowing how your gear works will not only help you become a better photographer, but it will also benefit you in that you will spend less time working on post-production!  The less time you spend in post, the more you can spend shooting. The more you spend shooting, the better you get…  Alternatively, you could think of this in terms of music: “Just because you can buy piano, doesn’t mean you don’t still have to learn to play it!”   A lot of what you do in Photoshop can be done in camera.  After realizing I did the same thing over and over in Photoshop, I set my user-defined picture style. The contrast is bumped up and the saturation bumped up. That is 2 less steps I have to do in post which in turn lets me spend more time in the field and actually doing what I enjoy – taking pictures!

6.  Part of being a good photographer, is being a good editor

Here, I don’t mean post processing editing, I mean what are you going to even pull into post, and then what will you show your client and the world. I was recently teaching a private lesson, and my student said “I bet you never take a bad picture”. Well she was in for a surprise when I handed over my Compact Flash card to see the images I took that day. There were bad ones on there, but she will be the only person who sees them besides me.  Show only your best, and you will look like the best photographer you can be!

Andie Smith Photography

Andie Smith Photography

Andie Smith Photography

Andie Smith Photography

Andie Smith Photography

Andie Smith Photography

Andie Smith Photography

Thanks go out to Andie Smith for delivering such an amazing and well-received first “Guest Blogger” post!  More Guest Bloggers should be forthcoming.  If you are interested in becoming a Guest Blogger, please feel free to email me at: jason <AT> canonblogger <DOT> com!

Seven Super Summer Tips

Since the podcast went live yesterday, the compositional theme was kind of put on the back burner, so I’d like to bring that back to the forefront today with something everybody likes…a list!

For some reason lists of bullet points seem to generate a lot of feedback, and garner the most interest, so here we go with a set of what I am calling “Seven Summer Super Photo Tips”

  1. Shoot early, shoot late – it’s the “Golden Rule” – and I think we all know about it, so this is just a reminder.
  2. Shoot often – seriously, the eye does not improve creatively without practice, so get out as often as you can
  3. Shoot outside your comfort zone – Like landscapes eh?  Shoot some portraiture, macros, or event work.  Nothing gets creative juices flowing better than a challenge.
  4. Shoot lower than you stand – or higher, whatever – take a different vantage point as that can make all the difference.
  5. Shoot with one lens – Preferably with a prime as this will force you to zoom in or out with your feet, changing your perspective and getting your skills down really rote on the focal length you chose.
  6. Shoot with a friend – nothing makes the post shoot high more gratifying than chimping your shots with a photo buddy.
  7. Shoot for yourself – often photographers are thinking of what clients want, what an editor would like to see, or what may sell well on a stock site.  While it’s true that money puts bread on the table, it’s often liberating to shoot without the pressure of a paycheck.  Your results may surprise you!

So, there they are – seven super summer shooting photo tips!  There’s got to be more thoughts out there though on how to get the most of your imaging eforts, so let’s here from everyone – what are your best tips and tricks for capturing the world around you?  Sound off in the comments.  As always, happy shooting and we’ll see you back here tomorrow.

Grab the feed