Don’t get too excited – no software giveaway on this one folks, as I’ve not had a chance to call OnOne yet and see if they’d be interested in participating in a contest. Instead, I am working off a trial version of one of the premiere up-sizing software programs on the market – Genuine Fractals from the good folks over at OnOne software. Available for both Mac and Windows, this product really has developed a good name for itself in the industry. While reputation may precede it, I have been wanting to give this product a try for some time now, so here we go!
To do this review, I decided to just share the work flow on a particular image that I happen really like, but because it was a pretty heavy crop, never really had a chance to see it in print very large as the limitations of Photoshop prevented more than a 4×6 image. The first step was to open that image:
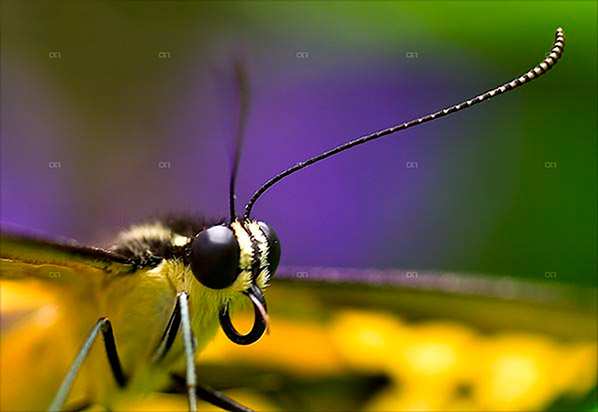
Here we’ve got this heavily cropped image of a butterfly I liked – and the capture shows the image is a 600px photo. Way to small to print – I want at least an 8×10. So, after installing Genuine Fractals, I loaded that in Photoshop by going to the File | Automate option and it showed up in there:
So, after selecting that, I got the GF window, which shows the current image dimensions, and the upsizing options, as shown below:
You can see the default dimensions of 2.5×1.72 just will not work for anything useful other than a desktop background or a postage sized stamp. I need to make this bigger. So, I plugged in the values that would take me up to an 8×10, and in this case the aspect ratio wasn’t exactly on, so I took the short side up to 8″, and that put the long side at 11.6″ roughly. Nothing I can’t crop out a little as I move through post, so here’s the larger sized image.
The little dots are the logo of OnOne software so yo can disregard that because when you purchase the software, those go away. Instead, click on the image and zoom in on the antennae for a better idea of how it handles the up-sizing process. I was actually pretty impressed. Granted this image is unusable as it stands because there is too much jpg artifacting since I was working off an already processed image, but if I was going off the original raw, the results would likely be that much better – and the results are much more impressive. Take a look at this next one.
That”s the original file, a roughly 15×10″ image, cropped to about the same dimensions and then sized for the blog here. I’d include a hyperlink to the re-sized version, which blew up to about 75″ on the long side, for the same approximate increase in percentages (500% – GF claims boosts up to 1000%), but it really is too huge to accommodate on the web. Besides, since it is copyright-protected, just putting that large a file out there is like – oh I dunno – like leaving your garage door open for thieves to steal your car! 🙂 ! Think about 75 inches though! That’s like 6 foot wide. We’re talking billboard sized posters now, and the degradation in image quality is much less because I was working with the original file.
So, whether you are trying to recover size from an accidentally compressed image, or trying to increase an image to use in large applications – you can see how Genuine Fractals might be a route to consider. It may be a pricey option at$300 retail, but when you sell just one billboard print – the software expense is covered.
I’d give GF6.0 a two thumbs up just because it produces such impressive results. To me, the proof is in the pudding! So, what do you all think of the software? Does anyone else use it? I’d like to hear others opinions, as well as some alternatives if you have any. I am pretty convinced, and should I ever need to up-size, I know where I am going from here! Happy shooting and we’ll see you back here tomorrow!
This week I am going to talk about the lack of software in the weekly software review. That’s right – the lack of it! You may be sitting there wondering which software item I am going to talk about, promote, or diss in some way shape or form, but instead of that, I actually want to talk about the general trending of software, hardware, and system resources. Why? Because we demand a lot from our computers these days. Think about it – we want our computers to do many things from surfing the internet, to designing graphics, office functions, building websites, and yes, processing ever-increasing image file sizes. At what point do we say we are asking enough of our computers?
Lately my main desktop computer had been getting slower and slower and slower, and it seemed no matter what I did whether it was beefing up the RAM, adding a faster hard drive, processor, or the like, and even re-installing the OS every 6 months – it was just getting pathetic. At one point, I clocked abut 5 minutes for Firefox to start – on a fresh boot! The culprit? I am asking my computer to do too much. I finally said enough is enough – and am re-purposing the computers in the house. We have a grand total of five computers and each has a unique function: from Office to web, to image processing, and podcasting. And that’s just it – each computer has a task. Yet I have not been disciplined about asking the computer to only perform its assigned task. I revert to the one desktop and the one laptop. The end result: the systems s……l……o……w…… d……o……w……n…….
With a grand total of 78 programs at last count, it’s no wonder my cmputer was screaming “Mercy!”. So, enough is enough. I vowed to make each computer perform only one set of tasks, as explained above. The end result: removing about 50 applications from the main computer. It took the better part of an evening (4 or 5 hours) but at the end, the computer is now screamingly fast again – and Firefox loads in seconds, not minutes. The reason – purposing your computer for a specific software function.
So, instead of looking at adding new software all the time to your computers, you may want to take a look at the computer itself – is it doing the job you want, or are you asking too much? Think about purposing your resources more efficiently. Do you really need that HP 3600 printer driver on there from 4 years ago? What about that trial version of Elements you downloaded a few months ago? And the 4 instances of Tweetdeck you have there? Really? Clean out your software and watch your computer performance increase a notch or two as a result. It’s just like us humans – we can get more done when we’re asked to do less all the time! We’re faster, more productive, and yes, more focused on the task at hand.
So, check that installed software list and try cleaning things out from time to time – your computer will thank you!
Happy shooting and we’ll see you back here again tomorrow!
Sorry for the lack of a post yesterday folks – for those of you that Twitter and have me on follow, you’ll know that we had our cars taken out from under our noses (literally while we slept) early Tuesday morning. By the time I woke up and got dressed for work (at 6) they were gone…
Suffice to say, the wind has kind of been taken out of my sails here, and after an entire day of dealing with police reports, insurance claims, DNA testing (yes, they took DNA from us), finger printing, and pretty much feeling like our private living space was totally disrespected and violated, I didn’t have much of a mood to put anything together for Wednesday. With another weekend looming large and trying to resurrect some excitement for Tracy’s pending birthday, I am afraid today’s post will be no picnic either, as this is more of a lecture on security. To make it photo-related, let’s look at it form an inventory perspective.
Say you were the victim of a crime – all your photo gear was taken from you. Could you produce the records needed to replace everything? With cars it’s easy, as insurance is in place, titles are held, and banks have documents as well that you can fall back on – but what about other items? It took some digging through the Mac, but I was able to find the serial number for my iPod. Do you know your serial numbers? What about that expensive zoom lens? What about your SLR serial number? When was it purchased? What was the purchase price? What about the computers? Software licenses? Think about it – you’ve invested some serious money into this, whether it’s a hobby or a profession. Do you have the records to produce in that worse case scenario? If not, take my experience with the cars and apply it to your gear – write info down! Update your inventories, and keep records of everything! Finally, don’t tempt fate – lock things up. Get a lock box or some kind of safe – and don’t leave things out in the open – it’s just an invitation waiting to be seen and responded to, so take precautions now to avoid lots of heartache and headaches later. Here’s a sample spreadsheet to get you started:
Inventory Spreadsheet (right-click, and select download or Save as and the file name is “inventory.xls”)
That’s it for today folks – so, sorry for the “downer” of a post, but felt there was something there that could be learned by all of us – so enough of the doldrums now – forget the past and move into the future with positivity – so get out shooting, and be careful out there! (Hello Hill Street Blues! 🙂 ) We’ll see you back here tomorrow, and hopefully the podcast that I’ve been meaning to finish will go up early next week. Until then, keep on shootin’ (photos)!
As economic belts are cinched, and we start spending our dollars more carefully than ever before, I am getting email a lot from photographers asking “What should I be charging for this event?”, or “A client wants a digital negative, what’s a fair rate?”, and even, “How much is my work worth?”
Truth be told, the economics of photography sales are just as much a mystery to me, and I don’t have all the answers. But I know a few things about where to start, and how to research. First and foremost, is to know your market. Are you working in NYC, or in Duluth MN? Have you looked at other photographers’ websites? What are they charging? Are they start-ups or established companies? What kinds of services do they offer? What kinds of services do you offer? Do you provide print fulfillment or is that out-sourced? What is your overhead? Cost of equipment? Cost of training? The whole 9 yards – it’s a lot to filter. Well, here’s some software that can give you a leg up in that regard – FotoQuotePro.
This software is very well designed and offers you rates for a wide variety of publications, ranging from magazines, to journals, brochures, quarterly reports, and a plethora of other variations. Quarter page prints, half page, full page, distribution of media, and many other factors are tallied in to help Fotoquote determine your rate. Granted this may not help the startup in portrait work, but if you are looking to market your work toward commercial and stock sites – this is definitely the software for you. And now, in a special offer here at the blog – I’ve been able to garner a 33% discount for some lucky listener. That’s right…33%!! It regularly goes for a price of $150, and the good folks over at Cradoc Foto Software have generously donated a discount code. Rather than buy and install it myself, I would like to pass this savings on to some lucky reader of the blog.
So, here’s how the winner of the discount code will be chosen – post a comment here at the blog. Say what you like about the software, why you could use it, or simply introduce yourself to the rest of the readership. This particular post will take comments through the end of June, so you have about two and a half weeks to get something out there and get a chance to win the discount code. In the meantime, head on over to Cradoc Foto Software and download a trial to see what the program is all about. In the meantime, here’s a few screen shots from the demo version to show you what they have to offer…
Tab 1 of FotoQuote ProTab 2 of FotoQuote ProTab 3 of FotoQuote ProTab 4 of FotoQuote ProTab 5 of FotoQuote Pro
Happy shooting, and we’ll see you back here again tomorrow! (Oh yeah, and don’t forget, you can also share your thoughts and suggestions for future hardware and software reviews that take place right here on the blog! Let me know what you think as it’s the contributions of readers that make this such a fulfilling blog – who knows, there might be a giveaway in that too!)
Ever since Tom Hogarty came on the podcast and I’ve had some time to dive into Lightroom, I am thinking more and more that this is a much better solution for managing all of my photo assets. Since I’ve found myself spending more time in LR and less time in PS CS3 (Extended), I started debating if I really needed so much horsepower under the hood. After all, CS3 Extended is quite the workhorse, from performance, to functionality, to footprint, and of course, price. It left me wondering about my upgrade path.
In all honesty though, I think the term “upgrade” may be a misnomer – after all, am I really using all the features of the full version of Photoshop Cs3? If not, what’s the point in upgrading? Perhaps I should be looking at a downgrade. After all, I really do spend less time post processing these days. So, what are the differences between CS3 and this thing called Elements? Well, for the loyal readers of this blog, I decided to find out.
First up, I downloaded a trial version of Elements 7.0 from Adobe’s website. The download is about half the size of the Photoshop Cs4 download (400+ MB for Windows Elements, and over 800 MB for Photoshop Creative Suite on Windows). To the geek in me, that means a smaller footprint on my hard drive, and less consumption of system resources. Something to consider…
Anyway, I decided to really do a side by side comparison, and loaded CS3 and Elements in their default work spaces, then compared notes. Here’s what I found (CS3 is first, Elements is second):
Photoshop CS3 Default WorkspaceDefault Elements Workspace
Wow! Quite a difference. I first noticed the much darker color of the work space for Elements. Not that big a deal in the grand scheme of things, but something that I would necessarily have to adjust to. So, what else is there? Well, rather than go over each painstaking difference of the two applications, I decided to just give a quick overview here. And, with the quick overview, I figured the best place to start would be the toolbars, since that’s what we really need to use in either of these anyway, right? So, let’s look at them side-by-side:
Photoshop CS3 Extended ToolbarPhotoshop Elements Toolbar
They actually don’t look too diferent when you look at them side by side, do they? I didn’t think so, and I set out to count the various tool bars. Know what? On a quick overview of the 22 tools in CS3, I counted 17 commonalities between CS3 and Elements 7! That’s a lot of overlap! Are there more buried tools in CS3? Most likely. On quick count, I found 60 tools throughout the CS3 Toolbar. In elements, 48! Even still, not a lot extra. From a percentage perspective, that is 20% additional functionality in CS3 Extended versus Elements 7.0 My guess is CS3 Regular would have less of a difference still.
The question is though – how often do you go searching for some buried tool in CS3? As a photographer, in all honesty, not that often. If you think about it, as photographers, we crop, re-size, perhaps straighten an occasional horizon, add some sharpening, and if we want to get really serious with a photo, we’ll do some dodging and burning. All of these functions are present in Elements 7.0
So, why would you want to go with the CS3 or CS4 version of Photoshop – truly if you want to take your photos to the Nth degree, or do serious work like graphic design, web design, or photo restoration, I can totally see the need for some of the more advanced tools in the Creative Suite. But more and more, I find myself using CS3 less and less. Take a look at the commonalities listed below – these are identical features in both applications! It took me a little by surprise when I noticed the similarities even in tool names. See if you can find the common tools from the listing below:
Common Tools between CS3 and Elements
So, what other important factors go into an image editing program for me? Well, having been working in the Creative Suite for a long time – I do enjoy the benefits of layered files for different purposes. Well, guess what – Elements does that too! That means you can edit and save files as PSD’s!
I also like using actions to automate my work flow. Uh Oh…from my initial glance, it does not appear that Elements 7.0 has this functionality built in. But, can it be added? Well, a Google search on the topic of “Elements Actions” says yes, so I think I could probably figure it out enough to eek the process to my needs.
The other major functionality I have an interest in is the ability to edit and manage raw files from my camera. Can I see the raw files? Sure enough, the ACR converter has made its way into Elements as well!
Adobe Camera Raw Converter in Elements
In fact, a lot of the preferences settings seem to have migrated over from Photoshop CS3…look at the same screen from there:
Photoshop CS3 Preferences Settings
As similarities continue to mount, the last major thing to consider is price. Retail, CS4 runs at $700 for the full price, an upgrade runs $200. Elements? Well, I think y’all know where this is headed: Retail $139 and upgrade for $119. I don’t know about you, but that is a HUGE cost savings. It almost seems too good to be true, and given my penchant for not taking things at face value – I will take a look at the image processing capabilities in greater detail next week. We’ll take a look at noise handling, speed, performance, and see how it does with a variety of images from my Canon 40D.
The biggest downside that I can see is that you don’t have the color management capabilities in Elements that you have in the Creative Suite – I like making some LAB adjustments from time to time, and filters may suffer in availability too – but more on that next week.
For the time being though, given the similarity in apparent functionality, the reduced price for Elements, and the proportionate footprint on my computer – Elements is definitely a contender. For all I know – as I learn more about Lightroom after the workshop from Scott Kelby and NAPP on Wednesday, the idea of a separate application for image editing may go by the wayside too, especially when the cost for the CS product is 400% that of Elements.
So, what do you think? Anyone out there using Elements? Any other downgraders care to share their thoughts? Have you enjoyed downsizing? Found things you missed? Workarounds? Add-ons? Tell me more as I continue to explore Elements next week – I’ll add reader observations there too! In the meantime, happy shooting, and we’ll see you back here tomorrow after the NAPP workshop!
I’ve not seen much coverage of how to shoot tethered using the Canon proprietary software, so for today’s post, I thought it might be useful to offer the Canon perspective here (since the blog bears the moniker of my camera vendor of choice). For those who are Nikon shooters, I would highly recommend reading the post Scott Kelby did a while back that shows how to shoot tethered into Lightroom. While he walks you through the Lightroom element, he then discusses the Nikon approach… the counterpoint here is to take a look at the Canon approach.
To start off – a little explanation of what tethered shooting is would be helpful. Tethered shooting means you have your camera connected to your computer or laptop (usually a laptop for portability purposes). This allows you to shoot straight into the computer with direct saves. There are a couple advantages to tethered shooting. First off, you don’t need any media cards, because the camera is transferring straight to the computer. Second, regardless of what size LCD you have on the back of your sensor, nothing will compare with a 15″ or 17″ monitor. You can see greater detail, see a broader tonal range, and get a much better handle on the finder points of composition when it comes to things like posing, lighting, and minimizing distractions that you could likely miss when using a 3″ LCD of your camera.
Okay, so now that we know when and why you would shoot tethered, and given an appropriate nod to Scott Kelby for his coverage of the Nikon version, here is a Canon-centric approach to tethered shooting. Since the Lightroom component is already pretty well covered, I will just be limiting the discussion to showcasing the settings, screens and considerations to take into account when configuring the EOS Capture Utility.
When you first start the EOS Capture Utility, you get a rather unassuming window that doesn’t look like much:
Startup Screen for EOS Capture
It’s pretty straightforward – the top button would be used to download images if you are importing from all your images off a CF card. The second button would enable you to select which images to import off a CF card. More relative to this content is the Camera Settings/Remote Shooting button and the Monitor Folder button. I’ll get to those in a minute. Lastly, it’s helpful to draw your attention to the Preferences button on the lower right – this is the one I’d like to take a closer look at now.
When you click on the Preferences button the window will change:
From here, you now have access to all the details of how you want to configure your tethered shooting options, starting out with the basic settings (see the drop down menu in the upper left). This first setting tells the EOS Utility what screen you want to show when you first start the software. This really is a matter of personal preference, but I would recommend the main window so that if you want to change your preferences, you can do so easily and quickly – often with software preference settings will require you to restart the program, so if that must happen, it’s always best to do that at start-up.
Moving right along, let’s take a look at the other preferences settings:
The Destination Folder Preferences
This should be pretty self-explanatory, but in the interests of covering each aspect, this is where you can specify what folder you want to save your images to on connecting your Canon camera to your computer. For the purposes of this demonstration, I created a folder called EOS Capture and put it on my desktop to use as the destination folder. To point the EOS Utility to your destination folder of choice, simply click the browse button, as shown:
Note that the EOS Utility does a nice little thing here – it creates a subfolder by date so helps to keep your images organized whether you are downloading images, doing remote shooting (tethered shooting), or set a monitored folder for some third party application (like Lightroom). If you are going to be doig remote shooting, here is where you would likely select the remote shooting option so that when the camera gets connected, that specific task will create a subfolder and get you ready that much quicker. Here, since I don’t have the full hardware connection, I am just going to leave it on the default setting and select the folder I created on my desktop:
File Name Preferences
If you want to change your image names from the default of _IMG_1234.jpg to another more descriptive naming convention (say JamesSmith.jpg this would be the place to do it. The options are shown below:
If you choose to modify your images, you can elect from many options, including the option to customize for your needs – just click the drop down menu to select your options. By default it’s set to Do Not Modify so I’l just leave that here to show your options for filename formats:
The next option here in your filename conventions is where you can define custom naming conventions, either by subject name (JamesSmith), event (SmithWeddding), or whatever convention works for you:
Feel free to customize these as you prefer for your own shooting conditions and, well….preferences! Moving right along now…
Download Images Preferences
Here is where you tell the EOS Utility what to do with images as they are generated. It’s pretty straightforward… the options are:
Remote Shooting Preferences
The remote shooting preferences here are also pretty straightforward: Do you want to save your images to a card or not? Do you want the software to rotate your images if needed to show the right orientation? Depending on your preferences, check or uncheck these boxes:
Linked Software Preferences
Last but not least, do you want to use another piece of the Canon Software family of products to work on your tethered images , whether it be Digital Photo Profesional (aka DPP) or ImageBrowser:
Since my work flow incorporates the Adobe product line (Lightroom, Photoshop, etc.), I would suggest choosing “None” here, but again, that’s why these are called preferences.
Once these Preferences are set, go ahead and return to the main window, then click the Monitor Folder option, because there is two last items that merit discussion here:
The Monitoring Folder
Note that the folder has been specified for me, but Canon has generously recommended that I take advantage of a specific Canon hardware connector to connect the camera and computer – the WFT-E1 Wireless Transmitter. These are available from most camera retailers and e-tailers, but I like B&H so that is the one linked (and the price is fairly reasonable at $999.99, so if you get one, let me borrow it to review here on the blog! 🙂 ). Basically what this allows you to do is shoot “tethered” to the computer, but without the tether…pretty cool stuff!
The Software Version
I created this post using the older version of the EOS Capture Utility, primarily because I had not used it since I owned my XT. As with any software though, as camera bodies are added to the vendor family of products, the software must update too. On capturing all the images for this post, I did not think the software would be what updated, only the camera drivers. Clearly, that was not the case as the software itself has undergone a colorful transformation since then, and is now at its most recent update as of just last month at 2.6.1 You can download it and update via the 40D web page here (where I got mine just earlier). The upshot though, and why I am keeping the original screen shots, is because functionally nothing has changed – there are just more camera drivers added to the library. To get your own drivers for other Canon cameras to use with the EOS capture, go to the main page here and select your camera…
Finally, I wanted to share a very short video from what the new interface looks like and how to use it when shooting in “tethered” mode:
So, there you have it! My down-n-dirty summary of the Canon EOS Capture Utility – with photos, text, and video! A virtual cornucopia of media to look at the feature set. Enjoy the material! I’d love to hear your thoughts, hear your feedback and get suggestions (other than checking the software for updates before I write the post! 😀 ) on future material that may be useful. Don’t forget too – that contest to win a copy of Adobe Lightroom (which you can use to edit shots taken in tethered mode!) is going on through the end of May, so don’t delay – get those contributions in today! One shot could be worth a free copy of Adobe Lightroom! That’s it for today – have a great one, Happy Shooting, and we’ll see you back here tomorrow for the latest in photography composition.
Just last week, I had the distinct honor of interviewing Tom Hogarty, Senior Product Manager for Adobe Lightroom. Needless to say, I postponed the podcast for a few more days so I could include the interview. He really gave a good breakdown of the function of Lightroom, what to expect from it, how to incorporate it into your work flow, and what (in general) we can likely expect to see in the future of image processing development. We spent a good deal of time going over the nuts and bolts, so under the general heading of Software discussions today, I’d like to introduce you to Adobe’s Lightroom.
Lightroom is a very different way of handling your images. Rather than taking a single image at a time through something like Photoshop, Adobe Lightroom allows you to not only address single image edits, but also manage an entire library of images. The key here is management, because that’s what Lightroom really does – it takes the idea of asset management and incorporates it into a program so that you don’t even have to think about it! Rather than belabour the point here though, it would probably be best to encourage everyone to just download the podcast and give it a listen. Not only do we discuss Lightroom, but we also take a lot of listener questions, both specific to Lightroom and general photography questions too – and, oh yeah, a contest!
That’s right – Adobe was kind enough to donate a copy of Photoshop Lightroom 2.0 to some lucky listener. At an estimated retail value of almost $300 ($299), this is by and large, the best contest I’ve could ever come up with! It’s very exciting! I’d love to share the details here, but if I did that, you wouldn’t listen to the podcast. So… want to know the details? Listen to the podcast! In the meantime, here’s the show notes on the things we discussed and where to get the latest and greatest info on the product:
Be sure to stop over at Twitter and start following these folks, because they are the ones who you can really learn a lot from! Then don’t forget to listen to the podcast for your chance to win a copy of Adobe Photoshop Lightroom 2.0! Happy Shooting and good luck one and all!
Happy Monday to all! Today is an exciting day here at the blog, because a new schedule of sorts is going to start, both to make reading more enjoyable, and to make writing more planned and easily executed.
The reason behind the new flow is due to many listener questions asking a wide variety of questions, ranging from hardware questions to software questions, technical questions, work flow questions and the like. So, in the interests of providing answers to each of the wide subject matter areas, here’s the new schedule:
Monday: Hardware – I’ll take a look at hardware components, ranging from lenses to bodies, attachments and accessories. This could come in the way of a review, a summary, or other commentary.
Tuesday: Software – many elements of photography involve using software, whether it be organizing your library of images, to managing that library, and editing idividual photos. Here is where I’ll take a look at software reviews, editing tips and tricks, considering work flows,and other similar subjects.
Wednesday: Composition – As with anything else, you only get better when you practice what you preach. We can only learn so much from reading – and today I’ll focus on the “doing”. How to take better pictures, what elements of composition work, what elements of composition don’t work, what to look for, what to avoid… things of that nature.
Thursday: Free-for-all – Who knows what may happen – I’ve been doing the “Thursday Thoughts with…” series, and this may happen from time to time – I’ll keep everyone on their toes with this post! (This will probably also be the post that includes show notes for the weekly podcast hosted over at Personal Life Media, Learning Digital Photography.)
Friday: Weekly wrap-up – news and events of the week, notable items of interest to photographers, and the occasional note with blog announcements, and other administrative types of things.
So, in kicking things off, here is the first installment of a look at some of the hardware in my own gear bag (since many of you dear readers have asked about that stuff specifically). This week, I take a look at the 10-22mm lens from Canon.
This lens has been the premiere wide angle lens for quite some time, as the widest non-fisheye available on the market. Only recently have Sigma and now Nikon added this specific range to their inventory of available lenses. I absolutely love this lens and have used it for everything from landscape work to architecture work, and even some portrait work when I am going for a unique look. In general you won’t use a wide angle lens for portrait work because of the distortion that can occur when you get up close. This distortion can work to your advantage if that is the look you are going for though. Alternatively, if you have a larger group of people, a wider lens may be required to fit everyone in the scene.
Fitted with the well-regarded USM feature for Canon lenses, I also love this lens for it’s whisper quiet and fast focusing. You almost can’t even hear it as it locks in on your point of focus.
On the downside (if this can be considered one) – because it is an EF-S lens, this will not work on the full frame cameras. So, shooters using the Canon 1Ds series (Mark II or III). While full-frame lenses may be the future of digital photography, there are enough people out there with the Rebel series, and the family of 20D-50D bodies that can really take advantage of this lens. I have to give this lens two thumbs up!
ETA: Update: I had inadvertently made the notation that the 10-22mm is an “L” lens from Canon. This is not the case – thanks go out to Bill for detecting this. While it was a typo, the disctintion is an important one because Canon designates their high end glass with the letter “L”.
First off, a bit of quick news about the blog in general: the layout has changed. Can anyone tell the difference? It’s a rather significant one, so hopefully it won’t go unnoticed! 🙂 Chime in and that’s your chance at winning the Think Tank Photo Streetwalker bag I reviewed a few weeks ago right here on the blog!
So, back on today’s post topic, as part of my maintenance routine that I recently posted, last evening I was doing some of my extended “IT” maintenance on my Windows computer. As a part of that maintenance, I was trying to optimize my hard drive performance, and thus resorted to cleaning out temp files, cache files, history files, restore points, and other sundry stuff. A defrag procedure on the hard drive, and I was back up to some pretty screaming speeds again. Puffing out the chest at getting a 5 year old Dell running a 2.4 Ghz Celeron processor, Windows XP, and 2 GB of RAM to move that fast without over-clocking, I checked off on what I thought was a job well done.
Then I opened Photoshop:
Uh oh – it seems I cleaned things out a little too much. Well, since I have diligently kept all my media, documentation, license#’s and other information in multiple places, I was easily able to find the needed materials to re-install. But, here’s the thing – that would require importing all my actions again, re-installing other elements like Noise Ninja, and then also go in and customize all the features I like (scrolling with my mouse to zoom in and out of the image, curves menu with more lines, etc.) Who wants to do all that? Well, not me! So, off to Google I went.
That five minutes on Google doing some research saved me probably two hours of software maintenance time. Adobe has a neat little utility that can be downloaded and run when things like this happen to restore your licensing info without having to go through the entire re-installation. Not sure what it does or how it does it, but the utility is very handy, so I thought to share it with the reading audience today. Here’s the download link, and supporting reading materials.
The underlying point here though, is that even the extensive maintenance I itemized the other day does not cover everything. Go into Photoshop, copy your preferences down via image pastes into a Word doc or other such format. Make a copy of your plugins folder external to PS – the same goes for Actions, noise removal, automation tasks, brushes, etc., etc., etc.! With as advanced and complex has an application like Photoshop has become – you can save a ton of time if you take some proactive measures.
What do you save from your Photoshop configuration settings? Share your ideas in the comments! As always, thanks for tuning in, keep on shooting, and we’ll see you back here tomorrow – Thursday Thoughts returns again with Chris Breedlove!
Recently I was participating in a thread in one of the photo communities that I enjoy, and the subject of the cost of doing business came up. I decided to take a serious look into the costs associated with being an event or wedding photographer. Turns out, the costs associated that I could determine made me appreciate even more the fact that I am a hobbyist/enthusiast and not a pro – I couldn’t survive on this salary and with that kind of workload!
Anyway, I thought I’d share the results of my calculations here, and hear what others have to say. Am I too high in my estimation? Too low? Did I miss any expenses? Are some unrealistic? (I don’t know how much health insurance is if you are not part of an employer plan…)
I categorized the costs into various groupings to include:
Hourly Commitment
Gear Investment
Educational Investment
Advertising Investment
Miscellaneous Expenses
Is there anything else? See the attached Excel spreadsheet and plug your own numbers in! (I made columns C, D and E formulas so everything should adjust out for you…) In the meantime, Happy Shooting, and I hope all your shots are good ones!