What-s This – Week 7

What's This?

Kind of funny how moving gives you new perspective on things. While packing and discarding and selling various things we’ve collected over the past 4 years, I wind up seeing things I’ve not seen in a while (or at least seeing things in a new way as I bend and lean over boxes to get through a day.

The above is a different angle on an everyday object. It is a “what’s this” though, because it likely is not obvious to most. Undoubtedly, someone will prove me wrong by saying “This is a ___” and get it right in like 2 hours!

As promised, I’ve also processed a few shots from my “Shoot the Day!” activities, and posted them at the CB Flickr Pool for your enjoyment. While over there, feel free to share your own shots from the day. If you have one that’s also based on the theme of “Freedom” you may win a $25 gift card from B&H.

Not much else going on today…two more days before we hit the road. Until tomorrow, happy shooting and watch those apertures!

What’s this? – Week 6

What's This - Week 6

So, any guesses for the latest edition of “What’s This?” Last week, the crop was from some fancy ornate crown molding in a capture from an old plantation house here in SC. It was kind of a stretch as I was pulling from my portfolio, rather than taking a shot specifically with the weekly theme in mind. This week I did a mite better though. I had hoped to have a tutorial compiled for publishing tonight too, but alas, t’was not meant to be. Someone did mention in the comments earlier this week though that the title page was notdisplaying correctly in their feed reader. Could anyone enlighten me further, as I don’t see any punctuation or anything wrong in the blog title header info. Thanks a bunch! Good luck with the theme, and we’ll see you out here again tomorrow! Happy shooting and watch those apertures…

Monday Mindbender

I was catching up on some recent photo magazines and the August issue of Shutterbug had a pretty cool picture. The theme was “Letters”, and people were taking pictures of various letters of the alphabet. Erica Ellis had a very interesting capture, shown below:

Alphabet Setup

The challenge here was to see how many letters of the alphabet you could find in the image. It took me about ten minutes, but I was successfully able to decipher the outline of all 26 letters of the alphabet. How many did you get? Share your results in the comments (or over at the Flickr site. FOr those that give up, I put together a PDF of all the letters below. Try it yourself though as this is just one interpretation of things. have fun, and enjoy the “Monday Mindbender”! It’s a great way to stimulate the creative juices to get you thinking outside the box!

See you all back here tomorrow for the Tuesday Tutorial (I’d better start working on one, eh? 🙂 )

Week 2: What’s This?

307

For Week 2 of “What’s This?” – the image is another typical household object, so, take a gander at the image above, then take a guess in the comments or via email…This is a _____(fill in the blank)!

After a week of various responses both via email and in the comments, there was one correct guess via email, and the answer is – wait for it – a microphone! That’s right, my Sampson CO2 Condensor Mic that I record the podcast with almost every week. I zoomed in real close and didn’t even crop to produce the photo – so congrats to Thomas for guessing the right answer!

Week 1 WInner - Thomas w/ Microphone

Things are picking up for me for the remainder of the week, so a shorter post today. One thing I will suggest as a Wednesday Web Gem is to stop over at the new CB Flickr Group! I’m posting the full size pics from what’s this (the following week) and sharing photos in there as I get a chance. Stop in, register with the FLickr foolks, and share images of your own, discuss things from the blog, offer ideas, other tips and tricks, or whatever the theme for the day is! The link to the CB Flickr Group is here: CB on Flickr

Until tomorrow, happy shooting and watch those apertures!

Look for Lines

Shapes

For this week’s edition of “Thursday Thoughts”, I’d like to take a look at the subject of composition. We always are striving to enhance our composition, either by understanding the rules of composition better, or by pushing the envelope in new directions. With the explosion of digital photography, the decreased price of entry, and the abundance of opinions, now more than ever, if you really want to succeed in photography, it helps to get a jump on the learning curve by a better understanding of what works consistently over time. There’s a reason why we often refer to the Rule of Thirds, or the Golden Mean when talking about classic composition – because they work. Time and time again, when photos are composed along these rough guidelines, the results are more pleasing than the same subject without the rules of composition applied.

One of the interesting things though about these rules is how they all use some form of linear movement through pictures. Whether the lines are vertical and horizontal, diagonal or even curved, the way you compose your pictures along these imaginary lines will have an impact on the final result of your image. So, rather than looking at the rules of photography, let’s break it down into a more elemental context: usage of lines.

As I mentioned above, there are four ways in which lines can take you through an image, vertically, horizontally, diagonally, and curved. Knowing the impact each of these types of lines will have on your pictures can really help as you look for scenes to capture and share with the world. And, as the old saying goes, “knowing is half the battle”…

  1. Vertical lines – What creates vertical lines in images? In nature, things like trees are great examples of vertical lines. Architecture also provides excellent material for including vertical lines in your images. Are you a people person? Try taking pictures near someone’s feet, looking up. The vertical lines of their legs will have a tremendous impact on your pictures. So, what does this mean? Usually, vertical lines are connoted with stability and power. These lines will anchor your images at the base (or top) of where the lines start (or end.)
  2. Vertical Lines on Sailboat

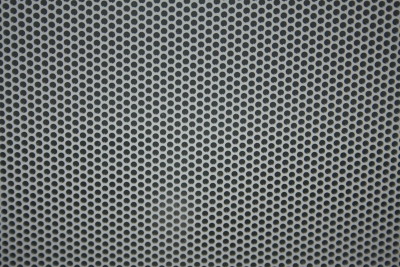
  3. Horizontal lines – What creates horizontal lines? Horizons are great examples, and architecture also can provide horizontals. Looking for portrait examples? Try imagining a horizontal line across the bottom or top of someone’s eyes or teeth. We all love shots of sleeping babies too. Their bodies are usually horizontally composed. Horizontals usually are associated with peacefulness and tranquility.
  4. Vertical Lines on Sailboat

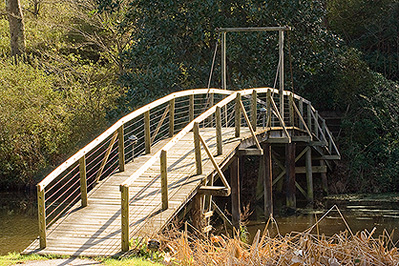
  5. Diagonal lines – What creates diagonal lines? This is a little trickier, because linear progression usually occurs (both in nature and in man-made objects) horizontally or vertically. This requires actually re-positioning your camera from its traditional position to find diagonals. Some examples that are easier to see include bridges, piers, and docks. Also, try looking at things at a different angle, or just looking in new directions. The sail lines of a boat are good examples of diagonals. Pitched rooflines work for architecture too. In people photography, the nose provides angles as do some jaw lines. You can also position people’s arms and legs to give an angular line in the picture. Diagonal lines are lots of fun because they make things more active and dynamic. I’ve even read about diagonals creating tension and suggesting motion.
  6. Vertical Lines on Sailboat

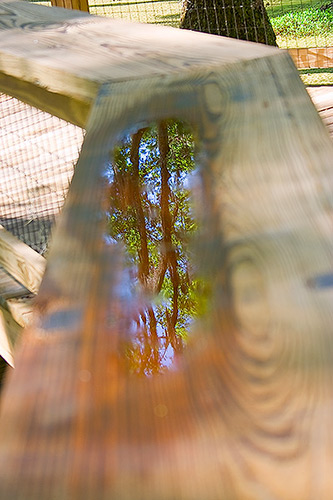
  7. Curved lines – What about curved lines? Curves are great at leading the eye through a picture. Imagine winding roads and curvy paths or ripples in waves ax examples in nature. For portrait work, the curvature of some cheekbones is a great perspective to base an anchor point of an image. Eyes also work here, as do smiles and facial expressions. Overall curves suggest motion because the eyes are always following the path the curve takes them on, but this motion is usually a smooth one, so there is also an association with grace.
  8. Vertical Lines on Sailboat

Lines are fun to find, especially if you mentally take note to look for particular instances. Take a day and say to yourself “today I am going to find curved lines” and see how many you find. Take notes and return with your camera (or take the shot if you have it with you!). With time you’ll find which types of lines speak to your preferences as well as where to position them in camera to yield the best composition.

Anyway, that’s the Thursday Thoughts for this week. I hope you all enjoyed it, and perhaps you’ll find new lines as you go out, cameras in hand this weekend. Happy shooting, watch those apertures, and find the lines!

Creating templates

Hey all, today is tutorial Tuesday, and I share a technique I used recently in creating a calendar template to import client photos in. I could only get about half way through the tutorial before I had to stop (I am trying to keep video tutorials at or under 5 minutes), so this will be part 1 of a two part series. Today I show you how I created the graphics with some guides, and keeping things all manageable on just a couple levels. As usual, the tutorial is linked in both Flash (web based) and QuickTime (iPod/iTunes friendly) formats at the end of the post.

Additionally, I’ve got a few rather unique shots (I think anyway) from my outing to Magnolia Gardens this weekend. There was a heavy thunderstorm the previous day, so lots of opportunities for some macro and water works. Here’s two I thought that the viewing audience might enjoy:

dewdrops21.jpg

reflectoin.jpg
That’s about it for today…a few photos and a tutorial for your viewing pleasure. A multimedia blowout this week thus far, with an article yesterday, photos and videos today, and who knows what tomorrow has in store…more articles, and maybe….an audio podcast *gasp!* (Likely not with the latter though – so no promises!) Until then, happy shooting and watch those apertures! 🙂

CB Episode 038: Calendar Template

PlayPlay

PlayPlay

Muscle Failure Monday – and the “sweetness” factor

As the weekend fades into the recesses of time, it leaves a reminder with me in the form of muscle failure from the screened in porch project. For regular readers (the half dozen or so)…you may recall me having posted in passing about the porch before. Well, enough was enough for me and I went full bore to finish the dang thing this weekend. I did (for the most part), but am paying the price today. The remaining false studs were put in place, and the panel trimming began in earnest. I never realized how tiring it can be to bend over a miter saw, hammer away (manually) at paneling with chincey nails that bend with the slightest off-center tap of a hammer, manually cut metal rebar for shelf hanging, finishing painting trim work around a counter, re-paint a contractor f***-up, rip paneling boards to exacting measurements, hang paneling boards with one hand while holding the paneling in place with shims and another hand all while running back and forth to Lowe’s every three or four hours. Starbucks saw almost as much money from me as Lowes did on this project!

It’s done though (for the most part – still a little trim work to do, and some cosmetic work here and there), and I’ve got a few shots to share of it.

_mg_7679.JPG

_mg_7680.JPG

_mg_7681.JPG

After all was said and done, I retired to the couch for about half the day to surf, watch HGTv (that channel is addictive), and catch up on my photo reading materials. It was a pretty sweet feeling to get all of that completed. Speaking of sweet, check out the new softbox I made this evening from the DIY’er perspective. Should be interesting to see if it works when I get back in my “studio”. Here’s a shot of that too:

_mg_7683.JPG

Not the most professional of softboxes, but it should do the job well enough, once I get the inside spray painted with white. (Without it the can itself cast a nasty yellow glare on shots.) For anyone who is thinking of doing this, all you need is an empty container, a piece of paper, a utility knife and a little spray paint. If you want to forgo the spray paint, you could always use something like a Clorox jug (empty and rinsed of course…) cut in half. Ultimately, I’ll likely put some cloth on there and rubber band it around to act as the softbox rather than a sheet of paper but you get the idea.

For more lighting ideas, try getting an empty cardboard roll from a carpet store – you can get them dirt cheap (as in free) and cut to size. Spray paint a little white paint on the inside and you’ve got yourself a neat little snoot! What’s a “snoot” you ask? Go find out at Strobist – where you will find everything you ever needed to know about lighting but were afraid to ask!