Brush it, Baby!

There is always something coming up that throws me for a loop and last night, it was a “thermal event” on my main Windows computer that I do my image editing from.  The room that the computer lives in is a tad warm, and as you may recall, we’ve been without A/C for a while now.  I am going to have to do something to keep that computer cooler, but for now, it means my 40D shots are not editable in PS3 because I only have a license for it on the one computer.  I have CS2 on the Mac, which won’t recognize the images, so I went about installing DPP there last night.  It did prreclude a “What’s This?” post for today as I had anticipated, so in lieu of that, I’ve got another topic waiting in the wings that should be of some interest, and that’s brushes!

We all know about the brush tool in Photoshop, but all the options that go along with it can sometimes be confusing.  Well, never fear, the “Canon Blogger” is here (me), to help explain it all to you.  Let’s go ahead and get started then.  As far as brushes go, there are four main elements that can adjust the type of brush that is applied to your document.  These are opacity, flow, size, and hardness.   Today I am going to look at the hardness element of a brush.

If you click on the various standard brushes in Photoshop, you will get brushes of various sizes and hardness.  This is all fine and dandy, but if you want a truly custom brush for your work flow, you need to really tweak the size and hardness depending on the image you are working with.  Brush hardness refers to the degree to which a single click of the brush will feather from the center to the edge of your brush size.  Here, it may be best to give you examples of what this means so you can see exactly what it does.

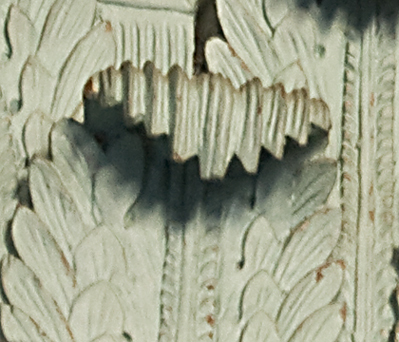
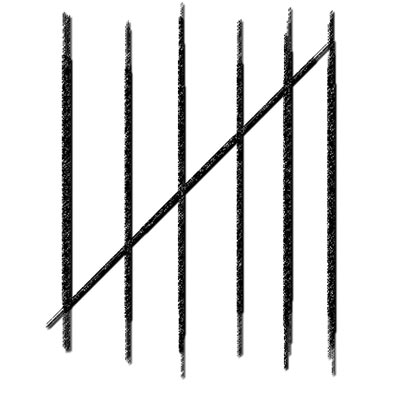
Here I am going to present a brush as applied to a document with a 50% gray background, with all other variables except hardness kept constant.  I then adjust the hardness from 0% to 25% and then 50% and 100%.  As you can tell, as I increased the hardness, the amount of the brush that that is filled increases relative to the hardness level.

Check these out:

Brush 1

Brush 2

Brush 3

Brush 4

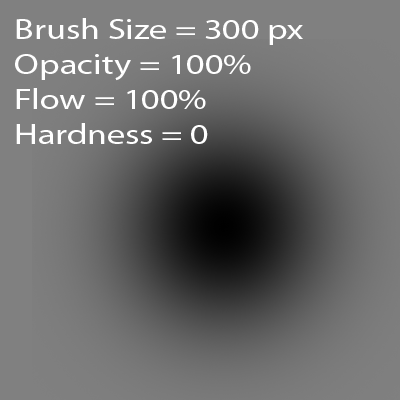
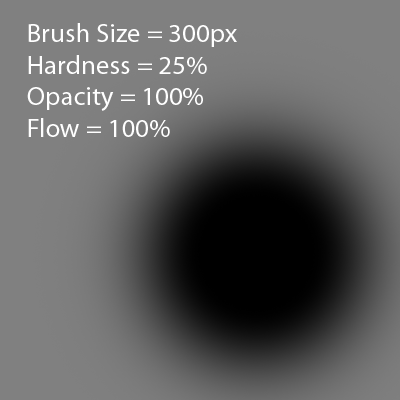
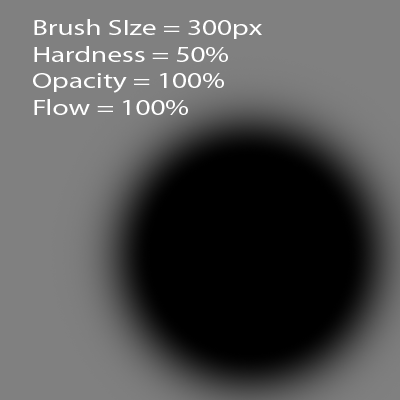
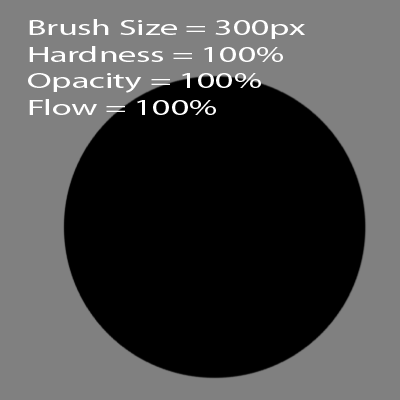
Notice how in each instance, the edge of the circle gets slightly sharper and sharper, with less of that “feathered” look.  Pretty neat, eh?  That’s what increasing the hardness does – it decreases the feathering or fading of a brush into the background.

I’ve often found that when learning all the tools of Photoshop, Lightroom, Bridge, Flash and everything else, that it helps to just take things one step at a time, and make comparisons between various settings.  Here, making just one change to one element of the brush options demonstrated to me (and hopefully to you) what impact changing the brush hardness has on the quality and type of brushing that you add to your imagery.

What brushes do you like?  Are there any particular settings that you find useful for certain types of imagery?  What about other tools?  Are there any tools that you just wish you understood better?  Feel free to share your own thoughts on brush features either via email or the comments.

Anyway, that’s it for todays post.  Tomorrow the “What’s This?” should be back up and running as I swing back into gear there.  Hope everyone enjoyed the post on brush features/options.  Clearly, there might be more content down the road that will illustrate various features of Photoshop tools, so make sure to share your own thoughts on what content would be of use so I can include that.  Until tomorrow then, happy shooting and watch those apertures!

Slideshow Secrets

As I thought about the tutorial for today, I pondered doing a quick set of tips for Photoshop, like CTRL+J for a duplicate late, CTRL=ALT+SHift+E to stamp all visible layers on to a new layer, and other such trinkets.  While debating which ones to include I was continuing the process of winnowing down the last of my photo magazines to just the articles I wanted to keep.   I was also thinking that perhaps a subject would come to me that could add a new dimension to the blog, when as luck would have it – the subject came to me.

From back in October of 2006 – nearly two years ago, I saw an article in PCPhoto that took a look at tips for making great slideshows.  Written by Chuck Summers, it reminded me of the days of yore when my dad would crank up a slide projector to have us watch slideshows of ourselves in Florida, the Grand Canyon, and other family adventures.  Well, the digital age is most definitely upon us, and one area I’ve not gotten into much is that of slideshows.

Chuck did a great job with this article, and I’ve condensed it down here to the nuts and bolts of each tip (twelve total, which makes for great alliteration – it pains me to dodge the obvious usage!)  Anyway, here’s his 12 Slideshow Tips:

  1. Determine the Theme and Purpose of Your Show
  2. Set a length
  3. Methodically edit your images
  4. Maximize image effectiveness
  5. Prep images
  6. Set Image Order
  7. Determine transitions
  8. Title Slides
  9. Choose music to set the mood
  10. Time the Presentation
  11. Preview, Evaluate and Revise
  12. Test Projection Needs

While very informative, and logical in layout (I like logic!), what the article did not present is software recommendations.  I’ve read various bits and pieces around but have not had reason to delve into it thus far.  However, with a cross country move coming up, I thought it might be fun to take images that capture the trek from the East Coast to the Rocky Mountains and compile them into a slideshow when done.

To do that though, I need some software that is designed for slideshows.  I know Photoshop and LR can do these functions, but as an old hat, I like a specially designed piece of software for each function.  Thus, I can’t help but wonder what would be the best software to accomplish these ends.  I recall Proshow Gold as a name, but forget who produces it.  In the interests of full disclosure, I feel that I should also state that I actually have not really tried the slieshow functions in either PS or LR, so am appropriately ignorant on both counts.

So, what should it be?  Should I use Proshow Gold, Photoshop, Lightroom (I am using the Beta 2 via invite), or is there some other software out there that is better purposed to these ends?  Any slideshow superstars care to share their own secrets on software and other tips for making great shows?  Feel free to educate me in the comments.

Meanwhile, happy shooting, watch those apertures, and see you here again tomorrow.  (Perhaps a video tutorial is in the air for then…ya never know! 🙂 )

What’s This? Week 5 – or is it 6?

This last week have been rather hectic for me, so I honestly don’t remember what week we are on for the “What’s This?” theme.   I think it’s Week5, but perhaps someone could confirm this for me in the comments.  Truth be told, I also have not had the luxury of much surf time so I don’t have much in the way of web traffic to point people to. Just a couple links to float out there for you.  First, this is day 6 of the first ever CB photo contest “Photographing Freedom”, so keep that in mind.  News and info on that available from the July 3 post here.

In web news, I will say that there was an amazing post by a guest writer at Scott Kelby’s blog today. (I am going to refrain from my personal thoughts on the subject, but it’s worth reading – especially if you have a background in higher education like I do). I’d be interested in hearing what others think on this subject in the comments.

The other fun bit of news also involved another guest writing on Scott’s blog, courtesy of John Nack, one of the senior staff over at Adobe.  He wrote on his appearance about the desire for transparent windows and was met with a little bit of ruffled feathers from others in the field.  Check out the respective posts to the discussion here, here, and here to get Matt K.’s take, John’s take, and then Jeff Revel’s take.  Interesting world we live in.  Three people all with direct ties to “the man” and three different opinions on it.  I wonder which way Adobe is going to go on this?  While I realize that there is some agreement on parts of it, and alternatives vary depending on whether you’re talking about transparency or translucency, but to me, it’s a window that I have off on my second monitor anyway, so I don’t really care.  Go with John’s approach and devote R&D to other more meaningful improvements.  But, I said this would be a quick post today, and this is starting to ramble, so I’l leave it up to the readers:  Where do you think PS development should go?

So, moving quickly to the “What’s This?” subject for this week, I went through some of my own archives to see if I could find an interesting crop (and I did), so here is a crop of a much larger image. I’ve tried to keep some of the context, but at the same time make it intriguing to guess what this is. So, without further ado…What’s This?:

What's This - Week 5?

Last week, in case you hadn’t guessed it – it was a flower!  Congrats to those who knew and saved their comments for a more challenging post (ahem – today!)  Good luck, have fun, Happy Shooting and we’ll see you here tomorrow!

Custom Brushes

Custom Brush

For this weeks tutorial, I thought to take a look at custom brushes and brush sets. It can be a pretty handy thing to have some custom brushes of things you do often, or looks and styles that you apply often to your photos (such as a signature, copyright, or some other such logo). The idea came from someone in one of the photo forums (NAPP forums if I recall correctly), asking if there was a brush set out there that had a set of hash marks (like for the days of the week). We talked back and forth on a few alternatives when it dawned on me – we could make a brush to do that! You really can make brushes to do whatever you want, it’s just a matter of doing it once and then saving it, much like an action.

So, here’s a tutorial that examines how to create, save, and load custom brushes inside of Photoshop. We’ll see you back here tomorrow! Until then, Happy Shooting and watch those apertures!

Creating Custom Brushes

In the News – Doo Wah!

Bop bop doo bop doo bop do wow!  Okay, sorry, that’s a bad skit for the great jazz tune from the ’50’s, but nevertheless, whenever I hear the phrase “in the news” I feel compelled to sing that line.  Now, for your real news from CB today:  I’ve got two stories for you, some news from Adobe on the next iteration of Photoshop and some Canon news on the Canon Hacking Development Kit (aka CHDK) that is now maing waves.  Read on for all the details!

Adobe Photoshop News

Well, the big news I read today during lunch was that the folks at Adobe will be incorporating some sort of GPU support for its next iteration of Photoshop.  Tapping into the GPU (graphics processing unit) means that larger images can be rendered on your display faster.   Another added benefit will be an increase in processing speeds for filters and other intensive activities. Nothing too earth-shattering, except they did report that at the Nvidia show, they watched the presenter zoom and rotate the canvas on a 2 GB image as though it were a 5 MB image.


Canon CHDK News

In more Canon-specific news, I have now read at least 10 articles from a number of resources talking about the Canon Hacking Development Kit (CHDK), which is a free firmware hack that can be applied to P&S grade cameras to allow them to do a number of things that SLR’s do, and even a few that your average SLR can’t do!


  1. The CHDK allows Point-n-Shooters to shoot in raw mode.  The caveat is that since it’s not a standard raw format, you can’t open this in Photoshop or Lightroom directly.  Instead, there is a third party software kit out there (also for free) called dng4ps2 that can convert the image to the more common DNG, which is Adobe’s Digital Negative format.  The DNG file can then be opened in Photoshop or Lightroom.
  2. The CHDK kit enhances the P&S feature set by adding a battery status indicator so you can see how much of a charge you have left on your battery.  I know this feature is already there in SLR cameras, so I guess the P&S’er didn’t have this feature regularly – news to me.
  3. The CHDK kit also adds what they’re calling a zebra mode which will show you whether a picture is under- or over-exposed.  Basically, it sounds like it’s adding a histogram feature.  Again, this feature is standard on most SLR’s, but not on most P&S cameras.  I just think that even a lot of SLR shooters don’t use the histogram (although I would personally encourage more use of it), so adding the feature on P&S cameras may be a little overkill.
  4. Finally, the CHDK kit allows P&S’ers to extend their range of shutter speeds.  The most reliable info I saw for the CHDK claimed the range went from a standard of 1/3200-15 seconds all the way up to a range of 1/33,333 to 65 seconds!  You read that right, that’s one-thirty-three-thousandsth of a second (and change).  Kind of makes the 1/8000ths shutter speed on the 40D look pathetic, eh?  Granted, this was specific to the S5 IS, but the standard change is to 1/64000ths of a second, which is still earth-shatteringly fast! 

Now, the caveats:


  1. Write time slows down considerably when shooting in raw (to about 2-4 seconds – yikes!).
  2. The raw file format is not recognized by mainstream applications like Photoshop and Lightroom.  In other words, file accessibility is likely not reliable.
  3. The software that you have to use to access the raw image data is freeware.  While some software from the open-sourced community is excellent (case in point GIMP, OpenOffice, and many others) and perfectly safe, the fact that this software comes from Russia and is (to my knowledge) untested, sets off red flags all over the place for me.  Of course I work in IT, so it’s in my nature to be suspicious of third party software from third world countries…
  4. As with any firmware hack, this is likely going to void any manufacturer warranty or vendor support for the camera if you install the software.

So, having shown the pros and cons, I’ll leave it to the community – install at your own discretion.  For those that do decide to install, feel free to share your thoughts here in the comments, or with me via email – I’d like to hear feedback on the reliability of the kit.  The CHDK can be downloaded direct from the link here:  http://chdk.wikia.com/wiki/S5IS, and the raw converter from here:  http://dng4ps2.chat.ru/index_en.html  Until next time, happy shooting and watch those apertures (or should I say shutters?)!


Back to Basics – Rule of Thirds Grid

After I recorded and started production on this tutorial my mind began to remember that perhaps I had covered this subject before. I reviewed the subjects I have posted over at the Tutorial Resource Center and did not see it covered there, so figure I am not repeating some tutorial I have already done. Having said that, this is kind of a return to the basics. Continue reading “Back to Basics – Rule of Thirds Grid”

PlayPlay

Calendar Templates, Part II

This week I wrap up the tutorial started last week on creating a Calendar Template using Photoshop. One of the things I found most useful was performing the screen captures of each month prior to beginning the place functions inside Photoshop. As you can see in the tutorial, the results came out really nicely.

This whole project started from wanting to make a single-page calendar and in looking at the design offerings on Mpix, thought “Hey! I could make that!” The second half of the genesis came courtesy of Matt Kloskowski over fro the Photoshop Guys where he did a tutorial a while back on making a desktop calendar for a single month. So…I put the two ideas together and this is the end result of that effort. I figured it may also have some interest for other photographers in making calendars incorporating either their own prints or those of their clients. Clearly, this is a “down and dirty” version, but if anyone is interested, I do have a pretty high resolution sized template that I would be willing to share on request.

In other news, I’d like to give some shout outs to Brian over at Professional Snapshots, who just last Friday celebrated the birth of his new daughter Isabelle! Congrats to Brian, even though this means he has pretty much lost the ability to sleep through a night for at least the next 18-24 months! Yeah, this may be your fourth, but I’ve heard the stories from siblings and neighbors! Enjoy!

Also, don’t forget to stop over at Jason D. Moore’s weekly summary of all things photography! I always head there to make sure I’m not missing anything interesting.

Last, but not least, the tutorial links: Flash first and QT second…

Calendar Templates, Part II

PlayPlay

PlayPlay

Creating templates

Hey all, today is tutorial Tuesday, and I share a technique I used recently in creating a calendar template to import client photos in. I could only get about half way through the tutorial before I had to stop (I am trying to keep video tutorials at or under 5 minutes), so this will be part 1 of a two part series. Today I show you how I created the graphics with some guides, and keeping things all manageable on just a couple levels. As usual, the tutorial is linked in both Flash (web based) and QuickTime (iPod/iTunes friendly) formats at the end of the post.

Additionally, I’ve got a few rather unique shots (I think anyway) from my outing to Magnolia Gardens this weekend. There was a heavy thunderstorm the previous day, so lots of opportunities for some macro and water works. Here’s two I thought that the viewing audience might enjoy:

dewdrops21.jpg

reflectoin.jpg
That’s about it for today…a few photos and a tutorial for your viewing pleasure. A multimedia blowout this week thus far, with an article yesterday, photos and videos today, and who knows what tomorrow has in store…more articles, and maybe….an audio podcast *gasp!* (Likely not with the latter though – so no promises!) Until then, happy shooting and watch those apertures! 🙂

CB Episode 038: Calendar Template

PlayPlay

PlayPlay