Adobe’s DNG Converter

For many of us, an upgrade of one element in our tool kit comes with many unforeseen consequences and additional expenditures.  Just as a new camera body can necesitate the need for larger memory cards, hardware upgrades can also come with software upgrades.  The reason?  Camera file formats!  As camera vendors develop new proprietary formats for their raw file formats (CR2 for Canon and NEF for Nikon as the two predominant players in the game), the need has always existed to update your software to accommodate the new formats for body upgrades.

The best example of this was when I did my upgrade of the Canon XT to the Canon 40D just last year (or was it two years ago now?)…at the time I was using Adobe Photoshop CS2 to process my files.  Well CS2 development stopped as CS3 development started.  My Canon 40D was stuck in between application life cycles, and as a result, I was no longer able to process my CR2 files from the 40D natively in CS2.  Granted, I did upgrade to CS3 because of my interest in the field, but for those that either may not be interested in the software upgrade, or cannot afford to upgrade, there is a free alternative from Adobe – the Adobe DNG converter.

This is a really cool utility and it gets updated on the same schedule as the Adobe Camera Raw utility that is unique to the image-editing applications of all Photoshop applications (CS4, LR, etc.).  The Adobe DNG stands for a Digital NeGative so it may help to think of this as a way of preserving your original data, yet still making it accessible, regardless of what other developments happen in the software world down the road.  I know, we all think that Adobe will be around forever, but the same was also thought of Kodak 20 years ago – and now those Kodak CD’s are becoming difficult to manage.  With that little nugget, it may be useful to consider the Adobe DNG option.  Additionally, the Adobe DNG negative has been submitted to the ISO standards setting organization for acceptance as a universal conversion utility, and are releasing it under the GNU licensing, so it will hopefully always be available for anyone.

With the stage set then,  for those who are not able to or not interested in upgrading, here is a brief tutorial of the Adobe DNG converter (in it’s current iteration as of 4/27/09), with screenshots.  If your folders of images look like this:

dng6

Then the Adobe DNG Conversion Utility may be for you.  It starts pretty easily…you can download the Windows or Mac versions of it from here:

Windows DNG Converter

Mac DNG Converter

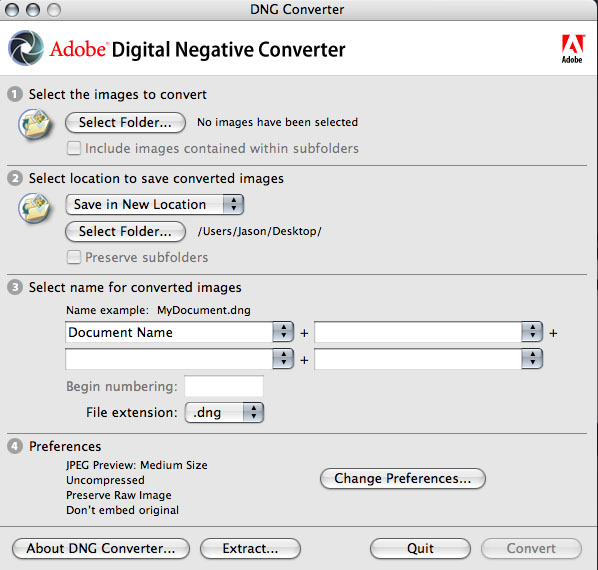
Once you download and install this utility (did I mention it’s free?), start the application to get this screen:
dng1

First off, specify the path where the images are that you want to encapsulate into the DNG format.  You can specify one folder, or you can specifiy a folder and all its sub-folders (in case you want to convert an entire library or set of images at once).  Then specify the output folder and naming convention you want to use.  Once that’s been decided, it’s time to select your preferences for how you convert your images.

dng2

Click on the “Preferences button” to specify how you want to conversion to occur:  Do you want full size conversions or do you want to reduce the image resolution sizes for smaller storage requirements?  (I always choose full size for maximum flexibility.)  What about compression?  Adding compression can further reduce the footprint that each DNG file has on your hard drive.  (It’s a judgement call, but I choose not to compress, again to maximize flexibility down the road.)  What about conversion methods?  You can convert to a linear format, but I don’t like this option because it’s a one-way street (you can’t go back).  Last but not least, what about inclusion of the original raw file?  In most cases I would actually recommend that.  It may increase file size, but this way you have access to the original raw date if your software needs ever change and you have access to software that can better handle the raw data you currently may not be able to manage.  All these are things to consider.  Hopefully, this short explanation of your options and the pros/cons will help in deciding how to proceed.

From here it’s pretty straightforward – you’ve specified everything from your input folder to your output folder, naming conventions, and conversion preferences, so now, simply click the button on the lower right to start the conversion process.  You will get a dialog window showing you the progress:
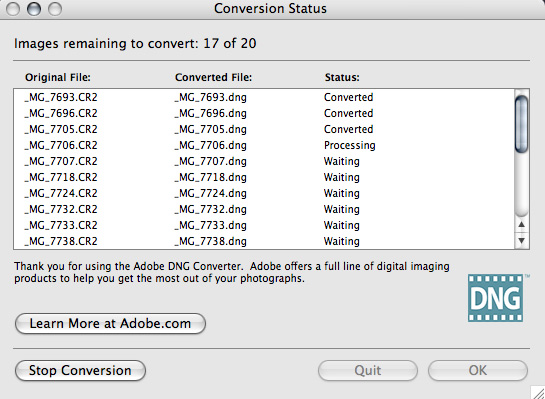
dng3

If you like, you can always click the button in the lower left to stop or abort the conversion process in case you specify the wrong folder or for some other reason.  Once the process is complete, the window will show all converted images.  Simply click “OK” to close the DNG converter utility from that window, as shown below:

dng4

Finally, open the destination folder, and voila!  Your image files will now have thumbnail previews again:

dng5

There you have it, your files are now prepped for one of the easiest, simplest, and most cost effective ways (did I mention this is free?) for both management, archiving, and accessibility – 3 very important things to consider in your image management workflow.

Granted, as with anything else, the Adobe DNG converter utility is not for everyone, as we all have work flows that call for different approaches.  So, what approaches do you use?  Feel free to share your own thoughts, processes, and suc in the comments or via email.  Happy shooting and we’ll see you back here tomorrow!

Experimenting with Photomatix and HDR

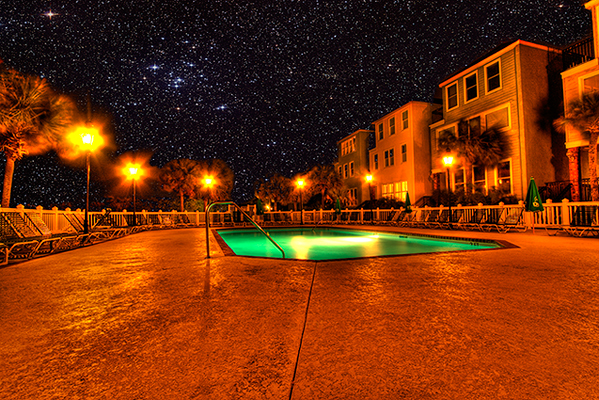
For a while now I’ve been meaning to devote some time to experimenting with HDR – specifically comparing Photomatix and Photoshop in their production of HDR photographs.  The industry preference toward the former is there for a very good reason.  Photomatix produces much better results.  Just look at this final shot (be sure to click the image for a larger view – the blog restrictions on size really don’t do it justice):

final_hdr_blog

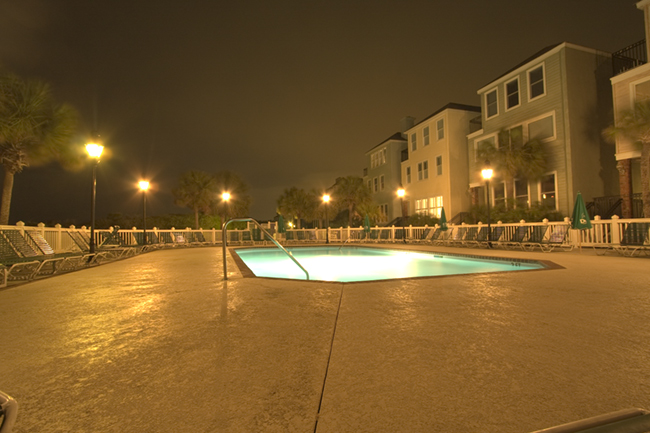
Now, in the interests of full disclosure, I did do some additional post processing work even after the HDR processing to get the above results.  But Photomatix was superior for a number of reasons.    For starters – Photomatix gives you options in what type of output you want.  Here are the two results, side-by-side, that I got from Photomatix:

sidebyside

The first was the result of  processing from the Tone Compressor tab and the latter of Details Enhancer tab processing.  As you can see, the first produced a smoother sky, but left the foreground a little flat, while the latter had more texture and, well… dynamic range to it.  So, I decided to go with the latter in my post processing.  The Photoshop alternative, however, produced something even less desirable than either of the above.  Take a look:

ps_hdr

Not only are the luminosity levels less interesting, but there’s literally no tone curve application.  No color, no tone curve mapping, and decidedly no interest when you consider the options from Photomatix.  I am in the process of putting together a tutorial of how I got the final result, so be on the lookout for that in the next few days.  In the meantime though, I’d like to take a moment to say “Thanks” to fellow NAPP member,  Elizabeth Gast (a.k.a. Firgs,) for the kind thoughts she has over on her blog – Design by Firgs – where she talks up a shot I took a while ago that is premiering on hew new series “Accidentally Awesome” today, so be sure to stop over there and give her a shout-out!  Until tomorrow – Happy Shooting!

Black and White Conversion Options

About a year ago, I put together a list of my top five favorite ways to convert images to black and white.  As technology has advanced though, more options have become available, and I have learned a lot more.  So, in the spirit of keeping the blog topics up-to-date and current, I would like to re-visit this here today.  (This is also coming on the heels of the Black-and-White issue I finally finished of Rangefinder Magazine!)

  1. Camera Raw Conversion – If you aren’t working in camera raw, here is a big reason to think about it – converting images to black and white in camera raw allows you to make a conversion while retaining access and malleability to all image data. The camera raw dialogs that you should use to make conversions here include the saturation slider, then exposure and shadow sliders, followed by the Brightness slider. Don’t forget to play with the contrast slider a little to enhance the effect as desired. Last but not least, for advanced adjustments, the calibration tab can have effects similar to the Channel Mixer.
  2. Black and White Conversion – With Photoshop CS3 and now in CS4, the good folks over at Adobe have added a Black and White conversion  option in the image adjustments menu.  This is pure gold because you can duplicate the image before making adjustments and apply the effect to it’s own layer.  You can also add back in tonal values for specific b/w effects that previously were pretty much out of reach without many many edits, layer adjustments, masks and much much more.
  3. Channel Mixer – with your image open in Photoshop (7.0 or higher), you can select a specific color set you want to remove from or add emphasis to in an image. The traditional color sets or red, green and blue are available, as well as a constant (think brightness), and a check box for monochrome.
  4. Hue/Saturation Adjustment – whether as a dedicated layer, or directly to an image, the Hue/Saturation allows you to account for different intensity levels of a wide range of colors, from Red, Yellow, Green, Cyan, Blue, and Magenta. You can also adjust the range of color within one of the default ranges for each set by adjusting the left and right limiters of the color wheel at the bottom of the dialog window.
  5. Grayscale Conversions – most black-and-white images aren’t true black and whites, because a little color from a specific range is added back in for emphasis. To make an image truly a b/w, it would only have a range of black and white. This can be done using the grayscale option in Photoshop. Often, this is used as the last step in a digital approach to black and white photography so that saturation and brightness level loss is minimized.

So, what have I added and what have I removed?  The Black and White conversion method is the latest addition, and I jettisoned in-camera conversions.  While pretty much all cameras have the in-camera option to take images in black-and-white, as I have crawled my way up the learning curve, I am cognizant of the fact that if you lose image data in-camera, there is no getting it back afterward.

Well, that’s it – the new and improved post on Black and White conversion options!  If you’d like to read the original post, that can be pulled up from the archives here.  In the meantime, feel free to share your favorite techniques for black and white conversions here in the comments or via email.  As always, Happy Shooting and we’ll see you back here again tomorrow!

Too much time in Photoshop?

(Courtesy of the NAPP forums) You know you are spending too much time in Photoshop when:

  1. You go into a sandwich shop and order a Gallery Wrap
  2. You wonder whether “Reduce Noise” will work on the kids
  3. You look for the healing brush to fix your drywall
  4. Your idea of hitting the snooze button involves cloning the digits because it’s quicker
  5. When accused of gaining weight, you say it’s layers you choose not to discard
  6. When “Vanishing Point” becomes something you hope can be applied to your in-laws
  7. When “Sharpen More” is something you wish you could beat your students with
  8. You hear about a stimulus plan on the news and wish it had a “Auto-Enhance” or “More Accurate” option attached to it
  9. Your write-in candidate for the last presidential election was “A Configurator Panel”
  10. You try to move something by just putting your hand in front of it and dragging…

I know this is just a tip of the iceberg – let your creativity and originality shine through in the comments!  Until tomorrow – Happy Shooting!

HDR, Web links, and a podcast!

fissure2

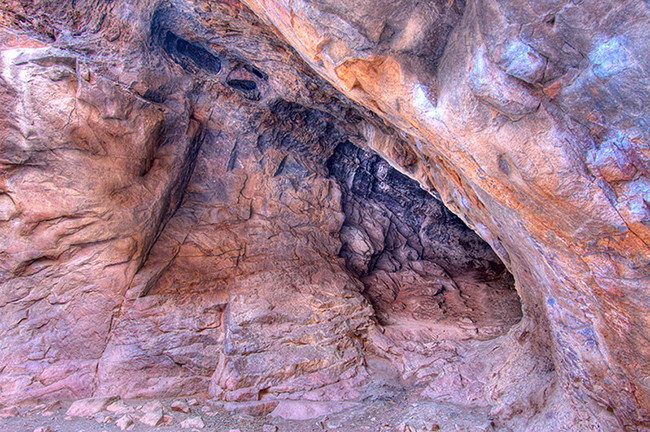
So, this last weekend I went on the photo meetup group outing for the month of February into Eldorado State Park, south of Boulder, and had many an opportunity to capture some landscape and macro work. Some great views were had and I only hope that they all come out as well as this one did. While hiking up a trail of slippery snow and ice (it was cold out Saturday morning), I saw this fissure that was pretty intense looking because it was only partially lit. I thought about it for a second and decided to bracket some exposures to see if it would turn out with some HDR massaging. Not only did it turn out better than I would have thought, I was also very pleased with how Photomatix did with this. I would highly recommend this software to anyone interested in HDR work. Not only is it more intuitive than Photoshop, the results were much more gratifying! You can buy Photomatix for PS, Lightroom and for either Windows or a Mac over at www.HDRsoft.com.

Some other web links I learned about recently also include www.fotoblur.com and www.usefilm.com Both are much more cognizant and respective of photography copyright than other social and photo networking sites like Flickr and Facebook (we all know about the Facebook Terms of Service fiasco, right?). One thing I like about both Fotoblur and Flickr is that you are limited in how many images you can upload daily. This requires you to be more careful about what you publish, and as a result, you are more thoughtful and objective of what work is worth posting and sharing online.

Last but not least, the podcast that I had intended to put out last week was delayed for a few days as I put the finishing touches up on a home improvement project. (We finished out one of the basement rooms – expect to see some photos on that makeover forthcoming!) The good news is that not only is the basement room on the verge of completion, but that the podcast is up for this week. Naturally, the title of the podcast will match the blog post title, as the show notes follow closely to todays content. Stop on over to Personal Life Media for the show, or pick it up in iTunes! (Don’t forget to leave your thoughts in the review section of iTunes too…the more the merrier!)

Until tomorrow, when I’ll have some more HDR shots to share, keep on shooting – hope all your shots are good ones!

License Lockout

First off, a bit of quick news about the blog in general:  the layout has changed.  Can anyone tell the difference?  It’s a rather significant one, so hopefully it won’t go unnoticed! 🙂  Chime in and that’s your chance at winning the Think Tank Photo Streetwalker bag I reviewed a few weeks ago right here on the blog!

So, back on today’s post topic, as part of my maintenance routine that I recently posted, last evening I was doing some of my extended “IT” maintenance on my Windows computer.  As a part of that maintenance, I was trying to optimize my hard drive performance, and thus resorted to cleaning out temp files, cache files, history files, restore points, and other sundry stuff.  A defrag procedure on the hard drive, and I was back up to some pretty screaming speeds again.  Puffing out the chest at getting a 5 year old Dell running a 2.4 Ghz Celeron processor, Windows XP, and 2 GB of RAM to move that fast without over-clocking, I checked off on what I thought was a job well done.

Then I opened Photoshop:

CS3 Error

Uh oh – it seems I cleaned things out a little too much.  Well, since I have diligently kept all my media, documentation, license#’s and other information in multiple places, I was easily able to find the needed materials to re-install.  But, here’s the thing – that would require importing all my actions again, re-installing other elements like Noise Ninja, and then also go in and customize all the features I like (scrolling with my mouse to zoom in and out of the image, curves menu with more lines, etc.)  Who wants to do all that?  Well, not me!  So, off to Google I went.

That five minutes on Google doing some research saved me probably two hours of software maintenance time.  Adobe has a neat little utility that can be downloaded and run when things like this happen to restore your licensing info without having to go through the entire re-installation.  Not sure what it does or how it does it, but the utility is very handy, so I thought to share it with the reading audience today.  Here’s the download link, and supporting reading materials.

Licensing Service Update

The underlying point here though, is that even the extensive maintenance I itemized the other day does not cover everything.  Go into Photoshop, copy your preferences down via image pastes into a Word doc or other such format.  Make a copy of your plugins folder external to PS – the same goes for Actions, noise removal, automation tasks, brushes, etc., etc., etc.!  With as advanced and complex has an application like Photoshop has become – you can save a ton of time if you take some proactive measures.

What do you save from your Photoshop configuration settings?  Share your ideas in the comments!  As always, thanks for tuning in, keep on shooting, and we’ll see you back here tomorrow – Thursday Thoughts returns again with Chris Breedlove!

The Weekender – Web stuff and some thoughts on CS4

The last few days have been insanely busy with work and home obligations, so out of necessity I have not had time to devote to content for the blog.  My apologies for abandoning the readership temporarily, and without warning.  I’ll endeavor to give advance notice before that happens again.  So, with that out of the way, I thought today it might be useful to get a wrap-up of what I have been seeing and reading around the forums, blogs, and internet that’s photography-related.

  • Jeff Revell, who has become quite well-known for his photowalking blog made a few interesting posts recently.  In one of them, he did a reminder on updating your firmware.  Great idea Jeff – if you’re interested, I actually put together a post with all the Canon firmware updates as of a few weeks ago.  The other one was ab out the Epson Print Academy season for 2009 has been published.  I had been meaning to go to one of these for a while, and for a mere $150 think it is definitely worth the cost.  They’re coming to Denver and it’s a mere block or two from where I work so I will most assuredly be in attendance this go around.
  • Scott Kelby, master instructor of Photoshop, Lightroom and author of more books than I can count, is also bringing his tour through Denver some time in December.  Check out the schedule here if you want to see him live and in action at what he does best!
  • David Ziser has offered up a Digital Wakeup Call DVD worht $75 to some lucky participant if he gets 20 ideas on how to incorporate video into your selling packages for photography businesses.  Not a bad deal for 5 minutes of your time!
  • Don’t forget, I’ve expanded the poll here at CanonBlogger to go longer than the 1 week, so the numbers are a more accurate representation.  What features do you like about the curreng generation of camera bodies on the market?  What motivates you to buy?  Share your thoughts on the poll to the right.

Last, but not least, the hubub on most forums lately has been surrounding the release of CS4 and LR2’s latest updates.  The reason for all the hoopla comes every time there is a new release to the software, and it’s a cycle that likely will not end.  Rather than just pile on and vent, I thought for the second half of this double-feature wrap-up, I’d share some thoughts on why people are frustrated rather than just saying “people are frustrated”.  So, here’s a different perspective.

Software is not a tangible asset

Software is not like a camera body, or a car, or a television, it’s something that lives on your computer.  Thus, the value of it is not as easy to see.  We are very much a society that thrives on all our toys, and software just isn’t the same as having the latest body, or flash or television or car.  It’s not something we can touch and feel and show off to our friends.  It’s only on our computer.

Necessity

With software, we are sometimes obligated to upgrade.  I personally had to upgrade because CS2 did not offer a raw converter for the Canon 40D.  Sure, there’s the Adobe DNG converter for free, and I actually have incorporated that into my work flow for the Mac where I don’t have CS3, but that does present another step in the process of a work flow that I was previously happy to not have to deal with.  Anyway, the point here is that if you don’t upgrade your software, you will find yourself unable to maintain a stable and consistent work flow (since you re upgrading other gear all the time too).

Competitive Pricing

With other technologies, competition keeps prices under control.  Camera vendors like Canon, Nikon, Sony, and the rest all have to compete with one another for your business.  Adobe really has no competition in the market place.  Okay, sure, there’s Corel, and the GIMP, but come on, who are we kidding?  Adobe is the market when it comes to photo editing software.  All the others are simply “alternative programs”.  Without a competitor, Adobe can price things however they want, knowing that those of us who have already invested are pretty much committed to maintaining our work flow by keeping the software interface as consistent as we can.  To their credit, upgrades are cheaper than the full blown versions of the software, and there are often promotions and suc (educational pricing is the best way to go imho – take a community college class once every two years and you will save anywhere fro $300 to $700 on pricing for the CS products).

Release Schedule

Do we really need to upgrade our software and work flow every 18 months?  With cameras, (which are released on the same schedules for most SLRs), most people I know wait at least 2 generations before upgrading.  Another analogy that has been made here is to cars – anyone upgrade their car every two years?  What about televisions?  Do we really upgrade our televisions every 18 months?  Unlikely…and even if we do, is the old television still usable?  Often times, the older version is relegated to the basement or a childs bedroom, or even sold second hand.  Who buys outdated software?  No one that I know of…

So, there’s the second half of the weekend post.  What do you think?  Am I off base?  Is the software market competitive?  Do you think the pricing is fair and equitable?  What about the upgrade schedule?  Does 18 months sound about right?  Sound off in the comments!

Again, sorry for the lack of material over the last two days.  Hopefully this will make up for the lack of content on Thursday and Friday.  Now, since you’ve finished this, take that last sip of coffee, pack up your gear and go have fun shooting!  (In other words, Happy Shooting!)  We’ll see you back here again on Monday.

A few of the Creative Suite 4 Features!

Before the release of CS4 in Adobe’s announcement this morning, I happened to see a post in the NAPP member forums of someone thanking the Photoshop Guys for their top ten of the new features for the latest edition of Photoshop Creative Suite 4!

So, for those who want the early bird news, here’s a hint of what Adobe will be talking about later this morning:

  1. Better scrolling with less jaggies as you zoom in and out of images.
  2. The Adjusment Panel – Adobe has added a dedicated panel for your layers adjustments
  3. On-screen image adjustments – you can now control hue/saturation, Curves and Black and White adjustments directly on your image
  4. Camera Raw saw some significant upgrades because now you can apparently do post-crop vignettes, apply gradient filters, and yes, that’s right, also the very-Lightroom like adjustment brush!
  5. Addition of the vibrance slider to CS4 – this previously was in LR and camera raw, but not as a layer adjustment in CS3 – they’ve ported that element over to the inside of CS4! Yay!
  6. Tools improvements for the eyedropper, dodging, burning, the brush engine is more responsive, and the clone and heal now allow for vanishing points
  7. Customizable GUI – that’s right, you can now customize your own panels in CS4! The Configurator 1.0 feature (flash-based) allows you to create and use your own customized panels! Truly amazing.

Kudos to the NAPP staff for taking the time to put all this together – 17 video tutorials in all – (and this is just proof positive that membership has its privileges…because by learning from those on the cutting edge means you are getting cutting edge technology too! I am not sure if it’s publicly viewable, or if it’s a members-only thing, so will refrain from providing the links to the CS4 features they talk about, but I must admit, this does have me more buzzed about the announcement than I was before. Make sure you stop in to Adobe to watch it as I am sure there will be much excitement across the blogosphere about this!

Anyway, back to the regular blogging – I’ve got some announcements of my own to share, but they kinda pale in comparison…

Friday Follies

Another week in the record books, and the poll has changed out.  Since the week pretty much consisted of discussions about noise in your photos, let’s see what people are using in the way of 3rd party plugins.  So, take a moment to participate in the poll on the right.  Thanks for all the participation last week – 29 people voted!  Let’s see if we can crack the barrier of 30 this week!

Today I thought it might be fun to share a few links to fun Photoshop resources – reasons to laugh and just take a break from it all.  Here’s 3 of my favorites:

Photoshop Disasters

You Suck at Photoshop

What The Duck

Fair warning, the second one could be considered “not safe for work”.   Do you have any fun Photoshop resources or web sites that you visit just for laughs?  Share them in the comments.  Have a good weekend all, and, as always, happy shooting!

Monday Musings – Reducing Noise in your photos

Before I even start on anything photographic today, this is a great day to be alive.  Not only is it the first installment of MNF (Monday Night Football), but it is my own beloved Denver Broncos!  Having been a fan since the age of 8, and cried through the first 4 Super Bowls in sadness, and then in exhilaration for the next 2 in happiness, let’s just say GAME ON as the season gets underway with us revving up against the Raiders (yes, I’m a Raider hater like nobody’s business!) tonight at 8pm!

Okay, now having set the stage for tonight, let’s shift back to the photography theme of the day – reducing noise in your images.  Let’s start with a little background:

From even the early days of film, photography as a medium has always had noise as a factor.  Before digital came of age, this was actually referred to as grain rather than noise, and the speed of the film was directly proportional to the amount of noise that you would get.  Higher ASA values meant you could capture images in lower light, but at the expense of grain.

As most major forms of photographic expression have moved to digital, we now are looking at this issue using more current semantics, that being noise rather than grain.  Digital noise is introduced as we increase the ISO levels within our digital cameras.  This has been a major advantage to digital photography, because you can change the noise/grain tolerance from one frame to the next, whereas with film, you had to choose your tolerance level when you put the film in.  If you put in too high a film speed, and you wound up with a lot of noise in images that otherwise did not need it.  Alternatively, if you put in too low a speed film, none of your pictures would turn out.

Some of us try to introduce grain/noise for artistic effect, while others try to minimize it to achieve clean smooth color transitions without any granularity.   Each of these could merit its own discussion, so today I am going to look at 3 of the ways that you can reduce noise in your photography:

  1. During capture – if you want to minimize noise, one of the best ways to do that is to ensure you are shootig with the lowest noise tolerance in your camera.  This means ensuring that your ISO is set to its lowest possible levels.  Most point-and-shoot cameras allow for this type of adjustment these days, as do practically all SLR cameras.  As a general rule of thumb, the better the camera, the lower the ISO.  Most consumer grade SLR’s will allow you to adjust ISO settings down to 100.  As you price into higher quality SLR’s, some can drop this value further to 50 or even 25.  At that level, expect to pay about $2000 or more for the SLR body that can accommodate this.
  2. In your photo editor – There are many options here for reducing noise if your in camera settings did not minimize noise enough for your tastes.  Everything from Photoshop Elements, to Lightroom, iPhoto, Corel, and of course Photoshop CS3 have internal controls that allow you to make adjustments to compensate for noise in images.   Some methods perform noise reduction better than others and even some programs excel at this better than others, but by and large, variances in the quality of noise reduction will be a function of the cost of the software itself – iPhoto is free, so the noise adjustments will not offer much in the way of malleable controls.  Elements, at about $75 is a little better at handling noise, while Lightroom and Photoshop round out the higher end of photo software programs both in their price and in their handling of noise.
  3. Specific Noise Reduction programs – Because there is such an interest in managing noise, a growing body of software caters specifically to this function, and this function only.  Software developers have seen a need for this and specially designed programs are now made to handle just the management of noise in images.  Most offer as a part of their programs, a way to incorporate their algorithms into larger photo editing software by means of plugins.  Some of the most common and well-known noise editing programs include Noise Ninja, Noiseware, NeatImage, and Dfine.

As you can see, there are many ways to manage noise, including in camera options, within your photo editor, and with free standing noise reduction software.  I have found that the best results lie in a combination of all of the above.  I try to remember to make necessary adjustments in camera for the type of images I am capturing.  From there, as I move into my photo editor, if noise is present but not excessive, I will use the built-in noise reduction measures.  For images where the noise levels are high, I use Noise Ninja and have been happy with the results.

But, just like haircuts, there are more opinions out there on what constitutes effective management of noise in photos.  So, let’s hear it!  What methods do you use to manage noise in your photos?  Feedback, thoughts, and discussions are always welcome in the Comments section.   Well, I guess that means tomorrow I will probably have to do a tutorial on noise management in images.  So, until then, happy shooting and watch those apertures!