The 2010 Winter Solstice Eclipse

As you may recall from yesterday’s post, I did not get the entire solstice eclipse from beginning to end due to cloud cover.  But, from the halfway point forward, the clouds cleared and I was able to get some adequate coverage.  After wrestling both mentally and processor-ily with the amount of images (98) and trying to figure out a good way to present the series, I decided on the spiral approach…

2010 Winter Solar Eclipse

What kinds of shots did you get?  How are you presenting them?  I debated on a video showing the movement across the sky, but that was very labor intensive, so decided on the above.  Thoughts, comments, feedback?  Share your shots too!

About Last Night…

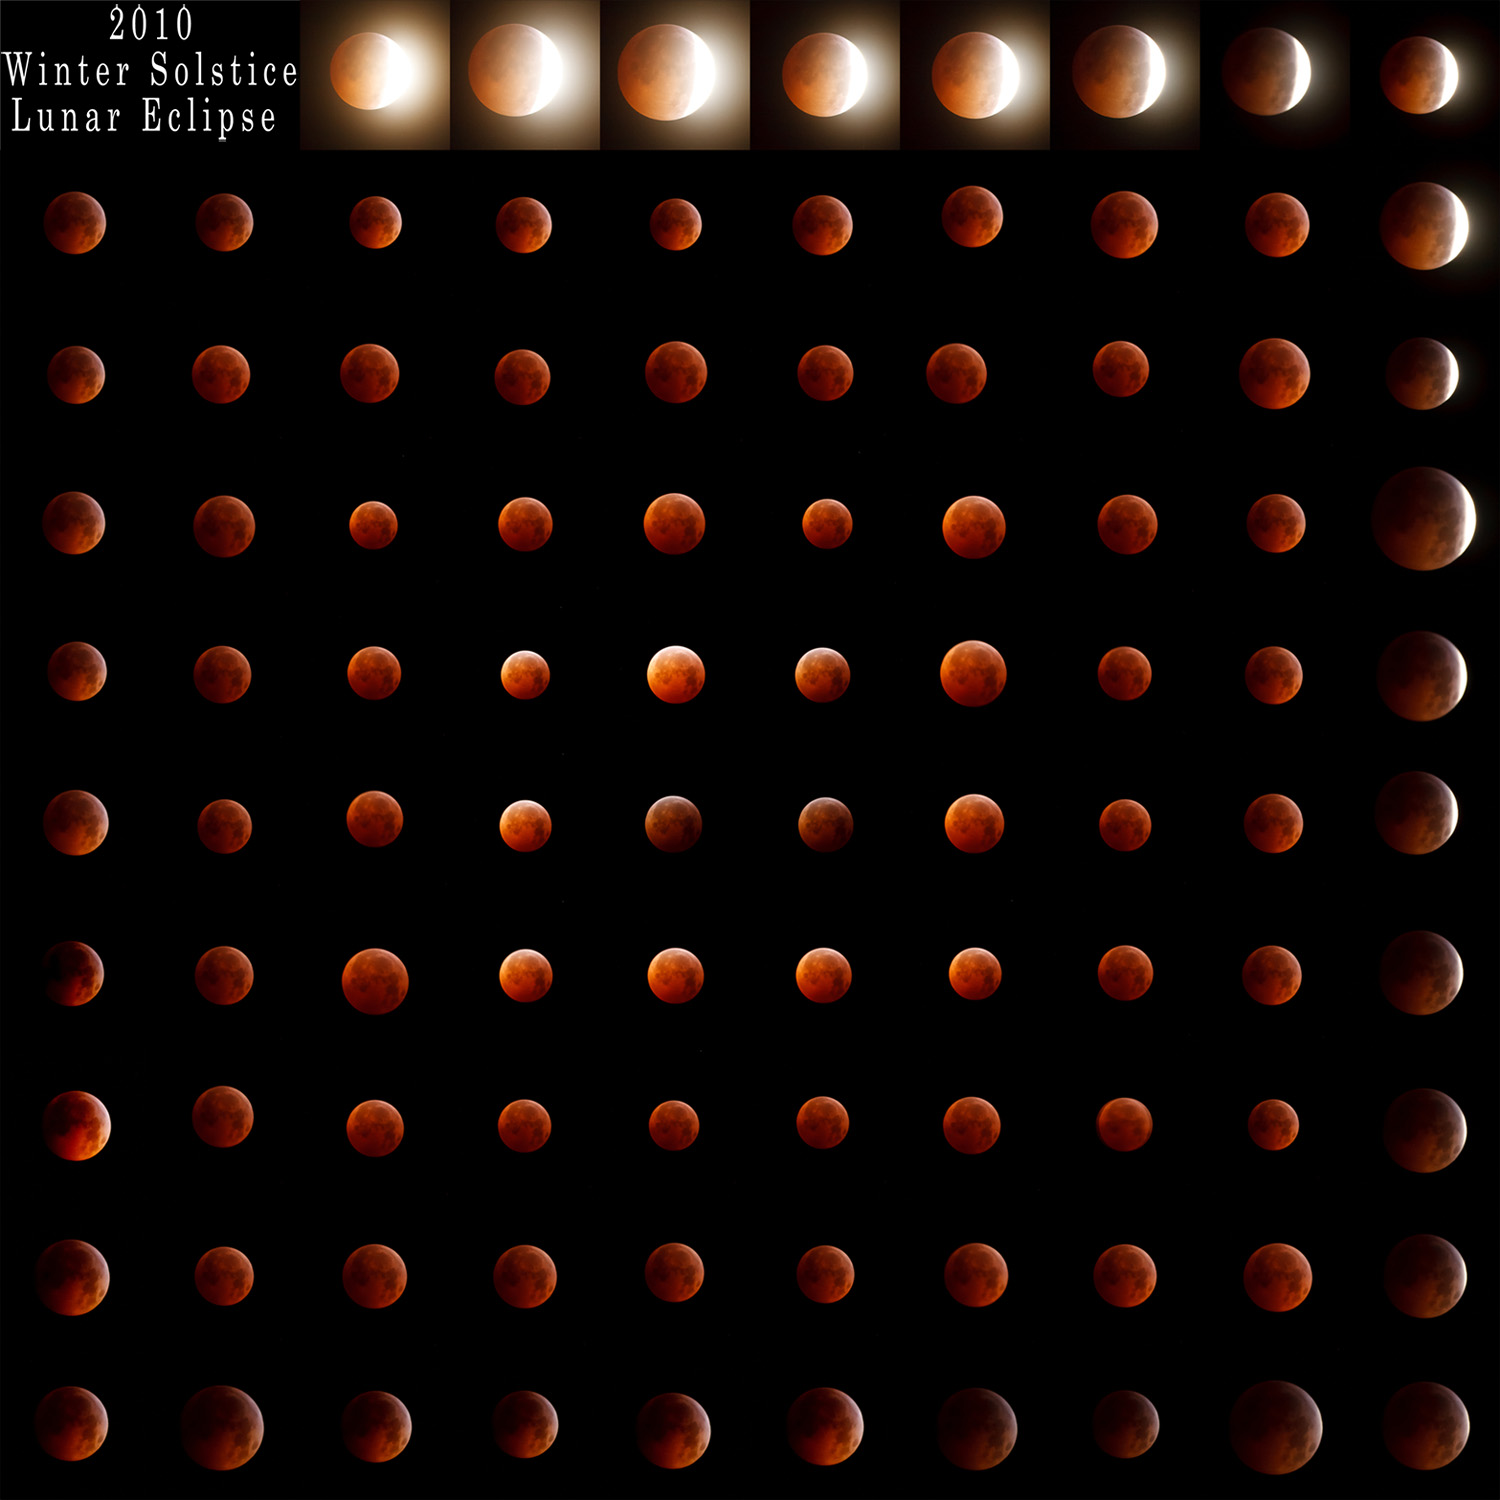
The first lunar eclipse to occur on the winter solstice occurred.  It’s the first time it’s happened in 600 years…and apparently won’t happen again for another 400 years.  I had two strokes of luck with this amazing astronomical event:

#1 – the path of the moon tracked almost directly over my house!  Literally!  I took maybe ten steps out my front door, and there it was, beautifully tracking across the sky.

#2 – Let me re-phrase that…beautifully tracking across the cloudy sky. 

At first it was just a few wisps…I started to capture a few shots at 10.  You know, to sort of document the before, during, and after.  But, by 10:30 the wisps were sticky patches of cloud cover.  By 11, even my naked eye could not discern any detail anymore.  It was very disappointing…

So, I put the camera away, began this post and went back out to glance at the sky for a bit before bed.  And as the first yawn escaped my tired body, sure enough, the clouds began to peel away.  At the halfway point, I finally grumbingly ran inside, bundled up, and grabbed the camera/tripod set which were already in place.  I’ve not done much post production on these, but here’s a select few:

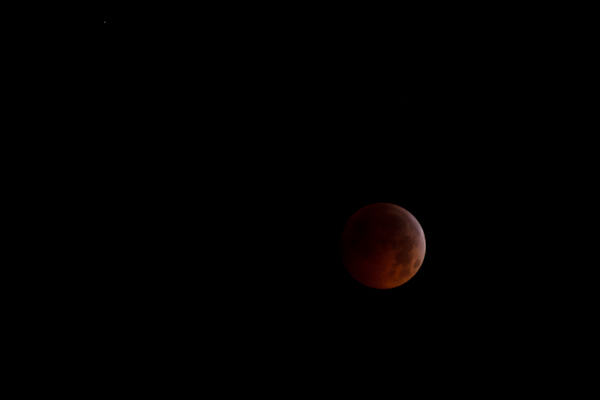
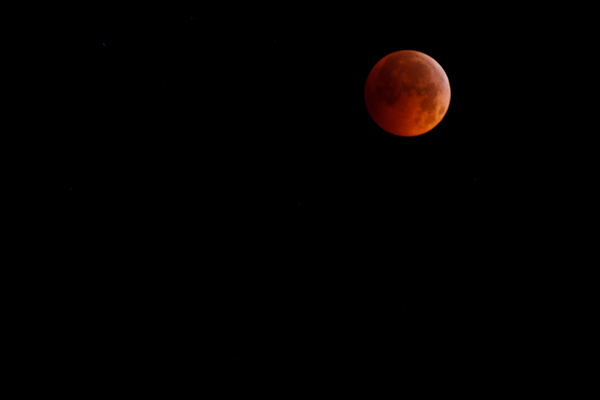
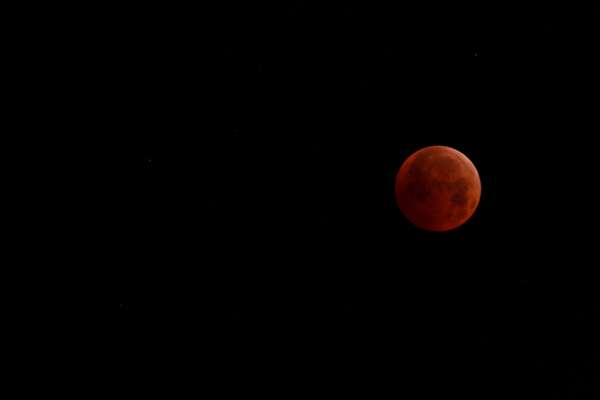
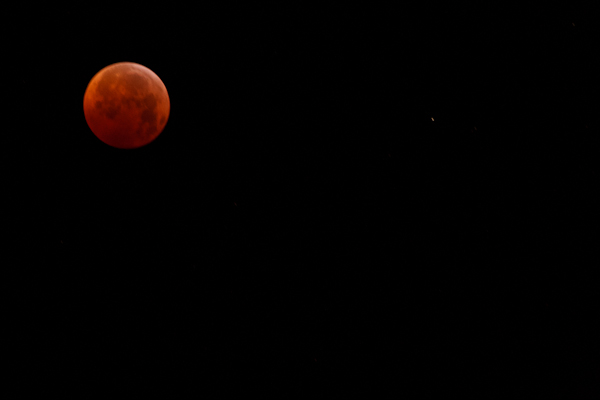
I am sure others will get wonderful views, and the folks at NASA, Roswell, SETI, and all the others will document it quite nicely for the rest of us. But…it’s just not the same as viewing it in real time.  When all was said and done, I was glad I stayed up to watch it.  Not only did I end up getting some nice shots, but I got to see almost the whole thing before heading off to bed.

What about others?  Did anyone else stay up to watch it?  I’ll bet some pretty cool time lapse productions come out of this!  Share your own thoughts and perspectives in the comments.  Would love to hear from you!  Happy shooting, and I’ll likely have a full set posted tomorrow.

Did You Know…

Over the weekend I was down in Tucson, spending some time with the in-laws, and during the getaway, had a chance to catch up on some overdue reading in my monthly magazine stack (it has been growing steadily lately as other stuff has gotten in the way. I emerged from my readings with several “Eureka!’s” and “What a great idea!” so, figured to pass on the new-found or re-kindled knowledge here on the blog. (In the spirit of giving and all that…) So, without further ado, here’s a new feature on the blog:

Did You Know…?

1.  Fog is about 1 stop brighter than what cameras detect as 18% gray?  To compensate for shots taken in foggy conditions, adjust your exposure settings up by about 1/2 – 1 1/2 stops to compensate, otherwise you’ll get underexposed shots.

2.  Cameras are designed for right-handed people…the ergonomics are made to grip and adjust controls with your right hand.  Left-handed shooters have it twice as hard as the rest of us so double kudos to you!

3.  Pentax was actually the first camera vendor slated to release a full-frame DSLR camera, not Canon or Nikon!

4.  As you move light away from your subject, the output drops off by a factor of almost 2 to 1?  (It’s actually technically “double the distance, 3/4ths the output…)  Which means if you move your subject away, you need twice as much light at double the distance to equal the same output…

5.   To shoot a picture of the moon, use the Moony 11 Rule, just like the Sunny 16, but use f/11 and match the ISO to shutter speed

And since I was in Tucson this past weekend, here’s a couple holiday photos to tickle your funny bone…Christmas Tucson-Style:

Santa Turtle
Santa Turtle
Cactus Cap
Cactus Cap

Got your own DYK tips or photo nuggets?  Share ’em here on the blog.  I’ll likely start doing this as a monthly feature and would love to hear the ideas, tips and tricks that others have to share as well.  In the meantime, keep on shooting, and we’ll see you back here again tomorrow!

6 Tips for Shooting Christmas Lights

It’s that time of year again, and many have already covered the tips and tricks that surround shooting Christmas Lights.  Here’s just a few tips and sample photos to help you along the way, and give you some ideas for your own creative vision and inspiriation:

  1. Keep your shutter speed around 3-7 seconds.  Much longer than 7 seconds and the lights will start getting blown out, losing detail.  Much shorter than 3 seconds and your lights won’t have enough detail.
  2. Shoot at twilight (or early morning if the lights are still on).  This avoids the problem of needing longer exposures in darker night shots, which can cause #1.  Also, the dark blues in twilight can add some real nice depth and appeal that would otherwise be lacking in darker sky photos.  If you time it right and get clear enough skies, you can also get stars in your images!
  3. It should go without saying, but use a tripod – these long exposures are impossible without it.  To this end though, if you don’t have your tripod wrapped in foam, now is the time to do it.  Colder temps can make it downright painful to touch.
  4. Don’t try to capture too much – you have a limited window of twilight, so once that’s gone, just enjoy the rest of the evening – most of your shots after twilight won’t be “keepers”
  5. Try shooting low to get a different angle, or from above looking down – to get a better “aerial” approach.
  6. For the starburst effect without the star filter, drop your aperture down to f16 or smaller – lights will start to exhibit the starburst effect at these smaller apertures.

There’s my 5 tips – but there’s always more where that came from.  What about the rest of the audience?  What tips, tricks, and advice do you have for shooting the holiday lights?  Share ’em in the comments!  Here’s my sample (there’s more also up on my Flickr photo stream).  Happy shooting and we’ll see you back here again tomorrow!

Christmas Lights at Chatfield 1
Christmas Lights at Chatfield 2
Christmas Lights at Chatfield 3
Christmas Lights at Chatfield 4
Christmas Lights at Chatfield 5
Christmas Lights at Chatfield 6

Editor Note:  These were taken at Chatfield, part of the Denver Botanical Gardens, which are decorated every year.  A nice change of pace from shooting the downtown Denver area, and tickets go for $9.50 (adults) and $6.50 (kids).  With lots of lights and diversions for kids including hot chocolate, hay rides and more, it’s definitely worth the price of admission.  Maps, schedules, and additional information are available here.

Cameras for Christmas? Not so fast!

It’s no secret that prices for things tend to adjust based on the season.  For instance, gas grills are cheaper in the winter, as are fans, air conditioners, and pool chlorine.  Conversely, sweaters, warm clothing, and snow shovels can be had for bargain basement prices in the summer.  But where do digital cameras and other technology items fit into the picture? My line of thinking is that such items are less susceptible to seasonal trends.  But, apparently, there are trends that can be deciphered for pretty much anything – camera gear included.

The most recent issue of Consumer Reports suggests that pricing trends for digital cameras tends to be the best during March and April, then again in September and October.  This kind of makes sense after I thought about it because that’s typically when the vendor rebate programs are rolled out, and you can apply discounts to existing models that are probably already marked down as new products are pending release.  Vendors have to clear out old inventory sooner or later, and the rebate programs are a way to do that.

So, does that mean the Powershot G11 you just got for your spouse, sibling or parent was a bad buy?  Not necessarily…but if you are looking to add gear to your own inventory, you may want to consider holding off until the months Consumer Reports suggests to see the biggest savings.  Want to see what the seasonal trends are for other items?  I’d highly recommend getting your own subscription to CR, but for those interested in seeing what they suggest for 2010, here’s a summary from my own issue:

Consumer Reports Product Trends

To sharpen or not to sharpen

I was having a conversation recently with a fellow photographer and the discussion turned to taking the sharpest possible photos with your camera, and what was needed for it.  Inevitably, post production came into play, and being very much a purist, he claimed that he does no sharpening in post production.   It struck me that this sounded odd to run no sharpening algorithms in a digital world, as my understanding was quite different.  I tried to make the case orally, but was hard-pressed to really make a convincing argument for it without supporting documentation.  Given my penchant for writing, the resolution was my advice to “read the blog in a few days…there will be a post on sharpening”!  So, for Paul (and for others who may be interested, here’s my take on whether or not to sharpen your images, and when!

The way I understand the digital photography landscape (no pun intended), is that there are three phases in which you can (and should) sharpen your images:

  1. Capture Sharpening – This type of sharpening is done on initial import from your camera to your image editor.  Whether that is through ACR in Photoshop, in Lightroom (which has ACR built in), or any other application.  This initial one is of utmost importance because of the inherent softening of images during the demosaic process when interpreting raw sensor data.  As I understand it, the settings used here are relative to the camera you are using, but not so much the specific image.
  2. ACR Sharpening
    ACR Sharpening
  3. Creative Sharpening – After import, this would be the time when selective and subjective interpretations are done on images.  Whether you choose to apply USM (unsharp mask) in Photoshop, a High Pass overlay layer, or some other means, these types of effects are always done to taste, and very much open to interpretation.
  4. Creative Sharpening using High Pass Filter
    Creative Sharpening using High Pass Filter
  5. Output Sharpening – Last, but not least, output sharpening is when you apply sharpening effects specific to your output device.  These settings are dependent on the output device, such as a printer, the web (screen), as well as the size and resolution of the output image (smaller size requires less sharpening than larger files).  Even within output sharpening there are settings specific to the printer you are using, and to the paper you are using,

Again though, these are just my impressions on whether sharpening is needed in a digital age or not. I know someone is going to ask, so should probably state here that an entirely different set of criteria should be used when talking about film sharpening techniques…but I digress! 🙂  Back on topic, there’s actually a couple really good resources (from my biased perspective of course) that discuss sharpening in much greater detail than I did here.  First off, a book called “Real World Sharpening” by Bruce Fraser and Jeff Shewe is one I would highly recommend.  For those with an online reading preference, here’s another good article on the subject, also by Bruce Fraser.

Am I off base?  What are your thoughts on sharpening?  Is it needed in a digital world?  When and how do you sharpen your images (if at all)?  Sound off in the newest poll (also in the sidebar):

[poll id=”14” ]