And the winner is…

Ladies and Gentlemen,

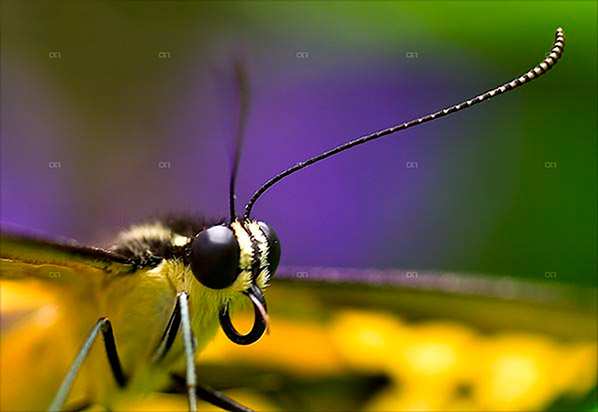
Here today, I am happy to announce that the winner for the OnOne Software Plugin Suite Giveaway has been decided.  So, without further ado, please give it up for Pete Petersheim!  Pete submitted the following image to the LDP contest thread, which got the ultimate nod:

Pete Petersheim's Winning Image

Click the picture to go to his Flickr thread, wish him congratulations on a job well done.  Note there are two images in his Flickr thread, a cropped version (which was entered) and the full-size one.  I think that regardless of which he had entered, it would have won the day.  The colors, composition and impressive post-processing, as well as his unique flair for something unique is just superb.  Congrats Pete!  Send me a Flickr mail message, DM me on Twitter, or email me here and I’ll get you the contact info for the folks at OnOne to get the software prize out to you in short order!

To all the entrants – thanks so much for participating – we all learn so much from one another it really is amazing to see the artistic talents that inspire in new and exciting ways!  For a full look on the entrants and the finalists, there are web galleries here:

All OnOne Entries

The Top Ten

I’d also like to take a moment and thank the folks at OnOne software for their highly generous contribution – since the winner has been announced, it’s probably appropriate to note that there is also a very generous discount being offered on the entire suite right now through Thursday, August 13th!  Save $150 off the bundle, which is an amazing savings.  So, for those who are still interested, the time is still there to save a lot of money on the package – just tell them you heard about it here at Canon Blogger/Learning Digital Photography!

With the July contest completed now, it’s probably a good time to turn our focus to the August contest – you can win a Wacom Bamboo Fun valued at $100!  I reviewed this tablet a while ago here, so if you’d like some feedback that’s a good starting point.   But, don’t forget to enter your images – you can pull from archives this go around, and submit up to three images in the Flickr Thread!  More details are also available on Flickr!

That’s it for today, so congrats to Pete!  Thanks to Wacom!  And  Happy Shooting!  (We’ll see you back here again tomorrow!)

Grab the Feed

Exposure Denver Presentation

Tomorrow I will be speaking at a local photo club’s monthly meeting – Exposure Denver.  It’s quite an honor and my first time presenting in any way so we’ll see how it goes.  I’m sure the photogs there will have tons of questions I have absolutely no clue on what the answers are, but I am going to try to talk a bit about work flow – from capture to print.

I’ll be sharing the process I use to import my photos from the camera to the computer and then my file management system, both for redundancy and output to various outlets including web galleries and to print.  Talking points will include:

* Card Readers
* File/Asset management
* Lightroom
* Web Galleries
* Blogging and sharing images online

Anyone in the area is welcome to stop by and meet the the group.  Exposure Denver can be found online at http://www.blog.exposuredenver.com

The meeting starts at 7pm at the Breckenridge Brewery located at: 471 Kalamath Street | Denver, CO 80204  Hope to see you there!

In contest news, the finalists for the OnOne Software giveaway should be announced in a few days – judging begins today.  The August contest kicks off today – with the prize at the end of the tunnel to be the Wacom Bamboo Fun (small)!  Thanks to the good folks at Wacom for donating this great tablet for a lucky reader.

As always, post your images to the Flickr thread, and make sure your image is sized between 800 and 600px on the longest side.  The theme:  FUN!

Here’s the link to the Flickr Thread:  Bamboo Fun Giveaway

That should be enough news for one day, so happy shooting all!  We’ll see you back here tomorrow!

Grab the Feed

Win, Listen, and Bang!

This week’s show is a doozy – I talk about the latest contest, (#3 for 2009), have a fun conversation with Jason Loucks, then tackle some tips on photography fireworks.  Of course the show always takes care of a couple listener questions and answers, so it’s 45 jam-packed minutes of photography fun.  Here’s the show notes:

The Third Photo Contest, sponsored by OnOne software.  Rules and entry information are posted on Tuesday’s blog, and you can enter your photos here.

Here’s the sites and twitter folk we talk about during the show:

  • www.freelanceswitch.com
  • www.smashingmagazine.com
  • www.tutsplus.com
  • www.css-tricks.com & Chris Coyer on Twitter
  • www.w3schools.com

Shooting Fireworks

  • Use a tripod
  • Make sure you have spare batteries (and fully charge all batteries)
  • Shoot with a low ISO
  • Set your shutter between 4-8 seconds for best results
  • Try adjusting the zoom in or out for attention grabbing light trails

Enjoy the show, hosted by the folks over at Personal Life Media!  Happy shooting, and be sure to share your own tips and tricks for shooting fireworks by tomorrow and I’ll try to put all of them together along with some (hopefully) inspiring photos for enjoyment.  In the spirit of the show, don’t forget the trailing question:  What was your first camera?

Creative Composition – Vignetting Photos

In general we learn that placing your subject dead center in the frame is something to avoid – creatively speaking it can kill a picture.  While this holds true as a general rule, I was walking into work yesterday morning and the sky was a brilliant blue, with the capitol bulding of Denver right dead center in front of me, and I thought that might make an interesting attempt at breaking the rules if only I had my camera….and then it dawned on me, I did have a camera.  Granted, not my trusty 40D, but the smaller Powershot As500 IS.  So, on a whim out it came and I snapped off a few frames of it.  The vertical came out the best compositionally speaking, but it still lacked something to bring it into what I would consider the “creative” realm.  After all, it is a rather mundane shot, and something you would expect the typical tourist to capture.  So, how could I create interest…and then it dawned on me:  vignette!  That would bring the eye in more, focus attention where I want it to go. So, into Lightroom I went, and sure enough it did create a little more visual interest.  I thought I’d share that view with you here today:

vignette

Granted this is still something that I would probaby personally consider a snapshot from my library of countless snapshots, but it does serve to illustrate that post processing in software can create more visual appeal and vignetting is one way to achieve those ends.  So, the next time you are about to toss a shot, ask yourself:  Could I improve this with a little vignette?  Give it a whirl – you never know whegn a little vignette might surprise you!

On that note, it’s always helpful to remember that post production work can make or break a shot.  Yes, the better your images are to start with, the less work you have to do in post, but that is not to say that post processing is a bad thing…so regardless of whether it’s a little dodging here, burning there, perhaps a litle vignette, or even applying some plugin processing from your OnOne Plugin Suite 4.5, always be willing to explore!

Oh wait – you don’t have the OnOne Plugin Suite 4.5?  Well, go figure, just the luck – today starts the July photo contest here on the blog, and entries are now being accepted in the Flickr thread here for some lucky reader to win their very own copy of the Plugin Suite from OnOne!  Pretty cool as this is a retail value of $500 for this package, so you can imagine the creative possibilities!  Feel free to capture away, and share your favorite shot in the contest.  You can find all the rules from the announcement post yesterday, but get out and shoot for your chance to wina free copy of this great software suite!

For those of you expecting the podcast today – year-end in state work means processing financials so we were working late today to get a lot of T’s crossed and I’s dotted before the clock struck midnight – so the podcast did not roll out today, but I promise it will roll out tomorrow and I’l be talking more about the photo contest then too, as well as answering viewer and reader questions, so if you have any to throw out in the mix, now’s your last chance to get questions in before the show goes live tomorrow!  Got a questio about photography, gear, software, tips, tricks, techniques?  Share it in the comments or with me via email.  Happy shooting for now and we’ll see you back here tomorrow for the podcast.

Grab the RSS Feed

Software Review – Genuine Fractals 6.0

Don’t get too excited – no software giveaway on this one folks, as I’ve not had a chance to call OnOne yet and see if they’d be interested in participating in a contest.  Instead, I am working off a trial version of one of the premiere up-sizing software programs on the market – Genuine Fractals from the good folks over at OnOne software.  Available for both Mac and Windows, this product really has developed a good name for itself in the industry.  While reputation may precede it, I have been wanting to give this product a try for some time now, so here we go!

To do this review, I decided to just share the work flow on a particular image that I happen really like, but because it was a pretty heavy crop, never really had a chance to see it in print very large as the limitations of Photoshop prevented more than a 4×6 image.   The first step was to open that image:

before
Here we’ve got this heavily cropped image of a butterfly I liked – and the capture shows the image is a 600px photo.  Way to small to print – I want at least an 8×10.  So, after installing Genuine Fractals, I loaded that in Photoshop by going to the File | Automate option and it showed up in there:

fractals1

So, after selecting that, I got the GF window, which shows the current image dimensions, and the upsizing options, as shown below:

fractals2

You can see the default dimensions of 2.5×1.72 just will not work for anything useful other than a desktop background or a postage sized stamp.  I need to make this bigger.  So, I plugged in the values that would take me up to an 8×10, and in this case the aspect ratio wasn’t exactly on, so I took the short side up to 8″, and that put the long side at 11.6″ roughly.  Nothing I can’t crop out a little as I move through post, so here’s the larger sized image.

Butterfly

The little dots are the logo of OnOne software so yo can disregard that because when you purchase the software, those go away.  Instead, click on the image and zoom in on the antennae for a better idea of how it handles the up-sizing process.  I was actually pretty impressed.  Granted this image is unusable as it stands because there is too much jpg artifacting since I was working off an already processed image, but if I was going off the original raw, the results would likely be that much better – and the results are much more impressive.  Take a look at this next one.

fractals3

That”s the original file, a roughly 15×10″ image, cropped to about the same dimensions and then sized for the blog here.  I’d include a hyperlink to the re-sized version, which blew up to about 75″ on the long side, for the same approximate increase in percentages (500% – GF claims boosts up to 1000%), but it really is too huge to accommodate on the web.  Besides, since it is copyright-protected, just putting that large a file out there is like – oh I dunno – like leaving your garage door open for thieves to steal your car! 🙂 ! Think about 75 inches though!  That’s like 6 foot wide.  We’re talking billboard sized posters now, and the degradation in image quality is much less because I was working with the original file.

So, whether you are trying to recover size from an accidentally compressed image, or trying to increase an image to use in large applications – you can see how Genuine Fractals might be a route to consider.  It may be a pricey option at$300 retail, but when you sell just one billboard print – the software expense is covered.

I’d give GF6.0 a two thumbs up just because it produces such impressive results.  To me, the proof is in the pudding!  So, what do you all think of the software?  Does anyone else use it?  I’d like to hear others opinions, as well as some alternatives if you have any.  I am pretty convinced, and should I ever need to up-size, I know where I am going from here!  Happy shooting and we’ll see you back here tomorrow!