One of my annual clean-up sprees happened over the weekend and ran a little long into the week…this was not a task for the light of heart because it requires seriously chimping your own work – and even admitting that some you’ve kept just aren’t worth keeping anymore because you’ve never touched them ever since capture. I cleaned quite a bit, and although tedious, the task really is for the birds because you should be doing this all the time, not just annually. Sometimes a diamond in the rough can squeak through though…and here’s two that might be a exception…what do you think?
I wish the birds eyes were more viewable, and the ISO was pretty high so took some serious slider dragging in LR to make presentable here. Not sure the second is close enough to be worth it, but then again there is something to be said for negative space! Consider it a photo critique day – so do thy worst fair readers, critique the author! 🙂
Happy shooting and we’ll see you back here again soon!
With the October Contest underway where the winner will walk away with a fully licensed copy of Noise Ninja, courtesy of the folks at PictureCode, today is a great day to give everyone an idea of what makes this program one of the industry leaders. Since I have talked about the presence of noise in your images before (read that post here), re-hashing the principles of what introduces noise and the artistic benefits and image quality downsides of it in your images isn’t really needed.
Instead, here I will simply share some of the interface, and a few before and after shots here so you can get an idea of how well this software handles noise in your images. So, enjoy!
First up (after entering your license code), you’ll have a screen that looks like this:
Noise Ninja
You can see the yellow squares in the image on the right that shows the sections scanned to determine the noise profile for the image selected. On the right, a closer view of what the image will look like (or at least a close approximation) after the noise reduction is run. You see how you can make certain adjustments on one of several tabs. On this main tab, you can see the options for Image Profile, Profile Chart and radio buttons for luminance and color values, along with the reset option. I actually leave these alone most of the time.
On the second tab is where I vary my noise reduction adjustments (and I would venture to guess most people make their valuation adjustments based on the image used). Here’s the options available to you:
Noise Ninja
You can see here that many more detailed adjustments can be made to the strength, smoothness, contrast, USM amount, radius, color noise, and then checking whether you want the processing done quickly (turbo) and applying the settings to coarse noise situations. I made my adjustments to 12 for the strength, smoothness and contrast (and typically use these ones for most images with noise).
In the next tab, as shown below, you can see the noise brush, where you can apply the noise on a paint mask or an erase mask, specify the channel (luminance, chroma, or all) ad the quality of the brush trail by not only the type of edge, but also by radius and strength. (This is very handy if you want the noise reduction faded across the image so as to leave some noise behind for artistic effect! Normally I don’t make adjustments here either – but it is fun to play!) Take a look at the interface:
Noise Brush
The Actions tab, as shown next, defines how Noise Ninja operates when it’s loaded. Specifically, here is where you can tell NN wither the profile is by default configured based on EXIF data or to create a profile from the image, or to use a specific profile. This can be very handy as well if you are batch processing a lot of photos that were shot under the same or similar circumstances so that a profile doesn’t have to be loaded each and every time. The fallback, and filter policies can also be defined here as well. Here typically I leave the default settings alone as I prefer not to batch profess since my type of work is more geared toward fine art and individual edits rather than massive quantities. To each their own I guess – take a look at the interface:
Noise Ninja Actions
The next tab is the annotations tab. I almost never use this, as this is a place where you can add additional EXIF and metadata. Since I prefer to take the values from camera rather than adding my own specific notations, this tab doesn’t get any use from me – but it can be handy if you want to vary settings based on things like manufacturer, Model, FIlm type Megapixel count, ISO level, etc. A second tab lets you add even more…see the interface captures below for reference. Noise Ninja to me is isn’t about editing exif data though – it’s about noise reduction, so I skip these tabs. Take your pick:
I do occasionally reference the Image Info tab though, because some useful information can be obtained there as well. Things like the manufacturer, model, and more specifically, the ISO setting at which the image was taken. ISO settings can be an indication on the amount of noise that was introduced due to camera settings and thus, how much can be reasonably applied.
Noise Ninja Image Info
You can see that my first image, shot at ISO 3200, was subject to some pretty intense noise on the 40D. So, I ran the process, and take a look at the before and after results:
Before
Before Noise Ninja processing
Some pretty heavy noise, as expected, so let’s just look at the image after processing:
After
After Noise Ninja processing
See the difference in grain? Yeah, I was impressed too. But is it always the case? I ran another couple images through NN and got the same or similar results on other objects in my print box. (Which, by the way, is a great resource for test shots when looking into lens and gear performance on a wide variety of things like noise, white balance, macro, depth of field, and much more.) Here’s another sample crop just to show you for comparison sake:
Before NN Processing 2
and after…
After NN Processing 2
Again, some impressive results. When push comes to shove, results is where it counts in my book and PictureCode delivers at a superb value.
Now granted, there are other noise handling programs out there, and if you ask a dozen people what they use, 5 will say one, 5 will say another, and 2 will offer up another alternative. When push comes to shove, it really is up to personal preference on which one “works best”. For me, it doesn’t really matter as long as you are aware of what noise is, what it can do to an image, and how to fix it. The tool you use is up to you. I think Noise Ninja is probably recognized well enough for a reason, and the results here seem to suggest why.
The rest I’ll leave up to personal preferences, and if you would like to contribute your own thoughts, by all means, share them here in the comments or with me via email. If you want to try it – you can download a free copy from the folks at PictureCode here – or simply participate in the October Contest over at Flickr and win a copy from them for free!
That’s it for today – happy shooting all, and we’ll see you back here again tomorrow!
For those that have been visiting the blog, you know that Podpress, my plugin of choice for putting out podcasts has been broken for some time as the developer has not released an update that makes it compatible with WordPress 2.6 Well, since it has been several months now, I am officially parting ways with it as my method for publishing.
Thanks to the folks over at Blubrry, I have been successfully able to implement a new alternative to embed podcasts into the native feed that already exists for CanonBlogger. So, in the interests of getting the content posted to iTunes and to those feeds that had not been updated from web references, I am going to spend the next few days providing some video content updates. The expanding ease of the .mov format not only in this interface, but also for portability purposes also seems to suggest that I am going to stick to that format exclusively for the foreseeable future.
For those that had been coming to the blog for their content, you will already have seen this video, but for those who have been waiting on the feed for new multimedia, this will be new material. Today, I am re-publishing the tutorial on reducing noise in your images. Enjoy! For the rest of you, see if you can tell the differences between some clouds shot with and without a circular polarizer. Share your thoughts in the comments on which one is with and which is without.
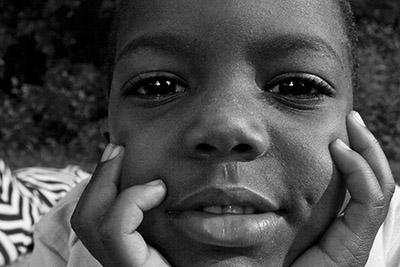
Earlier this week I talked about various ways to decrease noise in your images. While preventing and removing noise is something we typically do like to address in our work flow – there is also the flip side where noise or grain can enhance the quality of a print. All one has to look at for examples where noise can have an impact is in black and white photography. Grain gives an added sense of detail to black and white photos. The same can also be said for sepia-toned photos, those with a slightly yellowish, an “old-fashioned”, or “antique” look to them.
To give you an idea of how images can benefit from noise, take a look at the following two shots. First the color:
And how the black and white:
See how the grain from the image really accentuates his facial features? That’s one way in which noise/grain can enhance an image.
So, what about noise in your images? Do you like it or not? Got ideas for how noise can enhance your creativity? Sound off in the comments! Until tomorrow, happy shooting, and as always, keep watching those apertures!
Before I even start on anything photographic today, this is a great day to be alive. Not only is it the first installment of MNF (Monday Night Football), but it is my own beloved Denver Broncos! Having been a fan since the age of 8, and cried through the first 4 Super Bowls in sadness, and then in exhilaration for the next 2 in happiness, let’s just say GAME ON as the season gets underway with us revving up against the Raiders (yes, I’m a Raider hater like nobody’s business!) tonight at 8pm!
Okay, now having set the stage for tonight, let’s shift back to the photography theme of the day – reducing noise in your images. Let’s start with a little background:
From even the early days of film, photography as a medium has always had noise as a factor. Before digital came of age, this was actually referred to as grain rather than noise, and the speed of the film was directly proportional to the amount of noise that you would get. Higher ASA values meant you could capture images in lower light, but at the expense of grain.
As most major forms of photographic expression have moved to digital, we now are looking at this issue using more current semantics, that being noise rather than grain. Digital noise is introduced as we increase the ISO levels within our digital cameras. This has been a major advantage to digital photography, because you can change the noise/grain tolerance from one frame to the next, whereas with film, you had to choose your tolerance level when you put the film in. If you put in too high a film speed, and you wound up with a lot of noise in images that otherwise did not need it. Alternatively, if you put in too low a speed film, none of your pictures would turn out.
Some of us try to introduce grain/noise for artistic effect, while others try to minimize it to achieve clean smooth color transitions without any granularity. Each of these could merit its own discussion, so today I am going to look at 3 of the ways that you can reduce noise in your photography:
During capture – if you want to minimize noise, one of the best ways to do that is to ensure you are shootig with the lowest noise tolerance in your camera. This means ensuring that your ISO is set to its lowest possible levels. Most point-and-shoot cameras allow for this type of adjustment these days, as do practically all SLR cameras. As a general rule of thumb, the better the camera, the lower the ISO. Most consumer grade SLR’s will allow you to adjust ISO settings down to 100. As you price into higher quality SLR’s, some can drop this value further to 50 or even 25. At that level, expect to pay about $2000 or more for the SLR body that can accommodate this.
In your photo editor – There are many options here for reducing noise if your in camera settings did not minimize noise enough for your tastes. Everything from Photoshop Elements, to Lightroom, iPhoto, Corel, and of course Photoshop CS3 have internal controls that allow you to make adjustments to compensate for noise in images. Some methods perform noise reduction better than others and even some programs excel at this better than others, but by and large, variances in the quality of noise reduction will be a function of the cost of the software itself – iPhoto is free, so the noise adjustments will not offer much in the way of malleable controls. Elements, at about $75 is a little better at handling noise, while Lightroom and Photoshop round out the higher end of photo software programs both in their price and in their handling of noise.
Specific Noise Reduction programs – Because there is such an interest in managing noise, a growing body of software caters specifically to this function, and this function only. Software developers have seen a need for this and specially designed programs are now made to handle just the management of noise in images. Most offer as a part of their programs, a way to incorporate their algorithms into larger photo editing software by means of plugins. Some of the most common and well-known noise editing programs include Noise Ninja, Noiseware, NeatImage, and Dfine.
As you can see, there are many ways to manage noise, including in camera options, within your photo editor, and with free standing noise reduction software. I have found that the best results lie in a combination of all of the above. I try to remember to make necessary adjustments in camera for the type of images I am capturing. From there, as I move into my photo editor, if noise is present but not excessive, I will use the built-in noise reduction measures. For images where the noise levels are high, I use Noise Ninja and have been happy with the results.
But, just like haircuts, there are more opinions out there on what constitutes effective management of noise in photos. So, let’s hear it! What methods do you use to manage noise in your photos? Feedback, thoughts, and discussions are always welcome in the Comments section. Well, I guess that means tomorrow I will probably have to do a tutorial on noise management in images. So, until then, happy shooting and watch those apertures!


 Before I even start on anything photographic today, this is a great day to be alive. Not only is it the first installment of MNF (Monday Night Football), but it is my own beloved Denver Broncos! Having been a fan since the age of 8, and cried through the first 4 Super Bowls in sadness, and then in exhilaration for the next 2 in happiness, let’s just say GAME ON as the season gets underway with us revving up against the Raiders (yes, I’m a Raider hater like nobody’s business!) tonight at 8pm!