With all the hubbub of the release of Lightroom 3 and all the resources that cropped up online in mere minutes of the announcement, we often find ourselves asking more questions once the excitement and energy that surrounds a product release has drained.
I took these questions with me to a conversation with Senior Product Manager Tom Hogarty last week, and got a lot of insights and answers, with both a technical perspective and that of long-term development. I give you this week’s podcast: Continue reading “Lightroom 3 is here – Now What?”→
In the latest release of the LDP podcast, a shorter show this week as I prep for some other ventures, but there’s still enough material to really sink your teeth into. To start things off, Leica released two new cameras in a synchronized announcement including a full frame ranger finder camera for $6995 and a crop factor camera with 12 MP for just under $2K which will release around the holidays. More info on both cameras here
The other big photo news of the week comes to us courtesy of Apple, with the latest updates to iPods not only by adding features, but also by decreasing cost. Find out how this all relates to photography (very cool ways) on the podcast today! You can get Apple-specific details on their main page.
Second up on the show, the contest news which regular readers mostly know about except for the October announcement of two new sponsors! Find out who the new sponsors are and what will be the giveaway for October in this episode.
Finally, I also let you know about the latest project to be looking for from CB and LDP – a monthly newsletter, and let you know how to become a featured artist in a monthly newsletter. Details in the podcast so be sure to tune in and catch all the details today!
We cover the usual spate of listener Questions and Answers, so here’s the links to help answer the issues in this weeks show:
I’d also like to give some special cross-promo props to Kerry Garrison of Camera Dojo last week to talk about the Canon 7D! It was a lot of fun, and I would encourage anyone looking to add photography-related podcasts to their listening libraries to visit Camera Dojo and pick that up today! (Also, while you are there, don’t forget to say hey in his community too as he’s got a lot of great resources available. His website is linked here.)
That’s enough news and excitement for one day, so make sure to stop back in tomorrow for more photography news and info as we head into the tail end of summer weekend photography fun. Happy shooting all! Don’t forget to visit the Podcast site here and Digg it! (Or download through iTunes) and we’ll see you back here tomorrow!
Don’t get too excited – no software giveaway on this one folks, as I’ve not had a chance to call OnOne yet and see if they’d be interested in participating in a contest. Instead, I am working off a trial version of one of the premiere up-sizing software programs on the market – Genuine Fractals from the good folks over at OnOne software. Available for both Mac and Windows, this product really has developed a good name for itself in the industry. While reputation may precede it, I have been wanting to give this product a try for some time now, so here we go!
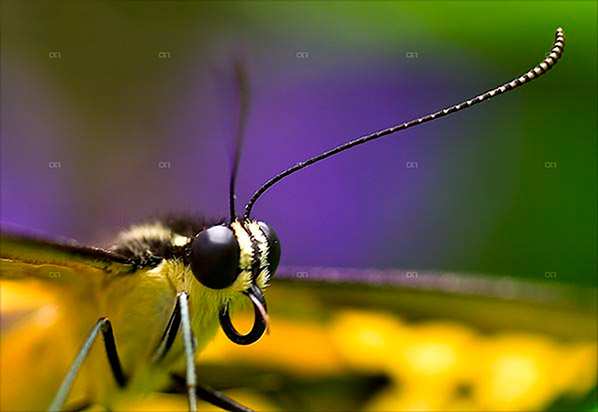
To do this review, I decided to just share the work flow on a particular image that I happen really like, but because it was a pretty heavy crop, never really had a chance to see it in print very large as the limitations of Photoshop prevented more than a 4×6 image. The first step was to open that image:
Here we’ve got this heavily cropped image of a butterfly I liked – and the capture shows the image is a 600px photo. Way to small to print – I want at least an 8×10. So, after installing Genuine Fractals, I loaded that in Photoshop by going to the File | Automate option and it showed up in there:
So, after selecting that, I got the GF window, which shows the current image dimensions, and the upsizing options, as shown below:
You can see the default dimensions of 2.5×1.72 just will not work for anything useful other than a desktop background or a postage sized stamp. I need to make this bigger. So, I plugged in the values that would take me up to an 8×10, and in this case the aspect ratio wasn’t exactly on, so I took the short side up to 8″, and that put the long side at 11.6″ roughly. Nothing I can’t crop out a little as I move through post, so here’s the larger sized image.
The little dots are the logo of OnOne software so yo can disregard that because when you purchase the software, those go away. Instead, click on the image and zoom in on the antennae for a better idea of how it handles the up-sizing process. I was actually pretty impressed. Granted this image is unusable as it stands because there is too much jpg artifacting since I was working off an already processed image, but if I was going off the original raw, the results would likely be that much better – and the results are much more impressive. Take a look at this next one.
That”s the original file, a roughly 15×10″ image, cropped to about the same dimensions and then sized for the blog here. I’d include a hyperlink to the re-sized version, which blew up to about 75″ on the long side, for the same approximate increase in percentages (500% – GF claims boosts up to 1000%), but it really is too huge to accommodate on the web. Besides, since it is copyright-protected, just putting that large a file out there is like – oh I dunno – like leaving your garage door open for thieves to steal your car! 🙂 ! Think about 75 inches though! That’s like 6 foot wide. We’re talking billboard sized posters now, and the degradation in image quality is much less because I was working with the original file.
So, whether you are trying to recover size from an accidentally compressed image, or trying to increase an image to use in large applications – you can see how Genuine Fractals might be a route to consider. It may be a pricey option at$300 retail, but when you sell just one billboard print – the software expense is covered.
I’d give GF6.0 a two thumbs up just because it produces such impressive results. To me, the proof is in the pudding! So, what do you all think of the software? Does anyone else use it? I’d like to hear others opinions, as well as some alternatives if you have any. I am pretty convinced, and should I ever need to up-size, I know where I am going from here! Happy shooting and we’ll see you back here tomorrow!
I’ve not seen much coverage of how to shoot tethered using the Canon proprietary software, so for today’s post, I thought it might be useful to offer the Canon perspective here (since the blog bears the moniker of my camera vendor of choice). For those who are Nikon shooters, I would highly recommend reading the post Scott Kelby did a while back that shows how to shoot tethered into Lightroom. While he walks you through the Lightroom element, he then discusses the Nikon approach… the counterpoint here is to take a look at the Canon approach.
To start off – a little explanation of what tethered shooting is would be helpful. Tethered shooting means you have your camera connected to your computer or laptop (usually a laptop for portability purposes). This allows you to shoot straight into the computer with direct saves. There are a couple advantages to tethered shooting. First off, you don’t need any media cards, because the camera is transferring straight to the computer. Second, regardless of what size LCD you have on the back of your sensor, nothing will compare with a 15″ or 17″ monitor. You can see greater detail, see a broader tonal range, and get a much better handle on the finder points of composition when it comes to things like posing, lighting, and minimizing distractions that you could likely miss when using a 3″ LCD of your camera.
Okay, so now that we know when and why you would shoot tethered, and given an appropriate nod to Scott Kelby for his coverage of the Nikon version, here is a Canon-centric approach to tethered shooting. Since the Lightroom component is already pretty well covered, I will just be limiting the discussion to showcasing the settings, screens and considerations to take into account when configuring the EOS Capture Utility.
When you first start the EOS Capture Utility, you get a rather unassuming window that doesn’t look like much:
Startup Screen for EOS Capture
It’s pretty straightforward – the top button would be used to download images if you are importing from all your images off a CF card. The second button would enable you to select which images to import off a CF card. More relative to this content is the Camera Settings/Remote Shooting button and the Monitor Folder button. I’ll get to those in a minute. Lastly, it’s helpful to draw your attention to the Preferences button on the lower right – this is the one I’d like to take a closer look at now.
When you click on the Preferences button the window will change:
From here, you now have access to all the details of how you want to configure your tethered shooting options, starting out with the basic settings (see the drop down menu in the upper left). This first setting tells the EOS Utility what screen you want to show when you first start the software. This really is a matter of personal preference, but I would recommend the main window so that if you want to change your preferences, you can do so easily and quickly – often with software preference settings will require you to restart the program, so if that must happen, it’s always best to do that at start-up.
Moving right along, let’s take a look at the other preferences settings:
The Destination Folder Preferences
This should be pretty self-explanatory, but in the interests of covering each aspect, this is where you can specify what folder you want to save your images to on connecting your Canon camera to your computer. For the purposes of this demonstration, I created a folder called EOS Capture and put it on my desktop to use as the destination folder. To point the EOS Utility to your destination folder of choice, simply click the browse button, as shown:
Note that the EOS Utility does a nice little thing here – it creates a subfolder by date so helps to keep your images organized whether you are downloading images, doing remote shooting (tethered shooting), or set a monitored folder for some third party application (like Lightroom). If you are going to be doig remote shooting, here is where you would likely select the remote shooting option so that when the camera gets connected, that specific task will create a subfolder and get you ready that much quicker. Here, since I don’t have the full hardware connection, I am just going to leave it on the default setting and select the folder I created on my desktop:
File Name Preferences
If you want to change your image names from the default of _IMG_1234.jpg to another more descriptive naming convention (say JamesSmith.jpg this would be the place to do it. The options are shown below:
If you choose to modify your images, you can elect from many options, including the option to customize for your needs – just click the drop down menu to select your options. By default it’s set to Do Not Modify so I’l just leave that here to show your options for filename formats:
The next option here in your filename conventions is where you can define custom naming conventions, either by subject name (JamesSmith), event (SmithWeddding), or whatever convention works for you:
Feel free to customize these as you prefer for your own shooting conditions and, well….preferences! Moving right along now…
Download Images Preferences
Here is where you tell the EOS Utility what to do with images as they are generated. It’s pretty straightforward… the options are:
Remote Shooting Preferences
The remote shooting preferences here are also pretty straightforward: Do you want to save your images to a card or not? Do you want the software to rotate your images if needed to show the right orientation? Depending on your preferences, check or uncheck these boxes:
Linked Software Preferences
Last but not least, do you want to use another piece of the Canon Software family of products to work on your tethered images , whether it be Digital Photo Profesional (aka DPP) or ImageBrowser:
Since my work flow incorporates the Adobe product line (Lightroom, Photoshop, etc.), I would suggest choosing “None” here, but again, that’s why these are called preferences.
Once these Preferences are set, go ahead and return to the main window, then click the Monitor Folder option, because there is two last items that merit discussion here:
The Monitoring Folder
Note that the folder has been specified for me, but Canon has generously recommended that I take advantage of a specific Canon hardware connector to connect the camera and computer – the WFT-E1 Wireless Transmitter. These are available from most camera retailers and e-tailers, but I like B&H so that is the one linked (and the price is fairly reasonable at $999.99, so if you get one, let me borrow it to review here on the blog! 🙂 ). Basically what this allows you to do is shoot “tethered” to the computer, but without the tether…pretty cool stuff!
The Software Version
I created this post using the older version of the EOS Capture Utility, primarily because I had not used it since I owned my XT. As with any software though, as camera bodies are added to the vendor family of products, the software must update too. On capturing all the images for this post, I did not think the software would be what updated, only the camera drivers. Clearly, that was not the case as the software itself has undergone a colorful transformation since then, and is now at its most recent update as of just last month at 2.6.1 You can download it and update via the 40D web page here (where I got mine just earlier). The upshot though, and why I am keeping the original screen shots, is because functionally nothing has changed – there are just more camera drivers added to the library. To get your own drivers for other Canon cameras to use with the EOS capture, go to the main page here and select your camera…
Finally, I wanted to share a very short video from what the new interface looks like and how to use it when shooting in “tethered” mode:
So, there you have it! My down-n-dirty summary of the Canon EOS Capture Utility – with photos, text, and video! A virtual cornucopia of media to look at the feature set. Enjoy the material! I’d love to hear your thoughts, hear your feedback and get suggestions (other than checking the software for updates before I write the post! 😀 ) on future material that may be useful. Don’t forget too – that contest to win a copy of Adobe Lightroom (which you can use to edit shots taken in tethered mode!) is going on through the end of May, so don’t delay – get those contributions in today! One shot could be worth a free copy of Adobe Lightroom! That’s it for today – have a great one, Happy Shooting, and we’ll see you back here tomorrow for the latest in photography composition.
Many of us as photographers are also gadget hounds, and the ability to accessorize our cameras with the latest and greatest gadgets and doohickeys is both a boon and a curse. It’s a boon because we have so many options available to us, and it is a curse for the same reason – because we have so many options available to us. A perfect example of this is the development of GPS attachments.
GPS (Global positioning system) units allow us to add the longitudinal and latitudinal information to the meta data of our digital images. This can help us locate the picture on a map, find the location later, and adds another type of data that we can filter for when managing our images. As the technology has advanced, the price has come down to the point where the ability to incorporate such an accessory is much more feasible.
Here are some of the more popular GPS units on the market these days. While I have not tested these, coming from the article Jack neubart wrote in the May issue of Shutterbug, I would suspect that these are some of the more well-known devices available:
Amod AGL3080
DeLorme Earthmae GPS PN-40
Eye-Fi Explore
ATP GPS Photofinder
GiSTEQ Phototracker CD111
Jobo Photo GPS
QStars BT-Q1000X
Sony GPS CS1KA
Super Trackstick
Wolverine GEO-35
I was able to get some pretty detailed reviews on each of these devices, along with their respective software components by performing a simple Google search of the device name, and rather than regurgitate all that information here, suggest that those who are interested in learning more detailed information do the same.
Special thanks for the collection of all this data to Jack Neubart over at Shutterbug magazine for his very informative article and summary on all of these devices. If you’d be interested in the summary, be sure to pick up a copy or subscribe to the magazine today – it’s one of the better resources on the internet! Happy Shooting and we’ll see you back here tomorrow for the Software Review – very exciting one too, so be sure to add CB to your feeds!
I had been working on a list of some of the more popular listener/reader questions and some answers to share for the podcast this week. Since it is late getting out (notice the lack of a post at all yesterday), I thought it might be helpful to share an abbreviated list of some of the Q&A here…
1.What color space should I shoot in with my camera, Adobe RGB or sRGB?
A.Neither, shoot in Raw!Since defining a color space is only applicable if you are shooting in jpg rather than raw, if you shoot in raw, color space won’t matter.However, if you absolutely must shoot in jpg (or if you prefer to due to massive amounts of images for easier mass processing), use the widest possible gamut when you start for maximum flexibility.In this case, that means Adobe RGB.If your camera offers the Pro Photo color space, that is even wider so choose that if available.However, the best answer is to shoot in raw, and then specify your color space during post production.
2.What is the difference between full frame sensors and cropped sensors?
A:Full frame are built to mirror the traditional size of 35mm film, so the mirror is 24x36mm
3.What does “Bulb” mode mean on your camera dial?
A:The term “bulb” is a carryover from days of film when flashbulbs would have to be triggered manually after the shutter was opened but before it was closed.The process was to open the shutter, fire the flash, then close the shutter.Since advances in technology now allow us to fire flashes automatically as the shutter is also tripped, we no longer need to manually actuate the shutter in order to allow a flash to fire.However, we still may want to manually control how long the shutter stays open, so that feature persists.
4. What’s the difference between Lightroom and Photoshop?
A:I get this question a lot.At a fundamental level, Photoshop could be considered a pixel-based image editor where you have the ability to alter or edit the actual pixels of the image.Lightroom, on the other hand, is a vector-based editor where the information does not alter or edit the actual pixels.Lightroom would be considered more of a photo management software tool.While the latest developments have incorporated more features of photo editing in addition to the management tools, at its basic level, Lightroom is still a vector-based program, where changes are not made to the actual image, but to how vector based criteria are applied to the image.
5.What’s the difference between metadata and exif data?
A:Not much.When we talk about one set of data in this capacity the two terms are often used interchangeably.However, if you want to get technical, exif data refers to information about the shot such as shutter speed, aperture, ISO settings, camera body, etc. while meta data is more about other information like photographer name, location of photo, image editor used, tags that are applied for searchability, copyright information and other information that can be inserted into the tag fields for images.
6.What is geo-tagging?
A:Geo-tagging refers to adding the geographic location information to your photos, usually as a set of meta data tags.This practice has become more commonplace as GPS (global positioning system) units have come down in price and both hardware and software have seen developments where the information can be applied to images either directly in camera (from a GPs unit that is attached to the camera), or where it can be added afterward via special software programs.
7.What is sync-speed?
A: Sync speed refers to the fast shutter speed you can set your camera to and not get the typical black bars from the shutter closing before the flash is finished firing.Typically the sync speed is 1/250th of a second, but with the development of high-speed sync, this traditional rule of thumb will likely become rapidly obsolete.
8.What color space should I save to?
A: Another very common question – and the answer does depend on how you will be outputting your images.Because most web browsers are not color-space aware, they will default to the web norm of sRGB as it has the narrowest color space.So, if your output is to the web, sRGB is your best bet.If you are outputting to a printed version though, Adobe RGB is the best option.More and more though, as printers are able to print to wider gamuts, Pro Photo is becoming more feasible as well.However you plan to output your images though, it’s always best to work in a color-calibrated environment, so make sure you calibrate your monitors and printer profiles for consistency!
9.Which is better, APS-C, CMOS or full-frame sensors?
A: None of these sensor types are inherently better than any other – but they serve different purposes.The full frame sensor is the digital equivalent of a single frame of 35mm film (although technically it is just a smidge smaller).An APS-C sensor is often referred to as a crop-sensor and generally has a crop factor ratio of either 1.5 or 1.6 depending on the vendor.APS-C stands for Advanced Photo System, type C and is just one of several different ways of building crop factor sensors.Other ways include the CMOS sensor and the CCD sensors (which mean Complementary Metal Oxide Semiconductor and Charge Coupled Device, respectively).The differences here are more in the manufacturing process, and really are technical considerations that most photographers shouldn’t even worry about.The only difference that 99% of photographers need to concern themselves with is whether they want to shoot full frame (where one substantial benefit is that due to the lack of a crop factor on their lenses, so wide angle lenses are really that wide) or on a cropped sensor (where one benefit is that zooms have an effectively longer zoom).Analyzing past this level is really something beyond the scope of most photography.With the differences explained you can hopefully see that one is not inherently better or worse than another – just that there are pros and cons for each, and those must be weighed against your needs.
If anyone has any questions that are not covered here, feel free to email or comment. Thanks for all your continued support. As always, happy shooting and we’ll see you back here again tomorrow!
On this weeks show, I take a look at the power of the pen – the artist statement. For those of us with aspirations of sharing our work with others via art shows, galleries, and contests/competitions, the value of the artist statement can make the difference between getting into a show, gallery or other event and buying a ticket. So, if you want to learn what the artist statement is, how to write one, and things to consider, this is the show for you. Here’s the show notes:
Make sure you stop in and grab the podcast from the good folks over at Personal Life Media, and visit our show sponsor Lensbaby if you are thinking about the Lensbaby Composer. Diggs from PLM and reviews from iTunes are encouraged, welcomed, and appreciated! Happy shooting all and we’ll see you back here tomorrow! 🙂
Don’t forget, you can email me from the show link with any questions, comments, feedback or thoughts, as well as share comments here, and reviews on iTunes. For those without iTunes or Zune, I can provide an mp3 version of the show on request.
The folks over at This Week in Photography (aka TWIP) had a post earlier this week that gave a suggested checklist to follow when unboxing new gear. As you all know how much a fan of checklists I am, I started giving this some thought about what sort of unboxing strategy would work best in my own patterns of gear management and setup.
Then toda at work, we got in 23 new computers. This means we now have:
23 CPU’s
23 Monitors
23 keyboards
23 mice
23 VGA cables
23 USB cables
23 power adaptors
46 power cords (one each for the computer and monitor)
and 46 boxes (one each for the computer and monitor)
23 Reinstallation CDs
23 Owners Manuals
We needed a strategy! So, we opened three of the boxes, took all the acouterments out. With three boxes now empty, keyboards began piling up in one, power cables and adaptors in another, then mice and VGA cables in the third. It became an assembly line of sorts. Thank God we had a tech room to sort it all out. By the end of the day, all but the first three boxes were cleared out. Tomorrow, the switch will be set up so that these can all be prepped with our standard image over the weekend and we’ll have 23 new happy end users (that’s what computer geeks call everyone else in the world). Then come the new laptops… *sigh*
I belatedly thought I should have taken a picture of the before, during, and after. Instead, you’ll just get an end result tomorrow. (It looks kinda cool after all was said and done!)
The point today though, is that with a checklist and a strategy, you can make pretty much any task go easier. You will get more consistent results with whatever the task is, and the chances of being able to repeat your results will also increase with practice. So, make sure you are always practicing your technique, because the same concepts hold true to photography. Thanks to the good folks over at TWIP for the creative genesis for this post today. Happy shooting all and we’ll see you back here tomorrow (with pics!).
Last night I got word from Dave Seeram, Editor of PhotographyBB Magazine that the latest issue of his monthly online publication had been completed! The reason this is so exciting? I had an article published in this issue. This is my second published article here and it’s always exciting to see the fruits of your labor in print. Take a moment to stop over and read the entire issue (but especially my article! 🙂 ) THanks to Dave for the honor of participating.
You may also notice the delay in the publishing of the daily post today – the host I have had some SQL issues and the resulting maintenance made for some downtime on a few domains, mine included. As a result, the site was not visible yesterday, but obviously since I am writing this post everything is back up and running again. FTP access has been sketchy, but seems to be okay again. Due to the downtime both on the host and for me personally (see Monday’s post, or lack thereof) I don’t have a “What’s This?” for this week, so stay tuned for next weeks edition. In the meantime, stop over to the TOP Test and see how you rank! Can you beat the high score of 23 on the advanced test? Share your thoughts and scores in the comments section.
Tomorrow is also an exciting day as Jeff Revell agreed to sit down with me for the Thursday Thoughts with series. He’s got some great little nuggets and such so be sure to stop in for that. Until then, I hope all your shots are good ones! Keep on shooting, and we’ll see you back here tomorrow!