As an avid proponent of doing due diligence, I’ve always encouraged people to do research on lenses before buying them. Whether it means renting them from vendors like LensProToGo, Rent Glass, or through vendor relationships, it’s a great way to get a first hand look on how lenses perform under a variety of circumstances. This was the case when I’d been the benefactor of a solid relationship with the folks at Sigma. I spent about a month kicking the proverbial tires on one of their latest lenses to hit the market: the Sigma 8-16mm lens. Continue reading “Hardware review: Sigma 8-16”
Tag: gear
Cleaning Your Sensor
As with most things, your camera needs maintenance too – and I’ve waxed here periodically about establishing a maintenance schedule, cleaning schedules, and the whole schmear – but I’ve never addressed the specifics of cleaning that most important piece of equipment – the sensor in your camera. As I dive in here, it bears mentioning that I am not advocating any one of these over another – just sort of laying the foundation on the various ways that are available:
1. Having someone else do it – Most camera stores offer this service for around $50, so if the idea of getting anything near your sensor just gives you the heebie-jeebies, by all means, this option is a good one for the nervous Nelly.
2. Air Blowers – These are rapidly becoming one of the more popular options as they are relatively cheap, easy, and don’t require messing around with chemicals. You simply put your camera into the cleaning mode, insert tip of the air blower near the sensor and puff it a few times remove and you are done. Some claim fantastic results with these while others say stubborn dust won’t come off from this method. The advantage of this approach is that you never have to touch your sensor (technically the filter in front of the sensor) with anything! The downside is that results may not get everything off.

3. Sensor swipes – Certain swipes are made just for camera sensors that use hydrostatic charges to remove dust from your sensor. It’s got an advantage in that it’s a dry cleaning approach so requires no chemicals. I have heard of some who are reluctant to use this as foreign fibers and materials can get in the swipe which could scratch your sensor.

4. Chemical cleaning – Pec Pads, Eclipse alcohol and sensor swipes all combine in this method to give the most thorough cleaning, virtually guaranteed to remove even the most stubborn dirt from your sensor. The risk – doing it wrong can permanently damage your sensor and the cost of buy-in is a lot higher than other methods. Once you buy-in though, the long term cost drops rapidly!

Since I only mentioned it briefly at the beginning, I should also clarify that the idea behind cleaning your sensor is actually a misnomer – all of these solutions are cleaning the filter in front of the sensor – the sensor technically never gets cleaned unless you use option 1 – sending it in for a cleaning. All the camera vendors (Canon, Nikon, Pentax, etc.) offer this service, but the downside there is multi-faceted in that it’s usually more expensive, you have to go without your camera for a period of time, and there’s shipping involved!
What methods do you use? I know some people that combine multiple approaches, while others simply just shake it out once and a while (heck, I read a story once of a guy that used his t-shirt! – not sure how valid it is, but you get the gist). Sound off in the comments with your own cleaning products and approaches!
Take Time to Play
Ever feel like your creativity is at a standstill? Something got it on hold? The common belief is that creative or mental blocks come from trying too hard to actually be creative. So, how can we stop trying to hard? It’s not that we should stop trying per se. It’s more that we need to stop trying to make every image a powerful image. Being playful often starts with just laughing at yourself. Seriously…laugh at yourself. Do something stupid or silly. That becomes infectious and can move you forward to play.
In being playful with your work, it’s often even more helpful to put down the tripods, and SLR’s. Put down the lenses and filters. Put down the soft boxes and fill flashes. Being playful means letting go of the “rules” of photography. I’m reading David DuChemin’s book, The Inspired Eye (available now on his website – use EYE3Free for 20% off through Sat.), and in it, he speaks to this idea that that inspiration can come from play.
Some ideas from David include taking a day and try taking pictures whenever the mood hits. Even if you are shooting through wet glass, or in a moving car. Take a picture with your focus ring taped down. The softness from the out of focus shot can force you to look at something more generic like the lines and energy of a scene. It really is inspired capture that David is going for here, and that can definitely come from play.
One of my favorite images from my own library is a niece – I was literally playing. I wasn’t expecting anything great, or show-stopper quality. Just goofing around. I was laughing and being silly, and so was she. I took the camera to ridiculous angles, knowing it wouldn’t work (or so I thought). Just goes to show you the power of play in photography:

The upshot? Take time to play – only good things can come from it!
What? You’re Not Going to PSW?
Photoshop World – aka PSW – has become a week-long hug-fest, and is a bi-annual tradition,especially among the NAPP faithful. As an active and sometimes promotional arm of NAPP, I can promise you that if ever given an opportunity to attend PSW, I will jump at said opportunity. Having said that, I’ve been a member fr nearly four years now and still have not found the financial wherewithal to pony up the necessary funds needed to:

1. Pay for the cost of entry
2. Pay for the cost of travel
3. Pay for hotel accommodations
4. Pay for the cost of food
It’s an expensive proposition, which I conservatively estimate at nearly $1000. This does not mean it isn’t worth the money, because it most likely is, even if for networking purposes only (and I am sure there are educational opportunities galore)! Let’s face it – if you want to be a “player” in the photography world, there is usually justification to attend PSw either in Orlando (Spring) or Las Vegas (Fall).
My problem is that I am something of a one-man-show. And photography is very much a secondary stream of income, when it even does present opportunities. My primary job has always been in IT. I suspect it always will be. So, to find the time off for a traditional working stiff is tough – I am often needed, and earn precious little vacation time every year. So, unless a company that values both my IT and photography skills hires me (Adobe, are you listening? ), I will likely not be in a position to attend this event.
As is often the case, I know I am not alone. So, here’s your chance to let your non-PSW light shine! What are you doing this week? For me, I am taking a little time off between jobs actually. After accepting an offer at a new company (I am not holding my breath for Adobe), I have a week or so to spare from my calendar (but not my budget) to travel a little, and am visiting family in both AZ and NY. Let’s face it, family should always come first, and here is no exception. This last weekend I spent in AZ, and coming up later this week is a trip to NY. Maybe I’ll get in a little fall foliage out east, but not sure as the fall seems to be late arriving all over this year.
So, there’s my plans, and why I won’t be there! What’s your excuse? Why are you not at PSW? Sound off in the comments! See ya back here tomorrow, and keep on shootin’! I’ll be back again with the August contest winner and a new contest for September that will knock your socks off!
Buying Used?
I’ve not been in the gear market for a while, but while discussing some technical stuff with colleagues over in the NAPP forums, had some time to check pricing in various outlets for used gear, and there are some deals going on these days! In my previous experience, used gear would go for roughly 10-15% less than the new retail equivalents. That percentage is apparently a bit low now as some gear is selling for up to 25% off new pricing! So, if you’re in the market for gear, check out the used market for some serious savings! Here’s a few items I saw in just a mere matter of minutes:
- Nikon D7000: New = $1200, Used = $1000 (16%)
- Sony A580 kit: New=$899, Used = $699 (23%)
- Sigma 50mm f1.4: New=499, Used = $420 (15%)
- Canon 500mm f4: New=$7000, Used=$5600 (18%)
- Canon 5D Mark II: New=$2500, Used=$2135 (15%)
There’s more out there, but that’s just a sampling of what you can expect to see. The nice thing is many of these items include useful accessories like bags, straps, cases, and media cards as incentive pieces…savings add up even more (about a 20% average in my estimation). For what it’s worth, I used the forums from Fred Miranda to look up used gear pricing and B&H for retail equivalents. Your mileage may vary.
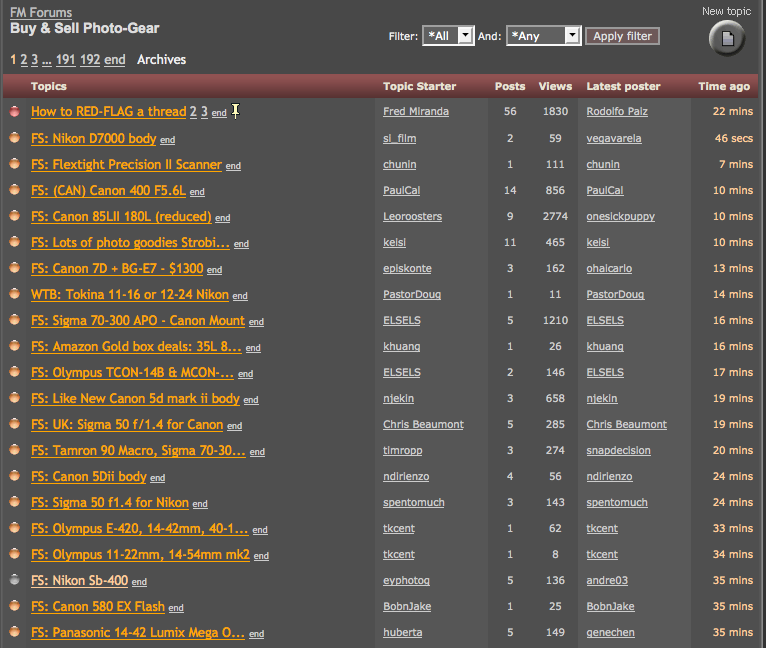
What sort of discount would you expect to pay for used gear over it’s new counterparts? Is 15% the new minimum? 20%? 30% What’s considered a “good deal” anymore? Since I’ve not been in the market to buy anything lately, am totally not sure where things are except what I’ve seen above. Those sound good to me but I have not scoured all of the internet to be sure…so, let me know if you’ve had similar or different experiences. Likewise, if you’ve got any of your own deals you’ve noticed recently? Sound off in the comments!
Hardware Review: Hoodman Loupe
As mentioned previously in the monthly contest series post, this month the featured vendor is none other than Hoodman. Their patented and widely recognized CF cards and loupes are proudly made in the U.S.A. (the only ones I know of that can make this claim), and are virtually indestructible. They have generously donated one of their Loupes for the contest winner, and allowed me a chance to review it as well. So, without further ado – here is the latest in the hardware review category for the blog:
Hoodman Loupe
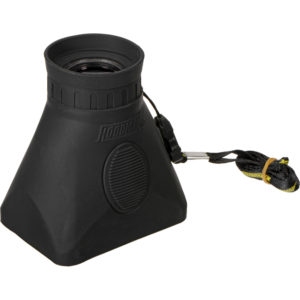
The whole purpose of the Hoodman Loupe is to block stray light from hitting your LCD. In sunlight or hazy scenarios, it can often be challenging to view your screen, and even change settings if you own a newer camera. Given it’s simple function, the review aspect of this really is a simple matter to determine, does it do the job it claims to do or not.
Not only did it completely block all ambient light with ease, the Hoodman Loupe also seemed to make the on-screen photo much more brilliant and crisp than I had remembered before using it. That surprise was further mitigated by seeing how compact the Hoodman Loupe actually is – at roughly 2 inches long and an inch deep. Not only did it perform adequately, but at this compact size, the Hoodman Loupe is an easy addition to your camera bag with the minimal footprint it takes up in space.
Most rubber or manufactured products attempt to make things slick of shiny and in so doing, the product becomes quite slippery and difficult to hold. Not so with the Hoodman Loupe, as the rugged rubberized exterior was nicely made, and I was pleased to get an easy grip on it. Although easy to hold when in use, I was not as thrilled with the ease of porting. The short trap that they provide to carry it around your neck is much too short for me. Now granted, I am 6’1”, but certainly no giant, and the size was just awkward for me. While the quick release snap does attenuate it to a certain degree, the idea of keeping it tethered somehow is a little more reassuring (I have a penchant for losing small items when taken away from my body…LOL) The accompanying carrying case was a nice addition, but did serve to really make it easier to carry…this seems to only serve as a storage container for when not in use so you can differentiate it from other gear in your bag.
I did recall after using this that a DIY solution was suggested by Larry Becker, of NAPP notoriety (he does the weekly NAPP News segments and writes his own blog at Larry’s Cheap Shots), and think his belt clip idea is both innovative and and highly functional. If the folks at Hoodman made this accessory and slapped their brand on it, I’d be half inclined to purchase the entire kit from them directly.
It’s a fairly simple idea in total, and not much else to say other than – it works! The sturdy construction, and compact nature of it is perfect for any photographer who wants to utilize their LCD. For those of us with older cameras where shutter, aperture, ISO, and all other settings done via dials and the top viewer, it may not be as relevant, but for shooters using more recent gear like the Canon 50D, 60D, and 7D, the back screen is used much more to make these adjustments, so a device like the Hoodman Loupe could be a huge aid in making sure you’ve got your settings where you want them. For $80, you almost can’t go wrong! This is definitely the accessory you never thought you needed, but you really did!
Remember, this very Loupe is being given away at the end of the month, so for your chance to win this cool accessory, don’t forget to submit your BLOCK themed photo in the Flickr thread here. Good luck to those who enter, and thanks again to the folks at Hoodman for their sponsorship and contribution!
Hardware review: The Tether Table
A while ago I was thinking about what would be the best way to set up all the hardware for a studio scenario and blogging about it with the reading audience. The idea of the Tether Table came to me quickly and on approaching the folks at Tether Tools, it was met with equal enthusiasm. So, in short order, one was dispatched to me for review here on the blog – this will be the one given away in the upcoming end of month finale for the March Flickr Contest. So, without further ado, I give you:
The Aero-Master Tether Table
The Tether Table is a pretty straightforward device – it comes with the table itself, made out of T6 Aerospace Aluminum (whatever that is). Regardless of what the official name is – this table is pretty solid – I have no doubts as to whether it might bend under the weight of a laptop. What I found to be really nice is that it spins onto a tripod (sans head of course) quite nicely, and just as easily fits over the top of a light stand. The stability is also pretty equal between the two once it’s locked down.
So, how does the table lock down? There’s four little Allen screws that tie the female acceptor tube to the bottom of the table through the top. Their design makes them lay seamlessly flat so no worries about your laptop getting off kilter. Here’s a few sample shots to show you the design:
")
")
The other part that bears mentioning is the additonal kit item (not included normally with a Tether Table) is the Jerkstopper – a handy little device that attaches at both the laptop and camera end to avoid getting cables tugged out of your connection points. They really help to keep equipment from falling, plugs or connectors from getting ripped or damaged, and the add-on value is well worth the $22! Here’s the product shot from Tether Tools site to give you an idea…

The first problem I found was that it does require either a light stand or a tripod. So, if your camera normally goes on a tripod (mine does) and you have an external flash that goes on the light stand (mine does), then either the flash has to become more of a portable device (enter the wireless trigger system), or you need to get another light stand. I initially lucked out in that I am/was running the triggers through their paces for my good friend Kerry Garrison over at Blackbelt Lighting for an upcoming review this Friday, but the need for another light stand has become pretty clear to me. When I am using two-light setups though, things could get complicated, but that’s a personal gear issue, nothing really to do with the Tether Table itself, so no harm no foul there.
The second problem I found was budgetary. While the sturdy construction and clean polished look and feel are certainly features I can appreciate, being on a budget, the cost of entry to obtain a Tether Table of this caliber is a little pricey for my blood. At $179 for the Table and another $22 for the Jerkstopper kit, we’re over $200 and while it’s not inconceivable, it’s certainly rich for the enthusiast blood. For most professionals it is easily justified and likely something you can itemize in an invoice if needed. So, not completely out of reach, but up there for sure. Oh well, no one ever said photography was going to be cheap!
When all is said and done, I do think it’s a worthwhile investment. These can be invaluable in a studio or on-location shoot where you need to be moving around in between shots. The benefits of both the Tether Table and the companion Jerkstopper could be invaluable in a number of environments, including macro photography, food photography, portrait photography, and most product photography where a dedicated preview monitor would be super handy to have! To that end, I will be sad to see it go, but alas, the Contest Series gets priority! Thanks to the folks at Tether Tools for their generous contribution, and best of luck to all the participants! (If you haven’t entered your photo yet, the theme is FLAT, and the contest link is both here and at the top of the page!)
Have you got an idea for a product review? Is there something you’d like to see a test drive on? Sound off in the comments and I’ll try my darndest to make things happen! See you next time here on the blog. (And don’t forget the Facebook page where the “Behind-the-Scenes” video is posted on using this very table!…”Likes” and comments there are always appreciated too!).
What’s a Perigee?
Without getting too scientific on everyone, an exciting moment is going to happen this weekend – it’s the perigee! What is the perigee? It’s the point when the moon and the earth reach their closest point between each other. The moon is going to look super huge this coming weekend, and this will be a great opportunity to really get some stellar shots of the moon through even the more common focal lengths we all have in our gear bags. Even with a 70-200 lens and a 1.4 TC, you should be able to get some pretty awesome full frame shots of the moon, with some pretty good detail!
Here’s a couple tips to scheduling a good moon shoot:
1. Check the weather in your area – It goes without saying that you don’t want a lot of cloud cover, but at the same time, clear skies mean no heat is staying in the atmosphere. Since it’s still relatively early in the year, standing around at midnight could be a tad chilly. Plan ahead, dress warmly, and you’ll be able to stay out longer to get the shots you really want without being cold or uncomfortable.

#2. Location, location, location – In photography, as in real estate, location can mean everything, and a lunar shoot is no exception, even though it’s in the sky. Depending on the type of view you are looking for, you may want to find some place that gives you a completely unobstructed view of the horizon. Alternately, you may want to include something “human sized” to give a sense of comparison.

#3. Pick your gear – In astro-photography, you will most likely be shooting at the longest end of your reach, so don’t bother taking the whole kit-n-kaboodle. Maybe take a variable zoom to stuff in a cargo pocket in case you want a “behind the scenes” kind of shot if going with others, but no more than two lenses are needed. Don’t forget your tripod and extra batteries, as well as a flashlight. Other essentials I have on my checklist include my wallet and cell phone.
What stakeouts have you planned in your area? Taking any friends? What about your own suggestions and tips for lunar photography? Sound off in the comments!
The March Contest Begins
With March now underway, and the February giveaway wrapped up (check my rare weekend posts making this announcement), I thought I’d take a moment and let the cat out of the bag. This month it’s quite an exciting prize! The winner is going to be awarded a 17″ Tether Table (a $200 retail value)! As if that’s not enough, the folks over at Tether Tools have also generously have thrown in a Jerk Stopper tethering kit that prevents your cables from snagging. If you want to know more about it right now, stop over to their website and check out the product line: Tether Table Product Page

In the meantime, here’s the nitty gritty details for the contest:
- The Number: 1 image per person
- The Size: Longest side must be between 600-800 pixels.
- The window: 30 day window for capture date (nothing earlier than February of 2011
- The theme is: Flat
- The deadline: March 31st at midnight (my time)
- The rest: You can read more about it at the Contest Guidelines page and the Rules of Engagement
Good luck everyone, and here’s the link: March Contest Giveaway
For the record, the Tether Table will be very slightly used, as you know a hardware review is likely forthcoming quite soon on this equipment…but then again, that’s something to look forward to, right?
As a final postscript today, a new poll is up on the sidebar, so if you don’t visit the archives much (maybe take some time soon – lots of good stuff there! 🙂 ), be sure to take a moment and sound off in the latest poll:
[poll id="17"]
Did You Know…
This last week has been kind of rough – after teaching in Minnesota on Sat., my whole time schedule was thrown off and I never really have been able to get my body clock back in sync. (I don’t know how traveling types do that…) That, combined with a little out-patient surgical procedure on Friday made for a lot of distractions. So, apologies in advance for being a little hit and miss with the blog posting.
Today though, I thought I’d share a little-known (or at least not-often-discussed) tip about the Canon EOS camera line. Did you know that there is a silent shooting mode? To enable this mode of shooting, simply switch your camera to the live shooting mode (where you compose your image using the LCD instead of the viewfinder), and when pressing the shutter, it’s much quieter than when normally pressed! I knew about this, but honestly had not used it in quite a while. It’s one of those “Oh yeah…..!” moments and when reviewing some material, I came across this from the owner’s manual. Here’s the page directly from the 40D guide:

This is a very handy feature to have if you don’t want to interrupt an emotional moment during an event (say a bride and groom kissing, a baby sleeping, or some other such occasion).Got your own unknown or not-often-mentioned feature to share about your own gear? Sound off in the comments! Have a great weekend all and we’ll see you back here next week!