I Am a Teapot!

Nothing too fancy, just a short post today to share a particular “vision” I had.  Hopefully it helps to illustrate that even the mundane can be interesting if you think outside the box!

Teapot

For the inquisitive, this was shot with off-camera flash, using Radiopoppers.  The EXIF data:

Shutter Speed = 1/250th
Aperture = f/18
Focal Length = 70mm
ISO = 100
Flash = 580 EX II

Since EXIF data doesn’t record flash settings, I want to say that this was at 1/4 power, bare bulb (no diffuser, umbrella, bounce or anything like that).  The hint of yellow reflection off the background of the stove is likely due to bounce off the yellow color of the teapot itself onto the black metal on the stove.  It was an unintentional but cool side effect, so I left it in!

As the old saying goes: “Keep on shooting!”

Using On-Camera Flash?

As much as we like to promote moving your flash off-camera, there are times when using that little pop-up flash can be really fun!  One such time can be when it’s snowing outside!  A little wind to help kick things up also helps.  Here’s a few shots I took earlier today on an outing to Keystone, CO when the weather conditions were just about perfect for these fun effects!

Using Flash in the Snow - #1

Using Flash in the Snow - #2

Using Flash in the Snow - #3

Using Flash in the Snow - #4

Now granted, these are nothing that would ever been usable for fine art or stock type work, but it’s always fun to experiment, and this is one such case where on-camera flash works particularly well.  There’s other times when using on-camera built-in flash can also be useful though, so don’t be afraid to experiment.  Where have you had success with on-camera flash?  Share your own thoughts, perspectives and shots in the insight

Problems with Triggers

As mentioned yesterday, the example self-portrait I took had some misleading EXIF data.  The thrust of the post was that EXIF data isn’t always right, and if you read through the comments, you’ll find out most of what was wrong (this is one sharp reading audience – y’all don’t miss a beat! 🙂 ).

What was most glaring though was that the radio trigger didn’t report itself to the EXIF data.  I’d noticed this in the past from the Cactus triggers when I first purchased them.  It could be due to the economical nature of the cirtuitry (i.e. they weren’t very expensive).  Or it could be due to the very nature of the devices themselves.  I’m not sure as I’ve not had a chance yet to test the heftier devices like Radio Poppers, Cybersyncs, and of course, the mecca Pocketwizards!

Here’s the part where the reading audience is more than welcome to chime in!  Do you own any of the above devices?  If so, which ones?  And of course, do they report to the EXIF data in your photos?  Last, but not least – how regularly do they report?  Because one of the things that is very useful in reproducing images (the very mark of a professional) is looking at flash data from one shot so you can repeat those settings again if needed.  So, in this vein, I am not happy with the Cactus Infinity triggers.  Yes, I got what I paid for, and they work well enough for their purpose…but I feel I am starting to outgrow them even more.  Guess it’s time to pony up, eh?  Only question is – to what?

Already, some questions are coming in about what kind of lighting was used, what the lighting EXIF was, and several have also asked about the background – some things I had a feeling would come up, so thanks to all sending in email asking for more details…much more is coming!  I promise!

In the meantime, take a break (or a photo) and enjoy the weekend.  For those of us in the U.S., remember, Memorial Day isn’t just a day of baseball, hot dogs and beer – it’s also a day to remember the fallen heroes that died defending our country…

U.S. Flag
In honor of Memorial Day

Making the Switch…

We’ve all heard the stories of people switching vendors.  Scott Bourne was noted for his switch from Canon to Nikon.  Friends and family often talking about switching from Ford to Chevy, or from Coke to Pepsi, and even *gasp* switching from PC to Mac.  As I find myself moving more and more toward Apple products I contemplated making another switch – from Verizon to AT&T.  You see, my contract with Verizon was due to expire soon, and I would then have the choice (and choice is a good thing) to move however I want.  For me it was a tough decision for a number of reasons:

Pros

  • Many of my friends in both IT and the creative fields own iPhones…and not being able to do some things with my phone that they could do was aggravating.
  • I also did not enjoy having to walk around with two devices – my 1990’s flip phone and my iTouch.  I wanted to unify everything under one umbrella

Cons

  • However, getting the iPhone meant going to AT&T.  I’ve had Verizon service for many years now, and while talking to any support staff anywhere is not my cup of tea, Verizon has rarely given me any reason to call.  From what I understand of previous experience with AT&T, there are often reasons to call…
  • I know this was covered just yesterday on the blog, but the lack of Flash support on Apple products is troublesome.  While I understand that things change – I need a new phone now.  Given Apple’s “heel digging” on this subject, and the impending release of Flash support in conjunction with Google (Adobe and Google working together..wow!) made the Android OS a palatable option.  Plus, HTML5 is readily going to be accessible under both if it ever becomes finalized (you know it’s just a specification right now…right?)

I was also a little less than enamored with the public image Apple has had recently what with the whole fiasco of the thundering police in the case of the iPhone 4 beta product that they wanted back (see video here about it).  That compiled with the fact that Apple has admitted that they changed their SDK to specifically exclude developers from using Adobe products when working on iPhone development.  This is like telling a photographer to only use a Canon or one particular set of cameras to take pictures.  That was the icing on the cake for me.  The end result?  I got a Droid!

I’ve already set up a website where I am sharing my experiences with the Droid so far – mostly it’s been pics (kind of an abbreviated 365 project).  Feel free to stop by the site where I am trying to post a photo a day from the Droid.  It’s at www.mydroidpics.com.  I’ll also probably start throwing in a few commentary type posts periodically about new apps and features as I discover them…

So, I’ve made the switch.  From flip phone to smart phone!  And the solution for me was:

THE MOTOROLA DROID!

Motorola Droid

What kind of phone are you using?  Is it a smart phone?  Is it a Droid or an iPhone?  What things do you like/dislike about it?  Sound off in the comments – I’d love to hear what others are thinking about the smart phone fad!  Have a great weekend and keep on shooting!

Thank goodness for the blog!

Ever have one of those days where you know that you are doing something wrong with your gear – but for some reason it’s just not clicking (so to speak)?  I had just such a day recently.  I still have the DIY-style radio triggers from Cactus I bought last year (still have not upgraded to the Cybersyncs), and I was trying to light something off camera for a macro shot with this little solution.  Try as I might, I could not get the transmitter to fire my 580 when on camera.  For the life of me, if I tried one setup, I tried at least several dozen, all to no avail!  Finally, in frustration, I tossed the whole thing aside.

Then today, I was considering some advice on blog content to help “promote” archived content.  One such technique is to do a theme of  “a year ago today…” and reference a post from that same day last year.  Well, last year today I did a neat little write-up on…yup, these little Cactus triggers.  Lo and behold, the one combination of cables, wires and gadgets I did not try was the one I demonstrated nearly a year ago to the day that does work with these guys.  Oh the joys of camera gadgetry!  With all the gear and gadgets we own, it’s really amazing that we are able to keep this stuff in our heads as we do.  Well, mine must have sprung a leak, because I ended up reading my own blog on how to configure my own gear!  Well, thank goodness for the blog, eh?

In honor of finally figuring out (from my own writing no less) how to create the shot I was trying to get, and in kind of a rebirth of the “What’s This?” series from last year, here’s that shot for you today.  The first person to guess what this is – wins!

Can you identify this?

I’ll give everyone a hint – it has to do with photography! 🙂  Oh, and as an aside, I am loving the noise reduction in LR3 Beta 2!  I was at ISO 100, but some noise still creeped in – nothing LR3B2 couldn’t cure rather quickly!

Also, in light of it being “tax day” here in the states, to lighten your mood, here’s a laugh from WTD (I’ve not posted one of their cartoons in a while – though I do keep visiting every day!)

Saving Money is Always Good

In photography it’s pretty much accepted that you get what you pay for.  If you want super fast glass with pristine optics, then expect to pay for it.  Alternatively, if you’re on a budget, don’t expect apertures in the 2.8 range do bring the sharpest images.  You can also kiss things like Image Stabilization goodbye (Vibration Reduction for the Nikonian crowd).  So, yeah, we all know that photography is a field where you have to spend money.

But, this does not mean you have to spend money unnecessarily.  When there are savings out there to be had, I am all for taking advantage of such opportunities.  Many savings can come from DIY projects.  Here on the blog I’ve done a few DIY projects, not only to save money, but also to experiment.  This kind of experimentation and money saving is almost always a source of creative inspiration, and usually some decent images come out of them!

Then, there are other more obvious ways to save money.  Here I am talking about coupons and rebates.  Most vendors will offer savings periodically in the form of instant rebates, two-fers (buy one get one half off) and other gimmicks to try and get consumers to let go of a little money.  Here is where you can actually get some really good deals if you plan accordingly.  If you know that you will be upgrading your camera body every 18-24 months – then buy during rebate cycles.  The same goes for lenses, accessories, and computer equipment – although with the computer items, there are sales and rebates going on pretty much all the time, so it’s to a lesser extent there.

So, if you are planning on upgrading any photo gear in the near future – take advantage of the Canon rebates.  They are going on now and you can save a few bucks (nothing stellar, $25 on flashes, $100 on the 7D, and some savings on the 5D Mark II) on your purchases.  You might want to move soon because the deals end in early April (the 3rd I think).  After all, saving money is always a good thing!

  • Need the links for the rebates?  Go here to get all the details.
  • Got your own money savings ideas?  Share them in the comments!
  • Or tell me on Twitter!
  • Finally, today is the final day for the March Giveaway so be sure you get your images in before midnight!

Have a great weekend all, happy shooting, and we’ll see you back here on Monday!

A dash of splash

First up – another web gallery of water drops – this time with a neutral black background that I developed in Lightroom.  I am tellin’ ya – this product is just too cool!  Photo management, editing, tagging, and gallery production all in one – what’s not to love?

Also up today, a little shout out to Dave Zarzacki, who owns a like new Canon XSi in mint condition, but just doesn’t need it in his gear bag (he’s trying to round out his collection with an SLR that will take all his current lenses).  It’s a great deal which includes the following:

  • XSi body (black) – $640 value from B&H
  • Canon 18-55 IS lens – $60 value as part of above kit from B&H
  • Tiffen UV filter – $7 value from B&H
  • 2 4GB SDHC cards – $25 value from Amazon
  • Gary Fong Puffer flash diffuser – $20 value from B&H
  • M-Rock Yellowstone bag ($54 value)

Individually, this would sell for over $800 easily, and Dave is only asking for $650 plus shipping.  I know the guy personally and can say that he knows how to take care of gear – this stuff will not have a scratch or scuff and will work as though new.  A great deal for someone starting out!  Any takers?  Drop me a line to get his email address and information.

Finally, for today, the Sigma lenses are in, and I can’t wait to start the review process on these this weekend!  Already found a few features that are just too cool for school!  Some other gear review items are on deck too – but I want to hear from you!  What do you want to learn more about in the way of products, gear, accessories, and such?  Sound off in the comments or with me via email!

Happy shooting all and we’ll see you back here tomorrow!

Grab the feed

Cactus, Trigger, Zebra, Oh My!

Remember the old game of password where you said a related word to one on your card to get your partner to guess it?  Well, here goes:  What do the words cactus, trigger, and zebra all have in common?  If you answered “flash photography” you’d be right!  As you may have realized, that does mean that the podcast will not come out today – I simply didn’t have time to get all my thoughts and notes together.  So instead, here’s a review of sorts that I did just earlier this evening.

A while back I decided to ditch the Canon ST-E2 wireless trigger for a number of reasons – those being:

  1. It relied on line-of-sight
  2. It didn’t have a very good range
  3. It wouldn’t work with non-Canon gear

I, like many others, have been salivating over the new developments in radio trigger technology.  And, at my last job, I had access to multiple lights, strobes, and such for experimentation.  So, in order to do said experimentation, I decided to invest in some Cactus Triggers that I purchased off an online web vendor (I forget the vendor off the top of my head – search the archives and I am sure it’s there…).  Much to my chagrin though, it would not work with my Canon 550EX flash.  So, when I left my previous job, it was back to the ST-E2.  In order to spur some motivation to invest in some more serious lighting gear on my own, I decided to sell the ST-E2 to fund the purchase of some Cyber Syncs.

Long story short, I ended up with no off-camera method to trigger my one flash unit.  So, I was back on-camera.  Needless to say, ambient light photography was a large focus for that time period.  Well, after the economy stabilized a little for the household with my state job, I decided to invest in the Cyber Syncs – but as a measure of insurance, wanted to make sure the devices would work in my 550EX (the 550EX does not have a sync port).  So, a quick email to them revealed that a neat little device from the folks over at Flash Zebra would make the Cyber Syncs compatible.  A mere $14 later and the device arrived late last week (while I was in SC).  So, next month the Cyber Syncs will be making their way to my doorstep.

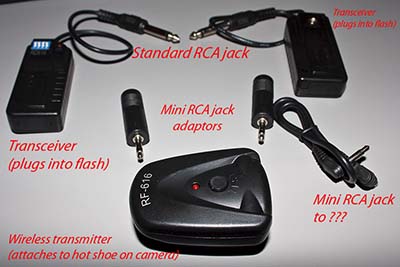
In the meantime, I have these Cactus triggers, and I thought with the inclusion of a sync port, perhaps I could jerry-rig something together.  With the sync port going out to what looks to be an RC-mini, and the receiver also going out to an RC-mini, I needed a way to join two RC-mini’s together.  A quick dig through my various buckets of cables and connectors revealed a dual mini that is normally used to connect to headphones to a single audio.  Worth a shot, since it’s only about $50 total invested.  I connected everything together to get this:

lightcables

On your left is the trigger that came from Cactus, to the RC male.  A reducer on that took it to an RC-mini male.  In the center is the well-hidden PC-sync device that came from Flash Zebra.  (For a better picture, see below…)  A female sync port on that was able to connect to the male sync port that was included with my Cactus gear.  That also went to an RC-mini male.  These are both connected on the right to the y-connector that you would typically see two headsets connect to the same audio source.  The technology is the same, so it’s worth a shot right?  (No pun intended…)

I fired off a test shot from the 40D and it worked!  So, how well would it work?  What kind of reliability would there be?  I took the flash into the next room and fired the trigger from a further distance away…about 20 feet.  Flash!  Then I took the trigger around the corner and fired it.  Flash!  How cool is that?  Another set of tests was needed.  One where radio waves wouldn’t bounce all over the place – outside!  If you recall, I interviewed Scott Eccleston from Weekly Photo Tips a while back, and a recent post of his armed me with a good testing method of the Cactus triggers.  Armed with the inspiration of this video, I enlisted the aid of my wife and took to the great outdoors.

I began with a fresh set of batteries in both the trigger and receiver, as well as the flash.  Starting from ten steps away from the flash, I tripped the shutter – flash!  Twenty paces – flash!  Thirty paces – flash!  Fourty paces – nada.  Hmmm…tried again – nada.  So, I moved back to 35 paces – still nada.  A couple steps closer and it flashed again.  About four more tests at this distance and I had 100% flash rate.  Starting back to my wife, I counted the paces, 1-2-3… all the way to 33 paces.  At an average gait of 3 feet per pace, that’s an outside range of 99 feet!  Considerably better than the ST-E2 and at a third of the price!

For posterity’ sake, and since I am in a very casual way reviewing the PC-sync adaptor from Flash Zebra, here’s a better shot of just that device.

zebra

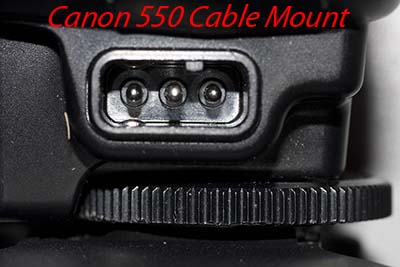
Also for posterity sake, here’s a view of the trigger that attached to the hot shoe of the 550EX:

trigger2

Cactus Confusion

Well, I finally got the Cactus gear that I ordered online at GadgetInfinity last week.  I had ordered their wireless trigger/receiver combo set and an extra receiver for the purpose of getting two lights to fire.  I excitedly opened all the packaging and unwrapped it all, then – stop, hold the phones, and check this out – I read the directions!

Yes, that’s right, an admitted geek read directions to make sure I utilize them right.  After reading about these kinds of things on David Hobby’s Strobist site and over on the Flickr Colorado Strobist site, I wanted to make sure I don’t accidentally fry either my precious 40D or the cheapo 550EX because of improper usage.

Well, after reading through the massive 1/4 page sheet of instructions, I was confused so I sorted back through the gear and here’s what I have:

Cactus Gear

Cactus Gear

Cactus Gear

So, I am not sure what the one cable is for on the right of the trigger (transmitter).  Is that supposed to plug into the transmitter, or the transceiver?  If you look at the back of the transceiver, there’s a funky little plug there that looks as if it is made to accept the one female end to that spare cable.  Meanwhile, the other end looks to be another RCA mini, and the side receptacle on the transmitter is built to take an RCA mini.  Not sure I understand why, as the trigger would normally be connected to the hot shoe of your flash.

Finally, it looks as though in order to get these triggers to work with a Canon 550EX, I would need an adaptor cable of sorts that would change an RCA mini to a female version of that three-prong set on the 550.  Any ideas from those out in the blogosphere?

Lest I forget you, dear readers, here’s a brief bout of humor courtesy of What the Duck:

HAPPY HALOWEEN EVERYONE!!!

Don’t get too hyped up on sugar – you’ll get camera shake!  Happy shooting all and we’ll see you back here on Monday!  Thanks in advance to anyone willing to help me sort out this wireless trigger confusion! 🙂