I am putting together a DIY project that requires a tool which is rather pricey (roughly $50). So in the interests of keeping costs down, I’ve been contacting local glass cutting shops (although that might be telling too much) to see if they have the tool needed for the job. Specifically, the shop needs to have a 3 and1/8″ diamond tipped hole saw for this project. The first words out of my mouth are always:
“Hi, my name is Jason and I am trying to find a local shop that can cut a piece of glass for me, but it must be done with a 3 and 1/8″ diamond tipped hole saw bit. Do you have that specific size?”
There’s no denying it – we’ve all deleted countless shots both off our camera and off our computers because they were just even to horrible to admit to publicly. And while filtering out the chaffe from the wheat is a good thing, if we don’t learn from our mistakes, we’ll continue to get chaff and never be able to make bread (take great pictures)! So, don’t just look at blurred photos and toss them instantly without thinking. Don’t immediately delete out of focus subject matter, and most importantly don’t blindly drag your less than stellar work to the trash bin.
So wait – does this mean to keep our bad pictures? For a short while – yes it does. You certainly are not going to go back and create photo galleries for clients with their mouth firmly clamped onto a forkful of food, but in seeing bad pictures and recognizing what makes them bad, helps you to avoid errors in the future. And to help illustrate what I am talking about, you’re going to see something here today that is a cardinal sin in photography – I am going to show you a terrible shot! Take a look at this:
The Virgin Star Tracker Voyage
So, why is this terrible? Well, it was taken from my recently built star tracker. As you may recall from the DIY video on YouTube, the whole purpose of a star tracker is to minimize star trails…to keep the stars bright and in one location as your camera moves relative to their position in the night sky. So, when I saw the above image, needless to say I was disappointed. But in seeing not only the blurred star, I also noticed that the star was much more blurred than it would have been from even being on a stationary tripod. This told me that the problem could be one of several things:
There is a flaw in the design of my tracker, or…
There is a flaw in the execution of the shot, or…
There is a flaw in the design of the camera, or…
There is a flaw in the design of the photographer!
So, back to the drawing board I went, hoping it wasn’t #4! What did I do wrong? Off to the web I went – first stop: Wikipedia on Barn Doors. As it turns out, I learned that while the barn door I built was the simplest in design, referred to more scientifically as a Haig Mount (characterized by a bolt or screw that rotates vertically as it pushes the one door up. Advances in the mathematics show that if you tilt the screw and have it push the door up at an angle, you are using the Isocoles method, which translates to less shift as your exposures get longer. Finally, the curved bolt mount minimizes shift even further. As the details explain at Wikipedia though, the shift only occurs in exposures as your shutter length increases past the 5 minute mark. Since I was doing a 30 second exposure, the design should not have been a factor. Other links off of Wikipeda pointed me to a several sites on how to build better barn doors, using a different method, but one note struck a chord with me:
“The double arm mount shown in the photograph uses a 6mm (M6) threaded rod to drive it.”
The more I thought about it, the threads on the bolt I used were awfully thick, so one revolution in a minute likely pushed the top door more than it should have gone, thus causing the significant star trail. The little jig in the line also told me I was not moving the screw smoothly and that I should probably motorize this if possible. Clearly the project is growing more detail-oriented, and mistakes have been made. But, as I (we) learn from mistakes, our chances of capturing better images only increases with time. As I make the modifications, I’ll report back with more details, but some additional points to consider that I learned through all my additional reading if you’re interested:
Polar alignment is critical – this means you have to have some understanding of the stars and where they are in the sky (time to brush up on the astronomy class I took in college…)
If you want to build a DIY kit – an average to intermediate grasp of math and formulas helps because your dimensions are dependent on one another for proper configuration (I am going back to check my cuts and drilling points on the first kit, but I am happy to know I have some spare parts in reserve…)
Wider lenses are more forgiving on trails, and longer zooms are less forgiving – if you are just a hair off, that movement will be even more pronounced on a field of view that is narrow… (I was shooting on my crop sensor, with a t.4 TC and my 70-200 zoomed all the way in (448mm) – a pretty narrow field of view).
For today though, (and this holds true whether you are into astro photography, landscape, wildlife, portrait, event, or any genre of photography) the instructive point is to learn from your mistakes.As the old saying goes – those that don’t learn from the mistakes from history are doomed to repeat them. I had an economics professor in college say something very similar to the class once too: “I don’t care how many mistakes you make in this class – just don’t make the same one twice!”
So, look at your bad photos – find out whythey did not come out well. Was it the camera? Was it the subject? Or was it the photographer? Learn from your mistakes so you don’t repeat them! Kind of an odd post for today, and for those that are not into astrophotography, I promise to return to some content tomorrow that has a wider interest base. But I figured that when I learn something, the whole point is to share that newfound knowledge with the reading and listening audience. On that note, how about the rest of the CB faithful? Anyone out there have any mistakes or goofs they learned from? Share your mistakes if you dare in the comments! (Or with me privately if you’d like to contribute, but remain anonymous – jason <AT> canonblogger <DOT> com.) Thanks for stopping in all – keep on shooting and we’ll see you back here again tomorrow! Happy shooting!
Rather than go through another hardware review today, I thought I would share a different kind of hardware with you – the DIY kind! Over the weekend I embarked on a little project on building a device to track stars as they move across the sky (even though it’s really the earth that’s moving and not the sky). Now granted, there are better ways to build star trackers, but many involve electronic motors, are more complex (in my mind anyway), and can get kind of costly (at least from what I’ve read). So, I figured I’d start simple, and go from there. Join me in this adventure in building my first star tracker for under $20!
It was a lot of fun and I learned a lot in doing it, both about other methods, some of the short comings of this approach, but for the cost, figured it’d be a good entry into doing these kinds of things for comparison sake. Check out the main YouTube video that gives a narrative on the process and my finished result:
The reference material I used for building this leaf-style star tracker came from a professor at the Rochester Institute of Technology (sounds impressive enough to me!), so figured I should give credit here as well: http://people.rit.edu/andpph/text-star-tracker.html
If you have thoughts, comments, feedback, or suggestions to either improve this one, on how you’ve made your own (or plan on making one), and even if you have shots to share made from DIY star tracker kits, please feel free to et me know via either the comments or email! I will start a photo gallery for all shots shared and plan on updating that monthly with all the photos received, either via links in the comments or via email!
Happy (star) shooting, and we’ll see you back here again tomorrow!
P.S. Don’t forget, we’ve still got the Wacom Bamboo Fun Giveaway going on all this month! Share your shots in the Flickr thread and you’re entered to win this prize worth $100 retail! Thanks go out to the folks at Wacom for contributing this awesome tool for blog readers and podcast listeners!
So, I’ve got the Macbook Pro with the factory default 150GB hard drive. Sounds like a ton of space, right? Well, we all know how quickly that amount of storage can get sucked up these days. So, I considered buying a new laptop drive, buying the latest iteration of the Mac OS and just building one from scratch again. But then I realized, I have lots of storage being eaten up in the drive already by means of exactly that – the OS, the applications, and everything it needs to run. Then it dawned on me – why not just add a second drive?
I bet you are asking, “Ok, Ace, where you gonna add a second drive?”
Well, here’s an easy way to add a second drive to your laptop in 10 easy steps:
1. Buy a USB drive (I got mine at Best Buy – they price matched Newegg which was in and of itself a jaw-dropper but I digress)… but the point here is that addtional storage is cheap! Less than $80 bucks for 320 GB
2. Buy a strip of two-way Velcro tape. I happen to have some from other projects, but at most it’s $5
3. Before messing with the physical setup, plug the drive in and configure as desired. For mine I re-formatted to a Mac partition (journaled), then created folders for my music library and my working photo library on the Mac.
4. I then moved all the data over for the above folders from the pre-existing OS drive.
5. Position new USB drive on back-side of laptop monitor to see where it best fits according to your USB layout – I happened to like mine on the left, as shown:
6. Wrap USB (or Firewire) nice and snug – I used another velcro strip to keep it tightly wrapped.
7. Cut one or two pieces of two-way Velcro, and place one in the middle, and the other one near the top or bottom. (I started with one and added the second):
8. Peel the backing and affix to the USB drive. With the other side still stuck, peel the backing off the second two sets and affix to the back of the monitor.
9. Plug mini-USB (or Firewire) and USB ends of cable back in. (I’d already done it to ensure the slack of the cable was how I liked it, but you can do this afterward too if that makes things easier for you…)
10. Open monitor top, and voila – you have a laptop with two drives!
For the record, I saw someone once with a setup like this, so it’s not completely an original idea. The onyl difference was that he had two of these bad boys connected – a Dymo label printer had identified each as a Time Machine drive and a Files drive. For the cost/size/weight and portability, it’s really not a bad idea. When they fill up, just buy a new drive and port the data over, or even just archive and store in a tupperware shoebox if you prefer.
So, there’s a neat little idea for you this Monday. Happy shooting and we’ll see you back here again tomorrow.
In lieu of a video tutorial today, I’ve recorded an audio podcast. The primary reason for this is because the tip I want to share involves a technique I don’t really have a good sample shot in my library to show you how to apply the technique. So…tune in to this special audio episode for Canon Blogger.
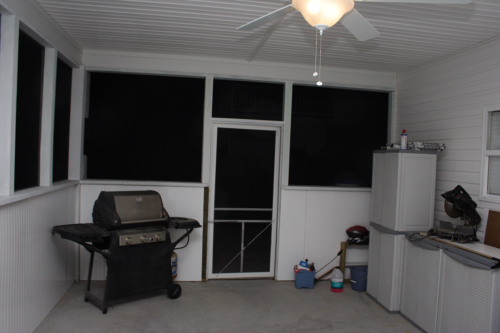
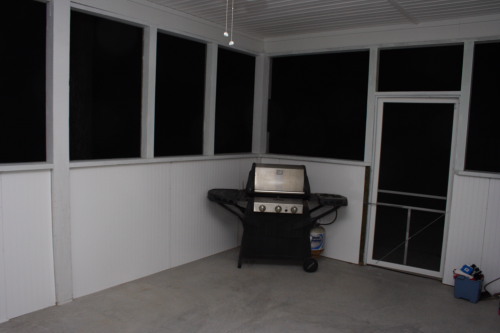
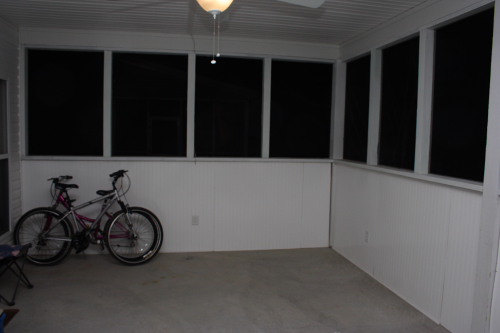
As the weekend fades into the recesses of time, it leaves a reminder with me in the form of muscle failure from the screened in porch project. For regular readers (the half dozen or so)…you may recall me having posted in passing about the porch before. Well, enough was enough for me and I went full bore to finish the dang thing this weekend. I did (for the most part), but am paying the price today. The remaining false studs were put in place, and the panel trimming began in earnest. I never realized how tiring it can be to bend over a miter saw, hammer away (manually) at paneling with chincey nails that bend with the slightest off-center tap of a hammer, manually cut metal rebar for shelf hanging, finishing painting trim work around a counter, re-paint a contractor f***-up, rip paneling boards to exacting measurements, hang paneling boards with one hand while holding the paneling in place with shims and another hand all while running back and forth to Lowe’s every three or four hours. Starbucks saw almost as much money from me as Lowes did on this project!
It’s done though (for the most part – still a little trim work to do, and some cosmetic work here and there), and I’ve got a few shots to share of it.
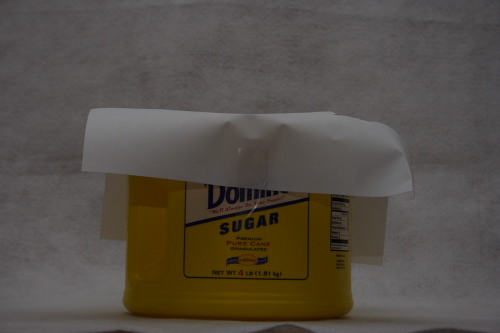
After all was said and done, I retired to the couch for about half the day to surf, watch HGTv (that channel is addictive), and catch up on my photo reading materials. It was a pretty sweet feeling to get all of that completed. Speaking of sweet, check out the new softbox I made this evening from the DIY’er perspective. Should be interesting to see if it works when I get back in my “studio”. Here’s a shot of that too:
Not the most professional of softboxes, but it should do the job well enough, once I get the inside spray painted with white. (Without it the can itself cast a nasty yellow glare on shots.) For anyone who is thinking of doing this, all you need is an empty container, a piece of paper, a utility knife and a little spray paint. If you want to forgo the spray paint, you could always use something like a Clorox jug (empty and rinsed of course…) cut in half. Ultimately, I’ll likely put some cloth on there and rubber band it around to act as the softbox rather than a sheet of paper but you get the idea.
For more lighting ideas, try getting an empty cardboard roll from a carpet store – you can get them dirt cheap (as in free) and cut to size. Spray paint a little white paint on the inside and you’ve got yourself a neat little snoot! What’s a “snoot” you ask? Go find out at Strobist – where you will find everything you ever needed to know about lighting but were afraid to ask!