Over the past three years or so, I’ve had several people ask me about what’s involved in migrating from one installation of Photoshop to another, or what’s involved in moving from an old system to a new system. With Photoshop, it’s just not as easy as it is with other applications for a number of reasons:
1. Dependencies – While Photoshop is insanely popular, this popularity has spawned an entire industry of third party applications called plug-ins that get installed into Photoshop. If you simply remove Photoshop without considering these 3rd party “apps”, you could lose their functionality. There are also other things that become part of your work flow in Photoshop that you may want to save too, including actions, scripts, font folders, brushes, and much more.
2. Licensing – Because it’s not a cheap application, Adobe has to carefully manage licensing, which means that any serial number can only be activated twice before it gets “locked”. This allows you to have an installation on a desktop and a laptop, or a work computer and a home computer. Well, if you go an just un-install or delete the files for Photoshop, you may find yourself unable to activate again should you re-install on a new computer. The way to avoid this is to ensure you de-authorize (or deactivate) before uninstalling. This will free up the license for use again.
3. Other add-ons – Photoshop also has other add-in elements like automation tasks you may have added over time. I have a few from On One, Topaz Labs, and a few others that I’ve gathered over time. Make sure you check to make sure these don’t have installers with licensing too, because that can also be problematic for a software migration.
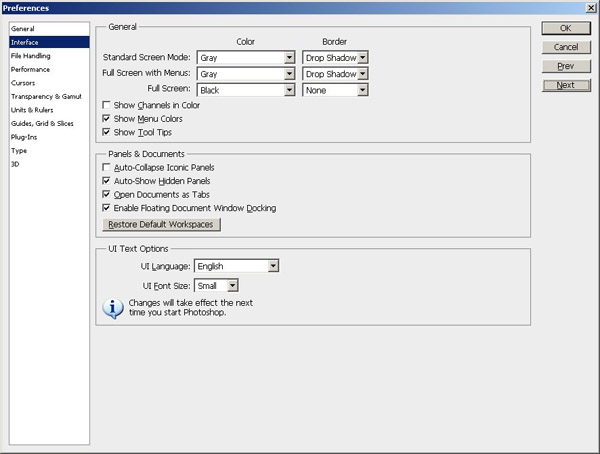
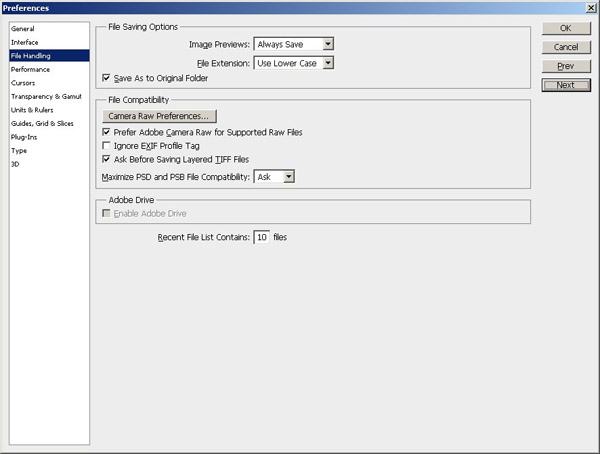
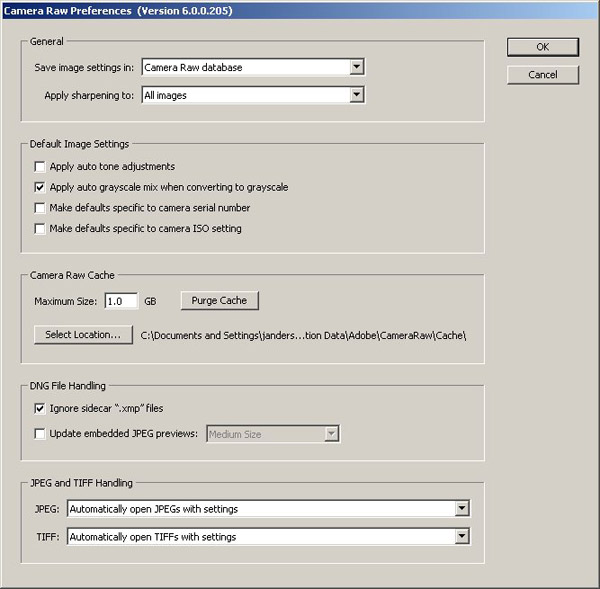
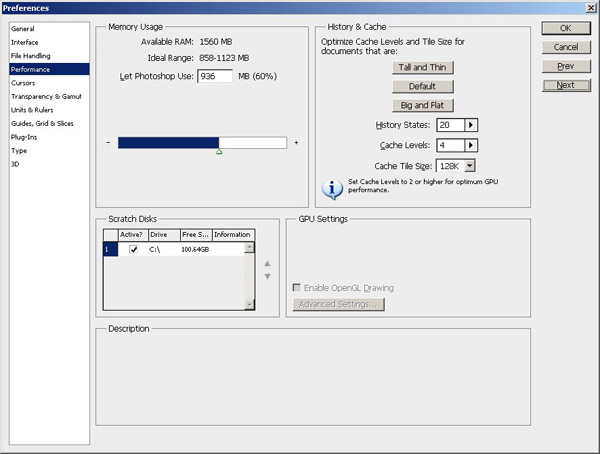
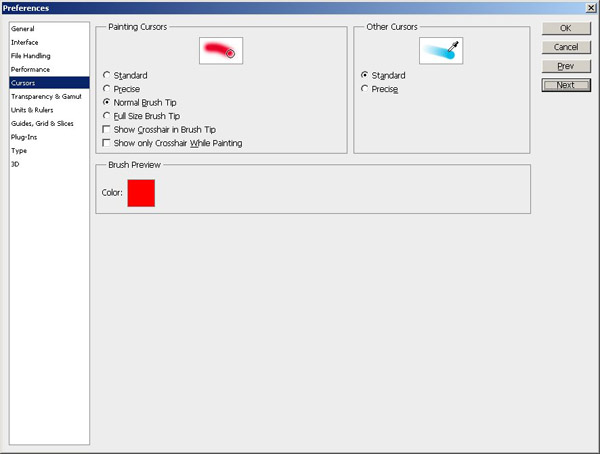
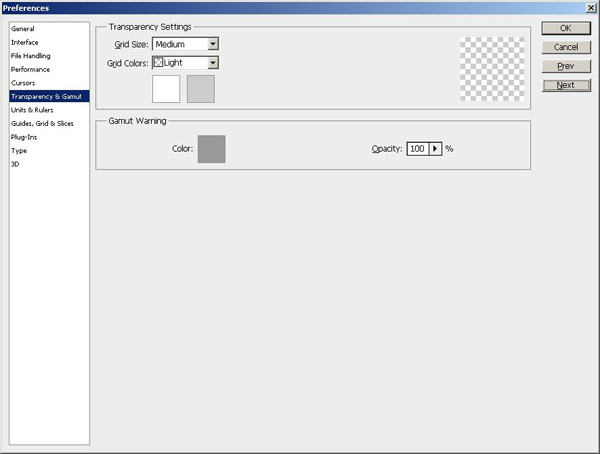
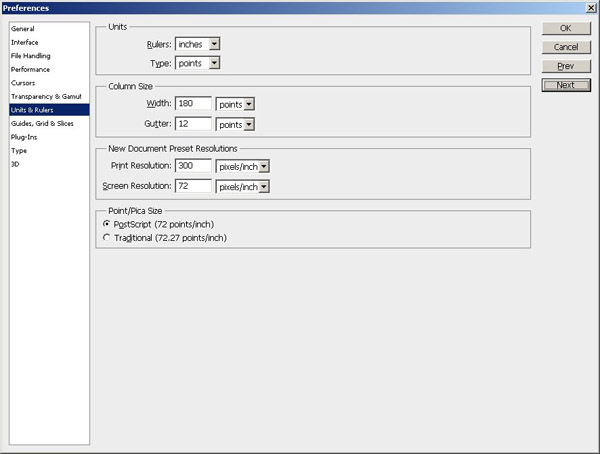
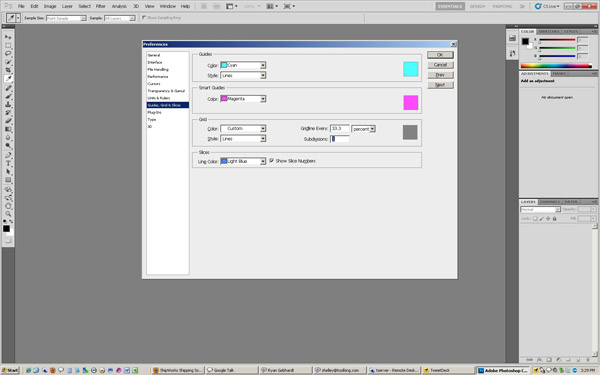
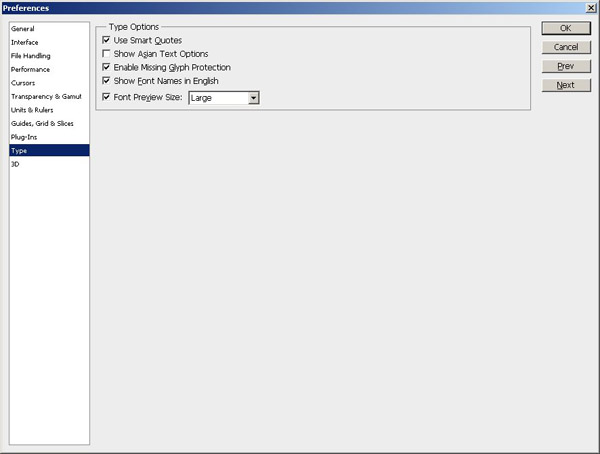
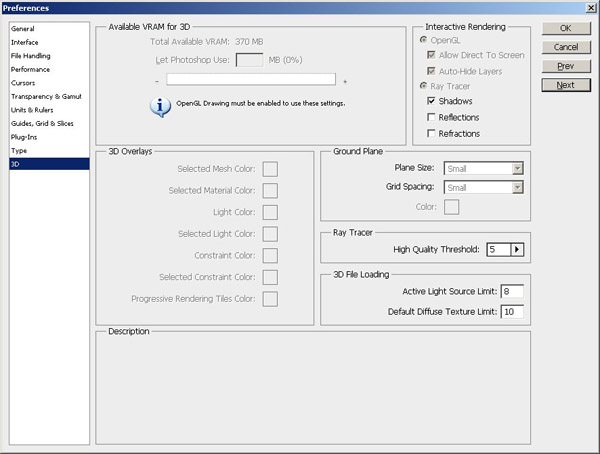
4. System settings – Unlike e-mail, some settings and preferences don’t stay with you during the course of a migration. So, it’s often helpful to grab screen captures of various setup windows so that you can get things configured just right once you get in your new digs! Here are the 11 screens you may want to capture before un-installing off any computer:
As you can tell, there’s a lot to consider. And, given the length of this post already with the included screen captures, to make things easier in terms of reference information, I’ve put together a step-by-step procedure to migrate Photoshop from one computer to another that you can download for free! Enjoy!
Ever since Tom Hogarty came on the podcast and I’ve had some time to dive into Lightroom, I am thinking more and more that this is a much better solution for managing all of my photo assets. Since I’ve found myself spending more time in LR and less time in PS CS3 (Extended), I started debating if I really needed so much horsepower under the hood. After all, CS3 Extended is quite the workhorse, from performance, to functionality, to footprint, and of course, price. It left me wondering about my upgrade path.
In all honesty though, I think the term “upgrade” may be a misnomer – after all, am I really using all the features of the full version of Photoshop Cs3? If not, what’s the point in upgrading? Perhaps I should be looking at a downgrade. After all, I really do spend less time post processing these days. So, what are the differences between CS3 and this thing called Elements? Well, for the loyal readers of this blog, I decided to find out.
First up, I downloaded a trial version of Elements 7.0 from Adobe’s website. The download is about half the size of the Photoshop Cs4 download (400+ MB for Windows Elements, and over 800 MB for Photoshop Creative Suite on Windows). To the geek in me, that means a smaller footprint on my hard drive, and less consumption of system resources. Something to consider…
Anyway, I decided to really do a side by side comparison, and loaded CS3 and Elements in their default work spaces, then compared notes. Here’s what I found (CS3 is first, Elements is second):
Photoshop CS3 Default WorkspaceDefault Elements Workspace
Wow! Quite a difference. I first noticed the much darker color of the work space for Elements. Not that big a deal in the grand scheme of things, but something that I would necessarily have to adjust to. So, what else is there? Well, rather than go over each painstaking difference of the two applications, I decided to just give a quick overview here. And, with the quick overview, I figured the best place to start would be the toolbars, since that’s what we really need to use in either of these anyway, right? So, let’s look at them side-by-side:
Photoshop CS3 Extended ToolbarPhotoshop Elements Toolbar
They actually don’t look too diferent when you look at them side by side, do they? I didn’t think so, and I set out to count the various tool bars. Know what? On a quick overview of the 22 tools in CS3, I counted 17 commonalities between CS3 and Elements 7! That’s a lot of overlap! Are there more buried tools in CS3? Most likely. On quick count, I found 60 tools throughout the CS3 Toolbar. In elements, 48! Even still, not a lot extra. From a percentage perspective, that is 20% additional functionality in CS3 Extended versus Elements 7.0 My guess is CS3 Regular would have less of a difference still.
The question is though – how often do you go searching for some buried tool in CS3? As a photographer, in all honesty, not that often. If you think about it, as photographers, we crop, re-size, perhaps straighten an occasional horizon, add some sharpening, and if we want to get really serious with a photo, we’ll do some dodging and burning. All of these functions are present in Elements 7.0
So, why would you want to go with the CS3 or CS4 version of Photoshop – truly if you want to take your photos to the Nth degree, or do serious work like graphic design, web design, or photo restoration, I can totally see the need for some of the more advanced tools in the Creative Suite. But more and more, I find myself using CS3 less and less. Take a look at the commonalities listed below – these are identical features in both applications! It took me a little by surprise when I noticed the similarities even in tool names. See if you can find the common tools from the listing below:
Common Tools between CS3 and Elements
So, what other important factors go into an image editing program for me? Well, having been working in the Creative Suite for a long time – I do enjoy the benefits of layered files for different purposes. Well, guess what – Elements does that too! That means you can edit and save files as PSD’s!
I also like using actions to automate my work flow. Uh Oh…from my initial glance, it does not appear that Elements 7.0 has this functionality built in. But, can it be added? Well, a Google search on the topic of “Elements Actions” says yes, so I think I could probably figure it out enough to eek the process to my needs.
The other major functionality I have an interest in is the ability to edit and manage raw files from my camera. Can I see the raw files? Sure enough, the ACR converter has made its way into Elements as well!
Adobe Camera Raw Converter in Elements
In fact, a lot of the preferences settings seem to have migrated over from Photoshop CS3…look at the same screen from there:
Photoshop CS3 Preferences Settings
As similarities continue to mount, the last major thing to consider is price. Retail, CS4 runs at $700 for the full price, an upgrade runs $200. Elements? Well, I think y’all know where this is headed: Retail $139 and upgrade for $119. I don’t know about you, but that is a HUGE cost savings. It almost seems too good to be true, and given my penchant for not taking things at face value – I will take a look at the image processing capabilities in greater detail next week. We’ll take a look at noise handling, speed, performance, and see how it does with a variety of images from my Canon 40D.
The biggest downside that I can see is that you don’t have the color management capabilities in Elements that you have in the Creative Suite – I like making some LAB adjustments from time to time, and filters may suffer in availability too – but more on that next week.
For the time being though, given the similarity in apparent functionality, the reduced price for Elements, and the proportionate footprint on my computer – Elements is definitely a contender. For all I know – as I learn more about Lightroom after the workshop from Scott Kelby and NAPP on Wednesday, the idea of a separate application for image editing may go by the wayside too, especially when the cost for the CS product is 400% that of Elements.
So, what do you think? Anyone out there using Elements? Any other downgraders care to share their thoughts? Have you enjoyed downsizing? Found things you missed? Workarounds? Add-ons? Tell me more as I continue to explore Elements next week – I’ll add reader observations there too! In the meantime, happy shooting, and we’ll see you back here tomorrow after the NAPP workshop!
First off, a bit of quick news about the blog in general: the layout has changed. Can anyone tell the difference? It’s a rather significant one, so hopefully it won’t go unnoticed! 🙂 Chime in and that’s your chance at winning the Think Tank Photo Streetwalker bag I reviewed a few weeks ago right here on the blog!
So, back on today’s post topic, as part of my maintenance routine that I recently posted, last evening I was doing some of my extended “IT” maintenance on my Windows computer. As a part of that maintenance, I was trying to optimize my hard drive performance, and thus resorted to cleaning out temp files, cache files, history files, restore points, and other sundry stuff. A defrag procedure on the hard drive, and I was back up to some pretty screaming speeds again. Puffing out the chest at getting a 5 year old Dell running a 2.4 Ghz Celeron processor, Windows XP, and 2 GB of RAM to move that fast without over-clocking, I checked off on what I thought was a job well done.
Then I opened Photoshop:
Uh oh – it seems I cleaned things out a little too much. Well, since I have diligently kept all my media, documentation, license#’s and other information in multiple places, I was easily able to find the needed materials to re-install. But, here’s the thing – that would require importing all my actions again, re-installing other elements like Noise Ninja, and then also go in and customize all the features I like (scrolling with my mouse to zoom in and out of the image, curves menu with more lines, etc.) Who wants to do all that? Well, not me! So, off to Google I went.
That five minutes on Google doing some research saved me probably two hours of software maintenance time. Adobe has a neat little utility that can be downloaded and run when things like this happen to restore your licensing info without having to go through the entire re-installation. Not sure what it does or how it does it, but the utility is very handy, so I thought to share it with the reading audience today. Here’s the download link, and supporting reading materials.
The underlying point here though, is that even the extensive maintenance I itemized the other day does not cover everything. Go into Photoshop, copy your preferences down via image pastes into a Word doc or other such format. Make a copy of your plugins folder external to PS – the same goes for Actions, noise removal, automation tasks, brushes, etc., etc., etc.! With as advanced and complex has an application like Photoshop has become – you can save a ton of time if you take some proactive measures.
What do you save from your Photoshop configuration settings? Share your ideas in the comments! As always, thanks for tuning in, keep on shooting, and we’ll see you back here tomorrow – Thursday Thoughts returns again with Chris Breedlove!
So, today I had the day off work, and was catching up on a few things. I read through most of my piled up photo magazines, caught up on some NAPP tutorials, and some overdue email replies to various asundry things. One of the tutorials I watched was from Matt Kloskowski on installing camera profiles for ACR in both LR and CS3/CS4. It’s pretty cool stuff.
Basically, Adobe has worked with various camera vendors to get the ACR to approximate the same colors that are shown in the vendor proprietary software (Digital Photo Professional for Canon and Capture NX for Nikon, and a whole host of others.) Matt did a great job of showing how close it gets while even still in beta. I was convinced enough to go ahead and download the plugin to use in CS3. Fair warning though, you do need at least ACR version 4.5 or higher to use these profiles (I have 4.6 installed). Since my bodies are Canon-specific my interface may look a little different, but thought I’d share the screenshot of what it looks like for me:
My thoughts are that the Camera Landscape beta is the closest to what DPP shows. Since it’s all happening in camera raw, as Matt stated, it just gives you a better starting point with less editing to get to your final results. I really can’t wait to see how this develops and moves out of beta. Just hope that Adobe sees fit to release the final shipping version for CS3 owners as well as CS4. What about others – has anyone else installed this? How do your pictures look? Are they close to your vendor software? Feel free to jump in with the comments!
In other news for Friday, this is the last day to participate in the economy-photography poll from the sidebar. You RSS readers – stop in and vote, we’re trying to break 30, and only have until midnight! Other than that, it’s been a great day – I even got some cool shots of the dog after our walk with the sunlight glistening in her eyes.
I’ll leave with my favorite What the Duck of the Week. Happy shooting and we’ll see you back here again on Monday – have a great weekend!
As promised earlier this week, I finally have some photos to share. In the middle of the drive across country from SC to CO, I stopped a few times and saw some possibilities for panorama shots. Keeping in mind a couple tips, I switched my camera from landscape mode to vertical (a.k.a. portrait) mode, and captured several scenes on my 40D. Here is the first installment of my attempts at panoramas:
So, you’ll notice that the color on these is a little off, and the exposure is a little dark. I realized that I would have issues though, if I tried to expose for such a wide scene and range of colors across the entire panorama, most especially when trying to use the Photomerge function of Photoshop. So I set my White Balance to cloudy, my exposure to one frame, and just snapped across the image.
Here’s where it gets fun…I am running CS2 on my Mac laptop which cannot read my 40D files. My CS3 was set up on my Windows desktop. The Dell only has a 2.3 Ghz Celeron processor with 1.5 GB of RAM (I never got around to adding that last 512 before the move…). Needless to say, without being set up right, I really couldn’t process 8 shots each at 10MP (that’s a grand total of 80 MP in the final pano)! Even now with the portable AC on the Dell, it was screaming along as I ran the Photomerge utility through Bridge. Once I got the photomerge done, I stamped the layers (CTRL+ALT+SHIFT+E) and converted to a smart object.
I then double-clicked the smart object to edit in it’s own window. This image file was now at 480 MB! Needless to say, I did some layer adjustments for exposure, and curves, then saved the file. I was now back in the full pano composite. I saved the full pano as a PSD file, then flattened before making some downsizing. For the curious, the full size pano is over 8000px on the long side. For the purposes of the web, I did have to downsize it a little. Clearly downsizing to allow the blog to show it would be out of the question, so here’s links to a large sized version (1600px long side), and a xl sized (3200px long side).