Spring Photo Projects

With Spring in the air (if not already sprung), many of us are out and about brimming with photo ideas after being couped up for a chilly winter.  What’s that you say?  No photo projects brimming yet?  No problem – here’s a few to get you started:

1.  The Call of the Birds: Avian photography has always been something of an art form, with many of the hard core, die hard types venturing way out into the boonies of mountains, hills, lakes, and other far-reaching places.  For the rest of us though, it’s tough to find the resources (time and money) to go to the birds, so another option is to bring the birds to you!  Buy some bird feeders and see what comes!  My folks have several bird feeders in upstate New York, and every time I visit, there are birds flying everywhere.  Pine cones with peanut butter, humming bird feeders with sugar water, and even just a plain old bird bath with feed from your local DIY store can bring a bounty of birds to your doorstep!

Avian Photography 1

Avian Photography 2

2.  Join a photo group: We’re everywhere!  From ASMP groups to NAPP groups, Meetup groups, and WPPI, you can find groups for pretty much anything ranging from professional development, to studio lighting, and just groups of photographers that like to get out and shoot together for the love of the craft and the camraderie of it all!  I’m a member of several local groups, all via the site Meetup.com, and I don’t have to pay a cent to participate!  (I do contribute though, just because I like supporting such efforts…)

3.  Shooting in a park:  Get some photographer-friends, family-friends, or just some friends to join you in a park.  Set up a blanket, a few light stands, and have some park-type food available:  (crackers, cheese, water, whatever).  Add an ipod with some speakers for a little music.  Offer gag prizes for people who dance, act silly, or pose for the camera.  Process the photos and post online so they can share, download, add to Facebook, Twitter, or print!  Low cost, fun, and helps to build your portfolio!

The ideas are only limited by your creativity!  Got your own ideas for photographic opportunities this Spring?  Sound off in the comments to share, encourage, and inspire others!  Happy shooting, and we’ll see you back here next time!

P.S.  Don’t forget the April photo contest on Flickr – win a BacklitBox of your favorite photo!  Flickr Contest Thread


8 Megapixels…

When I first transitioned to digital photography seriously, my camera of choice was the Canon Rebel XT. In that camera I found a whopping 3 frames per second, 8 megapixels, and a host of other features and benefits that go with SLR photography. The times, how they change…

My Droid2 smart phone bit the bullet (this was the third one of these to die prematurely), and Verizon in its wisdom decided I needed to go to a different model phone.  After several logistical problems with getting the correct battery shipped for the correct model to the correct address, I finally got a battery for the new phone, powered it up and activated my number on the new line.  Imagine my surprise when I found out that this new phone has…yup:

8 Megapixels!

It staggers my mind that they can fit the same number of pixels on this teensy sensor that used to fill a sensor for an SLR.  My hesitancy at embracing this MP count is that there will be excess noise, and pixelation on the images.  While the smart phone features (phone, email, Facebook, Twitter, etc.) look to perform adequately, the camera is always a point of contention for me as I wish these phones could adapt somewhat and figure out a way to have an adjustable aperture.  If you can fit that many pixels onto that teensy a sensor, surely the aperture could be adjustable!

This could just be me ranting on quixotically though – so, here’s a sample image at full resolution (click it to see full size).  Does this seem decent enough for a camera phone?  Sound off in the comments with your own thoughts on cell phone cameras – what features are good, what should be thrown out, and what should be improved?  (No carrier bashing please – try thinking of this as carrier agnostically as possible! 🙂

Droix X Test Shot

Everything Old is New Again

Let’s face it.  The economy is still not the powerhouse it was five years ago.  We’re all still reeling a little bit and saving money is at a premium, while spending excessively is a luxury only for those with deep pockets!  Count me in the former group too, so when someone asked me recently if it’s worth saving the coin to buy used I answered…“It depends”! I know, you thought I’d say yes, but it really does depend.  Here’s where and when it can be a good idea when upgrading your camera!

Buying used cameras versus new cameras

It’s no secret by now that the best place to invest the bulk of your money is in your lenses.  However, you still gotta have a camera, right?  So, should you opt for using last years model and risk having a client show up with better gear than you?  Or, should you just step up, spend the bigger dollars and always be on the leading edge?  If it’s a matter of economics, and there’s no gear limitations that stand in your way (slow shutter speed/clicks per second, etc), my answer is to always go used.  There are some of the perils and pitfalls of buying used gear though, so here’s a few tips to keep in mind when shopping around for used gear:

1. Shutter count – the shutter has an expected lifecycle of clicks it is built for. If you can get the shutter count (lots of software programs to do this) make sure you have at least 50% of them left.

2. Overall camera condition – check the camera for nicks scratches, scuff marks, and the like. If it’s all beat up, that cold be indicative of interior problems.

3. Sensor and other internals – Some problems aren’t as easily determined on a visual inspection, and it’s always best to take a few shots with the camera. Check to see if the sensor is scratched, nicked, has dust spots, etc. If it’s dust, that can be easily cleaned, but nicks and/or scratches can be a deal-breaker.

There’s obviously more to it than that, but those are the basics in looking at used camera bodies. In general, my rule of thumb when buying/selling used gear is to start at retail minus 10-15%. If the price is in that ballpark, it’s likely well cared for. I also look at seller ratings whenever possible. Fred Miranda is one of the better places to buy and sell, but Craigslist can be good since they are most often local and you can go do a visual inspection before throwing money out the window… If you’d like my take on buying and selling through FM – I’ve touched on this before here

What experiences have others had with buying and selling new gear?  Any places that are preferred?  Places to avoid?  Sound off in the comments with your own thoughts and experiences!  In the meantime, remember, it’s really not about the gear – it’s who’s behind it, so keep on shooting!

One last thing to mention today – the April contest is live (I announced it over the weekend in the free newsletter blast), and the winner will get an 8×10 image of their choice printed and mounted in a pretty cool Backlitbox!  Very cool prize and thanks to the folks at Backlitbox for sponsoring the April giveaway!  I promise more details are forthcoming here soon in the form of a product review, but time’s a-wastin’, so be sure to get your entries in soon!  Congrats also to Evelyn for her win of the March giveaway!  She’s getting a very cool Tether Table from the folks over at Tether Tools – just drop me an email to claim your prize!  Here’s her winning image up in lights!

Flat Tire

Do you Have Your Torx in Order?


So, after years and years of advice and instruction on maintaining hard drive redundancy, and the benefits of upgrading from time to time, I finally am following my own advice and upgrading my venerable Macbook Pro.  After a screamingly good deal came out for laptop disk drives locally, I went out and snagged a 750GB 7200 RPM hard drive from MicroCenter and brought it home.  I also picked up a copy of Mac OS X.6 since my previous upgrade came through a friends DVD who was no longer living in the area.  All told, I am in for a little over $100 – not too shabby!  However, as they say, the Devil’s in the Details!

I’ve changed out lots of hard drives in my time…after all, it’s no secret that I am a working IT professional – that’s my day job.  I’ve been doing that for about 10 years now, so hardware upgrades are pretty routine for me by this point – and I’ve got lots of tools to do it with too…everything from magnets, to phillips heads, to flat heads, to Torx bits for unique screws, and even a pair of nylon pliers.  But all of this based on a Windows background.  I’d never done much with Macs.  The mentality I’ve always had though is that hardware is hardware, right?  I did check out a few tutorial videos on YouTube and all the tools sounded like ones I own, so I jumped right in and off I went – until I got inside the Mac and was presented with two teeny tiny screws that required a Torx bit T6.  I went to my trusty toolbelt and saw my Torx bits went from T30 all the way down to T4 – awesome!  Until I noticed that one slot was missing – and sure enough, it was the dreaded T6!

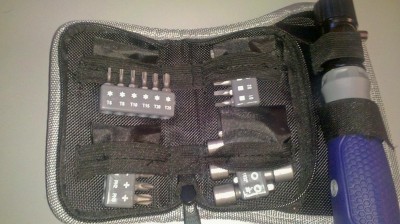
A trip to Wal-Mart yielded no dice (it was getting late), so this morning off to Lowe’s I went.  I did find the T6 bit – but it was in a package of other bits and a nut driver – for $20:

Torx KitSuffice to say, I was a bit (if you’ll pardon the expression), a bit torqued to be missing what was likely a 50 cent bit and having to spend nearly $20 to reassemble the Mac.  However, the eternal optimist, I put the positive spin on it – this is a nice kit I bought and the rest will probably go to Good Will since they are showing their age a bit.  Finally, of course, the educational moment for me:  I finally got my Torx in Order!


So, with the Mac now flying on a 7200rpm drive with plenty of storage, my weekend will likely be spent performing a fresh install of all my favorite apps.  Which ones do you think will go on there first?  I’ll give you a hint – the company name starts with A and ends with dobe!  The takeaway from all this – make sure you have your Torx in order – it is definitely a good motto to add to your motto book!  Have a great weekend everyone – just because I wont be shooting doesn’t mean you can’t so be safe, be smart, and…(wait for it)…

Happy Shooting!

That Face!

Last week I wrapped things up with three tips for posing your subjects better, and boy did that launch a flurry of questions…so many that I think the next podcast will be dedicated to tips on posing your subjects.  There’s so much to take into account, it really shouldn’t be that much of a surprise.

However, until then a few nuggets here and there will have to do.  (I am trying to coordinate with friend-of-the-blog Kevin Mullins to have a go at a podcast and this would be a great subject for him as he’s an accomplished wedding, event, and photographer from across the pond.  Kevin, I promise we’ll find a date here soon!)

So, the nuggets for this week are facial features – because at the heart of the portrait photographer is bringing out the beauty in your subjects’ face!  Here’s a great set of tips for bringing out the best in your subjects!  When shooting subjects it helps to keep in mind the three basic facial positions:  full front, 3/4 pose, and profile positions:

Three-Fourths view

Three Fourths View


Profile View


For subjects with round or wide faces, it helps to raise the camera angle slightly so as to look down to them just a little bit.  This elongates things a little more and minimizes the width perception.  It also helps to approach them with a pose that has a 3/4 look rather than a full frontal look.

For subjects with a thin face, just the opposite holds true – have their full face looking toward you with the camera and try to keep the camera at eye level with your subject.  Going up or down below their eye level will only serve to elongate a thin face even more.

For subjects with a large nose, it can often help to have them also face the camera directly.  By doing this, their nose will point straight into the camera to help minimize its size, and lets viewers see the rest of their pretty face!

For subjects with a smaller nose, it’s time to shift back to the 3/4 look…this will bring more depth to their face and “enhance” things a little…

Other tips I’ve picked up that are not specifically related to facial positioning include things like:

  • People Deep-Set Eyes – Point light into their eyes. Light coming too far from the sides will accentuate the depth.
  • Glasses – Bounce the light off the ceiling where possible. If not, position the subject so that glasses are pointed away from the lights.
  • Dark Hair – Make sure that the background provides enough contrast so hair doesn’t just blend into it. Hair lights or a light on the backdrop are extremely helpful. Also make sure the background doesn’t show through hair.
  • Double Chin – A slightly higher camera angle will be more flattering than straight on. It also helps to have the subject leaning forward.
  • Large ears – Use a ¾ face pose or a profile.

There you have it!  Great ways to capture portraiture, specifically when working with facial angles.  Special thanks go out to my good friend Evan Ashenhurst for sharing some of his portfolio for this article.  You can see more of his work on his website at:  Ashenhurst Photography

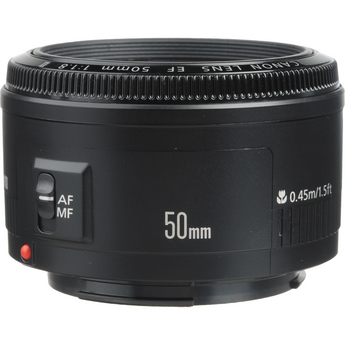
A final footnote – since I will undoubtedly get a few questions about which lenses are best to shoot portraiture with, my favorite is the nifty fifty actually.  Amazingly sharp and the 1.8 depth of field is to be envied among all glass.  If you’re in the market for a portrait lens, you’ll definitely want to check this bad boy out.  Here’s the Canon-mount, a steal for less than $150 retail!

Canon Mount 50mm 1.4

Three Top Tips for Posing Your Subject

As the Spring weather comes upon us, so does the urge to get out and shoot more.  Models are also more willing to brave the warmer temps, so it’s easier to get some willing subjects.  As you start to venture out of the warm caves, here’s a couple tips to getting your subjects to pleasing postures:

1.  Turn and Burn:  So many photogs want to get facial expressions but in doing so, forget that most of the time we never see someone’s full face toward us.  It’s usually more of an angled shot, and that’s why it’s often recommended to turn your model to one side.  Some models will swear that one side is better than the other, but when it comes to photography, my thought is not so much shooting their best side, rather shooting an expressive side!

Stand to the Side

2.  Breathe! – That’s right, so often when a model poses, the natural inclination is to “hold that pose” which subconsciously puts them in a state where they hold their breath.  Help them remember by even telling them to do so.  “Turn here, great, now chin up, awesome, and just a little to the right, excellent!  perfect!  Hold that pose….!  Oh, and don’t forget to breathe!  Take a deep breath and now exhale…fill those lungs with air!”  Not only will it surprise the model, but you may get a more natural smile – and if you’re lucky, even a laugh!

Posing Your Subject

3.  Encourage the lean! – When people start to get in posing mode, there is a tendency to lean forward.  Leaning into the front shoulder is common, as is leaning to accentuate cleavage for a woman.  If you think about it though, the forward lean does make everything look a little bigger!  That’s not always a desirable thing, so encourage your models to lean back just a tad.  Not too much as you don’t want them to fall over, but at least make sure their weight is shifted to the back leg.

Leaning Back a Tad

The other thing to remember, (kind of sneak tip for you), is that modeling rules work for both men and women, so even though the ones here are all women, many of the same rules apply!  There ya have it – 3 tips to get you started with subject posing and portraiture!  Got your own tips?  Share ’em in the comments!  Have a great weekend and happy shooting!

Hardware review: The Tether Table

A while ago I was thinking about what would be the best way to set up all the hardware for a studio scenario and blogging about it with the reading audience.  The idea of the Tether Table came to me quickly and on approaching the folks at Tether Tools, it was met with equal enthusiasm.  So, in short order, one was dispatched to me for review here on the blog – this will be the one given away in the upcoming end of month finale for the March Flickr Contest.  So, without further ado, I give you:

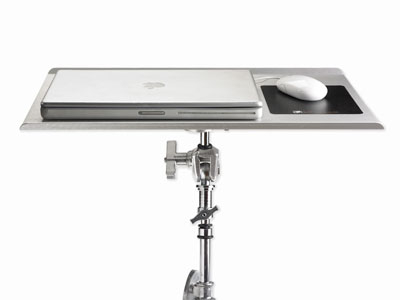
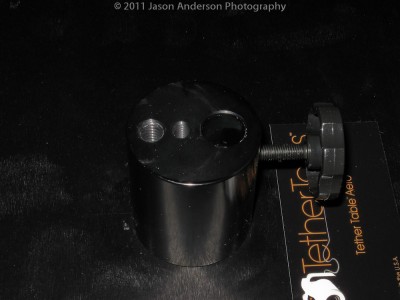
The Aero-Master Tether TableTether Table Aero Master

The Tether Table is a pretty straightforward device – it comes with the table itself, made out of T6 Aerospace Aluminum (whatever that is).  Regardless of what the official name is – this table is pretty solid – I have no doubts as to whether it might bend under the weight of a laptop.  What I found to be really nice is that it spins onto a tripod (sans head of course) quite nicely, and just as easily fits over the top of a light stand.  The stability is also pretty equal between the two once it’s locked down.

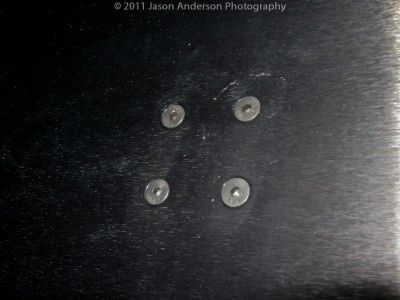
So, how does the table lock down?  There’s four little Allen screws that tie the female acceptor tube to the bottom of the table through the top.  Their design makes them lay seamlessly flat so no worries about your laptop getting off kilter.  Here’s a few sample shots to show you the design:

Allen Screws (on top side)

Female Acceptor Tube (bottom side)

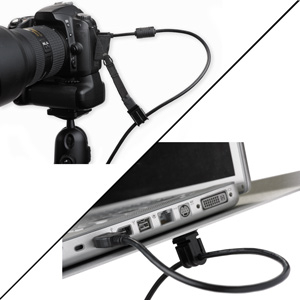
The other part that bears mentioning is the additonal kit item (not included normally with a Tether Table) is the Jerkstopper – a handy little device that attaches at both the laptop and camera end to avoid getting cables tugged out of your connection points.  They really help to keep equipment from falling, plugs or connectors from getting ripped or damaged, and the add-on value is well worth the $22!  Here’s the product shot from Tether Tools site to give you an idea…

Jerkstopper Kit

The first problem I found was that it does require either a light stand or a tripod.  So, if your camera normally goes on a tripod (mine does) and you have an external flash that goes on the light stand (mine does), then either the flash has to become more of a portable device (enter the wireless trigger system), or you need to get another light stand.  I initially lucked out in that I am/was running the triggers through their paces for my good friend Kerry Garrison over at Blackbelt Lighting for an upcoming review this Friday, but the need for another light stand has become pretty clear to me.  When I am using two-light setups though, things could get complicated, but that’s a personal gear issue, nothing really to do with the Tether Table itself, so no harm no foul there.

The second problem I found was budgetary.  While the sturdy construction and clean polished look and feel are certainly features I can appreciate, being on a budget, the cost of entry to obtain a Tether Table of this caliber is a little pricey for my blood.  At $179 for the Table and another $22 for the Jerkstopper kit, we’re over $200 and while it’s not inconceivable, it’s certainly rich for the enthusiast blood.  For most professionals it is easily justified and likely something you can itemize in an invoice if needed.  So, not completely out of reach, but up there for sure.  Oh well, no one ever said photography was going to be cheap!

When all is said and done, I do think it’s a worthwhile investment.  These can be invaluable in a studio or on-location shoot where you need to be moving around in between shots.  The benefits of both the Tether Table and the companion Jerkstopper could be invaluable in a number of environments, including macro photography, food photography, portrait photography, and most product photography where a dedicated preview monitor would be super handy to have! To that end,  I will be sad to see it go, but alas, the Contest Series gets priority!  Thanks to the folks at Tether Tools for their generous contribution, and best of luck to all the participants!  (If you haven’t entered your photo yet, the theme is FLAT, and the contest link is both here and at the top of the page!)

Have you got an idea for a product review?  Is there something you’d like to see a test drive on?  Sound off in the comments and I’ll try my darndest to make things happen!  See you next time here on the blog.  (And don’t forget the Facebook page where the “Behind-the-Scenes” video is posted on using this very table!…”Likes” and comments there are always appreciated too!).

Focus Stacking: A Primer

With all the talk and hooplah over things like dynamic range, HDR, Megapixels, and the latest and greatest bells and whistles in photography, some of the staples in composition are often over-looked.  Focus stacking is one such area.  Most folks kind of look at me quizzically when I bring this topic up, primarily because it is rather niche and unique, but it does rely on principles of composition that have been around for a while.

First off, focus stacking is used mostly in genres like macro photography, where intricate detail is needed across a range wider than what the aperture will allow for during composition.  The principle is much like the layered approach to HDR imagery – where you stack layers of images with different compositions on top of each other and blend the right portions through the entire image.

Where focus stacking differs from HDR is the types of images that you are layering.  In HDR images, you are compositing images with different exposure values over one another.  In focus stacking, you are not changing the exposure values, rather just the point of focus.  As depth of field drops off both in front of and behind your focusing point, the subject will blur.  While this may be an appreciated blurring technique in some cases, in other cases, getting different depths of field from different focusing points can make for a tack sharp macro throughout the range of the subject.

As is most often the case, explaining a photography concept is best done with images, so let’s take a look at an example.  For easy demonstration, I took a white cordless phone and placed it on a black background.  This way color issues are kept to a minimum…

First Focus Point

Notice on the first focusing point, the sharpest point is right near the front?  It also quickly drops off into the background as I was shooting at f2.8  The low aperture number means I will have a very shallow depth of field, which is what is causing the blurred background.  To bring the rest of it into focus, I need to “stack” more shots that have a different point of focus.  So, let’s add another few to the composite:

Second Focus Point

Third Focus Point

Fourth Focus Point

Fifth Focus Point

The end result from stacking all these together can be accomplished by any one of a number of methods ranging from the most time-consuming of doing it manually inside Lightroom or Photoshop, and the most efficient one of using 3rd party software.  While several options do exist, the one that has become pretty much the industry standard is that of Helicon Focus!  Their quality of processing is, bar none, among the best I’ve seen.  More on that likely later this week.

In the meantime, here’s the result of an image that has been focus-stacked:

The Final Result

It’s a quick edit, and done with only having focus-stacked 5 images.  If I wanted a really detailed depth of field on something more important than a cordless phone from circa 1990’s, I’d likely have taken at least 10-15 images and massaged them through Helicon Focus more carefully.  More details on this entire process are coming up later this week, including reviews of the Tether Table (which will be given away this weekend as the March contest comes to an end), Helicon Focus, and the light triggers from Blackbelt Lighting.

For a behind-the-scenes footage video, stop over to the Facebook page!  (Be sure to “like” it and share a comment while you are there…)

Turning Tasks into Photos

I had to bake bread for a work potluck today.  That’s ok, I like cooking, and it seems others do too, because most of the time the dishes I serve are some of the first things to disappear.  I decided last night to do something simple, but often popular:  banana bread!

When it was done, the house sure did smell good from the caramelized sugar, bananas toasting, and who doesn’t like bread?  (I know, I know – lots of carbs aren’t good for you…)  But, every once in a while it’s fun to indulge.  As luck would have it, this particular loaf of bread had some nice colors and tones to it, so naturally, I started thinking about my other hobby – photography!

With bread there’s so much you can do from capturing details, to using a shallow depth of field, to creative lighting and shadows, everything becomes a cornucopia of possibilities.  Here’s a few of my selects from just ten minutes of prep, 60 minutes of cook, and ten minutes of shoot time!

Banana Bread 1

Banana Bread 2

Banana Bread 3

Banana Bread 4

Banana Bread 5

Want a slice?  What tasks have you taken and turned them into photo opportunities?  The lesson learned here today (hopefully anyway) is to take something you have to do and make it something you want to do!  In this case, it was a win-win scenario for me, but what about you?  Sound off with your own fun-filled (or food-filling) photo projects!

Podcast #56: Is Blogging Dead?

Twitter, Facebook, microblogging, blogging, Audioboo, websites, statistics, logos, graphics, web design and more!  It’s a lot to take in and more often than not photographers who are just getting started ask me “Which ones should I choose?”  It’s a tough question because there’s no unilateral catch-all answer that will fit everyone.  As always, the answer starts with “It depends…”

So, to better address the question I decided to bring in a pro who deals with this stuff all the time.  That’s right ladies and gentlemen, we have another podcast! This is episode #56 of the LDP show, and I shared about an hour or so with Kirsten Wright talking about social strategies and best approaches and practices.  It’s an entire industry, and there are some who claim to know and then those who really do know their stuff.  Kirsten comes with some impressive credentials and a fresh outlook/perspective that many of us need.  It’s a good kick in the…well, a good way to get motivated to get going in the right direction!

Make sure you check out her site over at Wright Creativity and make sure to add her on your Twitter, Facebook, LinkedIn feeds, and everything in between.  She’s got gems and nuggets of brilliance galore to share.  I’m booking her soon here to help me get things streamlined (in case you haven’t noticed, my schedule has not been as consistent lately as I’d like it to be – Kirsten is my kick in the #$%^!)

If you need some focus, direction, and a good reality check, Kirsten is the one to give t to you.  Get it for free here in the latest episode of Learning Digital Photography:  Is Blogging Dead? with our guest of the hour – Kirsten Wright!

[display_podcast]