How you hold your camera is so important, yet so many of us take our camera grip for granted, assuming that we will naturally hold it in the most stable way available. For some, it does come naturally, but for most of us, bad habits can take root before we even know it. To that end, there’s a couple pointers I’ve put together on How To Hold Your SLR and How To Hold Your P&S. To wrap things up, today I’d like to share a couple tips on How To Hold Your Phone Camera.
Video seems to work for demonstration purposes, so again, YouTube to the rescue:
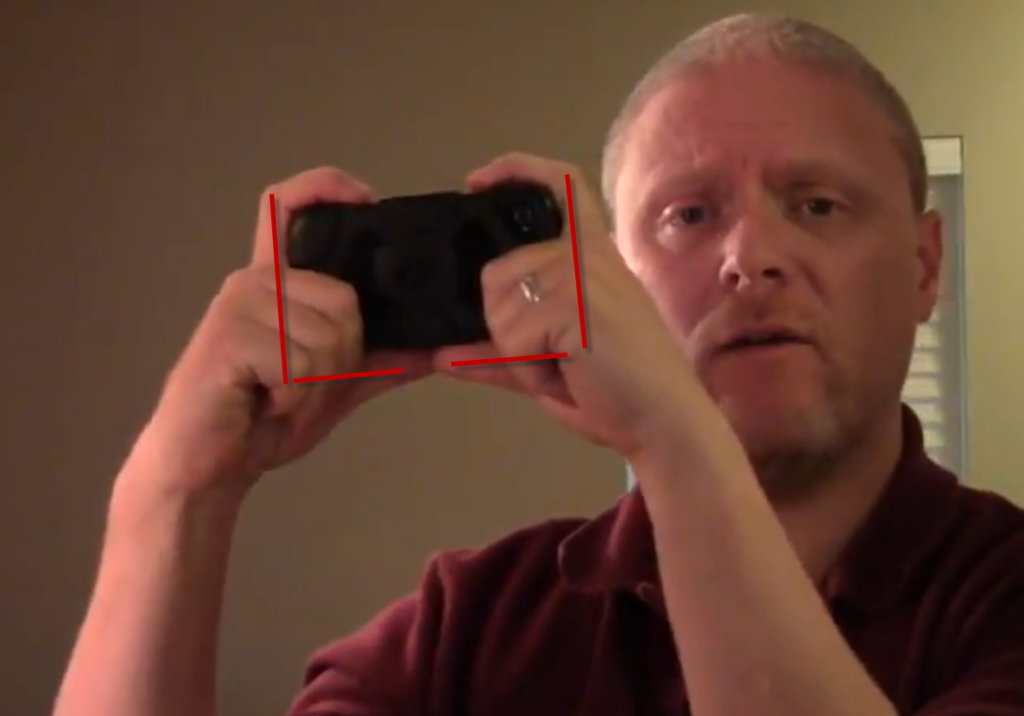
The takeaways from the video? Three simple ones:
1. Finger Curl – curl your middle fingers around the front lower side of your camera phone – this will add stability and will help subconsciously you to keep your armed tucked in
How to Hold your Smart Phone
2. Arm Tuck – Since I just mentioned it, avoid sticking your arms out – either to the side or in front of you. Extended your arms reduces stability and tends more toward camera shake. Keep your arms tucked in, elbows into your tummy by your waist.
3. Double L – Make an L with both hands and cradle your camera phone into the corner of each hand. Position the phone so that your camera lens is on the topside. That way, your thumb (either left or right depending on phone model) will be at the ready for the trigger on the edge of your phone (don’t use the on-screen one).
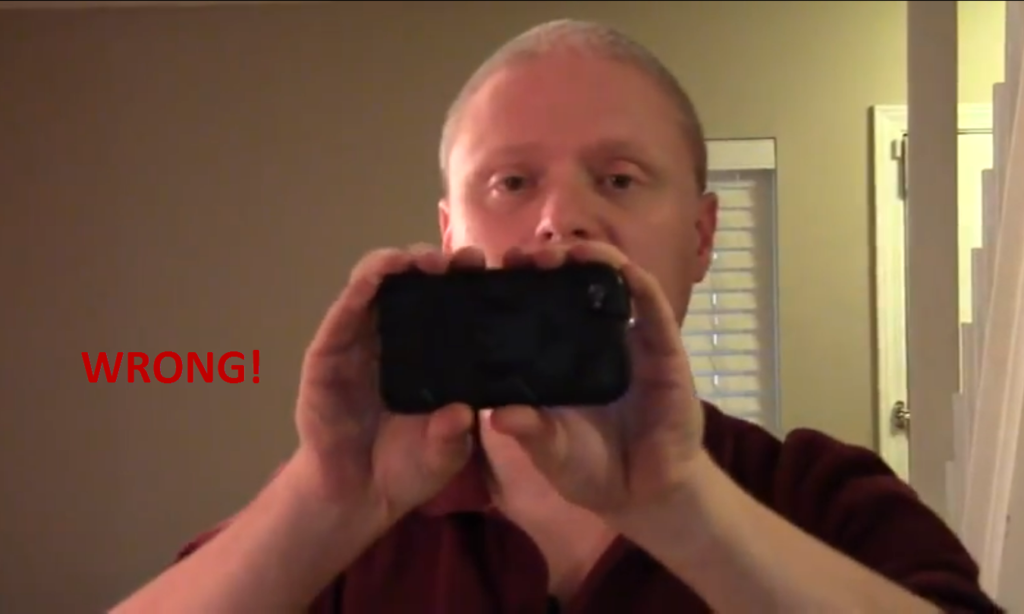
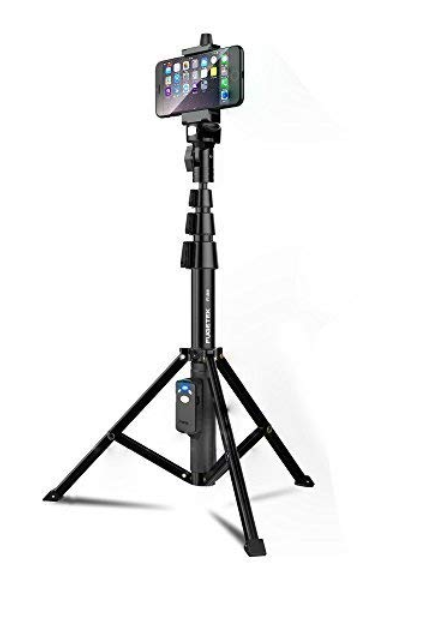
As always, there is no hard and fast set of rules to follow – using these techniques will not guarantee a stable shot. If you watch the video – notice even as I demonstrated, the camera shifted slightly even in my grip. The best way to hold any camera is not with your hands but with a tripod!
There are options out there for phone cameras now too – I like this one:
Got your own tips, ideas, or suggestions for hand holding a camera phone? What works for you? Do you use a tripod or a monopod? What gear would you recommend?
It’s official – about ten minutes ago I got the word from the horses’ mouth directly (a.k.a. Canon), that the new 60D is hot off the presses! Rather than spout all the technical details, (which the rest of the blogosphere will do in short order), here’s the ones I like the most and why: Continue reading “The 60D Cometh! New Canon Gear!”→
I’ve often wondered about the development of technology and the patterns that go with it. As technology has advanced in other areas such as computing, the World Wide Web, and mobile platforms, cameras have also seen similar changes in recent years. The difference between cameras and the rest of the industry though is that with cameras, it’s been a very recent development. Photography has been around a lot longer than the digital world, and the underlying principles and foundations that are the basis for the craft haven’t changed much. Shutter speed and aperture size are still the dominant forces that control exposure in images (along with ISO – which when combined gives us the exposure triangle): Continue reading “Digital Photography: Where do we go from here?”→
So, the Droid has been in use for about a week now…and I gave some initial feedback on it yesterday, but thought it might be helpful to give a short video on how to tether the Droid to a computer. It’s pretty straightforward, so here you are (special shout outs to Rich Charpentier for requesting it)…
As you can see – nothing too difficult or fancy to tether a Droid, which makes for great file manipulation and transfer, which means photos are also easily archived across multiple platforms! How are others tethering their smart phones? Just as easily? I didn’t like the Touch having to go through iTunes and be “licensed” on each computer. Thoughts and feedback welcome in the comments!
Don’t forget – I am also sharing pics daily on http://mydroidpics.com Won’t set the photo world on fire, but you can get an idea of the quality of images coming off the Droid! 🙂 Happy shooting all and we’ll see you back here tomorrow!
So, while debating the intervalometer cost implications for my SLR – I decided to give the Canon CHDK a run for its money. After downloading the CHDK for the A590 and making sure it didn’t break the camera I went out in search of an intervalometer script. I think it’s a VB script, but can’t be sure…nevertheless the results were kind of fun!
I tried to include as much info in the teaser as possible, but if anyone has questions on how I did all this, feel free to share your questions (or feedback if you prefer) in the comments or vial email! Here’s a dry run of my daily commute home (if only the real time commute went that fast!):
[display_podcast]
Happy shooting! If you have your own time lapse productions, feel free to link them in the comments too! See you back here again tomorrow… 🙂
For those of you that have been following the blog for a long time (and let me know who you are, because I want to ask why!), you may recall that I used to put out video tutorials on how to do various things inside of Photoshop. After plodding around with that for a while, I came across the gurus of NAPP and realized that several were already doing it, and doing it much better than I ever could. So, rather than re-inventing the wheel, I abandoned the video tutorials in favor of just sharing my “wisdom” in the form of the written word (blog posts and articles) and audio tips (which are now part of the Learning Digital Photography podcast).
Well, when I recently twittered with excitement over the newly released calendar of some of my favorite images for 2010, someone asked me about the template I used to create those images. I honestly answered that I didn’t really use a template as the website www.lulu.com just let me upload the images and they handled the rest. On realizing that they were talking about the images on my Photography Website, I recalled that a template was used for those images. I could have done a written post about this, but those take a lot of time to put together (lots of screen grabs, lots of writing, and lots of uploading), so I instead decided to put together a new video on how to create a template for your photos inside of Photoshop. The video may take some time to load, so please be patient as this is a self-hosted video production! 🙂
[display_podcast]
Keep in mind – this is just one way – in Photoshop there are always many ways to reach similar results, and as the old adage says, there’s more than one way to skin a cat! Anyway, this is for you @mitz! Enjoy, happy shooting, and we’ll see you back here tomorrow! Oh, and lest we forget, there are very few days left in the January giveaway! For your chance to win a free copy of Photomatix Pro from the folks at HDR Soft, get your Circle-themed photos in the Flickr Contest Thread by midnight on Friday (Mountain Time – GMT-7).
P.S. For those that like my videos and want to see the archives, check out the Learning Resource Page from the sidebar for more materials. And as an additional side note, this is post #600. No fuss, no muss, no fanfare, but yet somehow I landed back on video tutorials – which is kind of how it all started! Somehow, ,ind of poetic, eh? 🙂
Last Friday afternoon the local photography meet-up group for the metro Denver area got together and paid a visit to historic downtown Brighton (about 30 minutes northeast of Denver. It was a fun get-together, and with a smaller than average turnout of 6 of us, we really got a chance to not only converse and interact with one another, we also had some great opportunities for photographs. The highlight of the day was when we happened to be walking by the Brighton Armory. As it turns out, this building was recently renovated as part of a new cultural center for the area. The Operations Manager saw us walking by and invited us inside, as well as a tour of both the upstairs and downstairs areas.
Not only did we get a little piece of history about the place, we got some great shots of the building itself. With several hundred to parse through over the weekend, I’ve trimmed it to the slide show below showing some shots from both around Brighton and the Armory itself. The other thing that was exciting about this is that after expressing an interest in volunteering our photographic services for any events, they seemed interested in taking us up on the offer. We shall see what may come of these serendipitous meetings. It just goes to show you that it’s always a good thing to support the arts, and always good to think about networking – even when you are just having fun on a photo walk!
Here’s a couple links for those interested in learning more about the area and the Armory:
http://brightonarmory.org/
http://heartofbrighton.org/ArmoryVideo.htm
Enjoy the slide show and we’ll see you back here tomorrow – happy shooting!
Don’t forget too, the January Flickr contest thread is open, and the Circle theme should be producing some interesting images. Speak your creative vision and enter today!
As with every new year, there is always talk about setting New Years Resolutions – and setting goals is always easy to do, but what about keeping those resolutions? Sometimes it’s a challenging thing to do, because we either set goals that are vague or not very specific. For example, “lose weight” is a common goal, as is “exercise more”. From a photography perspective, we often will hear (or say) ones like “shoot more”, “get organized”, and other such platitudes. While the ideal is always good, the intangible goals are always the most difficult to reach simply because they are…well, intangible!
Do yourself a favor and not only set some concrete goals, but share them with colleagues, peers, and friends. If you write a blog, announce them! Make your readers hold you to your goals. Not only will you be more likely to achieve your goals, but your readers will also become more vested in your blog! It’s very empowering, and I would encourage everyone who writes a blog or has a web presence to do something like that.
Uh oh, I just realized something – I kind of set myself up there didn’t I? Okay, yeah, it was kind of intentional, but it came from the heart! 🙂 My biggest resolution for this year – finish projects! I can’t tell you how many projects I have started to get distracted by other projects, ideas, or things, only to never make it back to the original project.
For example, I had set a project once of getting all my resume and personal information in an easy to access text file for copying and pasting into database driven websites like USAJobs. So, it was off to getting various records for inclusion, including my military service. That led me to the filing cabinet (insert Psycho music here)! Before I knew it, I had spent 3 hours organizing the filing cabinet into tabbed folders of all things non-job related. Gas receipts, electric bills, and all sorts of other things kept popping up at me saying “file me file me file me”! It got so bad I even found myself at the local Staples getting tabbed divider label things for each category instead of getting the original project done!
In keeping with the idea of finishing projects, I would like to share the completion of project #1: The Sunrise Shoot at Rocky Mountain National Park! I mentioned it in December before the holidays and I had every intention of completing this sooner, but first the layoff, then Christmas, then New Years, and many other distractions pulled me away. No more! The trip is completed, the shots processed, and the videos montaged! I give you, ladies and gentlemen, the RMNP trip:
[display_podcast]
So, project #4982163 has been completed…I have all the rest to do! What are your resolutions and projects for 2010? Do they include getting a circle shot ready for the January Giveaway? (Announced here yesterday…) Here’s the link for the contest thread on Flickr in case you missed it!
Share your own thoughts and ideas, resolutions and projects in the comments and we’ll help keep you on track! In the meantime, keep on shooting, have a great weekend, and we’ll see you back here on Monday! Happy Shooting!
With the increasing popularity and discussion of video (we are always hearing about the convergence of photography and videography), I thought it might be interesting to take a look at the different video hosting services, and look at their functionality. So, earlier today I recorded a video using Quicktime Pro on the Mac, and tried uploading it to 3 different popular services: YouTube, Vimeo, and Animoto. Here are the videos in that order, followed by my thoughts on each:
YouTube:
Thoughts
Price: It’s free! Nothing beats free in my book, and with the competitive landscape of technology, this is pretty hard to beat.
Quality: The thumbnail does not look right, but that’s a minor nit…on playback it seems pretty good.
Ease of use: Another pro here as well…it was easy (and quick) to upload. It took less than a minute to upload, and adding the video details was also easy. You do need a Google account to do this though, but since that is also free, the downside here is hard to find.
Accessibility: It was VERY easy to find the embed code to copy/paste into the blog. And YouTube/Google is pretty recognizable as far as things go, so it’s going to be hard to compete here. But, let’s look at the other services…
Limitations: The only one I can find is that you are limited to videos under 10 minutes. You can do HD quality, up to 2GB per video (so no data size limit), with no waiting in line for video conversion or anything like that. At first I thought 10 minute limit was, well…limiting, but after looking at the other two services, not as much.
Price: It’s free…kind of. You can go the free route, but there are downsides which I will go into shortly.
Quality: It seems on par with YouTube in terms of video quality,
Ease of use: Also on par with YouTube, and the dialogs are very similar, so kind of a 6 of one, half dozen of the other sort of comparison here.
Accessibility: Vimeo videos are just as accessible as YouTube ones are, anyone can see them if you set them up the same, so kind of an interesting dichotomy here…
Limitations: Your limitations with Vimeo are that you can only upload 500MB of data per week. This may sound like a lot, but when it comes to video, that could get eaten up pretty quick. I didn’t see a length limit on Vimeo, but could be wrong here. Another limitation on the free account is that you have to wait in line for your videos to get uploaded. I uploaded the video 20 minutes ago, and still have another 40 minutes to wait before it will start the conversion for me. If you upgrade your free account to the Vimeo Plus one, you can get 5 GB of content, HD quality, no ads, and for $60/year or $10/month. Not too pricey, but again, in a competitive economy, it’s something to consider…
Animoto:
Not reviewable – as it turns out, Animoto only allows 30 second videos for free – everything else is a paid service. The price is cheaper than Vimeo for the service at $30 per year, and it does seem to have no limitations on video length or things of that nature, but the fact that you can only do a 30 second video on their free service seems rather lame. I realize that we need to be quick and to the point with our content, but 30 seconds? Really? This one gets a major thumbs down from me for this and on that basis would not recommend it.
Self-Hosting
In the interests of being as broad in the review process as possible, I thought it would help to also include the self-hosted option as one worth considering. There are some caveats to this though, as services and limitations would vary from one hosting service to another. I use Dreamhost, and I like their hosting, so figured it would be worth showing that here.(You can sign up from the link or from using the promo code CBPROMO to save 50% on sign-up!)
Price: Free…kind of. You do have to pay the hosting company for hosting your website, but as far as I know ISP’s typically do not charge additional fees for specific types of content.
Quality: Perfect! Since you are uploading the original video, there is no degradation in video quality – but that being the case, you are solely responsible for quality control…fair warning.
Ease of Use: Again, it depends on your host. For me and the blog, it’s pretty straightforward as I am using a self-installed version of WordPress and I am familiar enough with the functions and formats to handle it, but if you don’t want to be bothered with uploading a video via FTP, then referencing that source URL in your WordPress or website with HTML and all that, it could be challenging.
Accessibility: I hate to beat a dead horse, but it also will be a function of your host, and what format you choose to upload your videos. I uploaded the raw Quicktime video, so it will be dependent on people having Quicktime on their computer. There should be a conversion utility (I think it’s called jwplayer) that converts the .mov format to flash for easier viewing on the web, but this may need to be installed in your version. It is free, but could be a limitation as Flash viewers are more common.
Limitations: You are only limited by your own comfort level here – if you don’t want to deal with all the nitty gritty details, then this could be problematic. For those that enjoy managing all their own content, this could be ideal though, it really just depends where on the spectrum you are. For me, I am okay dealing with it, but if I had my choice between fussing over the details and using a service like YouTube to host it for me so I can go back out and shoot more, record more, and research more content, I’d choose the latter.
*****
So, that’s the top three reviewed for your consideration. If I had to vote on one, I would say YouTube gets the nod. Ease of use, lack of expense, and visibility is just unbeatable. But, keep in mind, that’s just my thoughts. What are yours? Anyone have any particular favorites or preferences for video hosting? Any I missed? Benefits and downsides? Sound off in the comments!
In other blog news, don’t forget, the post from Saturday (yes, I made a Saturday post!) allows you to embed your own photos to the comments! Share your own thoughts on the best photos of 2009 – they do have to be online (embedded via URL) but it’s a great way to share your favorites with the community at large.
Finally, time is ticking away on the December Giveaway. Over $400 in prizes including books, prints, paper, and software are up for grabs so make sure you get your “Giving” themed photo to the Flickr thread before the end of the year!
Well, the video I had planned for today fell through, and since everyone seemed to enjoy the stills from yesterday, I thought it might be kind of fun to share some scenes and sounds of the surf down in Cabo San Lucas. It really was breathtaking, and the little shaky (hand held) point and shoot video really doesn’t do it justice…but you can get the general idea! Anyway, here’s the “Abbreviated Post Tuesday”…enjoy!
Only four days left to win the $500 package of a Thinktank Photo Multimedia Bag System and the Topaz Labs Photoshop Plugin Bundle over at the Learning Digital Photography Flickr Thread. Get your photos in soon! Happy shooting all and we’ll see you back here again tomorrow!