Thursday Throwbacks

Okay…let’s throw things back two days and pretend it’s Tuesday again. Why, you ask? Because I finished the tutorial I had started. It’s just a quickie, but does explore some often missed elements from the Tools Palette – particularly with the Options bar for each tool. While there clearly wasn’t enough time to go into great detail on all tools – I did give the crop tool and the Lasso tool a run for their money. Watch me screw up too and blithely ignore it while powering through! Rather funny stuff – but hey, if we take ourselves too seriously, then we’ve stopped having fun, right?

Anyway , here’s the links to the Flash and Download versions of the tutorial.

The Options Bar

Enjoy the weekly shenanigans, happy shooting and keep watching d’em apertures! 😉

Tuesday Tricks and Treats (and a tutorial)

This Tuesday, I’d like to share some neat tricks I came across online. First, How to Light a Shot on Two Planes – this came courtesy of The Strobist (one of my regular reads) – plus it includes a really cool-looking shot of some Turkish Delight! Apparently he (David Hobby, Strobist author) did this workshop in Florida last weekend with industry folks like Scott Kelby and others from NAPP in the room – no, that wouldn’t be at all intimidating!

Another neat treat I read about through PhotoJoJo was a blog where two friends who live a fair distance (3191 miles to be exact) from each other and they each share an image a day on their blog, one from each region. A definite cornucopia of inspiration as sometimes it’s the regular snapshot-types while others it’s truly breathtaking scenes…and when the two complement each other, it’s just too cool (February 7th is my favorite day so far)! Stop over when you get a minute and comment on their work – they deserve the accolades. The blog name, coincidentally, is titled 3191!

And last, but not least, the tutorial for the week – my inspiration for this came from (surprise surprise), NAPP contributor Matt Kloskowski. He had done this trick on the show (and in the NAPP member space) for Macs, with a little verbal instruction set at the trailer for Windows users. After sharing a few msgs with him – I decided to do the counterpart tutorial this week for Canon Blogger – the Windows version of creating a Desktop Calendar. So…to Matt, thanks for the creative idea, and to the rest of the world, here’s how to create a desktop calendar for Windows. Enjoy!

Windows Desktop Calendar

Friday Free-for-all

So, last night after the sappiness ended, I came back to the trusty glow of my monitor and started knocking out a few more photos for my display book (more on that later). During a break, I stopped into the NAPP forums (highly recommend a membership with NAPP btw, at only $99 it’s a steal!) and was reading through some of the stuff, just to try and catch up a little more on my own knowledge base. Boy what a humbling experience that was! I did come away with some great web gems though, so every Wednesday for about the next milenium, I’ll dole out a few of them each week to the dirty dozen or so that read CB regularly! 🙂

In the meantime, here’s a couple to start things off – think of them as “Friday Freebies”:

The Graphic Reporter : Not only does her voice sound better than mine, she’s got an amazingly look and feel to her site.

Photoshop Cafe: A little heavy on the ads for me, but a great source of info, articles, and gateway to lots of things to do with photography.

DXO Labs: I recently installed the Film Pack demo after hearing about it on DPS, and have been playing with it for a few days now. This is a very cool plugin, and the coolest part about it is that you can launch the Film Pack w/out photoshop! Make your adjustments quick and easy and on the fly – very intuitive. Here’s a capture of an image you may recognize that I posted earlier this week with some tweaks done to it:

dxo-capture.jpg

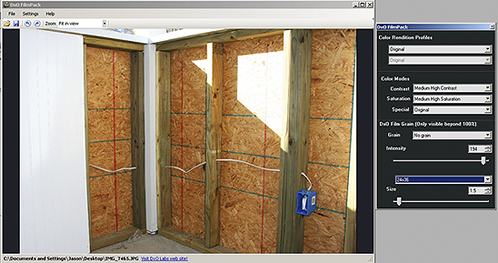
The types of effects you can run are quiet myriad, and well worth it. Stop over at DXO and check it out!

Finally, in the most recent issue of Photoshop User Magazine, I saw an add for a PS plugin called SiteGrinder2, from a company called MediaLab. I’ve not heard of them before, but I must admit, the ad makes me want to buy it. It does seem like a costly one though at almost$200 for the thing, but worth the trial which I downloaded last night and will try over the weekend.

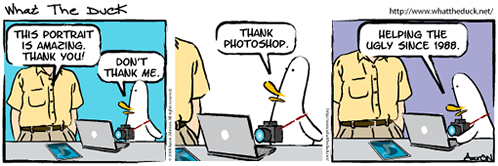
And, as many photo-blogger types do, I’ll leave you with a laugh from What The Duck:

wtd413.jpg

Have a good weekend! Happy shooting, and watch d’em apertures! 🙂

Selective Color, Part III

The Tuesday tutorial for this week is the final installment in making selections based on a specific color, or range of colors. The first demonstrated how to use the Magic Wand and Lasso tools to copy an item onto it’s own layer, while preserving the rest of the image for editing.

Part II looked at using the history brush to bring back color in a specific part of an image for a unique way of identifying one colorful object of an image.

In this final installment, I use the Color Range method to demonstrate how you can make a selection based on the range of color.

The Quicktime version is up and ready for download via the link provided or in iTunes. The flash-based version is uploading right now, but will likely not be finished before the 7pm deadline. For those that prefer the flash web-based version, check back later this evening, as the linked path should be finalized by then. Tune in tomorrow for more web gems. In the meantime, I would like to give another round of thanks for all that are tuning in to the show and sharing their thoughts, comments and feedback with me both personally and in the comments area. That’s all for today. Happy shooting out there and watch your apertures:

ETA:  Flash-based version is up – thanks for the patience! 🙂

Selective Color, Part III

Tuesday tutorial teaser

Today, I am going to show you yet another technique for making specific color selections, but as noted in the title, this is just a teaser – the tutorial is not finished in production, so I should have it up later this evening (around 7).  In the meantime, I would like to thank everyone again who has been reading, watching, listening, and sharing their feedback.  Let’s keep it up – what other tips, tricks, techniques and stuff do you want to hear in tutorials?  I’m listening… 🙂

Big Blue Bowl – Selective Color, Part 2

The tutorial for this week is the second in what will hopefully be a three-part series showing the various ways that you can approach selective coloring in Photoshop. Last week, I went over the technique of using the lasso and selection tools to select your color component and then putting that on its own layer. This week, I look at the history brush. You can quickly see the differences between each and how each has its advantages and disadvantages.

I gave a shout-out to Scott Sherman and Michael Stein’s Digital Photography Show on the video, but you really do need to listen in. Rudy Winston from Canon is on this week and according to the show notes, gives some really good insights and dialog on the Canon line. Kudos to Scott and Michael for incorporating the info into their podcast – I can’t wait to listen to it tomorrow during the commute. Additionally, I spoke with Scott on the phone today too, so that was a neat experience to actually talk to one of the established regulars of the photography community – if you’re reading, thanks for taking the time to chat with me Scott!

For those that prefer the flash version, here it is: Selective Color, Part 2

For the others, the Quicktime version is linked as a media file, and is also available in iTunes. Here’s a sample image of the final product as a teaser:

Selective Color applied to a Blue Bowl

Don’t forget, you can now sign up for email notifications of new posts to the blog. No worries about spam or hokey solicitations from me, I don’t even see that stuff. It’s all automated, and this way you can save space on your toolbar and widget space. One more thing that is done for you, so sign up for it today! As a final note, thanks to all the listeners who have been downloading and watching the videos. I’ve received several kind emails with ideas for future tips, so plenty of creativity is on its way for 2008.

Well, that’s about all for today. Tune in tomorrow for my trip around the web, compiling all the news and reports trickling out of PMA. Happy shooting, and as always, watch those apertures!

Missed Mondays

Egads, I am such a slacker – never posted yesterday. I was still feeling the effects of a rather tedious weekend spent on some home renovations and Super Bowl side effects. Suffice to say, I hit the sack at 8pm – a first for me in quite a while. However, I do have some tidbits to share – both Scott Kelby and David Hobby from Photoshop Insider and Strobist fame respectively give mention to Joe McNally’s recent book – The Moment it Clicks. I usually avoid promotional recommendations, but with the excerpts that I’ve read and the buzz about it, I may as well pull the trigger.

In other news, PMA is wrapped up and the blogs will surely light up with their recollections of the gear and trade show information they came away with from the event. Tomorrow I will endeavor to have a round-up of the web resources that cover the gamut. Today is tutorial Tuesday and I hope to have that up in time, but fair warning – it will be out fairly late tonight if I can make it.  Finally, thanks to the friendly folks at feedburner, I’ve added an email subscription link to the sidebar so you can add your email address to be notified every time I make a post.  The default code does not seem to like my custom stuff so things aren’t as pretty as I’d like, but if I waited on that kinda of minutia, I’d not even have a blog running yet!  Happy shooting all, and as always, watch those apertures! 😉

Selective Coloring: Method #1

The task of selecting a single object in an image to highlight by means of leaving that color intact while altering the surrounding elements is nothing new to photography…and there are several ways to do this, with varying levels of success and usability for each. The tutorial for this week looks at the simplest of ways, by putting that object on its own layer. The nice thing here is that the technique is portable to multiple versions of Photoshop. Having recently upgraded myself to CS3 Extended, I am trying to keep tutorials cross-functional across multiple versions for usability. Enjoy, and see you next week, for the second method. Don’t forget to vote in the polls!

bw_beer.jpg

Browser Version

waterfront pier


waterfront pier, originally uploaded by Canon Jason.

I’ve finally taken some time to get some of my pictures processed and online both on my dedicated photo site, and on Flickr. Since Flickr has this means of posting to the blog built in, it makes a handy means of sharing my photos back to the blog as well. So…here’s a random Pic of the Day. The tutorial should be out late tomorrow (Wed.) night. In the meantime, happy shooting everyone, and as always, watch your apertures! 🙂

Blue Skies…

Tutorial Tuesday looks at recovering the blue tonal range in your photography. I can’t tell you the number of times I’ve been out shooting landscapes with some really great colors, but due to limitations, the camera sensor just can’t handle the tonal range. With that limitation in mind, I’ve always focused more on getting the richer reds and oranges, than the amazingly blue skies. Well, today I am going to share a tip on how to restore that blue sky in your photos.

I picked this tip up from the most recent issue of Popular Photography, which gave an abbreviated pictorial and text version of the trick so if you prefer that, I would encourage you to get that issue – it’s the February 2008 issue. Also on todays docket – don’t forget to vote in the latest poll – what gear do you shoot with? – it’s over on the right hand panel.

Just a few other things to mention today:

  1. Since I am always talking up B&H, I figured it may be helpful to have a link or two to their site so I’ve added that both to the sidebar and the footer.
  2. Tips From The top Floor has a page set up for their 2008 workshops. Nothing on there yet, but it’s up and ready for bookmarking. I’ve put a link to it from the blog roll as well – hoping y’all come near Charleston in 2008! 🙂
  3. Last but not least, Photoshop User TV has their latest episode ready for viewing/download, so if you have iTunes, subscribe today, otherwise, check out the website here:

Happy Shooting and watch your apertures! 🙂

Blue Skies Tutorial