Three Tips to Blur Water

After posting about exposure triangle and how blurring water means decreasing aperture, I got a few questions about other ways to blur the water in your composition. So, here you go. 

It seems that water always seems to attract attention in photography…whether it’s an ocean at sunrise, dew on a flower, or waterfalls gushing through a mountain stream, the impact that water can have on our imagery is very powerful.  Harness that power to your own creative ends by recognizing 5 ways to blur it to your advantage:

Slow Down!

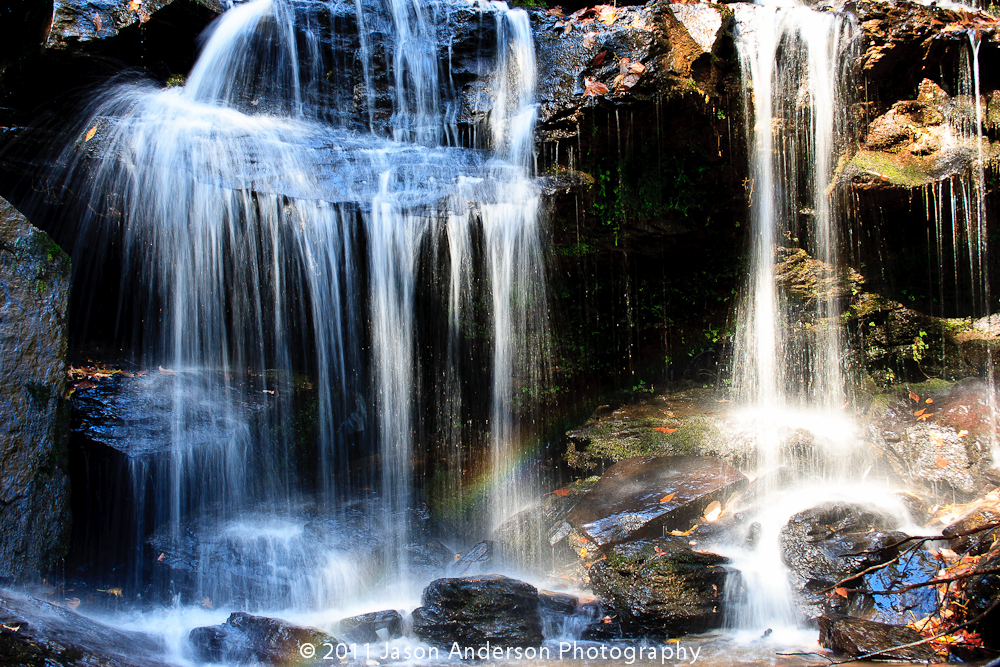
1.  Slow that shutter speed down! Your shutter speed is the best way to blur water…taking things down to at least 1/4 of a second, if not longer. This is what I did in my last post about the exposure triangle. It’s still my favorite way of blurring water to a creamy smooth texture in photography.

Use a Tripod

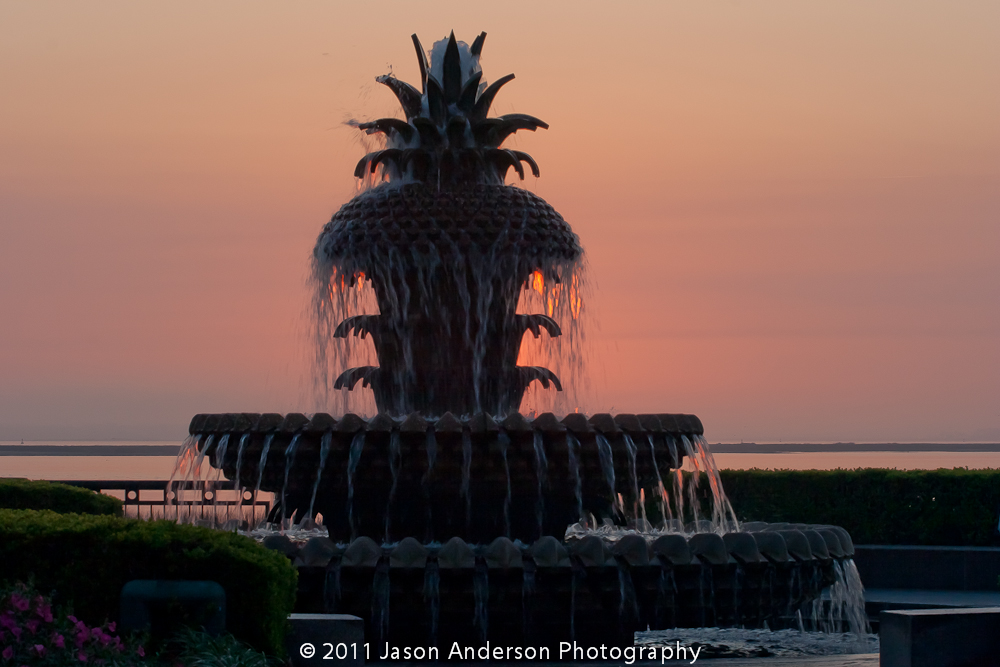
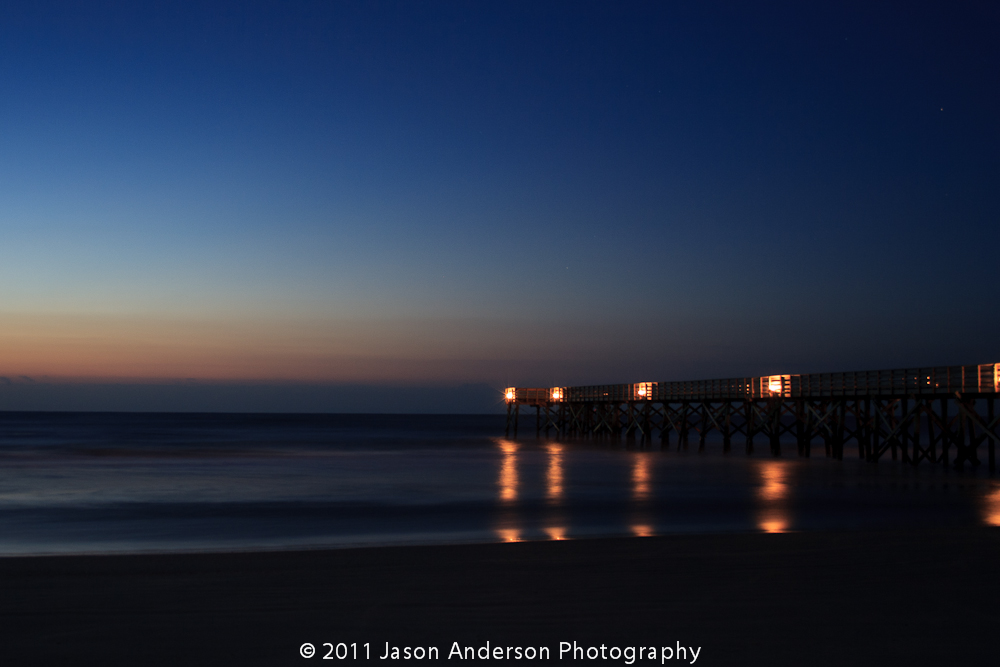
2.  Steady those shots – even without slowing your shutter speed, to seconds, keeping the camera stable to prevent shake when hand holding is near impossible, so please take and use your tripod!  Of course, it goes without saying that when shooting at slower shutter speeds, it helps immensely to be solidly mounted on a good set of legs.  Without getting into the pros and cons of various features and qualities of various tripods, if you are shooting a 10 second exposure of a beach at sunrise, you need legs!

Palmetto Statue
Palmetto Statue

ND Filters

3.  Sometimes even with slowing shutters and using tripods, it’s just not enough. So, you need to find another way to control the light. ND filters are the answer. I’ve seen a lot of people run into an invariably brighter exposure… and to combat extra ambient light in the scene, they use ND filters. These filters essentially prevent those extra rays of light from hitting your sensor.  Polarizers can work too, but they are less effective as they can have some downsides to them including elimination of reflections, casting a specific tone on your entire image, and more.  When in doubt, always use ND filters.

SC Pier at sunrise
SC Pier at sunrise

As always, there’s more than one way to skin a can (or blur water)!  More involve shutter dragging with fill flash, and lots of others.  What ways do you use to blur and control waters’ appearance in your images?  Sound off in the comments with tips and tricks of your own! Happy shooting all, and we’ll see you back here again next time with more photo goodness!

Photo Technique of the Week

Yeah, okay, I don’t do this a lot, but every once and a while it’s fun to put together a quick technique or tip to share with the reading/listening community, so here’s one that’s very helpful when using Lightroom. More of a tip than a technique, this is simply a suggestion to enable the Auto Advance feature.  When you check this feature, it makes your work flow go a lot quicker when making picks or rejects from catalogs. After I’ve completed an import, I’ll go through and tag the picks and rejects with my keyboard shortcuts (P) and (X) respectively. Because the Auto Advance feature is enabled, simply making a”tag” or flag selection on a picture, advances me to the next one in the current catalog or collection.


After I do this, I simply look up at the top of Lightroom while in Library mode to filter my collection for either picks or rejects. From my approach, I do the rejects first, then CMD/CTRL A to select all and delete! Then from the picks, I’ll go through and make whatever edits I need, even including round trips to Photoshop, Photomatix, or whatever 3rd party software I happen to need or be using at the time.  This is always so much easier with Auto Advance enabled. I can fly through a shoot of 500+ images in about 20 minutes both to clean up the catalog, and make the picks of what will likely be in the final published album. Give it a whirl and see if it improves your work flow!

Got your own tips or tricks for Lightroom, Photoshop, or simple camera techniques? Share the love and sound off in the comments! Either that or share your own thoughts on what you think of the techniques I share here. Regardless, tips tricks and techniques like these are always designed to help you get through post production and do what we all love to do – get out and shoot some more! Happy shooting and we’ll see you back here next time!

Aspect Ratio adjustments explained

I can’t tell you the number of times I’ve gone to print pictures I’ve taken only to find that I had composed it in a way that a portion of the image was lost when printed because it had to be cropped out to fit on the paper.  Today I am going to share a technique in Photoshop that will help you get around that pesky limitation.

First a little background – the reason why we are losing part of the picture is because we are changing the aspect ratio.  What is aspect ratio?  Simply enough, it’s the relative size of the long side of the picture to the short side.  Aspect ratios are often referred to by their lowest common factor.  So, a 4×6 print uses a 3:2 aspect ratio.  (Aspect ratios usually are stated with the larger of the numbers coming first…)  An 8×10 has an aspect ratio of 5:4.  Want to print a 16×20?  Guess what – it’s got an aspect ratio of 5:4 too!  Here are some of the most common aspect ratios that you see in photography:

4:3 – Point and Shoot Cameras
3:2 – 35mm Film cameras and most APS-C sensor cameras (SLR’s)
1.81:1 – APS-H Mode (High Def)
3:1 – APS-P (Panoramic)

So, with an SLR camera, since your sensor approximates an aspect ratio of 3:2, getting an 8×10 print means you need to keep your subject matter in from the edges because when you crop to the new ratio, at least one of those edges (and a little of the other) will be lost from the crop.  So, having now explained  “why”, let’s now look at the “how” (as in how to fix it!) in the delayed tutorial for the week:

49 Photo Tips Cheat Sheet

The quintessential PDF that started it all – my 49 Photo Tips Cheat Sheet! Over the course of my foray into the world of photography, I have been been busy compiling of my favorites and some unusual ideas for photography. Ranging in subject matter from how to improve your composition to gear tips, making money, photo walks, and everything in between, here are 49 Photo Tips – all compiled nice,  neat and easy as a PDF for easy download and reference (top 50 lists are so cliche! 🙂 )! This was initially launched as a freebie several years ago, but has grown in such popularity, and takes enough of a draw on my bandwidth for hosting and file storage, that I had to start charging for it.  But, for less than a cup of Starbucks coffee (it’s only $2.99), you can get your own digital copy of the

49 Photo Tips Cheat Sheet

49 Photo Tips Volume 1 - The Original Cheat Sheet
49 Photo Tips Volume 1 – The Original Cheat Sheet

Remember, we learn best by sharing with others, so if you like it – tell your friends, they’ll like you better!  If you have an idea for future inclusion, then tell me!  I am always looking for new ideas, sources of creativity and ways to learn and improve so by all means, let me know if I got something wrong, or if you have an idea to include.

And if that’s not enough, Volume 2 is available here:

Masking in Photoshop Lightroom

Often when  I talk to people about their work flow one big question and the need to do some pixel based editing in Photoshop, one of the questions that often comes up is “Why can’t I do X in Lightroom?”

Most of the time, it involves answers that include explanations of pixel based editing versus parametric editing, and lots of other technical reasons as to why certain things can’t happen in LR.  But sometimes (and this is the best part), I find out they are adding to their work flow because it can be done in Lightroom!  One of the most common ones is masking effects.  When I show people this, I almost always get a “Holy Cow!” or some other variation on the “cow” part.

So, today I thought I’d share a quick tutorial on how to implement masking edits in Lightroom.  Let’s take a look at the base image I am using here – a boat dock on Raquette Lake in the Adirondacks of upstate NY:

Before the Mask

So, the dock here is a significant portion of the subject, but it’s way darker than the rest of the image, and really could be increased by a stop or two relative to the sky.  So, rather than round trip to PS, let’s see what we can do here.  I’ll start off with making a general masking selection of the entire area.  So I check the Adjustment Brush (near the top of the Develop Module on the far right hand side), and then at the bottom of the image (over on the left), there’s a box that says “Show Selected Mask Overly”.  I check that box.  Then I just start painting!

Masking a selection in Lightroom

It’s a prety broad brush I’ve used, so we need to clean it up, as some of the water got caught and that will leave an ugly halo effect if I don’t take care of it.  So, to get more detailed selections completed, I zoom in, and then switch to erase mode while still showing the mask.  This is in the lower options of the Adjustment Brush, on the right hand panel – see where it has “A”, “B”, and “Erase”?  Click the erase and start painting again to undo the mask:

Erasing a Mask
You, of course, will have to adjust the size, feathering and opacity of your brush to taste, and to accommodate your brushing technique as needed (hint:  Wacom tablets work better than regular mice or trackballs).  Once you’re finished with your refining of the mask, go ahead and uncheck the option to display the mask and see your results.

At this point you can actually do something else kind of cool – hover your mouse over the dot that is on display and then slide it to the left or right as you see the exposure increase and decrease for the selected area!  Pretty cool, eh?  This same technique works with other features in the adjustment brush, whether you are working on eyes, teeth, dodging, burning, or even skin softening.  The scrubby slider is a nice feature in here.  Then, finally, one thing I’ll do is make a side-by-side comparison of the image in a before and after mode to make sure my changes aren’t too garish or over the top (you can do a side-by-side comparison, top and bottom comparison and even split the screen between the two for a more detailed look):

Side By Side Options

Side by Side View
Side by Side View
Looks pretty good for this quick tutorial…and here’s the final image after our masking edits are done:

Adirondack Dock
Adirondack Dock
Now I grant you that this is probably not a portfolio image, but it hopefully was helpful in illustrating how you can mask and edit your photos inside of Lightroom without having to do the round trip as often to Photoshop!

Like this tip/trick?  Got any other comments, questions, or curiosities of how to leverage Lightroom more in your own work flow?  Sound off in the comments, and as always, keep on shooting!


Do you Have Your Torx in Order?


So, after years and years of advice and instruction on maintaining hard drive redundancy, and the benefits of upgrading from time to time, I finally am following my own advice and upgrading my venerable Macbook Pro.  After a screamingly good deal came out for laptop disk drives locally, I went out and snagged a 750GB 7200 RPM hard drive from MicroCenter and brought it home.  I also picked up a copy of Mac OS X.6 since my previous upgrade came through a friends DVD who was no longer living in the area.  All told, I am in for a little over $100 – not too shabby!  However, as they say, the Devil’s in the Details!

I’ve changed out lots of hard drives in my time…after all, it’s no secret that I am a working IT professional – that’s my day job.  I’ve been doing that for about 10 years now, so hardware upgrades are pretty routine for me by this point – and I’ve got lots of tools to do it with too…everything from magnets, to phillips heads, to flat heads, to Torx bits for unique screws, and even a pair of nylon pliers.  But all of this based on a Windows background.  I’d never done much with Macs.  The mentality I’ve always had though is that hardware is hardware, right?  I did check out a few tutorial videos on YouTube and all the tools sounded like ones I own, so I jumped right in and off I went – until I got inside the Mac and was presented with two teeny tiny screws that required a Torx bit T6.  I went to my trusty toolbelt and saw my Torx bits went from T30 all the way down to T4 – awesome!  Until I noticed that one slot was missing – and sure enough, it was the dreaded T6!

A trip to Wal-Mart yielded no dice (it was getting late), so this morning off to Lowe’s I went.  I did find the T6 bit – but it was in a package of other bits and a nut driver – for $20:

Torx KitSuffice to say, I was a bit (if you’ll pardon the expression), a bit torqued to be missing what was likely a 50 cent bit and having to spend nearly $20 to reassemble the Mac.  However, the eternal optimist, I put the positive spin on it – this is a nice kit I bought and the rest will probably go to Good Will since they are showing their age a bit.  Finally, of course, the educational moment for me:  I finally got my Torx in Order!

So, with the Mac now flying on a 7200rpm drive with plenty of storage, my weekend will likely be spent performing a fresh install of all my favorite apps.  Which ones do you think will go on there first?  I’ll give you a hint – the company name starts with A and ends with dobe!  The takeaway from all this – make sure you have your Torx in order – it is definitely a good motto to add to your motto book!  Have a great weekend everyone – just because I wont be shooting doesn’t mean you can’t so be safe, be smart, and…(wait for it)…

Happy Shooting!

Three Top Tips for Posing Your Subject

As the Spring weather comes upon us, so does the urge to get out and shoot more.  Models are also more willing to brave the warmer temps, so it’s easier to get some willing subjects.  As you start to venture out of the warm caves, here’s a couple tips to getting your subjects to pleasing postures:

1.  Turn and Burn:  So many photogs want to get facial expressions but in doing so, forget that most of the time we never see someone’s full face toward us.  It’s usually more of an angled shot, and that’s why it’s often recommended to turn your model to one side.  Some models will swear that one side is better than the other, but when it comes to photography, my thought is not so much shooting their best side, rather shooting an expressive side!

Stand to the Side

2.  Breathe! – That’s right, so often when a model poses, the natural inclination is to “hold that pose” which subconsciously puts them in a state where they hold their breath.  Help them remember by even telling them to do so.  “Turn here, great, now chin up, awesome, and just a little to the right, excellent!  perfect!  Hold that pose….!  Oh, and don’t forget to breathe!  Take a deep breath and now exhale…fill those lungs with air!”  Not only will it surprise the model, but you may get a more natural smile – and if you’re lucky, even a laugh!

Posing Your Subject

3.  Encourage the lean! – When people start to get in posing mode, there is a tendency to lean forward.  Leaning into the front shoulder is common, as is leaning to accentuate cleavage for a woman.  If you think about it though, the forward lean does make everything look a little bigger!  That’s not always a desirable thing, so encourage your models to lean back just a tad.  Not too much as you don’t want them to fall over, but at least make sure their weight is shifted to the back leg.

Leaning Back a Tad

The other thing to remember, (kind of sneak tip for you), is that modeling rules work for both men and women, so even though the ones here are all women, many of the same rules apply!  There ya have it – 3 tips to get you started with subject posing and portraiture!  Got your own tips?  Share ’em in the comments!  Have a great weekend and happy shooting!

Running Off the Grid

Batteries

A friend of mine is going on an extended backpacking trip, and space is already tight, so he approached me to see if I had any ideas on how he should go about running his SLR for an extended period of time without being able to charge or re-charge.  A couple ideas came to mind:

1.  First, just buy a battery for each day – not the cheapest route, but the easiest way to ensure power is had all along.

2.  Second, what about renting these accessories?  If he has two of his own, then renting 5 would run half the cost…

3.  Another option was to get a battery grip.  Here he could use his own for as long as possible, then switch to disposable AA batteries…

4.  Last but not least, solar power…I’ve considered these and even saw them in REI – they were a tad expensive and I am not even sure how one would go about connecting these to an AC charger.  You’d need the solar panel, then a male USB/AC converter, then the charger.  And the other factor would be how much of a charge you could get off that…in addition to weather concerns.  What if it’s not all that sunny?

Given the options, my final recommendation was to go with option 3.  It’d be a sound investment, would actually make the gear easier to hold on to, and often more stable than going w/out.  He agreed and will likely buy based on my recommendation.  It’s always a good feeling to be helpful to others, but before he does, I asked him to hold off for a day or two if possible, because I wanted to throw the question out to the readership…what ideas does the audience have for my friend?

Some of the rental outfits I’ve pointed him to include:

I’ve not had the benefit of experience with any of these vendors as we have a local camera rental shop that gives pretty good rates, so I always rent local from them.  Anyone have any experience with the national rental outfits?  Would really be helpful to get some external input here as he is leaving soon on his trip and could use some direction.  Sound off with your ideas!

Enter your email address:

Delivered by FeedBurner

Did You Know…

This last week has been kind of rough – after teaching in Minnesota on Sat., my whole time schedule was thrown off and I never really have been able to get my body clock back in sync.  (I don’t know how traveling types do that…)  That, combined with a little out-patient surgical procedure on Friday made for a lot of distractions.  So, apologies in advance for being a little hit and miss with the blog posting.

Today though, I thought I’d share a little-known (or at least not-often-discussed) tip about the Canon EOS camera line.  Did you know that there is a silent shooting mode?  To enable this mode of shooting, simply switch your camera to the live shooting mode (where you compose your image using the LCD instead of the viewfinder), and when pressing the shutter, it’s much quieter than when normally pressed!  I knew about this, but honestly had not used it in quite a while.  It’s one of those “Oh yeah…..!” moments and when reviewing some material, I came across this from the owner’s manual.  Here’s the page directly from the 40D guide:

Silent

This is a very handy feature to have if you don’t want to interrupt an emotional moment during an event (say a bride and groom kissing, a baby sleeping, or some other such occasion).Got your own unknown or not-often-mentioned feature to share about your own gear?  Sound off in the comments!  Have a great weekend all and we’ll see you back here next week!

Subscribe to CanonBlogger by Email

Live from the Road

Northern Lights Poster

Over the weekend I had the distinct pleasure of joining my colleague and good friend Kerry Garrison (who you probably know from Camera Dojo) out “in the wild” as we traveled to the Breezy Point Resort north of Brainerd MN (about three hours west and north if the twin cities) and spoke at their Northern Lights conference.  Through the coordination of our sponsor, Nations Photo Lab, and the conference hosts, MNNPA, we had a wonderful time.  Not only did the coordinators treat us like Rock Stars (we did give some autographs though), the attendees were quite engaging too.

The pre-conference sessions were set to start at 12, and our gig started at 5.  After a few of the logistical things were addressed that always come up with hosting conferences (they even had a live wedding going on one room next to us – what a great opportunity for a bride to get a wide range of photographers applying their trade), we got rolling.  A mere five minutes into our introduction, we paused to add even more tables and chairs to the room as more and more people started filing in.  For a regional conference to have a crowd this big during a pre-conference tech talk was quite surprising, but also very enjoyable.  So, what did we talk about?

The topic was none other than Lightroom 3!  We talked about how to navigate around, some of the benefits and tips and tricks of LR to soon realize that we are very fortunate to be in the position that we are.  It was humbling to realize that we really are on the cutting edge as so many people are using Lightroom 1, LR 2, or even earlier generations of Photoshop for their workflow.  Our discussion quickly was adapted to both demonstrate why and answer questions on what makes Lightroom 3 such a useful tool for both established and emerging photographers.

The questions raised were just wonderful ranging from very broad-ranging ones like “Why should wedding and portrait photographers care about upgrading their work flow?” to ones as detailed as “Can Lightroom manage PSD files?” and “How can I keyword photos during import?”  By the time our two hour segment was up we had barely covered the import process, a little bit on the adjustment brush, and the nuts and bolts of things like cropping, selective color, and black and white conversions.

Ours was the last segment for the day and we were then invited to the after party over in one of the adjoining houses.  Food snacks, drinks and such were all available and in abundance.  With the abundance of spirits, everyone was in great spirits themselves as we laughed and talked further with lots of people about photography stuff until the wee hours of the morning.  By 1am we were done though and needed to head back to our respective cities (myself to Denver and Kerry to Anaheim, CA).  So, during our road trip back to Minneapolis for the return flight, we decided to record this show for you.  Answers to all the questions above and more are here, as well as a few photo opp stops!  Thanks for taking the time to listen, hope you enjoy it and we’ll be back again soon with more photo goodness!

Catch up with Kerry:

Follow me on:

Learn more about the Northern Lights Conference and MNPPA here:

[display_podcast]