Monday Minutia: Memory Management

CF Cards

A post over on This Week in Photography got me thinking about my memory cards and the rituals or practices I take to conserve my image data. As they suggested over at TWIP, I do format my cards in camera prior to using. This in-camera formatting optimizes the data sectors and creates folders to organize image data. However, I also occasionally format my cards on the computer for that exact reason. Since the XT only has an image counter that goes to 100, whenever I pass that 100 mark, it creates a new folder.  If I were to never format the card outside of the camera, those folders would always remain there – and I would wonder if there were images in there not being copied out to my hard drive for backup.

So, I do format my memory cards in the computer. About once a month I’ll insert my cards into the card reader, plug ‘er up, and format away. On the PC, that would be: format E: /fat32 (With “E” being whatever drive letter is assigned to media once you connect it. Having said that though, once the PC format is complete, I will do another format in camera to optimize sectors for the camera prior to shooting.

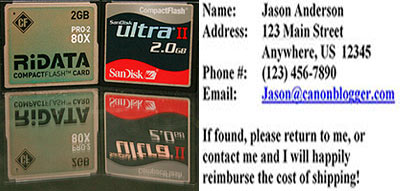
The last step I take in the format process is to take a picture. My very first picture on each card is a screen shot picture from my monitor. On my monitor, I put together a Word document that gives my contact information (Name, mailing address, phone, and email address), along with a request to return the card to me (see above – naturally, the info there is more accurate, but you get the idea). That way, if I ever lose the card, hopefully some benevolent person will find it and put it in their computer or camera and find that content there. I took the shot with PrintKey (Windows only- if you are on a Mac, use CTRL+SHIFT+4 to grab the area manually yourself), and then opened in PS and saved for web settings to minimize the space it takes up on the CF card (32K). This may seem rather a p.i.t.a., but the step for me is worthwhile just as a safeguard against the possible loss of my CF cards.

One final note, in case anyone is interested, I do have a few suggestions for vendors to use: I like Sandisk and Ridata. Both have been very good to me, and with three 2 Gig cards, I am probably safe with those. Although, I do know of others (like Scott Kelby) that recommend Hoodman. For those of you that are technically inclined, and want to know all the nitty gritty details of write speeds, failure rates, etc., Rob Galbraith also has an excellent page on all that stuff if it is up your alley.

This may be a rather unique approach to memory card maintenance, but it works for me. Maybe this will give others ideas for procedures to use in their own approach to memory card management. What about everyone else though? Any other tips or tricks to suggest for managing your media? Feel free to share those in the comments.

The week in review

globe

I know web links are typically done on Wednesdays, but a little schedule change was in order given the recent news from this corner of the internet.  So, for this Friday, here’s some stuff I read around the web recently:

Brian Reyman of Professional Snapshots has released a beta version of a neat Flash program for schematics of lighting setups.  It’s a very helpful in documenting studio work and other such photo utilities.  Best of all, it’s Flash-based so it will work on Mac and PC!  Many thanks to Brian for all the time and energy he’s put into this program.

Being very much a fan of DIY photography, I have to give shout outs to the guys over at This Week in Photography for their post on making your own reflectors from cardboard, styrofoam, or plywood and either paiting white or covering with aluminum foil.  Very clever, and a great tip!  Thanks to Scott Bourne for this…oh yeah, check out their weekly podcast too.  Lots of info and always fun to listen to!

Scott Kelby needs no introduction, as he’s pretty well recognized throughout the industry.  He also most certainly needs no help from me for publicity, but his post this week about the “School of Hard Knocks” really hit home as I forgot a CF card for my camera just the other day.  So, sometimes I really am just like Scott Kelby!

David Hobby also gave a little nod to this over on Strobist, and while it’s a little late to be saying it here, there was a Shoot! the Day scheduled for today – photogs the world over will be sharing their shots taken from today over at Photoshelter in the coming week or so.  I signed up, but because I forgot my CF card, was not able to participate.  Still, stop over there to see a day in the life of photographers the world over!

Michael Johnston of The Online Photographer anounced his newist list of Top Ten Cameras, and Canon gear made it in twice (three times if you count them in with the “any entry-level DSLR” listing.)  The top Canon recommendations are the 5D and the SD870 IS.

Finally, in Canon-specific news, we’ all have likely heard about the upcoming release of the Canon XS.  Scheduled for release in July, it’s gotten a few reviews trickling out from various resources.  The best review I’ve read is over at the Photokina site.

Last, but not least, don’t forget to take a break, and laugh a little over at What the Duck!  My favorite one from this week:

What the Duck

Pics, Trips, and Tips

What's This? - Week3

Welcome to week 3 of the “What’s This?” series! Last week I had a close-up shot with some great guesses including carpet, a towel, and a toothbrush – but the answer, as it turns out, is a candle wick!

What's This? - Week 2

I had cropped out a portion of it, to give kind of a different twist! Thanks to all for participating! So, as we move into week3, here is another everyday object that I’ve zoomed in on, and taken a cropped portion to share. Can you guess what this is?

In other news, it seems I will be somewhat busy over the next few weeks with several trips on the horizon. Late June, a friend is getting married, and that will require a trip to NC. Then, shortly after that, I will be traveling (driving) to New York for the 4th of July festivities. Very shortly after I get back, I will likely be accompanying my wife out to Colorado as we transition to that area from SC. She’ll move on ahead to start her job, while I stay behind to close up shop and sell the house. Oh yeah, did I mention? We’re moving to Colorado!!!

So, for the last tidbit of news, I did actually knock out the tip for the week as previously mentioned: displacement maps! I read about this technique in my most recent issue of NAPP and had a few images that I thought it may work for, so thought to give it a whirl! Pretty neat effect, so feel free to try it out yourself!

CB Episode #44: Displacement Maps

Rituals – Cleaning your Gear

Checklist

Rituals are an important part of many cultures and belief systems. Yet rituals can also be patterns of behavior. We drive the same way to work every day, we tend to eat similar meals from one week to the next, and we do certain things each and every day, like brushing our teeth, taking a shower (hopefully anyway!), and a host of others. Well, just like other rituals, many of us become very fastidious about our work flow. We color manage things, we duplicate images, back them up, and save in multiple locations. Yet I’ve not seen anyone really talk about establishing rituals over cleaning their gear. In that area, I feel that I am something of a loner, because I do clean my gear in a very ritualistic pattern. It may be overkill to some, while to others it may not be enough. Nevertheless, cleaning our gear is something we should all consider making a part of our recurring activities.

Tomorrow is the second Friday of the month, and since I’ve set that date (just an arbitrary date, no specific logic behind the date other than I didn’t have anything else “scheduled” for that date at the time I came up with this) as my monthly camera cleaning date. I clean every piece of equipment I own. It takes a few hours, but that way I do maintain a regular schedule of maintenance for all this gear. So, today I am sharing my cleaning schedule with you.

My Gear Cleaning Ritual

  1. Part One – Wipe Down This can take anywhere from 10 minutes to 2 hours depending on amount of crap in my bag! I first take the battery out of camera and insert in charger. While camera battery is charging to full capacity I use lint free lens clothes (you can get a 12-pack from WalMart for $1) to wipe down the camera body, the lens casings, my CF cards, my flash cards, everything! Then I take out all the velcro dividers from my camera bag. With the bag empty I use canned air and spray out my camera bag. Then I wipe everything down with a only slightly damp paper towel. I’ll also pick any fuzzies I can see off my velcro tabs.
  2. Part 2 – Glass cleaning This takes about 20 minutes, depending on whether certain lenses need multiple swipes. I Use the Eclipse/PecPad/Sensor Swab kit for all my detailed cleaning. First I remove the lens caps (front and rear, and dust them off with my canned air. Setting these aside I take a PecPad out and dab a few drops of the Eclipse solution on it. In a light circular motion I wipe from the center of the lens to the edge and swoop it away in a fluid motion. I then return the caps to the glass.
  3. Part 3 – Card clearing and formatting I lightly tap the CF cards with the holes facing down and stack them label side up by my card reader. After each is tapped, I run them through my computer, copying any images off into a folder titled “Unsorted”. Once the content is safely moved, I then format the cards from the OS command prompt (for me it,s format E: /FAT32)
  4. Part 4 – Air cleaner I take my Giottos Rocket Blower and with battery compartment open I pump twice into chamber, and then close. I then turn the camera sensor side down, uncap and repeat in that chamber with the blower. I recap the body then and lay it sensor side down on a pre-placed static bag.
  5. Part 5 – Sensor Cleaning I prep the sensor swab according to instructions with firm tight folds. I take the now fully charged batter, insert in the chamber, turn the camera on and move the menu to sensor cleaning mode, flip the camera over and lay it down on the bag. Then I dab two drops of Eclipse onto the edge, uncap the body and angle the wand to 45 degrees, placing the edge against the sensor. and in one motion move it from the first edge to the far edge. Without lifting the wand, I then shift the wand to the opposite 45 degree angle, slide it up and align the top edge of the PecPad to the top edge of the lens and in a single light motion, slide it back across the top of the sensor mirror. Using the same fluid motion I then lift the swab off the sensor, replace the body cap with my other hand and set the swab down on the static bag. I then turn the camera back over, and power down.
  6. Part 6 – Accessories check I take the now mostly de-charged camera/battery combo and insert my CF cards back into the camera. All cards are formatted in camera. Once the formats are complete, I then insert back into computer one last time and copy the low res contact info image back onto all CF cards. The battery is then taken back out and recharged again. (I do have spares too that get charged, and I take this opportunity to also charge all AA’s and stuff back in my camera bag. I’ll check my notebook for enough paper, my pen for ink, flashlight for batteries, business cards in front pocket of bag, ensure I have at least 5 model release forms, and I’ll wipe down my Krages card and cheat sheet (two laminated sheets of info I keep in my bag).
  7. Part 7 – Repack Reassemble Velcro dividers and insert everything back into my bag
  8. Part 8 – Tripod Maintenance Take legs off tripod and wipe everything down there. Remove all quick release plates and do the same. I then re-assemble the tripod and tighten down all the legs again.
  9. Part 9 – Inventory List Print out checklist inventory and insert in camera bag (when travelling).
  10. Part 10 – Relax Drink an ice cold beverage!

So, which of these rituals do you include in your gear maintenance schedule? Did I miss anything? Does anything I am doing sound weird or wrong? What do you think? Share your cleaning schedule in the comments or via email: jason <AT> canonblogger <DOT> com In the meantime:

  • Happy Friday 13th
  • Happy Fathers Day Weekend
  • and Happy Shooting (watch those apertures!)

Week 2: What’s This?

307

For Week 2 of “What’s This?” – the image is another typical household object, so, take a gander at the image above, then take a guess in the comments or via email…This is a _____(fill in the blank)!

After a week of various responses both via email and in the comments, there was one correct guess via email, and the answer is – wait for it – a microphone! That’s right, my Sampson CO2 Condensor Mic that I record the podcast with almost every week. I zoomed in real close and didn’t even crop to produce the photo – so congrats to Thomas for guessing the right answer!

Week 1 WInner - Thomas w/ Microphone

Things are picking up for me for the remainder of the week, so a shorter post today. One thing I will suggest as a Wednesday Web Gem is to stop over at the new CB Flickr Group! I’m posting the full size pics from what’s this (the following week) and sharing photos in there as I get a chance. Stop in, register with the FLickr foolks, and share images of your own, discuss things from the blog, offer ideas, other tips and tricks, or whatever the theme for the day is! The link to the CB Flickr Group is here: CB on Flickr

Until tomorrow, happy shooting and watch those apertures!

Usual becomes unusual

Lighting Objects

The tutorial for this Tuesday, you may notice is not your typical Photoshop tip, trick, or tutorial. I took things outside of the desktop and into the real world to show you examples of thinking outside the box when it comes to lighting. By now we are all familiar with Strobist, and the methods he uses to encourage people to think about lighting and how to do things in an economically friendly way.

Today, I wanted to take a moment to share with you a few lighting ideas I’ve had and some of the effects they’ve produced. None of these home-made products cost me more than 15 cents! Anyway, I’ll let the tutorial stand alone, but did want to include the show notes:

Tune in to Strobist for anything and everything lighting you ever wanted to read – David Hobby is the lighting guru of the blog world!

David was interviewed recently on Studio Lighting, so now I’ve listened to their podcast, and it’s definitely one to return to. These guys just sound like they’re a lot of fun.

And the shots… you saw the montage up top, but here’s the individual shots from my diffused snoot:

Horizontal View

Vertical View

Angled View

So, there’s just a few examples of how to generate creative lighting by looking at usual objects in unusual ways. Tune in to the podcast to see what other stuff I’ve come up with. Because it was recorded outside of the computer though, I only have the Quicktime version. I am still looking into a decent Flash converter so I can put that together with the “intro” and “out-tro” clips, so if anyone has suggestions for that, I am all ears there too. Anyway, to close out, I’d like to pose another question: What have you come up with in the way of uses? Any everyday objects become part of your photo gear? Share ’em in the comments section!

In the News – Doo Wah!

Bop bop doo bop doo bop do wow!  Okay, sorry, that’s a bad skit for the great jazz tune from the ’50’s, but nevertheless, whenever I hear the phrase “in the news” I feel compelled to sing that line.  Now, for your real news from CB today:  I’ve got two stories for you, some news from Adobe on the next iteration of Photoshop and some Canon news on the Canon Hacking Development Kit (aka CHDK) that is now maing waves.  Read on for all the details!

Adobe Photoshop News

Well, the big news I read today during lunch was that the folks at Adobe will be incorporating some sort of GPU support for its next iteration of Photoshop.  Tapping into the GPU (graphics processing unit) means that larger images can be rendered on your display faster.   Another added benefit will be an increase in processing speeds for filters and other intensive activities. Nothing too earth-shattering, except they did report that at the Nvidia show, they watched the presenter zoom and rotate the canvas on a 2 GB image as though it were a 5 MB image.


Canon CHDK News

In more Canon-specific news, I have now read at least 10 articles from a number of resources talking about the Canon Hacking Development Kit (CHDK), which is a free firmware hack that can be applied to P&S grade cameras to allow them to do a number of things that SLR’s do, and even a few that your average SLR can’t do!


  1. The CHDK allows Point-n-Shooters to shoot in raw mode.  The caveat is that since it’s not a standard raw format, you can’t open this in Photoshop or Lightroom directly.  Instead, there is a third party software kit out there (also for free) called dng4ps2 that can convert the image to the more common DNG, which is Adobe’s Digital Negative format.  The DNG file can then be opened in Photoshop or Lightroom.
  2. The CHDK kit enhances the P&S feature set by adding a battery status indicator so you can see how much of a charge you have left on your battery.  I know this feature is already there in SLR cameras, so I guess the P&S’er didn’t have this feature regularly – news to me.
  3. The CHDK kit also adds what they’re calling a zebra mode which will show you whether a picture is under- or over-exposed.  Basically, it sounds like it’s adding a histogram feature.  Again, this feature is standard on most SLR’s, but not on most P&S cameras.  I just think that even a lot of SLR shooters don’t use the histogram (although I would personally encourage more use of it), so adding the feature on P&S cameras may be a little overkill.
  4. Finally, the CHDK kit allows P&S’ers to extend their range of shutter speeds.  The most reliable info I saw for the CHDK claimed the range went from a standard of 1/3200-15 seconds all the way up to a range of 1/33,333 to 65 seconds!  You read that right, that’s one-thirty-three-thousandsth of a second (and change).  Kind of makes the 1/8000ths shutter speed on the 40D look pathetic, eh?  Granted, this was specific to the S5 IS, but the standard change is to 1/64000ths of a second, which is still earth-shatteringly fast! 

Now, the caveats:


  1. Write time slows down considerably when shooting in raw (to about 2-4 seconds – yikes!).
  2. The raw file format is not recognized by mainstream applications like Photoshop and Lightroom.  In other words, file accessibility is likely not reliable.
  3. The software that you have to use to access the raw image data is freeware.  While some software from the open-sourced community is excellent (case in point GIMP, OpenOffice, and many others) and perfectly safe, the fact that this software comes from Russia and is (to my knowledge) untested, sets off red flags all over the place for me.  Of course I work in IT, so it’s in my nature to be suspicious of third party software from third world countries…
  4. As with any firmware hack, this is likely going to void any manufacturer warranty or vendor support for the camera if you install the software.

So, having shown the pros and cons, I’ll leave it to the community – install at your own discretion.  For those that do decide to install, feel free to share your thoughts here in the comments, or with me via email – I’d like to hear feedback on the reliability of the kit.  The CHDK can be downloaded direct from the link here:  http://chdk.wikia.com/wiki/S5IS, and the raw converter from here:  http://dng4ps2.chat.ru/index_en.html  Until next time, happy shooting and watch those apertures (or should I say shutters?)!


Back to Basics – Rule of Thirds Grid

After I recorded and started production on this tutorial my mind began to remember that perhaps I had covered this subject before. I reviewed the subjects I have posted over at the Tutorial Resource Center and did not see it covered there, so figure I am not repeating some tutorial I have already done. Having said that, this is kind of a return to the basics. Continue reading “Back to Basics – Rule of Thirds Grid”

PlayPlay

Freezing the frame (for Friday)

Read a neat little blurb in Popular Photography, May issue that I cut out and added to the “clip binder” recently…Four good rules of thumb for fast shutter speeds and what they translate to. So, regurgitated for you here today, are…

Four Frame Freezing Follies

  1. 1/1000th of a second will freeze action moving either up and down or across the frame.
  2. 1/500th of a second is good for aerials (coming in over a scene, like in a plane or along those lines)
  3. 1/250th of a second is good for freezing action coming straight at you (toward the camera – unless of course it’s my dog who comes toward you then lurches to the side for no apparent reason)
  4. 4 seconds takes objects in motion and turns them into streaks of light (think car headlights here – night photography will never be the same)

In other news, I also saw over on Jeff Revell’s blog today (PhotowalkPro.com) a great post on how to be a frugal lens shopper. Stop over there to read all about saving money. We bloggers love to get feedback too, so if you like it, make a post to let him know!

The camera poll has officially ended, and the results are in. Looks like many of us have at least a few cameras in our bags…fun stuff. Where did you fit into the picture? Thanks to the 66 that did join in for these last two months!

Check out the new poll listed today too…on audio podcasts! I am thinking of adding yet another multimedia feature (audio podcasts) to round things out (presently I’ve posted videos, documents, and pictures, so audio is all that’s left! Don’t forget to vote before you leave.

And, so no one feels left out from friday funnies, another week’s favorite episode from What the Duck:

What The Duck

Calendar Templates, Part II

This week I wrap up the tutorial started last week on creating a Calendar Template using Photoshop. One of the things I found most useful was performing the screen captures of each month prior to beginning the place functions inside Photoshop. As you can see in the tutorial, the results came out really nicely.

This whole project started from wanting to make a single-page calendar and in looking at the design offerings on Mpix, thought “Hey! I could make that!” The second half of the genesis came courtesy of Matt Kloskowski over fro the Photoshop Guys where he did a tutorial a while back on making a desktop calendar for a single month. So…I put the two ideas together and this is the end result of that effort. I figured it may also have some interest for other photographers in making calendars incorporating either their own prints or those of their clients. Clearly, this is a “down and dirty” version, but if anyone is interested, I do have a pretty high resolution sized template that I would be willing to share on request.

In other news, I’d like to give some shout outs to Brian over at Professional Snapshots, who just last Friday celebrated the birth of his new daughter Isabelle! Congrats to Brian, even though this means he has pretty much lost the ability to sleep through a night for at least the next 18-24 months! Yeah, this may be your fourth, but I’ve heard the stories from siblings and neighbors! Enjoy!

Also, don’t forget to stop over at Jason D. Moore’s weekly summary of all things photography! I always head there to make sure I’m not missing anything interesting.

Last, but not least, the tutorial links: Flash first and QT second…

Calendar Templates, Part II

PlayPlay

PlayPlay