Airtight Viewers – Web Gallery Options Reviewed

Initially, this week was supposed to be the second in a series of software review posts to take a more detailed look under the hood at Photoshop Elements as an alternative to Photoshop Creative Suite.  Truth be told though, the more I poke under the hood with Adobe’s Lightroom, the more hooked I get.  One of the absolute best features (in my opinion) is the web gallery options available to you in Lightroom.  The options are endless!  You can go from standard HTML, to Flash-based templates, and hybrids, with customizations galore.

One of my favorites though, is how Adobe integrated a certain type of web gallery – those from Airtight Interactive.  Not sure what the deal was, but the delivery of images via these methods is just amazing!  So amazing, that I had to visit the website of the developer a while back just to see for myself.  The best part is that this guy developed even more than what’s in Lightroom.  I literally could get lost in these viewers, and as a fan of imagery – cannot imagine anyone similarly inclined that would not just love these displays.  Easy to install, a snap to finish, and Adobe Lightroom integration – what’s not to love.  Rather than go into the nitty gritty details, I’d rather just let the products speak for themselves in a few web galleries I put together.  There are four main ones, with three having Lightroom integration:  Simple Viewer, Tilt Viewer, Auto Viewer, and Postcard Viewer.  Each holds appeal for me, and depending on the imagery I am delivering, I can see where each may be the one of choice.

Airtight Simple Viewer

For me, the go-to one is the Simple Viewer though.  Clean, simple, easy lines, and somewhat traditionalist, the simple viewer allows for intuitive and easy navigation while delivering your images with precision and clarity.  This type of display option is great for people who enjoy looking at images, but also don’t want to have to think about how to do anything.  Just click and serve up the next image.  Clean, simple,and to the point.  Artistic types and non-artistic types alike will enjoy this for the ability to rapidly peruse many images fluidly and easily.  No muss, no fuss, just photos!

Here’s a sample gallery from a little photo project I did over the weekend.

Airtight Tilt Viewer

A little tricker to manipulate for the one viewing the show, I can see why Adobe didn’t want to incorporate this one into their web presentation.  Where the Simple Viewer is easy to manipulate for even the most simple-minded, you   actually have to have a little acuity and dexterity to maneuver your mouse to control this slideshow.  I think portfolios that would work well with the Tilt Viewer are ones that are are more edgy and off the beaten path.  The grunge type look is pretty popular right now and these galleries work well in this kind of display because the viewer that comes here is more artistically inclined to begin with, so they probably enjoy the “tilted view”.

Here’s another sample gallery from that photo project I did over the weekend, as well as the preview of it in a browser:
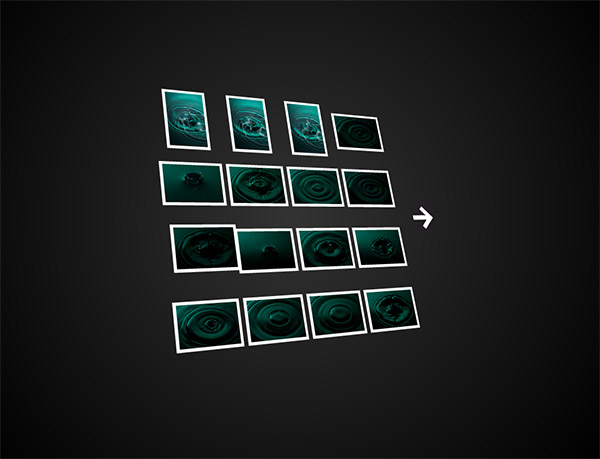
Airtight Tilt Viewer Preview

Airtight Auto Viewer

By its own definition, the auto viewer is  “designed to display a linear sequence of images and captions”.  Photo journalists may find the chronological characteristics of their work to fit well in this viewer, as would sequential types of shots.  Event photographers would find some appeal in this also because it delivers up a single image at a time, which gest every image some “face time”, whereas the Simple Viewer is more of a mass display where the viewer can just pick out their favorites to view closer.

Here’s that same gallery viewed in this style.  Because of the nature of this project, it actually may look a little disjointed, but only because I purged out some less than desirable shots before creating each gallery, so there could appear to be gaps.  When approached from a more journalistic approach, that element could easily be managed with more inclusion.  For RSS readers, here’s a snapshot of the gallery in a web browser:
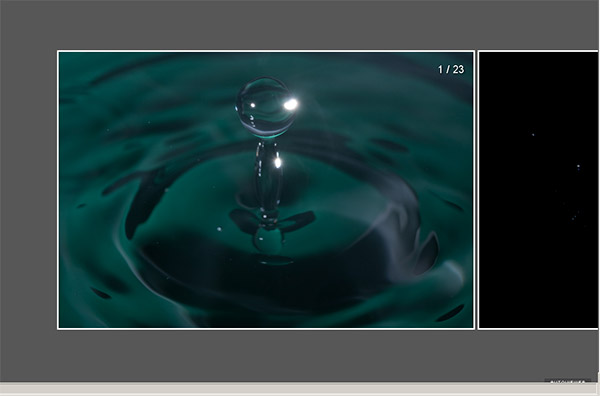
Auto Viewer Preview

Airtight Postcard Viewer

Here, the gallery has a great blend of classic photo gallery look and feel, while also incorporating a more “regular” sense to it.  The very name “postcard” suggests that anyone could look through this album and feel like they were a part of it.  Journalistic styles and event work would find appeal here again, but this style also lends itself toward the enthusiast or “prosumer” who wants to share their works with family and friends, but wants to do it with panache or style.  My only nit is that you only get one page of photos in either the LR or PS versions so images will extend above or below your page limit.  So, with this in mind, keep your galleries under the 20 count or keep the images smaller.

And finally, the photo gallery from this perspective, and a quick view:
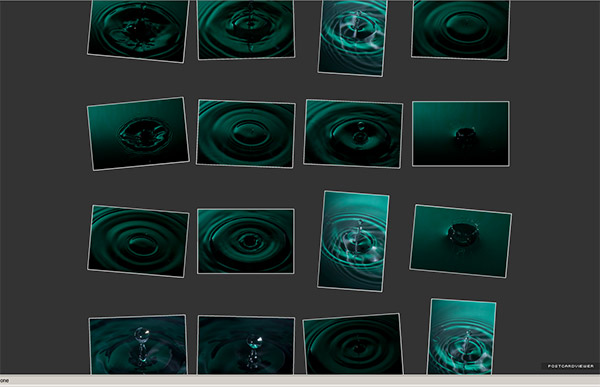
postcard

*****

Having seen and read about each flavor, it’s your turn now.  What do you think of this approach toward web galleries?  Any particular favorites out there?  What about other web gallery options?  Any alternative approaches that people find unique or that offer an interesting way to display images?  Sound off in the comments, and let me know what you think – one may just end up getting reviewed! 🙂

In the meantime, happy shooting, and we’ll see you back here tomorrow!

Grab the Feed

Photoshop CS3 vs Elements 7.0 – Part One

Ever since Tom Hogarty came on the podcast and I’ve had some time to dive into Lightroom, I am thinking more and more that this is a much better solution for managing all of my photo assets.  Since I’ve found myself spending more time in LR and less time in PS CS3 (Extended), I started debating if I really needed so much horsepower under the hood.  After all, CS3 Extended is quite the workhorse, from performance, to functionality, to footprint, and of course, price. It left me wondering about my upgrade path.

In all honesty though, I think the term “upgrade” may be a misnomer – after all, am I really using all the features of the full version of Photoshop Cs3?  If not, what’s the point in upgrading?  Perhaps I should be looking at a downgrade.  After all, I really do spend less time post processing these days.  So, what are the differences between CS3 and this thing called Elements?  Well, for the loyal readers of this blog, I decided to find out.

First up, I downloaded a trial version of Elements 7.0 from Adobe’s website.  The download is about half the size  of the Photoshop Cs4 download (400+ MB for Windows Elements, and over 800 MB for Photoshop Creative Suite on Windows).  To the geek in me, that means a smaller footprint on my hard drive, and less consumption of system resources.   Something to consider…

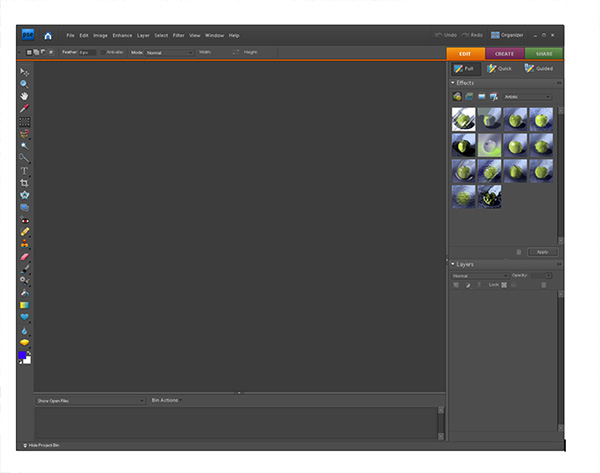
Anyway, I decided to really do a side by side comparison, and loaded CS3 and Elements in their default work spaces, then compared notes.  Here’s what I found (CS3 is first, Elements is second):

Photoshop CS3 Default Workspace
Default Elements Workspace

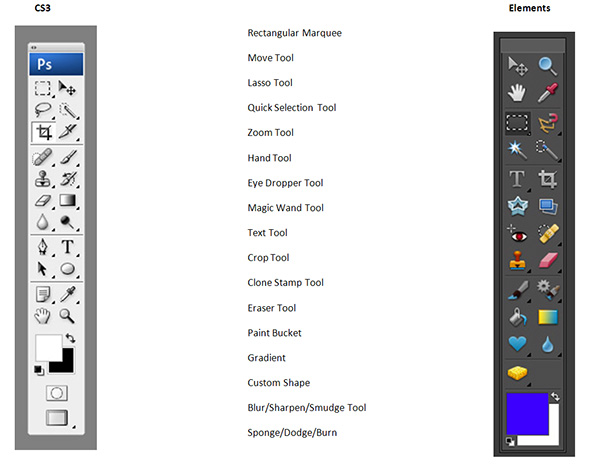
Wow!  Quite a difference.  I first noticed the much darker color of the work space for Elements.  Not that big a deal in the grand scheme of things, but something that I would necessarily have to adjust to.  So, what else is there?  Well, rather than go over each painstaking difference of the two applications, I decided to just give a quick overview here.  And, with the quick overview, I figured the best place to start would be the toolbars, since that’s what we really need to use in either of these anyway, right?  So, let’s look at them side-by-side:

Photoshop CS3 Extended Toolbar
Photoshop Elements Toolbar

They actually don’t look too diferent when you look at them side by side, do they?  I didn’t think so, and I set out to count the various tool bars.  Know what?  On a quick overview of the 22 tools in CS3, I counted 17 commonalities between CS3 and Elements 7!  That’s a lot of overlap!  Are there more buried tools in CS3?  Most likely.  On quick count, I found 60 tools throughout the CS3 Toolbar.  In elements, 48!  Even still, not a lot extra.  From a percentage perspective, that is 20% additional functionality in CS3 Extended versus Elements 7.0  My guess is CS3 Regular would have less of a difference still.

The question is though – how often do you go searching for some buried tool in CS3?  As a photographer, in all honesty, not that often.  If you think about it, as photographers, we crop, re-size, perhaps straighten an occasional horizon, add some sharpening, and if we want to get really serious with a photo, we’ll do some dodging and burning.  All of these functions are present in Elements 7.0

So, why would you want to go with the CS3 or CS4 version of Photoshop – truly if you want to take your photos to the Nth degree, or do serious work like graphic design, web design, or photo restoration, I can totally see the need for some of the more advanced tools in the Creative Suite.  But more and more, I find myself using CS3 less and less.  Take a look at the commonalities listed below – these are identical features in both applications!  It took me a little by surprise when I noticed the similarities even in tool names.  See if you can find the common tools from the listing below:

Common Tools between CS3 and Elements

So, what other important factors go into an image editing program for me?  Well, having been working in the Creative Suite for a long time – I do enjoy the benefits of layered files for different purposes.  Well, guess what – Elements does that too!  That means you can edit and save files as PSD’s!

I also like using actions to automate my work flow.  Uh Oh…from my initial glance, it does not appear that Elements 7.0 has this functionality built in.  But, can it be added?  Well, a Google search on the topic of “Elements Actions” says yes, so I think I could probably figure it out enough to eek the process to my needs.

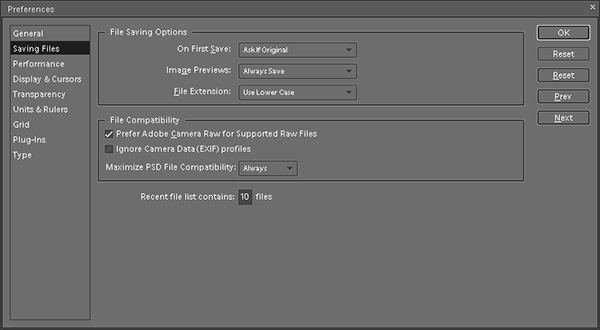
The other major functionality I have an interest in is the ability to edit and manage raw files from my camera.  Can I see the raw files?  Sure enough, the ACR converter has made its way into Elements as well!

Adobe Camera Raw Converter in Elements

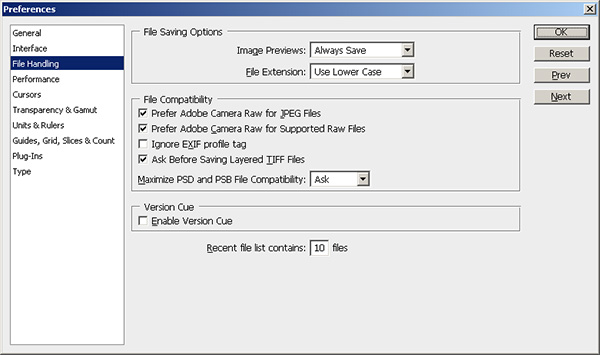
In fact, a lot of the preferences settings seem to have migrated over from Photoshop CS3…look at the same screen from there:

Photoshop CS3 Preferences Settings

As similarities continue to mount, the last major thing to consider is price.  Retail, CS4 runs at $700 for the full price, an upgrade runs $200.  Elements?  Well, I think y’all know where this is headed:  Retail $139 and upgrade for $119.  I don’t know about you, but that is a HUGE cost savings.  It almost seems too good to be true, and given my penchant for not taking things at face value – I will take a look at the image processing capabilities in greater detail next week.  We’ll take a look at noise handling, speed, performance, and see how it does with a variety of images from my Canon 40D.

The biggest downside that I can see is that you don’t have the color management capabilities in Elements that you have in the Creative Suite – I like making some LAB adjustments from time to time, and filters may suffer in availability too – but more on that next week.

For the time being though, given the similarity in apparent functionality, the reduced price for Elements, and the proportionate footprint on my computer – Elements is definitely a contender.  For all I know – as I learn more about Lightroom after the workshop from Scott Kelby and NAPP on Wednesday, the idea of a separate application for image editing may go by the wayside too, especially when the cost for the CS product is 400% that of Elements.

So, what do you think?  Anyone out there using Elements?  Any other downgraders care to share their thoughts?  Have you enjoyed downsizing?  Found things you missed?  Workarounds?  Add-ons?  Tell me more as I continue to explore Elements next week – I’ll add reader observations there too!  In the meantime, happy shooting, and we’ll see you back here tomorrow after the NAPP workshop!

Shooting tethered with Canon gear


I’ve not seen much coverage of how to shoot tethered using the Canon proprietary software, so for today’s post, I thought it might be useful to offer the Canon perspective here (since the blog bears the moniker of my camera vendor of choice).  For those who are Nikon shooters, I would highly recommend reading the post Scott Kelby did a while back that shows how to shoot tethered into Lightroom.  While he walks you through the Lightroom element, he then discusses the Nikon approach… the counterpoint here is to take a look at the Canon approach.

To start off – a little explanation of what tethered shooting is would be helpful.  Tethered shooting means you have your camera connected to your computer or laptop (usually a laptop for portability purposes).  This allows you to shoot straight into the computer with direct saves.  There are a couple advantages to tethered shooting.  First off, you don’t need any media cards, because the camera is transferring straight to the computer.  Second, regardless of what size LCD you have on the back of your sensor, nothing will compare with a 15″ or 17″ monitor.  You can see greater detail, see a broader tonal range, and get a much better handle on the finder points of composition when it comes to things like posing, lighting, and minimizing distractions that you could likely miss when using a 3″ LCD of your camera.

Okay, so now that we know when and why you would shoot tethered, and given an appropriate nod to Scott Kelby for his coverage of the Nikon version, here is a Canon-centric approach to tethered shooting.  Since the Lightroom component is already pretty well covered, I will just be limiting the discussion to showcasing the settings, screens and considerations to take into account when configuring the EOS Capture Utility.

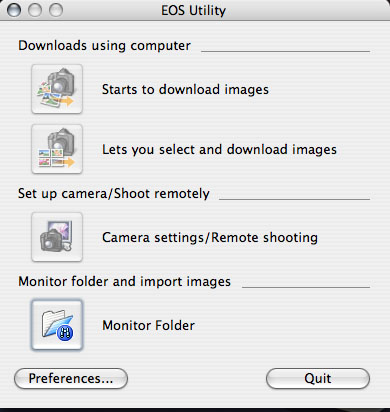
When you first start the EOS Capture Utility, you get a rather unassuming window that doesn’t look like much:

Startup Screen for EOS Capture

It’s pretty straightforward – the top button would be used to download images if you are importing from all your images off a CF card.  The second button would enable you to select which images to import off a CF card.  More relative to this content is the Camera Settings/Remote Shooting button and the Monitor Folder button.   I’ll get to those in a minute.  Lastly, it’s helpful to draw your attention to the Preferences button on the lower right – this is the one  I’d like to take a closer look at now.

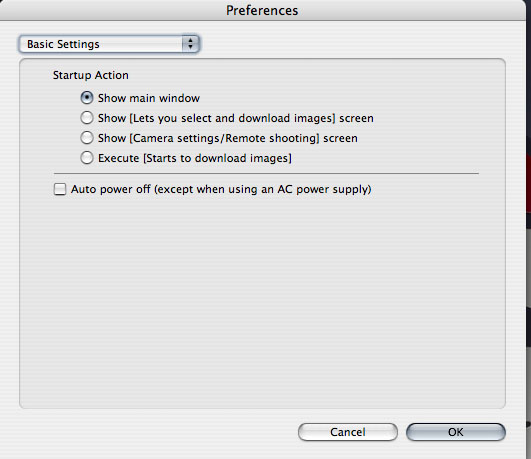
When you click on the Preferences button the window will change:

eos2

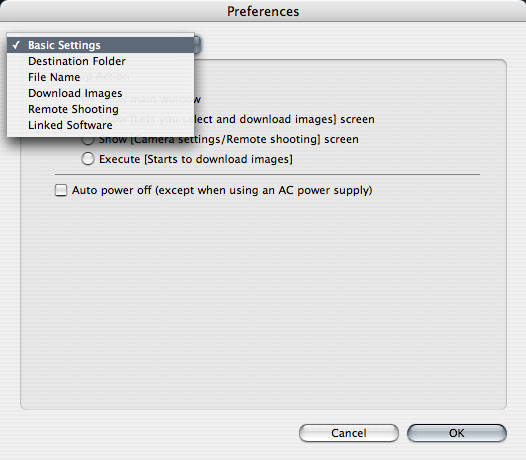
From here, you now have access to all the details of how you want to configure your tethered shooting options, starting out with the basic settings (see the drop down menu in the upper left).  This first setting tells the EOS Utility what screen you want to show when you first start the software.  This really is a matter of personal preference, but I would recommend the main window so that if you want to change your preferences, you can do so easily and quickly – often with software preference settings will require you to restart the program, so if that must happen, it’s always best to do that at start-up.

Moving right along, let’s take a look at the other preferences settings:

eos3

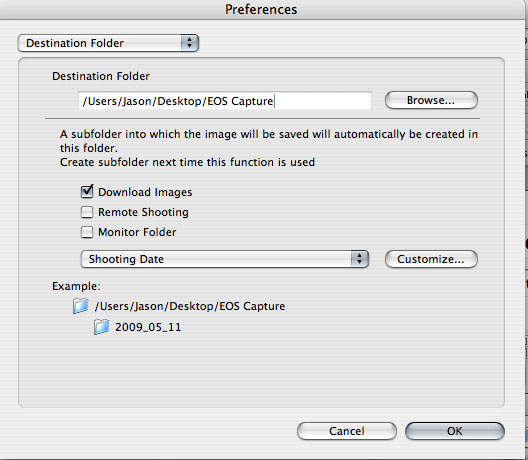
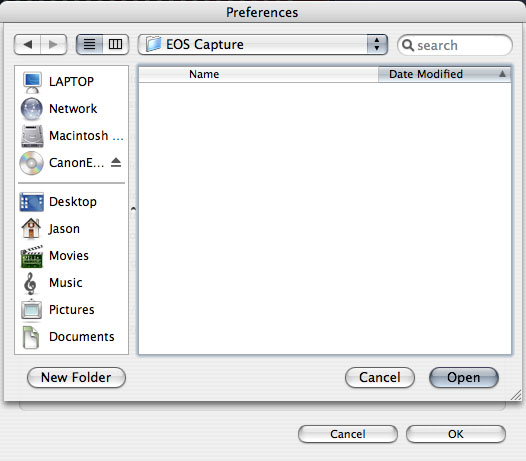
The Destination Folder Preferences

This should be pretty self-explanatory, but in the interests of covering each aspect, this is where you can specify what folder you want to save your images to on connecting your Canon camera to your computer.  For the purposes of this demonstration, I created a folder called EOS Capture and put it on my desktop to use as the destination folder.  To point the EOS Utility to your destination folder of choice, simply click the browse button, as shown:

destination2

Note that the EOS Utility does a nice little thing here – it creates a subfolder by date so helps to keep your images organized whether you are downloading images, doing remote shooting (tethered shooting), or set a monitored folder for some third party application (like Lightroom).  If you are going to be doig remote shooting, here is where you would likely select the remote shooting option so that when the camera gets connected, that specific task will create a subfolder and get you ready that much quicker.  Here, since I don’t have the full hardware connection, I am just going to leave it on the default setting and select the folder I created on my desktop:

destination


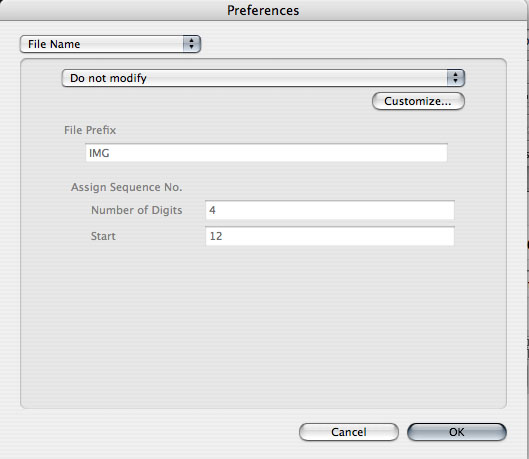
File Name Preferences

If you want to change your image names from the default of _IMG_1234.jpg to another more descriptive naming convention (say JamesSmith.jpg this would be the place to do it.  The options are shown below:

filename1

If you choose to modify your images, you can elect from many options, including the option to customize for your needs – just click the drop down menu to select your options.  By default it’s set to Do Not Modify so I’l just leave that here to show your options for filename formats:

filename2

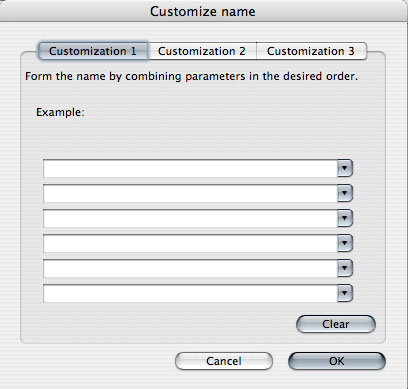
The next option here in your filename conventions is where you can define custom naming conventions, either by subject name (JamesSmith), event (SmithWeddding), or whatever convention works for you:

filename3

Feel free to customize these as you prefer for your own shooting conditions and, well….preferences!  Moving right along now…

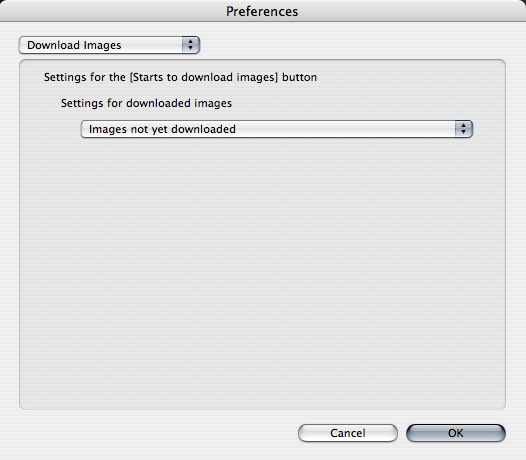
Download Images Preferences

download

Here is where you tell the EOS Utility what to do with images as they are generated.  It’s pretty straightforward… the options are:

downloadoptions

Remote Shooting Preferences

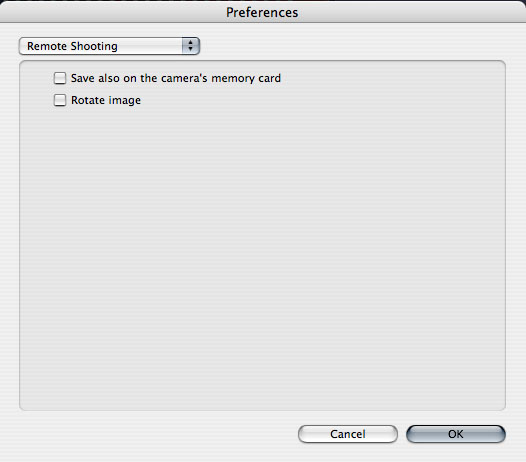
The remote shooting preferences here are also pretty straightforward:  Do you want to save your images to a card or not?  Do you want the software to rotate your images if needed to show the right orientation?  Depending on your preferences, check or uncheck these boxes:

remote

Linked Software Preferences

Last but not least, do you want to use another piece of the Canon Software family of products to work on your tethered images , whether it be Digital Photo Profesional (aka DPP) or ImageBrowser:

eossoftware1

Since my work flow incorporates the Adobe product line (Lightroom, Photoshop, etc.), I would suggest choosing “None” here, but again, that’s why these are called preferences.

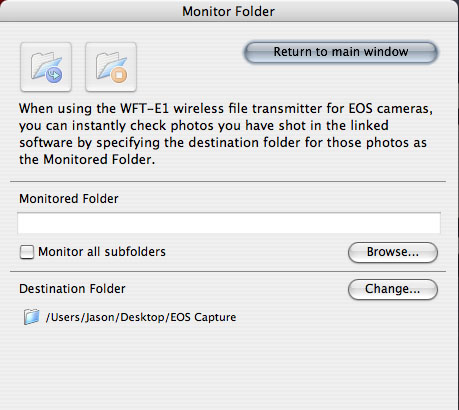
Once these Preferences are set, go ahead and return to the main window, then click the Monitor Folder option, because there is two last items that merit discussion here:

The Monitoring Folder

monitor_folder

Note that the folder has been specified for me, but Canon has generously recommended that I take advantage of a specific Canon hardware connector to connect the camera and computer – the WFT-E1 Wireless Transmitter.  These are available from most camera retailers and e-tailers, but I like B&H so that is the one linked (and the price is fairly reasonable at $999.99, so if you get one, let me borrow it to review here on the blog! 🙂 ).  Basically what this allows you to do is shoot “tethered” to the computer, but without the tether…pretty cool stuff!

The Software Version

I created this post using the older version of the EOS Capture Utility, primarily because I had not used it since I owned my XT.    As with any software though, as camera bodies are added to the vendor family of products, the software must update too.  On capturing all the images for this post, I did not think the software would be what updated, only the camera drivers.  Clearly, that was not the case as the software itself has undergone a colorful transformation since then, and is now at its most recent update as of just last month at 2.6.1  You can download it and update via the 40D web page here (where I got mine just earlier).  The upshot though, and why I am keeping the original screen shots, is because functionally nothing has changed – there are just more camera drivers added to the library. To get your own drivers for other Canon cameras to use with the EOS capture, go to the main page here and select your camera…

Finally, I wanted to share a very short video from what the new interface looks like and how to use it when shooting in “tethered” mode:

So, there you have it!  My down-n-dirty summary of the Canon EOS Capture Utility – with photos, text, and video!  A virtual cornucopia of media to look at the feature set.  Enjoy the material!  I’d love to hear your thoughts, hear your feedback and get suggestions (other than checking the software for updates before I write the post! 😀 ) on future material that may be useful.  Don’t forget too – that contest to win a copy of Adobe Lightroom (which you can use to edit shots taken in tethered mode!) is going on through the end of May, so don’t delay – get those contributions in today!  One shot could be worth a free copy of Adobe Lightroom!  That’s it for today – have a great one, Happy Shooting, and we’ll see you back here tomorrow for the latest in photography composition.

Photo Contest – Win Adobe Lightroom

Happy Saturday all.  It’s a rare weekend post here – since Friday was silent.  Two things – first off, Happy Mothers Day to all the mothers out there!  Second, as the podcast on Tuesday announced, don’t forget the first ever Learning Digital Photography Contest is under way – all during the month of May, submit your shots to the Flickr group (2 entries per person) for your chance to win a copy of Adobe Photoshop Lightroom 2.0!  Not only is it a great chance to win this wonderful program, but a great way to get increased visibility of your work and to network with others.

Information is available in the podcast, but you are welcome to just submit your entries directly to the Flickr group.  This is a prize package worth $300 retail, so definitely one worth entering!  Good luck and happy shooting!

Podcast

Flickr Pool

Win a copy of Adobe Lightroom 2.0!

box_lightroom2_150x150

Just last week, I had the distinct honor of interviewing Tom Hogarty, Senior Product Manager for Adobe Lightroom.  Needless to say, I postponed the podcast for a few more days so I could include the interview.  He really gave a good breakdown of the function of Lightroom, what to expect from it, how to incorporate it into your work flow, and what (in general) we can likely expect to see in the future of image processing development.    We spent a good deal of time going over the nuts and bolts, so under the general heading of Software discussions today, I’d like to introduce you to Adobe’s Lightroom.

Lightroom is a very different way of handling your images.  Rather than taking a single image at a time through something like Photoshop, Adobe Lightroom allows you to not only address single image edits, but also manage an entire library of images.  The key here is management, because that’s what Lightroom really does – it takes the idea of asset management and incorporates it into a program so that you don’t even have to think about it!  Rather than belabour the point here though, it would probably be best to encourage everyone to just download the podcast and give it a listen.  Not only do we discuss Lightroom, but we also take a lot of listener questions, both specific to Lightroom and general photography questions too – and, oh yeah, a contest!

That’s right – Adobe was kind enough to donate a copy of Photoshop Lightroom 2.0 to some lucky listener.  At an estimated retail value of almost $300 ($299), this is by and large, the best contest I’ve could ever come up with!   It’s very exciting!  I’d love to share the details here, but if I did that, you wouldn’t listen to the podcast.  So… want to know the details?  Listen to the podcast! In the meantime, here’s the show notes on the things we discussed and where to get the latest and greatest info on the product:

Be sure to stop over at Twitter and start following these folks, because they are the ones who you can really learn a lot from!  Then don’t forget to listen to the podcast for your chance to win a copy of Adobe Photoshop Lightroom 2.0!  Happy Shooting and good luck one and all!

Oh yeah, here’s the teaser link for the contest:  Learning Digital Photography Flickr Group