Software Review: Apple iPhoto


Mac Madness (Mac Systems)

As much as we glow and sing the praises of Photoshop and Lightroom, native photo editors that are included in Operating Systems are often overlooked as alternatives for photo editing and management.  This is primarily because… well, let’s face it, because they are not very good at photo editing…or management.  But think about what we are comparing them to…comparing Windows Picture and Fax viewer to Photoshop Lightroom?  Is that really fair?  What about comparing Photoshop Creative Suite 4 to iPhoto?  Is that a good apples to apples comparison?  If you think about it – not really.  We’re talking full-fledged dedicated programs that have years of programming and design and development put into them versus an add-on component for an operating system.  It’s really an apples to oranges comparison, and as a result, the programs themsevles suffer a bad beat.

So, I decided to take a look at the native photo editors for Windows and Macintosh – those being the Windows Picture and Fax viewer and iPhoto.  Well, because Apple computers were really designed with the designer and graphics guy/gal in mind, it’s no surprise that iPhoto is more robust than its Windows counterpart.  This is not to bash the Windows Picture and Fax viewer, because it does serve a need, especially when I need to preview an image in a pinch and make some very very minor edit like a teensy crop or something.  It’s not great, but it’ll do.

For that reason, today the focus (if you’ll pardon the pun) is more on iPhoto.  Now, keep in mind, I am operating off Snow Leopard with the ’08 version of iLife here, so my iPhoto is not the latest and greatest, but the nuts and bolts are pretty much the same from what I can gather, so this review while not complete, can give a good synopsis of what works and doesn’t in iPhoto.  Let’s begin:
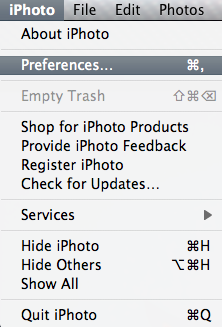
iPhoto Preferences Option

File Management:  B+ Let’s face it, we are making more and more images these days and applications need to be able to keep up.  If you don’t have some sort of back end database that can quickly render previews, without copying photos over as duplicates in low res formats that waste drive space, it’s gonna get ugly quickly.  iPhoto has the unfortunate option of copying files over on import.  While this may seem to be good for redundancy sake, since we’re all aware of the need for backups these days, but I would not recommend copying everything into iPhoto.  First off, the “copy” of your image is embedded in the iPhoto library and can only be opened in iPhoto.  If the library crashes for any reason, then those copies are gone.  I would rather have two copies accessible from any application.  Second, as your library expands, the longer it will take to load iPhoto and the more susceptible it will be to crashing.   Since this is, by design, supposed to be a “light” photo editor, you want to avoid making the footprint of the application larger than necessary.  For these reasons (and others) I would advise against copying your images into iPhoto.  To avoid this, when creating your first (or a new) library, simple click on the Preferences, then Advanced Menu options, where you can de-select the option to copy images over.
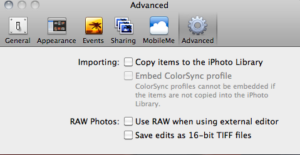
 

Uncheck the Copy Option


Albums and Sideshows

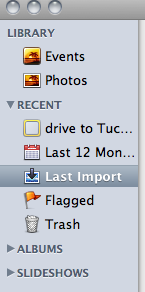
When it comes to managing your photos though, iPhoto rocks.  Much like Lightroom, you can build the equivalent of collections (as albums), and create slideshows from those albums.  You can also export slideshows with music which until Lightroom beta 3 was unavailable in any advanced photo editor – you needed a separate application!  Score one for the folks at Apple here!


Music in Slideshows is a Plus

Image Editing: A- Most of the basic functions are there, cropping, red-eye, image rotation, and even horizon correction.  Not much to improve upon here without entering the realm of serious photo editors, which I wouldn’t hold an OS program to…at least for now.


Editing options in iPhoto

Support:  B If your Apple product (your Macbook, iMac, or MacPro is under warranty, no problems – they got you covered.  It can include long wait times occasionally, but that’s to be expected from a company of Apple’s size.  (I know, I’ve vented about this before, but in this case, it has nothing to to with the program, because the support is there…when you can get through.)  What happens when your computer warranty ends?  So does support – it’s the nature of the beast, and support has to end eventually.  For the time being though, there is enough documentation out there on iPhoto to the point that most of us can get by with asking questions in various forums and Google research.  So, while support is not the best – it’s about an industry average, nothing to write home about, but also nothing that really garners complaints either.

There you have it, my take on the iPhoto editor.  I don’t really use it for major edits, or much more than occasional snapshots that I share on Twitter, forums, and other such venues.  Having offered up my two cents, it’s time to serve things up for the listening and reading audience.  What’s your collective take on iPhoto?  Do you like it, love it, or hate it?  Anyone using iPhoto ’08 or ’09 for managing and/or editing their photos?  What are your thoughts?  Sound off in the comments, or let me know via email.

In the meantime, that’s it for today…make sure you take a moment to get your photos into the November contest giveaway thread – there’s now less than two weeks left and the prize package is pretty cool!  The link is in the header, but here it is again for convenience:  Flickr Contest Thread Happy shooting all, and we’ll see you back here again tomorrow!


Software Review: Noise Ninja

With the October Contest underway where the winner will walk away with a fully licensed copy of Noise Ninja, courtesy of the folks at PictureCode, today is a great day to give everyone an idea of what makes this program one of the industry leaders.  Since I have talked about the presence of noise in your images before (read that post here), re-hashing the principles of what introduces noise and the artistic benefits and image quality downsides of it in your images isn’t really needed.

Instead, here I will simply share some of the interface, and a few before and after shots here so you can get an idea of how well this software handles noise in your images.  So, enjoy!

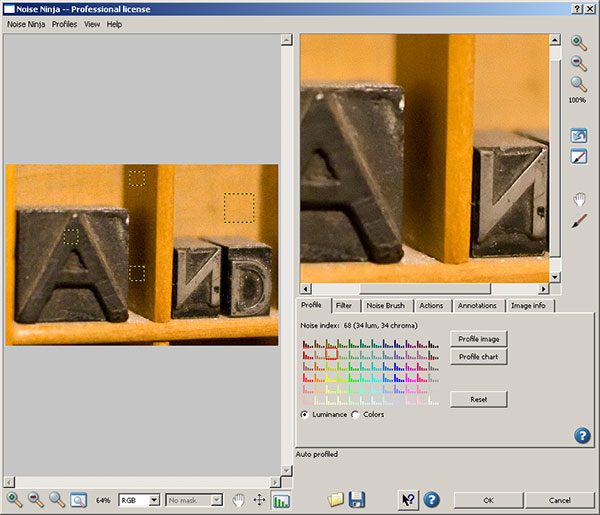
First up (after entering your license code), you’ll have a screen that looks like this:

Noise Ninja
Noise Ninja

You can see the yellow squares in the image on the right that shows the sections scanned to determine the noise profile for the image selected.  On the right, a closer view of what the image will look like (or at least a close approximation) after the noise reduction is run.  You see how you can make certain adjustments on one of several tabs.  On this main tab, you can see the options for Image Profile, Profile Chart and radio buttons for luminance and color values, along with the reset option.  I actually leave these alone most of the time.

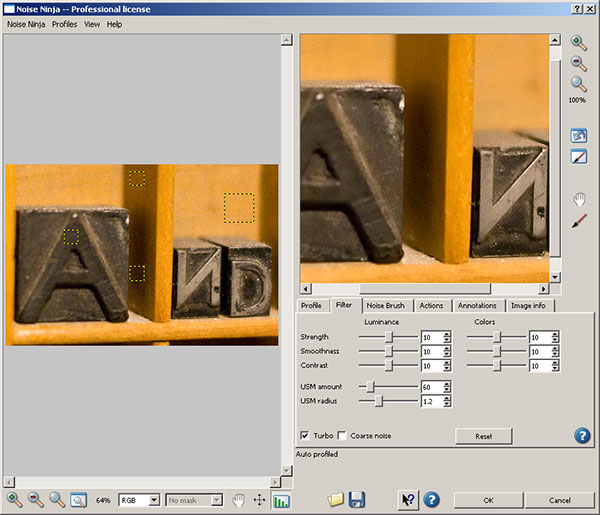
On the second tab is where I vary my noise reduction adjustments (and I would venture to guess most people make their valuation adjustments based on the image used).  Here’s the options available to you:

Noise Ninja
Noise Ninja

You can see here that many more detailed adjustments can be made to the strength, smoothness, contrast, USM amount, radius, color noise, and then checking whether you want the processing done quickly (turbo) and applying the settings to coarse noise situations.  I made my adjustments to 12 for the strength, smoothness and contrast (and typically use these ones for most images with noise).

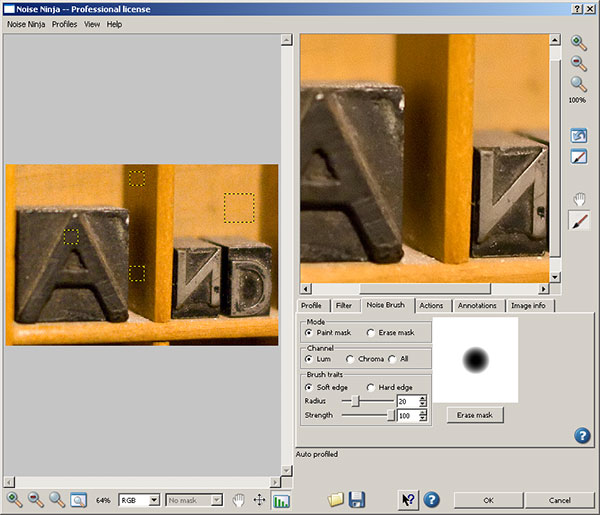
In the next tab, as shown below, you can see the noise brush, where you can apply the noise on a paint mask or an erase mask, specify the channel (luminance, chroma, or all) ad the quality of the brush trail by not only the type of edge, but also by radius and strength.  (This is very handy if you want the noise reduction faded across the image so as to leave some noise behind for artistic effect!  Normally I don’t make adjustments here either – but it is fun to play!)  Take a look at the interface:

Noise Brush
Noise Brush

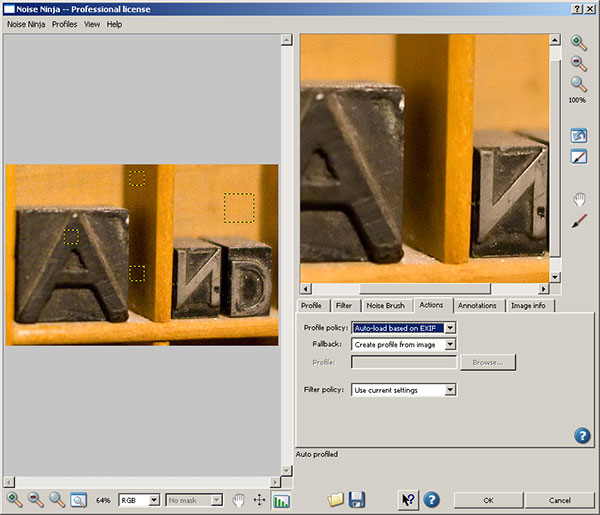
The Actions tab, as shown next, defines how Noise Ninja operates when it’s loaded.  Specifically, here is where you can tell NN wither the profile is by default configured based on EXIF data or to create a profile from the image, or to use a specific profile. This can be very handy as well if you are batch processing a lot of photos that were shot under the same or similar circumstances so that a profile doesn’t have to be loaded each and every time.  The fallback, and filter policies can also be defined here as well.  Here typically I leave the default settings alone as I prefer not to batch profess since my type of work is more geared toward fine art and individual edits rather than massive quantities.  To each their own I guess – take a look at the interface:

Noise Ninja Actions
Noise Ninja Actions

The next tab is the annotations tab.  I almost never use this, as this is a place where you can add additional EXIF and metadata.  Since I prefer to take the values from camera rather than adding my own specific notations, this tab doesn’t get any use from me – but it can be handy if you want to vary settings based on things like manufacturer, Model, FIlm type Megapixel count, ISO level, etc.  A second tab lets you add even more…see the interface captures below for reference.   Noise Ninja to me is isn’t about editing exif data though – it’s about noise reduction, so I skip these tabs.  Take your pick:

Noise Ninja Annotations Tab
Noise Ninja Annotations Tab 2

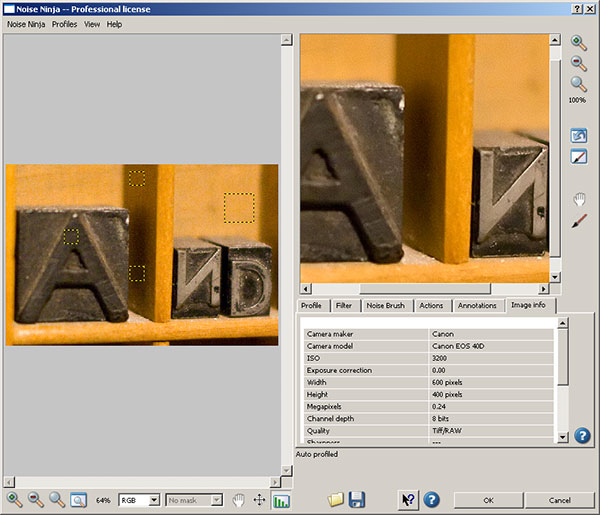
I do occasionally reference the Image Info tab though, because some useful information can be obtained there as well.  Things like the manufacturer, model, and more specifically, the ISO setting at which the image was taken.  ISO settings can be an indication on the amount of noise that was introduced due to camera settings and thus, how much can be reasonably applied.

Noise Ninja Image Info

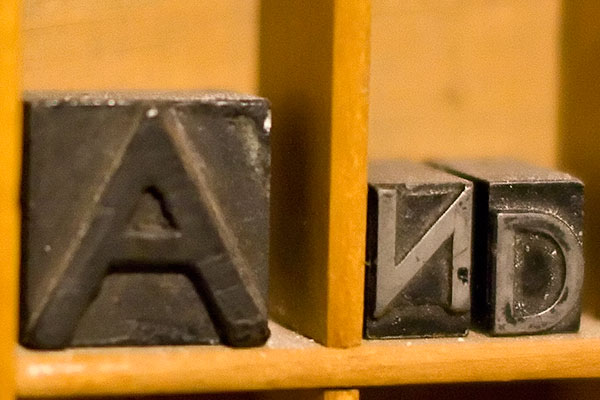
You can see that my first image, shot at ISO 3200, was subject to some pretty intense noise on the 40D.  So, I ran the process, and take a look at the before and after results:

Before

Before Noise Ninja processing

Some pretty heavy noise, as expected, so let’s just look at the image after processing:

After

After Noise Ninja processing

See the difference in grain?  Yeah, I was impressed too.  But is it always the case?  I ran another couple images through NN and got the same or similar results on other objects in my print box.  (Which, by the way, is a great resource for test shots when looking into lens and gear performance on a wide variety of things like noise, white balance, macro, depth of field, and much more.)  Here’s another sample crop just to show you for comparison sake:

Before NN Processing 2

and after…

After NN Processing 2

Again, some impressive results.  When push comes to shove, results is where it counts in my book and PictureCode delivers at a superb value.

Now granted, there are other noise handling programs out there, and if you ask a dozen people what they use, 5 will say one, 5 will say another, and 2 will offer up another alternative.  When push comes to shove, it really is up to personal preference on which one “works best”.  For me, it doesn’t really matter as long as you are aware of what noise is, what it can do to an image, and how to fix it.  The tool you use is up to you.  I think Noise Ninja is probably recognized well enough for a reason, and the results here seem to suggest why.

The rest I’ll leave up to personal preferences, and if you would like to contribute your own thoughts, by all means, share them here in the comments or with me via email.  If you want to try it – you can download a free copy from the folks at PictureCode here –  or simply participate in the October Contest over at Flickr and win a copy from them for free!

That’s it for today – happy shooting all, and we’ll see you back here again tomorrow!
Topaz Laps: Software Suite Review

So, as everyone is likely already aware, Topaz Labs approached me recently to sponsor a giveaway and generously donated their entire suite for some lucky listener/reader.  As is always the case, I like to say “thanks” in my own small way by giving the vendor some “air time” on the blog with a personalized review of whatever it is they are contributing.

In the case of the Topaz Suite – boy did I bite off more than I could chew!  The Topaz Labs package consists of 7 different Photoshop plugins with somewhat descriptive names for each plugin package, ranging between:

  • Adjust
  • Denoise
  • Simplify
  • Detail
  • Clean2
  • DeJPEG
  • Vivacity

There’s also two video plugins available:  Enhance and Moment.  I’ll address those in another post, just because, well… even just the 7 plugins for Photoshop was going to be a lot of plugins to review in one blog post!  Thinking I was up to the challenge, I powered on and installed each package, then fired up Photoshop.  Wanting to find an image that had some depth, color and tonal range to it, I picked one from a photo walk I did in Boulder a month or so ago of the tulips:

original_blog
Boulder Tulips

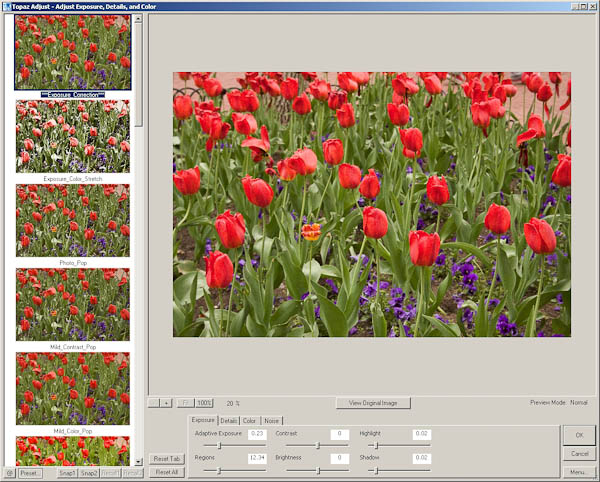
Kind of a neat image:  one flower all by itself ina sea of red tulips.  The green stalks and purple base also served as a nice contrasting set of colors to see how things progressed.  So, into the first plugin I went – the Topaz Adjust.  Lo and behold, within this one plugin are 21 different photo adjustment presets! That’s right – 21!  Here’s a quick look at the interface:

adjusteditview

See that left-hand column?  There’s 21 different variations of creative adjustments done to your photo to give you a specific look and feel to your images – all at the click of a button.  To the bottom center are all the slider controls for exposure, details, color, and yes – even noise handling.  You can select a creative style, then edit within that style to go for a unique look and feel all your own!  This is a very clever and unique approach to photography work flows, because now you can look at your photo with various edits in an simple and easy preview to see how various adjustment styles will look on them.  I’d like to give some face time to each style but there just isn’t room here in the blog to do each justice.  So….enter the photo gallery!

That’s right, I took my one image and ran it through each of the 21 possible adjustment styles.  On each style I just left the default sliders in place, but what’s especially cool is that these slider values change from one style to another, so if you are paying attention to the numbers, and you like a particular style, but want to drop just a touch of the contrast, or bump a touch of the noise, you can do so easily and intuitively!  Pretty darn cool in my book.  The styles go alphabetically in order in the gallery:

  • Clarity
  • Color Blast
  • Crisp
  • Detailed
  • Dramatic
  • Enhanced Contrast
  • Equalize
  • Exposure Color Stretch
  • Exposure Correction
  • Mild Color Pop
  • Mild Contrast
  • Mild Detail
  • Neutralizer
  • Photo Pop
  • Portrait Drama
  • Portrait Smooth
  • Psychedelic
  • Simplify
  • Small Details
  • Smooth and Flat
  • and Vibrance

To see the overall effect each adjustment style has on your images, visit this companion photo gallery here that shows each – the original is listed first, followed by the 21 different adjustment styles!

This alone would be worth a giveaway prize – but this is just one of the entire suite that Topaz Labs has donated to the blog/podcast for our next giveaway.  The rest of their various plugins will have to be reviewed individually on the blog, so this means during September, I’ll take a more detailed look at each of the plugins – clearly more than one will have to be addressed each week, and I’ll try to post an image gallery so you can see the effects of each plugin on some photos.  This is definitely a product to consider as a part of your arsenal of tools though – I’ve already seen so many possibilities for photo galleries and output options on my own collections that I could be busy for months just reviewing what these plugins have to offer.

One downside to the Topaz plugins is that they are only functional in Photoshop and Aperture.  From what I understand, a LR set is in R&D right now, and should be released in very short order.  But for the time being – Photoshop and Aperture are your installation options.  The only other downside I can see to all these options is the risk of decision paralysis – when prompted with too many options, it can often lead one to indecision.  For this reason, I’ve designed an action to use in my own work flow when using the Topaz Labs Adjust plugin.  Here’s what the action does:

  1. It takes my original file and creates 21 duplicate layers.
  2. Each adjustment style is then applied to its own layer, and the image is flattened and saved by that style name as a lower-resolution jpg file.
  3. I then go into Lightroom and look at all 21 (and the original) in either the Library module or in a web gallery module to see which one or two I like the most.
  4. I’ll then go back to Photoshop and find those two layers and delete the rest.
  5. Save that resulting file as a PSD
  6. On each adjustment style, I then tried some various tweaks on the sliders to see if there were minor adjustments that I found more appealing to my tastes.

This is just my work flow that I am thinking will work well for me – I like having at least a few options available, and since different scenes call for different adjustment styles – the action will help expedite my work flow.  It took a while to create the action as you have to be methodical and pay attention – but the resulting options for workup are worth it in my opinion.

Anyway, back to the Topaz Labs Adjust plugin – this thing rocks and I could easily see it become a part of my work flow (who am I kidding – it really already has since I built an action to support it!  LOL)  Don’t forget, next month you can WIN not just the Adjust plugin but the entire suite from Topaz Labs.  Keep checking in for details and the theme announcement.  Thanks to the good folks at Topaz Labs not only for their generous contribution to the LDP podcast, but also for the R&D they’ve invested in this entire series of plugins!  Judging from my review of the first component – this is sure to become part of the standard set of utilities for photographers and creatives!

Okay, that’s probably enough for today.  If you’re still chomping at the bit for more info about Topaz Labs software – go check out their blog – it’s got some great info on there too and really goes in depth from Product Manager Eric Yang (this is his Twitter link – follow him, very cool guy!)!  I’ve already added it to my own list of RSS feeds!  Check back tomorrow as we get back to the previous project I started – the manually adjusted Star Tracker!  In the meantime, you also have only a short time left in the Wacom Giveaway – Friday is the last day to submit your photos!  So, if you want to Win a Wacom (Bamboo Fun) – enter today over at the Flickr Thread!

Happy shooting everyone and we’ll see you back here tomorrow!

Grab the Feed

Reviews, Contests, and Blog Notes

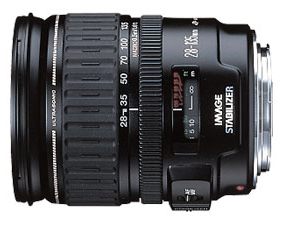
Lots to cover today on the blog so I am going to get right to it.  First up, I’m trying to maintain the schedule of hardware reviews, so rather than go into detailed analysis, I am just sharing an abbreviated review here today on the Canon 28-135mm lens.  Also up on todays blog, the OnOne Software giveaway finalists have been announced!  Last up, a few administrative things to address.  So, without further ado, let’s get started:

The 28-135mm Review

The luck of this review is due to the Scott Kelby Worldwide Photowalk.  I had been hearing good things about this lens for a while, and finally bit the bullet and rented it from a local camera store to try it out.  I tried to keep in mind that the gear is a little more worn than usual, but did see some pros and cons on the lens, so let’s get started:

28-135mm

The 28-135 is an excellent walk-around lens.  The focal range is perfect for going fairly wide and also zooming in to a certain degree.  It offers some of the best features of both worlds, and does so at a pretty reasonable price considering what it has to offer:

Pros

  1. Focal Range:  As mentioned it has a nice range for use while moving from one environment to another.  Not quite a wide angle, and also not a zoom, but a nice combination of the both.
  2. Weight:  For an IS lens, this is amazingly light.  I was expecting it to be a lot heavier, so a definite positive (and happy surprise here).
  3. Image Quality:  I couldn’t believe how wide the sweet spot of this was.  I got crystal clear tack sharp shots from probably 30mm to 130mm.  To get that kind of range in a “sweet spot” is significantly impressive
  4. Price:  The price for this lens is a shade under $400 from B&H and for an IS lens, that’s pretty darn good – about as cheap as you can get given the feature.

Cons

  1. Battery drain:  Although it’s related to the positive of Image Stabilization, the battery did seem to go rather quickly.
  2. Weight:  I know, it was listed as a pro, but I am also listing it as a negative, because with many of the newer SLR’s the weight doesn’t balance as well as it might have on the 20D or even the 350D.  Don’t get me wrong, I like light, but I also like balanced, and here I think the weight of the dated design has an impact on balance.

There’s a lot more I could go into here, but on the whole, the lens is a great one, and with the pros definitely outweighing the cons, it’s definitely one to consider adding to your gear bag – if you like to photo walk!  If you’d like to see samples of the 28-135 in action, feel free to check out this montage of shots I compiled from the Scott Kelby Photowalk:

The OnOne Giveaway Finalists!

I know, the moment you’ve all been waiting for – the finalists.  I am pushing forward here partly because my counterpart at OnOne, Mike Wong, has been on vacation, and is getting back soon, and secondly, because I understand OnOne is having an excellent promo sale going on right now for the suite, so I’d like to get this wrapped up so that those who have been waiting to hear can still take advantage of the opportunity to save a little $$$!  Lastly, also because the anticipation over the OnOne giveaway is a primary focus for many listeners, and other contests are both underway and coming up!  So, without further ado, here are the finalists I’ve chosen.

OnOne Software Giveaway Finalists

The quality of entries made it super hard to pick, because there were so many that were deserving of moving forward into the finals – but decisions had to be made.  Thanks to all for entering, and best of luck to the finalists – Mike and I will talk this week and hopefully have someone get a great email by Friday with the news that they are the proud winner of the OnOne Software Plugin Suite Giveaway!

Blog Notes

A couple updates are coming soon to the blog, and a couple have already been made.  Some things you may or may not have noticed that have already taken place:

The links in the sidebar have been broken out into categories from one another so you can find things easier

A paypal link has been added to the sidebar – I had mentioned this once before, and try not to push it, but donations are always welcome to help offset the costs of running this blog (bandwidth, time, and storage on my hosting provider)

The picture has been updated in the header.  I try to change this out periodically, and in the next incarnation that will randomize on each visit through an entire gallery of photos, but a new one is in place, so if you are picking up the content from a feeder – stop on over to see the changes!

Last but not least, thanks to Terry Reinert, I’ve added a plugin for fellow bloggers – when you post a comment here, your last post from your own blog is happily linked to your comment!  Enjoy!

So, that’s it for today?  Like the review and the changes?  How about those OnOne finalists?  Kudos to everyone who submitted images too.  Don’t forget to jump into the latest and greatest giveaway – the winner will get Wacom Bamboo Fun valued at $100!  Be sure to throw your best “Fun” themed images into the contest thread here:  Giveaway Thread

Happy shooting and we’ll see you back here tomorrow!

Grab the feed

Teaching to Learn…

For those of you that don’t know – there is a cool little feature available for iPhone and iPod Touch users called AudioBoo, where you can record up to three minutes of audio soundbites and share online.  It’s a pretty neat little feature, and allows for short bursts of ideas.  I shared just such a recording (they are called “boos”) this evening after I left the Exposure Denver photo club meeting.  You can listen to the recording here or continue reading below my thoughts on the Exposure Denver experience!

Speaking of which, the gang from the group was so cool – everyone was so welcoming!  They asked me to come in and share some tips and insights on Lightroom, which I was quite flattered but honored to do. If you want to learn more about Exposure Denver, follow the link to their blog where they have news of upcoming events, activities and more.  These folks take it to the next level with regular galleries, themes, critiques, reviews, and yes, you can sell prints at the shows!  A lot of thought, time and preparations go into the group and everyone contributes!  It was quite an energizing and motivating dynamic and has me very excited in ways that I have not even explored yet photographically and creatively.  My head is literally bursting with possibilities.  And why is this?

Because I was thrust into a teaching role, on a subject I am (or was) admittedly not an expert in!  I have no idea how it all started anymore, but this further confirms what I’ve known from prior experience in another field – the best way to learn about something is to try and teach it to someone else.  It forces you to get up to speed, get current, and learn more than you did before.  This happens in three ways:

You do research to prepare your class note, talking points and handouts.  I learned so much just from pulling all these resources together.

Others in the class will know things you don’t.  Without fail, this always happens.  There is no way you can expect to know more than everyone else on a subject you are teaching unless you have 20 years of age and experience over the audience.  But I was not in front of kindgarteners this evening – these were peers (and several were even a few steps ahead of me).  We each brought value to the table and while some probably learned a lot from me – others schooled me!  (But in a good way!)

So, if you want to really get your fingernails dirty, dig into something and know it better than you ever did before:  try teaching it!  I did and learned more than I ever have before about Lightrooom.

Mask Pro 4.1

Okay, I know the folks from onOne have been very generous with their contribution of a copy of the OnOne Plugin Suite for the latest giveaway here at Canon Blogger/Learning Digital Photography, but I have to say that I am literally blown away by this offer even more.  As I delve into each tool more and more, I am totally amazed at the functionality and how easily it really makes things.  For those of you that watch Photoshop User TV, you’ve seen what I’ve seen – ads from OnOne claiming that masking is made so super easy that you can swap backgrounds and composite images together in a snap – it’s a breeze, right?

Well, we all know that ads only show you the quick and flashy parts of things, not the nitty gritty.  Let me tell you here and now – the Mask Pro really has no nitty gritty – it really is that easy.  Take a look at these sequences:

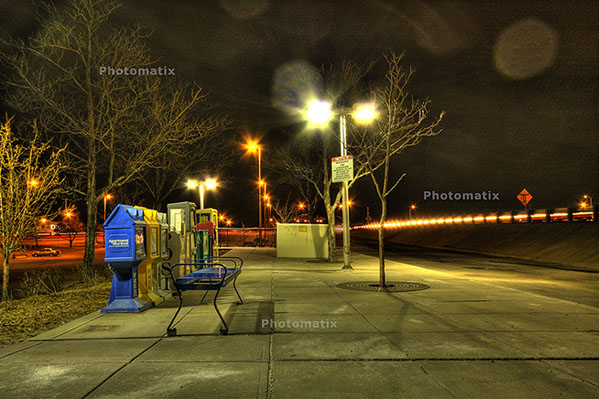
First off, an image I merged together during a trip to SC last summer.  It looked like it could make for a nice HDR, so I did some tone mapping and got this result:

originalhdr

Needless to say, it didn’t really have the “wow” factor I was looking for.  (I should also throw a mention in for the folks at HDRsoft that produce Photomatix, the HDR software utility that I was testing at the time I originally put this HDR together – still working on a review of that – I lost the trial version after re-installing XP, but will get that back shortly.)  Anyway,  given the success I’d had with some other images in HDR and the background I tried, figured it was worth the effort to blend in a different background.  Here’s the results.

hackjob

Keep in mind, this was after literally hours and hours of painstakingly selecting branches, twigs, and  what not literally zoomed in to almost the pixel level.  Still, not that flattering a result and clearly a less than “stellar” job.  I relegated that to the “learn from your mistakes” folder and had not really touched it since.

So, this was my test for the Mask pro – could it do what I couldn’t after at least ten hours of agonizing masking selections and duping to repeated layers to start up the following day?  Well, let’s see, here’s what happened.

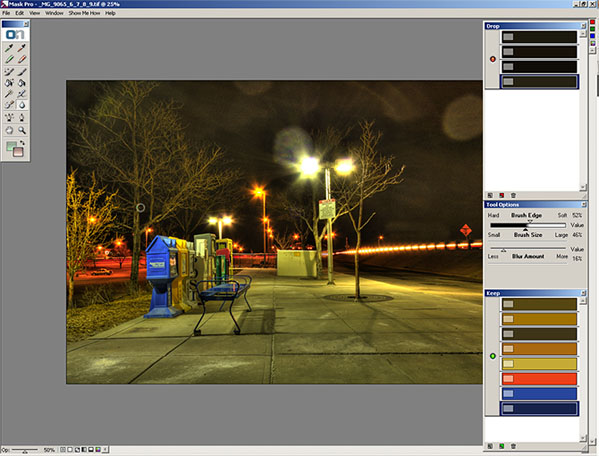
After installing Mask Pro, I loaded the tone-mapped HDR image into Photoshop.  Then, rather than taking any time to tweak, I went straight to Mask Pro (after all, it should do the work for me, right?).  After a short 7-slide presentation on the tools, my first screen looked like this:

maskpro1a

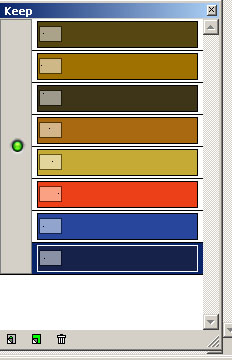
Before I go on, let me explain how the tools on the right ended up how they were.  You see, Mask pro gives you eye dropper tools to select the colors you want to keep and the ones you want to subtract.    So, I went and selected the green eye dropper to define the colors to keep.  I clicked a few parts of the branches and signage, which took the better part of 5 seconds.  The end result was this color set:

keep

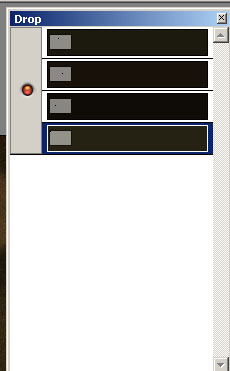
Then I switched to the red eye dropper to define the colors to drop.  I clicked a few parts of the sky.  This took another 5 seconds or so.    The end result was this color set:

drop Lastly, I clicked the Magic Brush tool, from the Mask Pro tool panel maskpro_palette

and just started painting around the sky.  I certainly did not take my time, as I was running on my Windows desktop which has a single core 2.3 Ghz celeron processor (it chugs when I load my browser fer Pete’s sake).  So, I dealt with about 5 minutes of a magic brush tool as it calculated the mask to apply as I painted impatiently across the image.  (After all, I wrote these blog posts after dinner, so time = sleep here.)

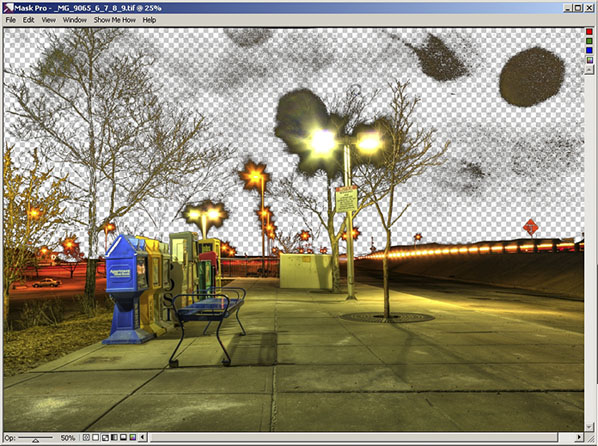
So, after about 5 minutes and 10 seconds, I have a mask that looks like this:

maskpro2

Yes, that was after 5 minutes!  I could already tell this was a wickedly intuitive and powerful tool (and I mean that in the best of ways), so I just stopped there and decided to take it back to PS for final cleanup and adding the new background.  To do that, I simply clicked the File menu, then “Save/apply” (another 2 seconds)…

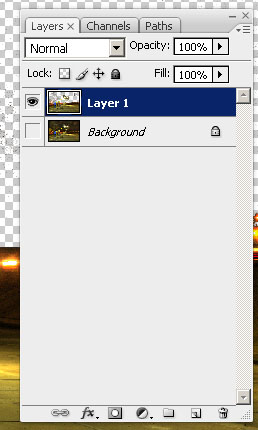
Now back in Photoshop with the original image.  It looks the same, but take a look at the layers palette:

layers2

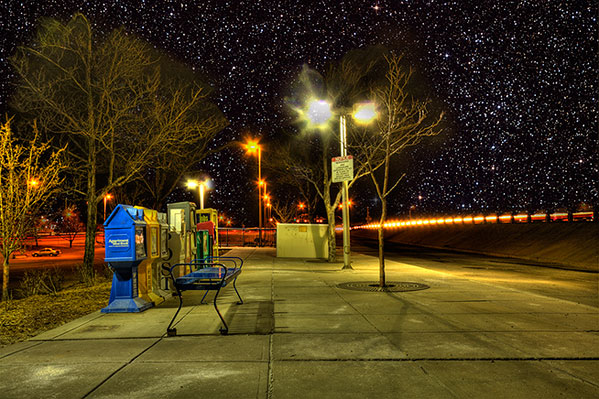
I know the low-res and smallness of captures for the blog make this hard to tell, but at this point I am pretty much ready to bring in the new background.  My only last step in PS is to duplicate the layer I just created from mask Pro to clean up the big blotch in the upper right, and a few specks in the rest of the sky on the third layer.   So, now I am ready to bring in my starry background again.  I place the object in the PS document to get this (for the record, I went with a different starry background to go for a more realistic effect rather than the Harry potter look of my swimming pool shots):

layers3

Finally, I just pulled the stars layer to sit below the Mask Pro layer and here’s the resulting layout in Photoshop:

layers4

The last bit took all of another minute, tops (remember, I am working off a slow processor.  The final result, which took literally less than 10 minutes (the first took over 10 hours):

finalhdr

Such is the power of the OnOne mask Pro – just one of the multiple plugins that are available in this Suite.  If you want this kind of power and malleability in minutes, then enter the giveaway today.  it can literally save you hours, if not days, of post processing!  Here’s the Flickr page for photo entries and here’s the link to the rules.

What can I say – OnOne rocks!  Just to give you a true frame of reference – it took me about an hour and a half to write this post – and that includes getting the screen captures, then sizing them for the blog.  I also interspersed some Twitter time and surf time as well, so it’s not like I was really in any kind of “zone” or anything.  It was just another task in an evening of multi-tasking.  The original one took me over ten hours of processing and that was with no other apps running, seriously.  I was restarting the computer just to free up the RAM for usage only by PS every evening.

This feature alone can save you days of time in the digital darkroom.  Don’t delay and enter to win today! Happy shooting and we’ll see you back here again tomorrow.

Grab the Feed

Let me count the ways…

The age old phrase of “let me count the ways” seemed like as good a theme as any to announce the newest contest from the blog here for the Learning Digital Photography podcast.  I just got word from the folks at OnOne software that they really liked the post on Genuine Fractals – so much that they would like to participate in a giveaway!  Can you guess the prize?  Yup, that’s right, the entire OnOne Plug-in Suite:  4.5!   This is an amazing offer, as the package normally retails for $500!  That’s five hundred big ones!  I don’t know about you, but if I had an opportunity to win a software package worth $500, I’d certainly stand up and listen…so, since we’ve got this contest announcement for the month of July that involves software, there will be no software review today.

Oh yeah, so anyway, that’s the prize package.  How do you enter?  Easy – just like the last couple of contests – it just requires a little participation.  A new thread will be set up on Flickr for people to contribute photos.  (It’s already live but entries will not be accepted until midnight Mountain time tonight.)  Here’s the rules:

  1. Since the contest sponsor is onOne – then the theme shall be Numbers.  I am not going to interpret or give any ideas here, but if your photo incorporates something to do with numbers (any number, multiple numbers, use of numbers, whatever), then it will be accepted.
  2. Join the Learning Digital Photography Flickr Group – the images will be shared in there anyway, and this is a great way to see other inspirational images from people that are regularly contributing to the common pool…just make sure you post your images in the thread titled Numbers Contest (easily linked for you right here)
  3. Photos will only be accepted for the month of July (and that are uploaded during that month, so no archived images will be accepted)  Only 31 days to enter so get clicking! 🙂
  4. One photo limit per participant.  Sorry all, but with a prize package this huge, I know there’s going to be a lot of entries, so in order to make judging easier one entry per person.
  5. Photo manipulation is acceptable – after all, it’s for a prize that encourages massaging those pixels, so edit away!  However, you just be the original copyright owner of the photo used – no “borrowing” the work of others.  People found using others images will be removed from consideration.
  6. Images should be no larger than 800 pixels on their longest side, and no shorter than 600 pixels on the longest side.  If you need to upsize a photo, use the onOne Genuine Fractals trial!  🙂  On that note, please also refrain from using digital frames to increase image dimensions – images with frames that advance will be cropped.
  7. By submitting images, you agree to allow your photos to be featured in the web gallery and here on the blog without expectation of compensation.  The three finalists will have an opportunity to have their photos link back to their Flickr Stream, website, or blog if they like as the finalists will be notified of their advancement one day in advance of being featured on the blog.
  8. The product is being offered by the folks from onOne on the basis that it is NFR – not for resale.  The prize cannot be re-sold to someone else.
  9. Judging will be done by myself and I have one representative from onOne who will also assist with making the determination.  Decisions of the judges are final.
  10. There will be three rounds of judging:
    1. As in the past, the initial pool will be whittled down to ten and the images collated into a web gallery for display here on the blog.
    2. Three finalists will then be pulled and featured here on the blog for a final day or two of consideration.
    3. Last, the grand prize winner will be declared after even more careful determination from all participating judges.  OnOne has generously donated their time for judging as well, so we’ll compare notes and come to a mutual consensus to determine the winner.

Good luck to everyone and have a Happy month of Shooting!  Thanks especially go out to the good folks at OnOne for their generous contribution of the Plugin Suite 4.5 Software for some lucky reader/listener/participant.  Happy shooting and we’ll see you back here tomorrow!

Grab the Blog Feed

Rate the Podcast on iTunes

Digg the Podcast on PLM

Software Review – Genuine Fractals 6.0

Don’t get too excited – no software giveaway on this one folks, as I’ve not had a chance to call OnOne yet and see if they’d be interested in participating in a contest.  Instead, I am working off a trial version of one of the premiere up-sizing software programs on the market – Genuine Fractals from the good folks over at OnOne software.  Available for both Mac and Windows, this product really has developed a good name for itself in the industry.  While reputation may precede it, I have been wanting to give this product a try for some time now, so here we go!

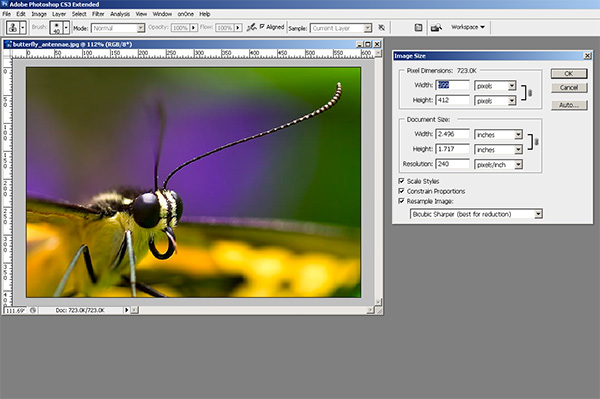
To do this review, I decided to just share the work flow on a particular image that I happen really like, but because it was a pretty heavy crop, never really had a chance to see it in print very large as the limitations of Photoshop prevented more than a 4×6 image.   The first step was to open that image:

before
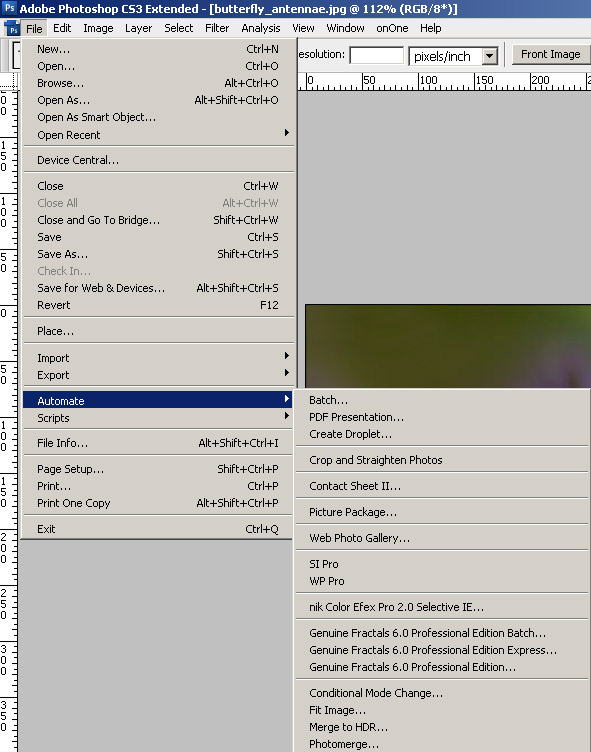
Here we’ve got this heavily cropped image of a butterfly I liked – and the capture shows the image is a 600px photo.  Way to small to print – I want at least an 8×10.  So, after installing Genuine Fractals, I loaded that in Photoshop by going to the File | Automate option and it showed up in there:

fractals1

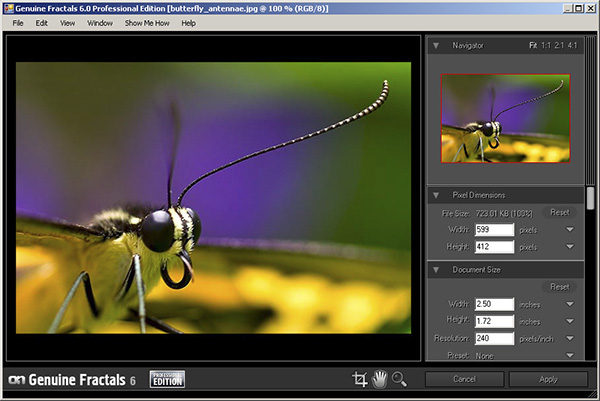
So, after selecting that, I got the GF window, which shows the current image dimensions, and the upsizing options, as shown below:

fractals2

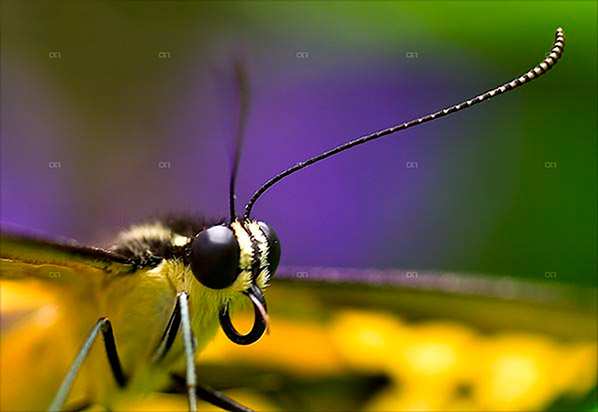
You can see the default dimensions of 2.5×1.72 just will not work for anything useful other than a desktop background or a postage sized stamp.  I need to make this bigger.  So, I plugged in the values that would take me up to an 8×10, and in this case the aspect ratio wasn’t exactly on, so I took the short side up to 8″, and that put the long side at 11.6″ roughly.  Nothing I can’t crop out a little as I move through post, so here’s the larger sized image.

Butterfly

The little dots are the logo of OnOne software so yo can disregard that because when you purchase the software, those go away.  Instead, click on the image and zoom in on the antennae for a better idea of how it handles the up-sizing process.  I was actually pretty impressed.  Granted this image is unusable as it stands because there is too much jpg artifacting since I was working off an already processed image, but if I was going off the original raw, the results would likely be that much better – and the results are much more impressive.  Take a look at this next one.

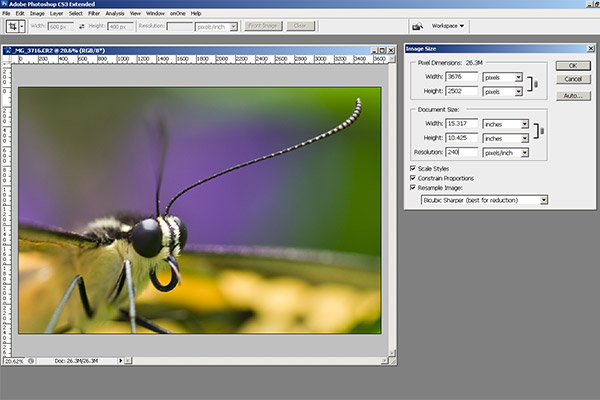
fractals3

That”s the original file, a roughly 15×10″ image, cropped to about the same dimensions and then sized for the blog here.  I’d include a hyperlink to the re-sized version, which blew up to about 75″ on the long side, for the same approximate increase in percentages (500% – GF claims boosts up to 1000%), but it really is too huge to accommodate on the web.  Besides, since it is copyright-protected, just putting that large a file out there is like – oh I dunno – like leaving your garage door open for thieves to steal your car! 🙂 ! Think about 75 inches though!  That’s like 6 foot wide.  We’re talking billboard sized posters now, and the degradation in image quality is much less because I was working with the original file.

So, whether you are trying to recover size from an accidentally compressed image, or trying to increase an image to use in large applications – you can see how Genuine Fractals might be a route to consider.  It may be a pricey option at$300 retail, but when you sell just one billboard print – the software expense is covered.

I’d give GF6.0 a two thumbs up just because it produces such impressive results.  To me, the proof is in the pudding!  So, what do you all think of the software?  Does anyone else use it?  I’d like to hear others opinions, as well as some alternatives if you have any.  I am pretty convinced, and should I ever need to up-size, I know where I am going from here!  Happy shooting and we’ll see you back here tomorrow!

The Un-review Software

This week I am going to talk about the lack of software in the weekly software review.  That’s right – the lack of it! You may be sitting there wondering which software item I am going to talk about, promote, or diss in some way shape or form, but instead of that, I actually want to talk about the general trending of software, hardware, and system resources.  Why?  Because we demand a lot from our computers these days.  Think about it – we want our computers to do many things from surfing the internet, to designing graphics, office functions, building websites, and yes, processing ever-increasing image file sizes.  At what point do we say we are asking enough of our computers?

Lately my main desktop computer had been getting slower and slower and slower, and it seemed no matter what I did whether it was beefing up the RAM, adding a faster hard drive, processor, or the like, and even re-installing the OS every 6 months – it was just getting pathetic.  At one point, I clocked abut 5 minutes for Firefox to start – on a fresh boot!  The culprit?  I am asking my computer to do too much.  I finally said enough is enough – and am re-purposing the computers in the house.  We have a grand total of five computers and each has a unique function:  from Office to web, to image processing, and podcasting.  And that’s just it – each computer has a task.  Yet I have not been disciplined about asking the computer to only perform its assigned task.  I revert to the one desktop and the one laptop.  The end result:  the systems s……l……o……w…… d……o……w……n…….

With a grand total of 78 programs at last count, it’s no wonder my cmputer was screaming “Mercy!”.  So, enough is enough.  I vowed to make each computer perform only one set of tasks, as explained above.  The end result:  removing about 50 applications from the main computer.  It took the better part of an evening (4 or 5 hours) but at the end, the computer is now screamingly fast again – and Firefox loads in seconds, not minutes.  The reason – purposing your computer for a specific software function.

So, instead of looking at adding new software all the time to your computers, you may want to take a look at the computer itself – is it doing the job you want, or are you asking too much?  Think about purposing your resources more efficiently.  Do you really need that HP 3600 printer driver on there from 4 years ago?  What about that trial version of Elements you downloaded a few months ago?  And the 4 instances of Tweetdeck you have there?  Really?  Clean out your software and watch your computer performance increase a notch or two as a result.  It’s just like us humans – we can get more done when we’re asked to do less all the time!  We’re faster, more productive, and yes, more focused on the task at hand.

So, check that installed software list and try cleaning things out from time to time – your computer will thank you!

Happy shooting and we’ll see you back here again tomorrow!
The Business of Selling Your Photos

As economic belts are cinched, and we start spending our dollars more carefully than ever before, I am getting email a lot from photographers asking “What should I be charging for this event?”, or “A client wants a digital negative, what’s a fair rate?”, and even, “How much is my work worth?”

Truth be told, the economics of photography sales are just as much a mystery to me, and I don’t have all the answers.  But I know a few things about where to start, and how to research.  First and foremost, is to know your market.  Are you working in NYC, or in Duluth MN?  Have you looked at other photographers’ websites?  What are they charging?  Are they start-ups or established companies?  What kinds of services do they offer?  What kinds of services do you offer?  Do you provide print fulfillment or is that out-sourced?  What is your overhead?  Cost of equipment?  Cost of training?  The whole 9 yards – it’s a lot to filter.  Well, here’s some software that can give you a leg up in that regard – FotoQuotePro.

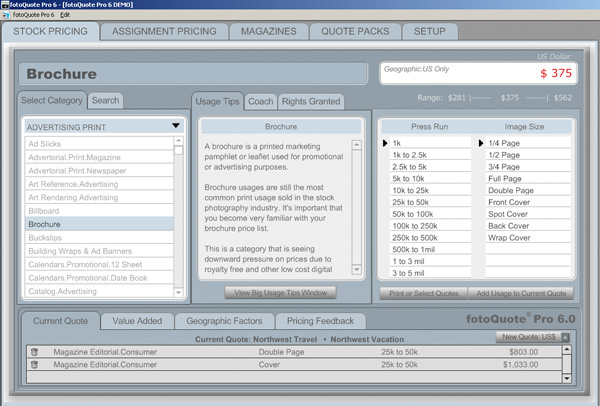
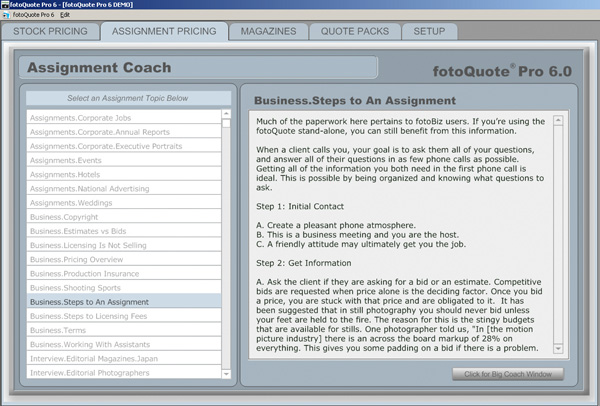
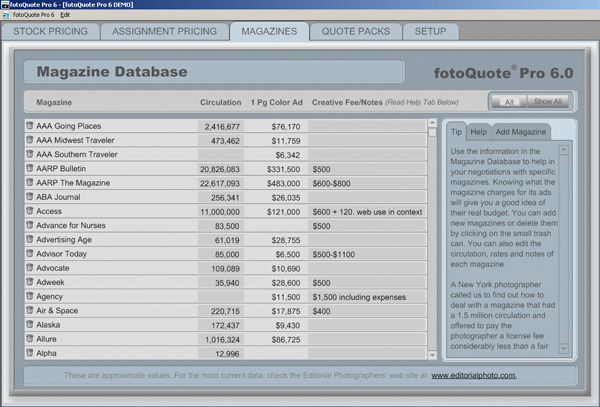
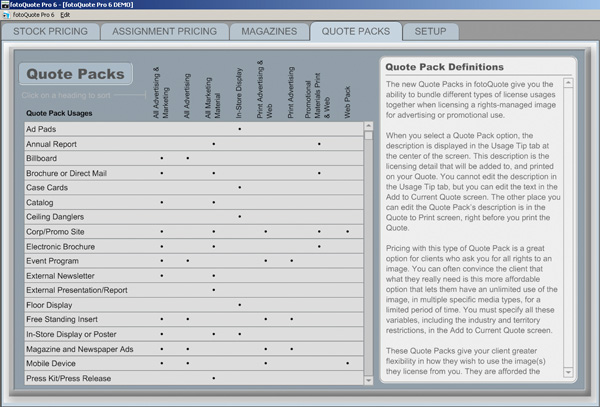
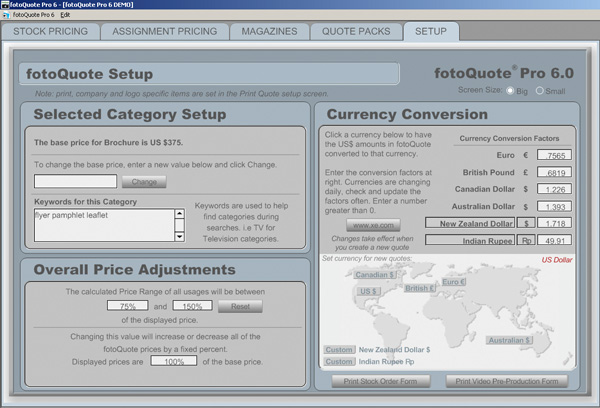
This software is very well designed and offers you rates for a wide variety of publications, ranging from magazines, to journals, brochures, quarterly reports, and a plethora of other variations.  Quarter page prints, half page, full page, distribution of media, and many other factors are tallied in to help Fotoquote determine your rate.  Granted this may not help the startup in portrait work, but if you are looking to market your work toward commercial and stock sites – this is definitely the software for you.  And now, in a special offer here at the blog – I’ve been able to garner a 33% discount for some lucky listener.  That’s right…33%!!  It regularly goes for a price of $150, and the good folks over at Cradoc Foto Software have generously donated a discount code.  Rather than buy and install it myself, I would like to pass this savings on to some lucky reader of the blog.

So, here’s how the winner of the discount code will be chosen – post a comment here at the blog.  Say what you like about the software, why you could use it, or simply introduce yourself to the rest of the readership.  This particular post will take comments through the end of June, so you have about two and a half weeks to get something out there and get a chance to win the discount code.  In the meantime, head on over to Cradoc Foto Software and download a trial to see what the program is all about.  In the meantime, here’s a few screen shots from the demo version to show you what they have to offer…

Tab 1 of FotoQuote Pro
Tab 2 of FotoQuote Pro
Tab 3 of FotoQuote Pro
Tab 4 of FotoQuote Pro
Tab 5 of FotoQuote Pro

Happy shooting, and we’ll see you back here again tomorrow!  (Oh yeah, and don’t forget, you can also share your thoughts and suggestions for future hardware and software reviews that take place right here on the blog!  Let me know what you think as it’s the contributions of readers that make this such a fulfilling blog – who knows, there might be a giveaway in that too!)
Grab the Feed