After much deliberation over the fantastic compilation of images for the July contest, I’ve finally had to just make probably one of the toughest judging decisions I’ve had to make thus far in the history of the contest series. However, in light of the theme of the contest (Slick), and the creativity that went into the image itself, I have to give the nod to Stephen Ludgate for his submission: Continue reading “Lightroom 3 Contest Winner!”
Category: software
Five Best Kept Secrets of Photoshop CS5
By now you should know all about the latest and greatest features of Photoshop CS5. People have been talking until the cows come home about Content Aware Fill, Puppet Warp, and the other “sexy” features of CS5 (and they are pretty awesome, sure). Heck, you may even know about some of the JDI (just do it) features, but there is still so much under the hood of CS5 that the gurus and pros haven’t even discussed yet. After taking some time and tinkering around inside CS5, here are five features that I am surprised are not getting more “air time”…I am calling them:
The 5 Best Kept Secrets of Photoshop CS5
1. Sharing Your Monitor – In Cs5, the feature has been added where you can share your monitor with others so you can show people exactly what you are looking at. I can totally see this as a feasible solution for clients that are remote to your location, and travel costs need to be kept down. Even training seminars could be conducted this way…imagine sitting at your computer at work (or home) and watching an instructor teaching you live from their own desktop! Very cool!

2. Refine Edge Backgrounds – I know, refine edge has been around for a while, and we are used to seeing the “marching ants” around our selections…but now Adobe has gone and added different backgrounds to help you better make refinements to selections. The options are the traditional Marching Ants, and several new options like Overlay, Black, White, and Layers (my favorite). This is a huge time saver when trying to make selections from within a photo!

3. Paste in Place – Another godsend! After making selection refinements and masking off your layer selection, it’s now super easy to take another image from your clipboard and paste it directly into the active document. Done with a simple keyboard shortcut: Shift+CTRL+V (Shift+Command+V on the Mac)

4. Cache Settings – are now adjustable to your own library preferences. If you have mostly smaller sized images in your library, you can tweak the cache to Tall and Thin to accommodate your particular editing and library needs. Likewise, if you are used to working with larger files, then you can customize Photoshop to Big and Flat for those purposes as well.

5. Stroke Settings – I cannot remember if this was in CS4, primarily because I didn’t have much interest in CS4, but now having used CS5 to a pretty decent degree, I am so glad this is now black instead of read by default, so I am including it here.

There’s my five “best kept secrets” of Cs5! It takes some time to kick the tires and check out everything that new programs have to offer, so be sure you download a trial copy from Adobe. It’s free! Have you downloaded your trial yet? What are your favorite “under the hood” features? Any that you feel aren’t getting enough press or coverage in the photo circles? Sound off in the comments! In the meantime, don’t forget to step away from the computer periodically and take pictures! 🙂 Happy shooting and we’ll see you back here again tomorrow!
Migrating Photoshop to a New Computer
Over the past three years or so, I’ve had several people ask me about what’s involved in migrating from one installation of Photoshop to another, or what’s involved in moving from an old system to a new system. With Photoshop, it’s just not as easy as it is with other applications for a number of reasons:
1. Dependencies – While Photoshop is insanely popular, this popularity has spawned an entire industry of third party applications called plug-ins that get installed into Photoshop. If you simply remove Photoshop without considering these 3rd party “apps”, you could lose their functionality. There are also other things that become part of your work flow in Photoshop that you may want to save too, including actions, scripts, font folders, brushes, and much more.
2. Licensing – Because it’s not a cheap application, Adobe has to carefully manage licensing, which means that any serial number can only be activated twice before it gets “locked”. This allows you to have an installation on a desktop and a laptop, or a work computer and a home computer. Well, if you go an just un-install or delete the files for Photoshop, you may find yourself unable to activate again should you re-install on a new computer. The way to avoid this is to ensure you de-authorize (or deactivate) before uninstalling. This will free up the license for use again.
3. Other add-ons – Photoshop also has other add-in elements like automation tasks you may have added over time. I have a few from On One, Topaz Labs, and a few others that I’ve gathered over time. Make sure you check to make sure these don’t have installers with licensing too, because that can also be problematic for a software migration.
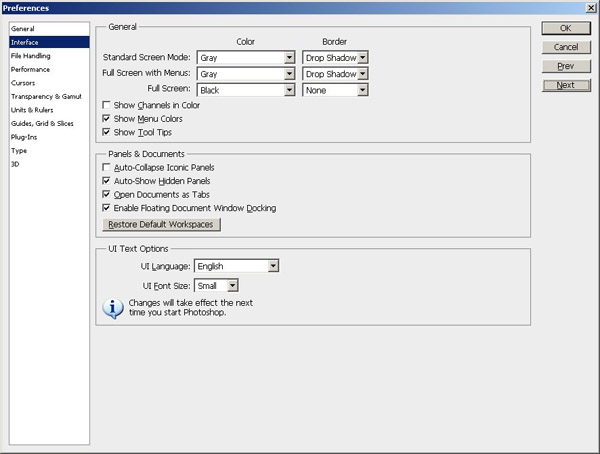
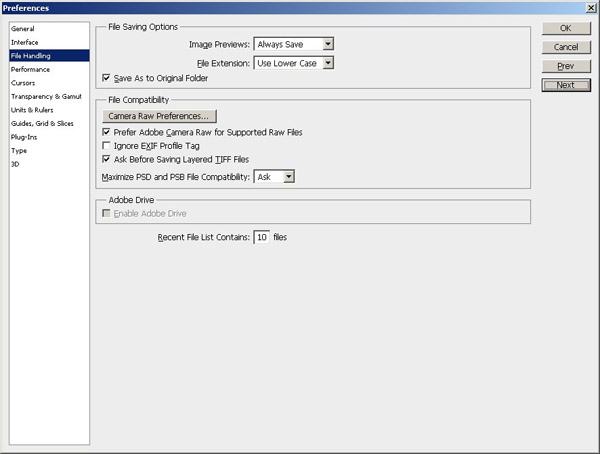
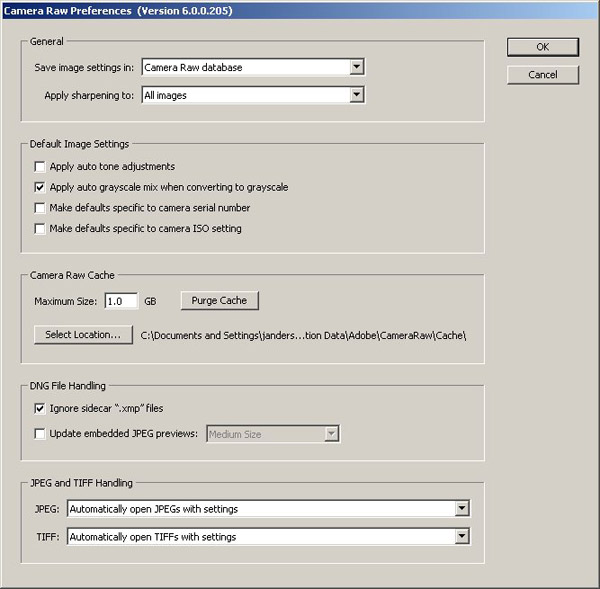
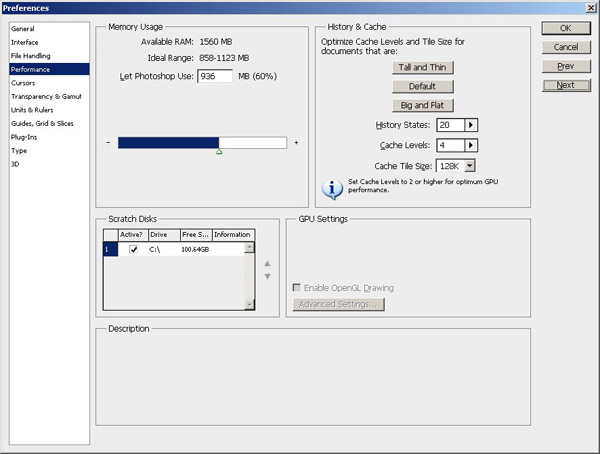
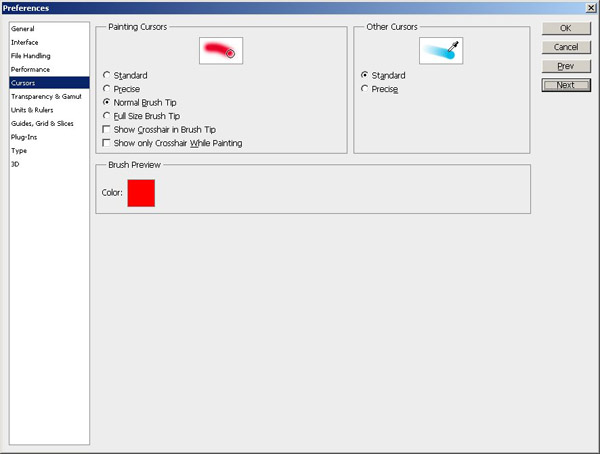
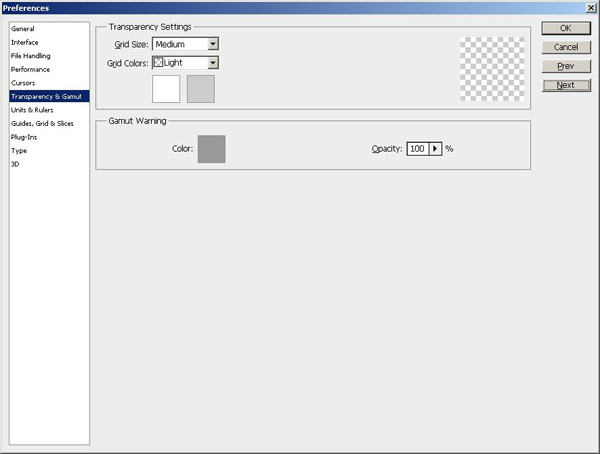
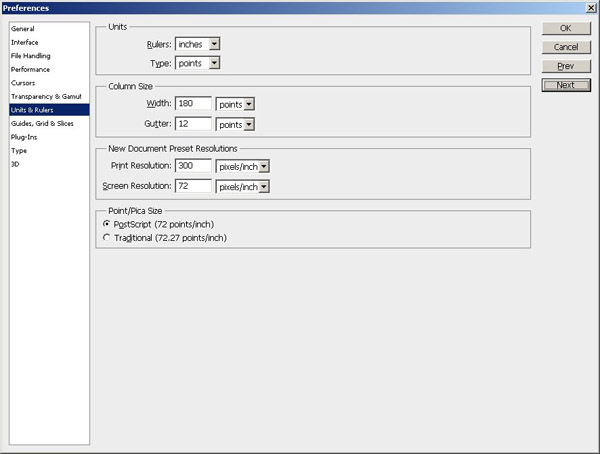
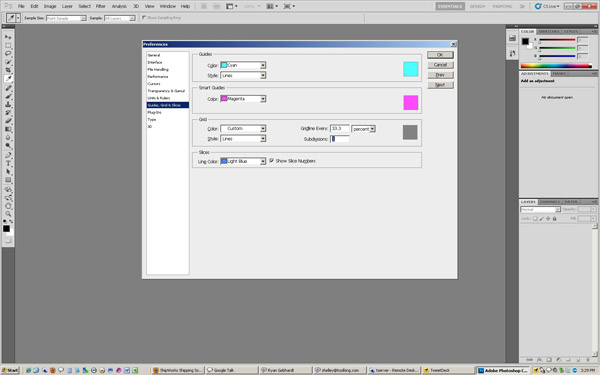
4. System settings – Unlike e-mail, some settings and preferences don’t stay with you during the course of a migration. So, it’s often helpful to grab screen captures of various setup windows so that you can get things configured just right once you get in your new digs! Here are the 11 screens you may want to capture before un-installing off any computer:


As you can tell, there’s a lot to consider. And, given the length of this post already with the included screen captures, to make things easier in terms of reference information, I’ve put together a step-by-step procedure to migrate Photoshop from one computer to another that you can download for free! Enjoy!
Happy shooting and we’ll see you back here again tomorrow!
Adobe CS5 FAQ
Ever since Adobe announced the impending release of the latest Creative Suite 5, there have been many questions circulating in various online communities and outlets. Although I was not one of the beta testers, I’ve been following the developments rather closely, and have seen a lot of questions repeated over and over. Many of the answers to these questions I’ve put together from reading various reliable outlets, including Adobe web pages, reading content from Adobe folks blogs, and from the fountain of information available to me as a NAPP member (and if you’re not a NAPP member, you should consider becoming one – it’s probably one of the best deals out there, including educational materials, discounts, and a ton of other member benefits)!

So, without further ado – here’s the most common questions I’ve seen on Adobe Creative Suite 5:
1. I own ***** – can I upgrade to CS5?
Pick your product, it doesn’t really matter too much if it’s a single product upgrade (not part of a suite). If you want to upgrade to Photoshop, CS5, here’s the list of products that are eligible for the upgrade path to CS5, courtesy of Adobe (I added the product to my shopping cart, and got this list of eligible products and the pricing path (upsell versus an upgrade):
- Photoshop Elements 6, 7, or 8 on Windows – (upsell = $599)
- Photoshop Elements 4, 6, or 8 on Mac – (upsell = $599)
- Photoshop CS4, CS3, or CS2 (Regular or Extended) – upgrade = $199
2. What if I purchased CS4 recently – do I have to pay for the upgrade to CS5 now too?
While there is no official “window” from Adobe, all indicators suggest that if you have recently purchased CS4, you may be able to get an upgrade. Some sites claim the window is between certain dates such as April 12th and August 10th, but I’ve not been able to verify this information independently so the site is not linked here
3. What about Lightroom – can I upgrade to Cs5 from that since it’s part of the Adobe Photoshop family?
No. Although there are similarities, Lightroom is a different software path than the Creative Suite, and you cannot upgrade from LR to CS5 anymore than you could upgrade a Dell to a Mac
4. Speaking of Macs, can I upgrade my Windows software to a Mac equivalent or vice versa?
Adobe does allow for this in what is called a “cross-grade”. You must sign a release that states you have destroyed the other media, and pay a small fee (I think it’s something like $20) to do this.
5. What about converting from one Suite of products to another, or converting to a single product?
While I don’t have the space to cover extensive details on the many options, and this is not official Adobe policy (I could not find anything specifically addressing all the possible conversions), I think it’s a safe assumption that you can downgrade from a more expensive suite to a lesser expensive suite or product, but not vice versa. So, say for instance you had the Master collection. It is likely that you could downgrade that to a web collection or a design premium. It is also likely that if you had a suite of products, you could downgrade to a single product within that suite. However, adding additional products to your existing ownership for free is not likely. As the old saying goes, “there’s no such thing as a free lunch.”
6. Are there any discounts available?
Of course there are – and if you are an eligible member of any one of a number of communities, you are eligible for discounts on products from Adobe. The most common ones I know of include educational discounts, governmental agencies, and NAPP. The other question that usually arises from the “discount” one is whether you can apply multiple discounts, and the answer here is no…Adobe does restrict you to one discount per purchase, so if you are a NAPP member and also a teacher or college student, you cannot apply both discounts. Pick the one that gives you the best savings, and be happy to are eligible – many people are not.
7. So, where do I purchase CS5?
You can’t yet – the announcement that Adobe made was kind of a teaser, to build excitement and to sort of “ramp up” for the eventual release date. It’s all part of the marketing, hype, and advertising of upcoming products. Also, keep in mind that Adobe, like any other software developer, has approved channels for distribution. So, when it does become available, make sure you find a reseller in your area through their partner page.
8. When will it be available for purchase?
Well, you can pre-order it any time you want. But if you want an official release date, take a seat with everyone else outside of Adobe headquarters, because that information is not available (that I can find anyway). There are several indicators that suggest the release will be in early to mid-May based on their history (Adobe usually does product releases on about an 18 month cycle, or ever year and a half) with the Creative Suite of products.
9. What are the differences in all the packages?
Excellent question! This is the one that vexes a lot of people, but thankfully, Adobe has put together a comparision page that not only show syou the products that go into each package, but the retail cost of each. Rather than regurgitate all that information here in some confusing chart, simply bookmark this link: Adobe Product Comparison Chart
10. Are you going to upgrade?
Yes I am. I will probably not be an early adopter, primarily because I have a couple other purchases to make first (hardware, a lens, and some lighting gear), but the advancements in CS5 are probably among the most significant of any version in the last 7 years! I may also need to upgrade my computers to handle the processing requirements.
That’s it – the top ten questions I’ve seen (and been asked) about Creative Suite 5! Got your own questions? I may not have the answers, but I can either give you my best guess, or pass the question on to someone who may know the answer, so feel free to sound off in the comments. Also, if I got anything wrong, or if you can shed additional light, all contributions are welcome!
Happy shooting all and we’ll see you back here again tomorrow!
An interva-what?
A friend of mine asked me if I had any recommendations the other day about time lapse…specifically software for post production. It’s a great question and brings up a subject that I am actually quite interested in, although I have no hands-on experience with as of yet. He’s got a Nikon D300, which apparently has the feature built in, so lucky him, because I need to go find an intervalometer now! ")
An interva-what? You heard me – an intervalometer! It’s just a fancy name for a remote control timer. I like the former though as it’s cool sounding word! Sounds kind of like the little ray gun that the martian was going to use to destroy planet earth in the classic Bugs Bunny Cartoon. Or was that a modulator? Well, anyway, much closer to reality, I have found myself recently considering adding another gadget to my toolkit! Regardless of what you call it, these devices are considered the tool to have when creating time lapse videos! Some vendors include a timer setting on certain models, so be sure you check your owners manual before running out and buying one. (More point-and-shoots have them than SLR’s – go figure!) Nevertheless, it’s something I am looking at. Here’s a few models that I am thinking about:
The Canon Specific Branded TC-80N3 (at B&H)
Opteka Timer Remote Control (on Amazon)
If anyone has other suggestions for remote timers, I am all ears! Of course with the time lapse, there is also the post production concern – although I am using Camtasia for video on my Windows box and iMovie or Quicktime on my Macbook Pro, so am pretty sure one if not more can handle time lapse. Nevertheless, that is always a concern too, so feel free t sound off in the comments with your suggestions there too. Interested in seeing time lapse photography in action? Check out these cool links I’ve found:
- http://www.youtube.com/watch?v=GDfqCFFvfag
- http://www.youtube.com/watch?v=-ifTCa97G6Q
- http://www.youtube.com/watch?v=pxCUlvEkQDg
Audio aside, there are some really creative approaches out there to time lapse. Most I’ve seen are sunrise/sunset, moonrise, etc. But the above three really captured my eye. So, there you have it, something to inspire some creative juices going into the weekend! Got your own ideas or links to time lapse? Sound off in the comments! Happy shooting and we’ll see you back here on Monday!
Hardware Updates
With the last few blog posts being software-related, wanted to take a few moments to let everyone know about some hardware updates that I’ve learned about as well:
Drobo – Yup, those proprietary RAID storage containers get firmware updates too – it’s version 1.6.8 for the Dashboard:

The Canon 1D Mark IV has a movie plugin available for Final Cut Pro available on the Canon website:

And last but not least, the Digital Photo Professional 3.8 came out a few weeks ago – also released from the Canon website. Make sure you have the original installation CD’s for this as it’s an updater file and not the full version:

That’s it for this “Update Thursday” – just in time for the weekend’s “Backup Friday” reminder that I give out periodically – hint hint hint! 🙂 Happy shooting, and we’ll see you back here again tomorrow!
Ammo in the armaments
Last night the DALPUG (Denver Area Lightroom Users Group) had their bi-monthly meeting and host Brian Reyman walked us through some of the features of the Lightroom 3 Beta. It was a gret seminar and offered an opportunity for many to get an idea of what to expect. I had not realized that there are many work flow options out there because when queried, the audience responded with quite the variety of software approaches. We didn’t officially count votes, but it seemed roughly along these lines:
40% Lightroom 2
40% Photoshop CS (no query here on version #)
10% Aperture
10% Elements or some other platform, including GIMP, Corel, and others…
If you think about it – the first software platform you learn for editing photos is usually the one where you really cut your teeth, grind your fingers to the bones, and once you know it, you just know it. So, for a new software application to come out and challenge the fact that you have this established work flow, suggesting that there is a better way can often be both disheartening and somewhat defeating. After all, some of us can even remember dodging and burning negatives in a dark room not too long ago.
It was quite an epiphany though to see people from such a wide variety of backgrounds – some younger than me (in their 20’s), many in my age range (30’s – 40’s), and others even senior to me (50’s and up) coming out to learn about this new-fangled technology of Lightroom 3.
What it brought to mind for me was a fundamental dichotomy in the way photography has transformed us. We have learned so much and in such a little time frame, yet there are always barriers to learning more, not the least of which is our own prejudices. We learn something, we know something inside and out, and then something new comes along that changes the paradigm. It’s no wonder there is still so much confusion over what “the best” way to work through images is.
One the one hand, if you have a flow, and it works – why change something that does what you want it to do, and it’s something you not only know, but are reasonably good at? Meanwhile, on the other – what if you are spending countless hours doing something much slower than you wish it could be and this new carrot is being dangled? Do you stick to your guns or do you lay that gun down and find a new one that fires better?
It’s a struggle to be sure, and while sticking to your guns can be a good thing in the face of a changing technology, for those of us that stick too long, we can ultimately find ourselves actually staring down the barrel of a gun. It’s all ammo in the armaments and the important lesson I learned is that while the principles may not change the tools to flex those principles are always changing.
So, the answer for me is to stick to my guns in principle, but be ready for a new rifle and prepare to adapt to meet the needs of that new tool, because odds are, the new one will ultimately do it better, faster, and cleaner than anything that came before it….eventually!
Sort of a philosophical musing for today, but nonetheless one I wanted to share, and hopefully get some feedback on. Are you an early adopter? Do you come out guns blazing with new technology whenever it becomes available, or do you stick with the rounds that you know how to fire until the proven replacement has been demonstrated and taught? Sound off in the comments, and come on back tomorrow for yet another round! 🙂
Software Review: PrintKey2000
Many times I have been asked what kinds of software I use to do various things for the blog, especially things like videos, screen captures, audio recording, and all that sort of stuff. One thing that I’ve never really talked about is screen captures…not the videos but actual still shots of things as seen directly on my screen. There are many programs available to do this, some paid for, and some open-sourced, with some being Mac or Windows specific, and a few scattering that cross both platforms.
Well, today, I am going to give a little nod to a Windows-only program, called Printkey. Specifically titled PrintKey2000, and under specific note that this is a freeware program (meaning it is not supported – to use at your own risk.) While I have never had problems with it, the mentality of “let the buyer beware” should always be a consideration when downloading applications, especially freeware.
Those in Apple-land know that there are keyboard shortcuts to do a screen capture of either your entire viewing area, or a specific window, and these can either be copied to the clipboard memory for inserting in an application like Photoshop, or saved outright to your desktop. While in Windows you can always use the Printscreen and ALT+Printscreen to copy either a full screen or active window to your clipboard, the ability to save directly to your desktop does not exist natively. Instead, you have to capture the screen to memory, paste into an image editor, and save out as a JPG if you want to use it. What PrintKey does is fill that void of directly saving to the desktop. This is especially handy if capturing things for posting in a blog, in creating documentation, and other useful learning resource outlets.
To use Printkey, simply download the free application from here, run the executable, and let the program start in your system tray. The entire packaged zip file is half a megabyte, so the footprint is super for those that are space conscious. Here’s a capture of the software itself in action (don’t ask me how I got it – that took a few minutes to figure out! LOL):

While there are many features wrapped up in this handy little application, the ones I use most often are the Save, Rectangle, Print, and then the dialog screen at the bottom of the screen (click the image above to see a larger view). These should be pretty straightforward to those who are familiar with the concepts, but here we go regardless:
- Save – saves the current capture to an image file…you can specify whatever format you prefer (jpg gif, etc.)
- Rectangle – gives you a + sign that you can drag and drop around a custom area for capturing only part of your desktop
- Print – sends the captured image to your printer…(hope that was explanatory enough)
The last one is the bottm details area…I am talking about this little section here:
![]()
It’s very handy because it will tell you the dimensions of the image, how large the file is in terms of storage space on your computer, and how much free memory is left out of the total memory. While some many not need all this info, the geek in me likes to have this!
So, there you have it, Printkey2000 in action. I feel that I should also mention another really good counterpart and that is the program, SnagIt from the folks over at TechSmith. With that handy application, you can not only capture images on both Windows and Mac, but you can edit them on the fly, including inserting text, arrows to call out an area, and other fun stuff. Alas, it’s not free though – 30 day trial is allowed before you gotta cough up the $50! (Which for me is not worth it for something like this. I have some friends that use other applications too, especially for video screen captures on both Mac and Windows platforms which include names like IShowU, Camtasia, and much more. Here though, was just a little scoop on a little known application for the Windows crowd out there.
Got your own favorite little unknown program? Have you used PrintKey? Like it, love it or hate it? Sound off in the comments as new little handy utilities are always welcome. Happy shooting all and we’ll see you back here again tomorrow! 🙂
One last thing all – don’t forget the Height themed contest for the month of February – get your photos in while the gettin’ is good! Deadline is a week from Friday!
speech recognition review
With time becoming and ever-increasing commodity, the ability to utilize speech recognition software has both benefits and disadvantages. And in the interests of sharing my initial experiences with speech recognition software here on the blog, today’s post comes to you courtesy of and open-sourced software application called “E-speaking”. On the initial install, I decided to take roughly ten minutes to let the program get used to my voice before it was accurate enough to consider using for writing a blog post.
It’s still clearly is not accurate enough to rely on 100 percent of the time as a stakes clearly will be made that require human correction. however it can aid in getting most of the content puts together for the purposes of blog posts, article writing, and book writing.
one of the biggest problems was in getting the software to recognize the term “blog”, “web log”, and the letter E. a dish rally it also had problems with punctuation from time to to time. The software also is better able to capitalize sentences when you remembered to state that you need a “.It ” at the end of a sentence. The other problem is that the software had specifically related to word press is the phrase, “new paragraph” which will automatically add an additional blank line between paragraphs. This was rather it easily overcome though, by having my hands near the keyboard.
two of the programs that I am looking to review stand here on the blog include “dragon naturally speaking”, and “Mac speech dictate”. Requests are currently In with both companies to see if they have demo versions of their software for review purposes . When I hear back from them I will let you know what their responses are.
if you have any recommendations, suggestions, or ideas for how to improve blog posting efficiency through programs like these please feel free to e-mail me here on the log, or in via the comments below. My apologies in advance for the grammatical punctuation, and other errors that are evident in this blog post, but I did not want to over-edit the content so you could see this state of speech recognition software.
as we move into the new year I am looking forward to reviewing an ever-expansive set of applications, accessories, and hardware here on the blog. If you have ideas for specific types of applications, accessories, and hardware please feel free to e-mail me as always at my e-mail address: Jason @ canonblogger .com . Thanks for tuning in and we will see you back here again tomorrow.
Flickr Plugin for Lightroom
While recently participating in a Photowalk group outing to Rocky Mountain National Park, with the fellow local photogs, I learned about this great little plugin for Lightroom that allows you to export your photos directly to Flickr…all within Lightroom! It’s a pretty cool little plugin, and as you know, when I learn something new – so do you!
This plugin comes courtesy of Jeffrey Friedl, and one of the greatest features of it is the cost – absolutely free! Well, that’s not exactly true, you do need to spend one cent via Paypal, but for a penny, check out what you can do:
I started off downloading the ZIP file (and it works for Windows or Mac) and expanding the archive. Then I moved the plugin to the root of my Applications folder on the Mac (you can choose where ever you want to store plugins, you just have to tell Lightroom – and for me this is an easy place). The icon for it looks like this:

Nothing too spectacular yet, and there’s a little bit of installation and customization needed. Your needs may vary based on how you want to use the plugin, Flickr, and Lightroom, but the cool thing is that Jeffrey has put together a plugin for most online locales including Smugmug, Zenfolio, Facebook, Photobucket, and many more. So, if you use another resource, it’s worth checking out. I’ll continue here for the Flickr plugin and you can decide for yourself if it’s worth adding this tool to your workflow.
Next up, I went ahead and configured the plugin from inside of Lightroom to use my Flickr account. Here’s what I did. To start, click on Export, just as if you are exporting to disk or some other resource

One the export dialog box is open (and here’s the tricky part), look to the far right of the gray bar across the top that says “Export to Disk”. You’ll see two little arrows which means there are menu options:

If you click on those arrows, you’ll get a new dialog box (bet you didn’t know that was there – did you? 🙂 ), and the Flickr option will show up. Select the Flickr dialog one for our purposes here:

Once you select the Flickr Exporter, you will get a new dialog box that will start the authentication process that Lightroom will use to log into Flickr. If you have multiple Flickr accounts, or specific authentication methods you prefer, these steps may change a little based on your needs. But here, I am doing things the most straightforward way:

Next up, if you are logged into Flickr already, the plugin will open a page that will grant access to the plugin. So, it helps if you are already logged into your Flickr account on the internet. So, you’ll get a dialog box that looks something like this from the plugin to that effect:

On clicking the OK button, it will take you to the grant access page, and you’ll get another dialog box that grants the plugin access to post photos to your Flickr account (which, after all, is the goal, right?). The one notable difference you will see in yours is that my face won’t be staring back at you like here. That is the avatar for my Flickr account, so your screen should show your avatar – if it shows something different, then you are in the wrong account (but I guess that goes without saying)!

A second confirmation screen from Flickr will also let you know that this is a 3rd party application, and just acts as a security measure to make sure you are aware of what that means. Click the button that says “OK, I’ll authorize it”, as shown below. Again, while it goes without saying at this point, your dialog will look a little different different. If it doesn’t and you see my avatar in your Flickr account, I am gonna be calling soon! 🙂

Finally, you will get a confirmation screen on Flickr, noting what you’ve done (they make it pretty clear what you’ve done, and how to delete it if needed on the Flickr side):

On return to the Lightroom interface, you’ll get a confirmation screen there as well – just click it to continue:

On granting access, you’ll get an authorization code, which for obvious reasons I am not going to post here, but make a note of that code and enter it back when you return to Lightroom. On completing that you will be presented with the Flickr Uploader Dialog. Here I am going to show you a few key ones that you have to scroll down to be aware of in making your uploading preferences.

- Your Flickr Account login in Lightroom
This first shot (above) shows the top part of the dialog, and shows how you are authenticating on Flickr. Now, use the scroll bar on the right side to move down through the options. First stop, the Photo Set. On authenticating, the plugin will pull your complete list of photo sets from Flickr. If you don’t have any photo sets built, then none will be here. Since I do have photo sets, it will default to the first one alphabetically. You can change the sort order, and specify what photo set (if any) you want the uploaded image to be added to, as desired. For this example, I did not add the photo to an existing set, or create a new one.

Pretty straightforward, but let’s keep scrolling through a few more key items you will want to think about utilizing or disabling depending on your work flow. The next one I think warrants mentioning here is the groups. One of the ways you can increase the visibility of your photos on Flickr is by participating in groups. More people look at them, you’ll get more feedback, and sharing our photos with others is the goal anyway, so go ahead and add the appropriate groups here. I selected the group “CanonBlogger” for obvious reasons! 🙂

Only a few other options that I think are useful from this plugin, so we’re almost done. Next up, is another social networking one that I tend to use fairly regularly – Twitter:

Last but not least are the meta tagging options you have available to you from the plugin interface. The options are just to diverse to go into detail here, and I prefer to tag photos on Flickr differently than in Lightroom, so I leave these blank, but in the interests of full disclosure, here are some of the tagging and naming options in the plugin dialog:

If you think about it, for a penny, this is a pretty good deal (I went ahead and made a donation, which I would also encourage you to do as well – Jeffrey has clearly put a lot of time into developing these plugins, and he needs to eat, just like the rest of us). So, there you have it – the process of finding, downloading, installing, configuring and using the Lightroom Flickr uploader. As I mentioned at the beginning of the post, there are other uploaders available as well, and I am going to probably go get the one for Smugmug as I have an account there too. It just makes the sharing of your photos that much easier. (Who knows, the Facebook one may also make its way into my utility belt at some point once I get more comfortable with it…)
If you have questions or problems with the installation or the uploader itself, Jeffrey has a good FAQ page here that should answer most questions for you. If not, I am sure he has an email address available somewhere for specific questions not addressed online. For my work, I think this plugin totally rocks! It’s going to become a staple in my work flow, and if you are into social media at all, I would highly recommend it for those purposes as well.
In talking about all of this, it bears mentioning that some of us are not fans of Flickr, Twitter, or Facebook, and while I can understand the hesitation of some, it’s really a matter of personal preference, and maximizing the time you spend on your computer. if these outlets aren’t your cup of tea, that is totally fine. But if you have the Flickr plugin – it is that much easier for you to participate in the Monthly Giveaways here at Canon Blogger/Learning Digital Photography!
With those thoughts, I’ll leave well enough alone as this post has gone on long enough for one day. Happy shooting (and uploading) and we’ll see you back here again tomorrow.