Topaz Laps: Software Suite Review

So, as everyone is likely already aware, Topaz Labs approached me recently to sponsor a giveaway and generously donated their entire suite for some lucky listener/reader.  As is always the case, I like to say “thanks” in my own small way by giving the vendor some “air time” on the blog with a personalized review of whatever it is they are contributing.

In the case of the Topaz Suite – boy did I bite off more than I could chew!  The Topaz Labs package consists of 7 different Photoshop plugins with somewhat descriptive names for each plugin package, ranging between:

  • Adjust
  • Denoise
  • Simplify
  • Detail
  • Clean2
  • DeJPEG
  • Vivacity

There’s also two video plugins available:  Enhance and Moment.  I’ll address those in another post, just because, well… even just the 7 plugins for Photoshop was going to be a lot of plugins to review in one blog post!  Thinking I was up to the challenge, I powered on and installed each package, then fired up Photoshop.  Wanting to find an image that had some depth, color and tonal range to it, I picked one from a photo walk I did in Boulder a month or so ago of the tulips:

original_blog
Boulder Tulips

Kind of a neat image:  one flower all by itself ina sea of red tulips.  The green stalks and purple base also served as a nice contrasting set of colors to see how things progressed.  So, into the first plugin I went – the Topaz Adjust.  Lo and behold, within this one plugin are 21 different photo adjustment presets! That’s right – 21!  Here’s a quick look at the interface:
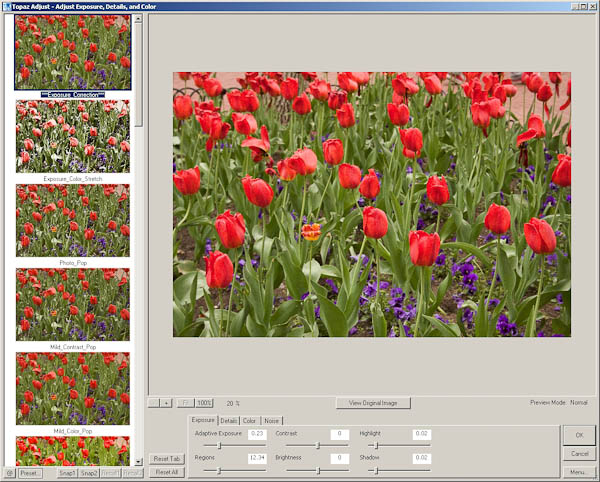
adjusteditview

See that left-hand column?  There’s 21 different variations of creative adjustments done to your photo to give you a specific look and feel to your images – all at the click of a button.  To the bottom center are all the slider controls for exposure, details, color, and yes – even noise handling.  You can select a creative style, then edit within that style to go for a unique look and feel all your own!  This is a very clever and unique approach to photography work flows, because now you can look at your photo with various edits in an simple and easy preview to see how various adjustment styles will look on them.  I’d like to give some face time to each style but there just isn’t room here in the blog to do each justice.  So….enter the photo gallery!

That’s right, I took my one image and ran it through each of the 21 possible adjustment styles.  On each style I just left the default sliders in place, but what’s especially cool is that these slider values change from one style to another, so if you are paying attention to the numbers, and you like a particular style, but want to drop just a touch of the contrast, or bump a touch of the noise, you can do so easily and intuitively!  Pretty darn cool in my book.  The styles go alphabetically in order in the gallery:

  • Clarity
  • Color Blast
  • Crisp
  • Detailed
  • Dramatic
  • Enhanced Contrast
  • Equalize
  • Exposure Color Stretch
  • Exposure Correction
  • Mild Color Pop
  • Mild Contrast
  • Mild Detail
  • Neutralizer
  • Photo Pop
  • Portrait Drama
  • Portrait Smooth
  • Psychedelic
  • Simplify
  • Small Details
  • Smooth and Flat
  • and Vibrance

To see the overall effect each adjustment style has on your images, visit this companion photo gallery here that shows each – the original is listed first, followed by the 21 different adjustment styles!

This alone would be worth a giveaway prize – but this is just one of the entire suite that Topaz Labs has donated to the blog/podcast for our next giveaway.  The rest of their various plugins will have to be reviewed individually on the blog, so this means during September, I’ll take a more detailed look at each of the plugins – clearly more than one will have to be addressed each week, and I’ll try to post an image gallery so you can see the effects of each plugin on some photos.  This is definitely a product to consider as a part of your arsenal of tools though – I’ve already seen so many possibilities for photo galleries and output options on my own collections that I could be busy for months just reviewing what these plugins have to offer.

One downside to the Topaz plugins is that they are only functional in Photoshop and Aperture.  From what I understand, a LR set is in R&D right now, and should be released in very short order.  But for the time being – Photoshop and Aperture are your installation options.  The only other downside I can see to all these options is the risk of decision paralysis – when prompted with too many options, it can often lead one to indecision.  For this reason, I’ve designed an action to use in my own work flow when using the Topaz Labs Adjust plugin.  Here’s what the action does:

  1. It takes my original file and creates 21 duplicate layers.
  2. Each adjustment style is then applied to its own layer, and the image is flattened and saved by that style name as a lower-resolution jpg file.
  3. I then go into Lightroom and look at all 21 (and the original) in either the Library module or in a web gallery module to see which one or two I like the most.
  4. I’ll then go back to Photoshop and find those two layers and delete the rest.
  5. Save that resulting file as a PSD
  6. On each adjustment style, I then tried some various tweaks on the sliders to see if there were minor adjustments that I found more appealing to my tastes.

This is just my work flow that I am thinking will work well for me – I like having at least a few options available, and since different scenes call for different adjustment styles – the action will help expedite my work flow.  It took a while to create the action as you have to be methodical and pay attention – but the resulting options for workup are worth it in my opinion.

Anyway, back to the Topaz Labs Adjust plugin – this thing rocks and I could easily see it become a part of my work flow (who am I kidding – it really already has since I built an action to support it!  LOL)  Don’t forget, next month you can WIN not just the Adjust plugin but the entire suite from Topaz Labs.  Keep checking in for details and the theme announcement.  Thanks to the good folks at Topaz Labs not only for their generous contribution to the LDP podcast, but also for the R&D they’ve invested in this entire series of plugins!  Judging from my review of the first component – this is sure to become part of the standard set of utilities for photographers and creatives!

Okay, that’s probably enough for today.  If you’re still chomping at the bit for more info about Topaz Labs software – go check out their blog – it’s got some great info on there too and really goes in depth from Product Manager Eric Yang (this is his Twitter link – follow him, very cool guy!)!  I’ve already added it to my own list of RSS feeds!  Check back tomorrow as we get back to the previous project I started – the manually adjusted Star Tracker!  In the meantime, you also have only a short time left in the Wacom Giveaway – Friday is the last day to submit your photos!  So, if you want to Win a Wacom (Bamboo Fun) – enter today over at the Flickr Thread!

Happy shooting everyone and we’ll see you back here tomorrow!

Grab the Feed

Reviews, Contests, and Blog Notes

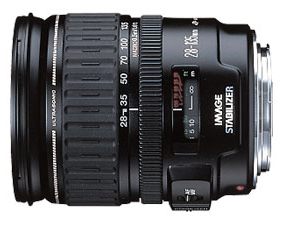
Lots to cover today on the blog so I am going to get right to it.  First up, I’m trying to maintain the schedule of hardware reviews, so rather than go into detailed analysis, I am just sharing an abbreviated review here today on the Canon 28-135mm lens.  Also up on todays blog, the OnOne Software giveaway finalists have been announced!  Last up, a few administrative things to address.  So, without further ado, let’s get started:

The 28-135mm Review

The luck of this review is due to the Scott Kelby Worldwide Photowalk.  I had been hearing good things about this lens for a while, and finally bit the bullet and rented it from a local camera store to try it out.  I tried to keep in mind that the gear is a little more worn than usual, but did see some pros and cons on the lens, so let’s get started:

28-135mm

The 28-135 is an excellent walk-around lens.  The focal range is perfect for going fairly wide and also zooming in to a certain degree.  It offers some of the best features of both worlds, and does so at a pretty reasonable price considering what it has to offer:

Pros

  1. Focal Range:  As mentioned it has a nice range for use while moving from one environment to another.  Not quite a wide angle, and also not a zoom, but a nice combination of the both.
  2. Weight:  For an IS lens, this is amazingly light.  I was expecting it to be a lot heavier, so a definite positive (and happy surprise here).
  3. Image Quality:  I couldn’t believe how wide the sweet spot of this was.  I got crystal clear tack sharp shots from probably 30mm to 130mm.  To get that kind of range in a “sweet spot” is significantly impressive
  4. Price:  The price for this lens is a shade under $400 from B&H and for an IS lens, that’s pretty darn good – about as cheap as you can get given the feature.

Cons

  1. Battery drain:  Although it’s related to the positive of Image Stabilization, the battery did seem to go rather quickly.
  2. Weight:  I know, it was listed as a pro, but I am also listing it as a negative, because with many of the newer SLR’s the weight doesn’t balance as well as it might have on the 20D or even the 350D.  Don’t get me wrong, I like light, but I also like balanced, and here I think the weight of the dated design has an impact on balance.

There’s a lot more I could go into here, but on the whole, the lens is a great one, and with the pros definitely outweighing the cons, it’s definitely one to consider adding to your gear bag – if you like to photo walk!  If you’d like to see samples of the 28-135 in action, feel free to check out this montage of shots I compiled from the Scott Kelby Photowalk:

The OnOne Giveaway Finalists!

I know, the moment you’ve all been waiting for – the finalists.  I am pushing forward here partly because my counterpart at OnOne, Mike Wong, has been on vacation, and is getting back soon, and secondly, because I understand OnOne is having an excellent promo sale going on right now for the suite, so I’d like to get this wrapped up so that those who have been waiting to hear can still take advantage of the opportunity to save a little $$$!  Lastly, also because the anticipation over the OnOne giveaway is a primary focus for many listeners, and other contests are both underway and coming up!  So, without further ado, here are the finalists I’ve chosen.

OnOne Software Giveaway Finalists

The quality of entries made it super hard to pick, because there were so many that were deserving of moving forward into the finals – but decisions had to be made.  Thanks to all for entering, and best of luck to the finalists – Mike and I will talk this week and hopefully have someone get a great email by Friday with the news that they are the proud winner of the OnOne Software Plugin Suite Giveaway!

Blog Notes

A couple updates are coming soon to the blog, and a couple have already been made.  Some things you may or may not have noticed that have already taken place:

The links in the sidebar have been broken out into categories from one another so you can find things easier

A paypal link has been added to the sidebar – I had mentioned this once before, and try not to push it, but donations are always welcome to help offset the costs of running this blog (bandwidth, time, and storage on my hosting provider)

The picture has been updated in the header.  I try to change this out periodically, and in the next incarnation that will randomize on each visit through an entire gallery of photos, but a new one is in place, so if you are picking up the content from a feeder – stop on over to see the changes!

Last but not least, thanks to Terry Reinert, I’ve added a plugin for fellow bloggers – when you post a comment here, your last post from your own blog is happily linked to your comment!  Enjoy!

So, that’s it for today?  Like the review and the changes?  How about those OnOne finalists?  Kudos to everyone who submitted images too.  Don’t forget to jump into the latest and greatest giveaway – the winner will get Wacom Bamboo Fun valued at $100!  Be sure to throw your best “Fun” themed images into the contest thread here:  Giveaway Thread

Happy shooting and we’ll see you back here tomorrow!
Grab the feed

Canon 550EX Review/Eulogy

Hardware Review/Eulogy – The Canon 550 EX

550ex_586x225
Ah, how I loved thee, the Canon 550 EX, with your 3 flash modes, ETTL, Manual and Multi mode.  You were especially wonderful because of how well the ETTL worked in conjunction with the Canon bodies.  Your typical standard hotshoe fit every Canon SLR from the first days of DSLR’s (I think)), and you worked beautifully both as a slave and as a master via the toggle just below the button panel.

Another especially nice feature you had was the variable power settings when in manual, where I was able to adjust you from full power down to 1/128th power.  YOu also were very kind in allowing me to adjust your zoom range from 24mm to 105mm for the range of output too.   Compatability with the ST-E2 and the infra-red line of sight was another added benefit, although the infra-red technology has dated you beyond use in the current spectrum of choices.

When it comes to working in master-slave modes, you were pretty rockin’ though.  The ability to adjust ratios from 1:1 all the way to +/- 1:8 was pretty sweet, as was the ability to  assign you to one of three different groups, A, B, or C.  Although I’ve never used you in the multi-mode, the options there seem quite nice as well.

The Flash exposure bracketing, and High Speed sync with later EOS models has been a nice feature for me too, which is why I’ve hung on to you as long as I have – provided I’ve got the batteries and power to support it!

However, it was your time to go as you did not have a full-360 degree rotation on the head (without a hack), and your vertical tilt only had 3 adjustments at 60, 75, and 90 degrees. You also went through your 4 AA batteries like a hot knife through butter without the accessory battery pack (pricey in its own right).

Additionally, at a smidge over 14 ounces without batteries, and your large size (3.1 x 5.4 x 4.4) you’ve taken up a lot of space in the gear bag.  YOur remote limitations also had their downside since I could only fire you with the ST-E2 or Canon proprietary cable.  Don’t get me wrong, I love Canon gear, but sometimes others had flashes that I would like to have been able to use or borrow and could have if only you had a PC-sync plug.  Sure, workarounds and jerry-rigged devices are out there (which I have ended up using), but the endless testing, mis-fires, and other tangential effects of a home-made brew had some less than desirable outputs.

Ahhh…550EX, I loved thee well – you shall work well as a secondary with your newer cousin, the 580 EX II when she arrives in another month or so!  But when she arrives, I shall bid thee farewell, relegating you to the dust mites of my camera bag.  Good thing your owner kept your vitals intact here

Until that day, I’ll shoot again tomorrow!  (Happy shooting everyone!)

Grab the Feed

Full Review: Apple iPod Touch 2G


Mac Madness (Mac Systems)

Having had the Touch now for about a week, I’ve had a fair amount of time to look at all the features, bells, whistles, and nuances of it to give a more thorough review.  As this review begins, you surely must be asking, “How does this relate to photography?”  An excellent question, so let me begin with the benefits relating to photography:

photo_icon

Photo Albums – this is a great way to take a portable portfolio with you where ever you go.  Say you are in a grocery store, restaurant, or somewhere and a discussion starts about any good photographers.   “Funny you should ask – I am a photographer…would you like to see a little bit of my portfolio?”  Then whip out that Touch and pick an album to show them – the ooohs and ahhs could make the difference between landing the gig and having them respond with “We’ll let you know…”  Having the extra advantage of being able to show at least a pocket-sized portfolio could make the difference between getting a gig or not.  Interesting food for though…

networking

Networking – the Touch has built in wi-fi, so you can stay up to date as long as you are connected to a wifi network.  Here in Denver there is a free wifi network downtown so as long as you are within range, you can check email, update status on Facebook, and network the latest developments on Twitter or Friendfeed.

Applications – bar none, the best feature in my opinion.  From here I was able to download an FTP client, a photo editor (very light in function, i.e. cropping brighten, darken, saturate, desaturate, etc.) and voice recorder.  Other utilities include sunrise/sunset calculators, light meters, word/excel editing apps, etc.  As the saying goes, if there’s something you want to do, there’s an app for that.  With these utilities I can do things like record audio snippets for the blog, upload said content to the blog or other website, do quick photo edits, or even review documents on the fly.  The built in email service is also very handy.

podcast

Music/Podcasts – Just like other ipods, you can listen to music, podcasts, and because of the nice glossy screen, watch videos, including TV shows and movies (pretty much anything the Apple Store offers).  As a blogger and podcaster, for me it is particularly useful because I can listen to what others are doing, and either ensure that I am keeping up, or ensure that I am producing original content that is enjoyable to my viewers and listeners.  If you are a fan of podcasts and other such learning resources to increase your experience and knowledge base, this can also be useful as there are many good podcast resources out there for aspiring and learning photographers.  What I am not a fan of in this regard though, is the fact that with the ability to install “applications”, the Touch still requires connection to a computer in order to manage your content.  You have to delete apps, music, podcasts, pics and such from the iTunes application on your computer and not from your ipod.  What’s up with that?  You’d think Apple would build their own applications into something this robust…but more on the cons in a moment…

Having started with the negatives a little bit, let me go into some of the drawbacks.

Software I – the iPhone user is very fortunate because when the software update from 2.0 to 3.0 came out, the upgrade was free.  Touch users saw no such benefit.  I bought this a week ago, and had to pay for the privilege of getting the OS update to 3.0.  Because of the benefits of it though, as well as the low cost (it was only $10), I went ahead and bit the bullet, but seeing as I had just spent over $200 for something brand new, in principle it seems that it should have shipped with OS 3.0 already on it.

Software II – A couple of the built in applications seem quirky, like the iTunes music.  There is a neat feature called Shuffle where you shake the Touch and it creates a random playlist for you from your library of music.  The problem is that it will keep generating new playlists randomly any time there is a little bit of shake unless you turn it off manually (say for your morning jog).  There must be a better way to toggle this on and off – but I am not a software designer, so not sure how to even go about doing this.

Photo Albums – One of the advantages of the Apple setup over Windows (I had always thought this anyway) is that you don’t have the same pyramid of files and folder structures where things can get lost.   Not really.  If you want to create multiple albums within your Touch (or any other iPod for that matter), the best method is to create a sync folder on your computer, then sub-folders within there and then connect the iPod and let it sync to that folder.

Deleting stuff – As mentioned above, I don’t like that you have to sync the iPod to the computer, then un-check the apps in iTunes on the computer to remove from the iPod.  Lastly, you have to then remove the applications from iTunes before they will be gone completely.  Give me an option to remove from the iPod directly.  The same goes for podcasts, music, photos, and the like – give me a way to delete (triple tap or something) from the iPod without having to resync.  Reason:  If I am on the go and a new podcast for Photoshop User TV comes out, I’ve got to have a fair amount of disc space available to download that from the wi-fi.  If I don’t have an iTunes instance on an available laptop or PC to connect up and delete manually, I am S.O.L.

Music – It’s similar to, but tangential enough from the delete/sync issue above that I thought the music portion warranted its own discussion.  This is not so much that I want to be able to delete music files, but I would like the ability to create playlists depending on what’s going on.  On the photo walk over the weekend, I actually did have about 20 minutes where there was no one in my immediate vicinity to talk to, so I was shooting around and decided to listen to some music to help with inspiration.  If the music isn’t right for the mood though, it can be distracting, so let me do that w/out having to re-sync back to iTunes to create another playlist – that’s just silly.

Camera – This is the only hardware element I have a complaint with – why did you not include a camera with the iTouch?  It seems rather odd that given the preponderance of built in cameras in things like phones, PDA’s, and Blackberries, Apple would say “no, just for the iPhone folks”.  Come on now…the TOuch seems like the more appropriate device for the camera than the iPhone.  After all, the phone has a utilitarian function, why would you bundle a camera into that and not the more accessory nature of the Touch?  Just seems like backward logic to me.

Accessories – The headphones for the iPhone have a built in microphone, and I can understand why they have always been included by default, but with the Touch 2G, and the new OS 3.0, the ability to record audio seems to becoming more and more standard as a way to make notes, deliver content to others.  Wit that, I think Apple should have included the headphones with built in mic wit the Touch.  It was a $30 investment, which I reluctantly paid, and am now glad I have, but really think Apple just wanted their extra little bit of my wallet in that scenario.  *sigh*

Of course I would be remiss if I didn’t at least mention the gaming and entertainment aspect of the device as many people do find the diversions an enjoyable activity.  For me though, I have other venues for distraction and don’t find as much benefit in them, but if you are of that particular ilk, then by all means, check out the App Store part of iTunes for whatever strikes your fancy.

Overall though, the nits I have with the Touch are minor.  It’s a great device that can give me content to listen to, the ability to create my own content, and stay connected with family, friends, and colleagues.  The ability to listen to music while surfing the internet, catch up on Twitter, check email, and even record some audio content for the blog makes the Touch a valuable addition to my belt.

Well, that’s about it for today, as I can’t think of any additional feedback to give on the Touch – I’d give it one and a half thumbs up.  Until tomorrow, keep the energy going from the Worldwide Photowalk and keep on shooting!  We’ll see you back here again tomorrow!

The iPod Touch Unboxing!

That’s right, my replacement podcast resources is finally here, and I share the unboxing with the viewers here tonight via YouTube:

Initial thoughts?  It’s pretty sweet – love the App Store, the WiFi, email access, twitter access, youtube, and so much more!  A few downsides though – no built in camera, and no microphone – I know it’s not for phone, but recording audio snippets would be ideal.  There are apps you can download but need a mic and with just the audio jack, not sure I am gonna be able to do one of the things I had been dying to do after getting this.  There may still be a way so Googling and researching to see.  In the meantime, we shall wait and see!  Look for a more detailed review of this in upcoming weeks!  Until then, just a couple reminders for everyone:

The Scott Kelby Worldwide Photowalk is this Saturday in cities all over the world.  There are still openings and it’s free to join.  You could win prizes too, so check for a city near you at www.worldwidephotowalk.com to see.  You can still join the fun if the group leader is okay with it, but if you are not registered, then you can’t contribute images or be eligible to win!

The OnOne Software Plugin Suite 4.5 Giveaway is going on for the entire month of July, but time is starting to tick against you as we are halfway through the month.  This is a $500 retail value and some lucky winner will walk away with this package for free!  Details and rules for participation are at the Flickr thread. If you own the software already, tell a friend as it’s an NFR copy.  If not, then chime in as the deadline will be here before you know it!

Mask Pro 4.1

Okay, I know the folks from onOne have been very generous with their contribution of a copy of the OnOne Plugin Suite for the latest giveaway here at Canon Blogger/Learning Digital Photography, but I have to say that I am literally blown away by this offer even more.  As I delve into each tool more and more, I am totally amazed at the functionality and how easily it really makes things.  For those of you that watch Photoshop User TV, you’ve seen what I’ve seen – ads from OnOne claiming that masking is made so super easy that you can swap backgrounds and composite images together in a snap – it’s a breeze, right?

Well, we all know that ads only show you the quick and flashy parts of things, not the nitty gritty.  Let me tell you here and now – the Mask Pro really has no nitty gritty – it really is that easy.  Take a look at these sequences:

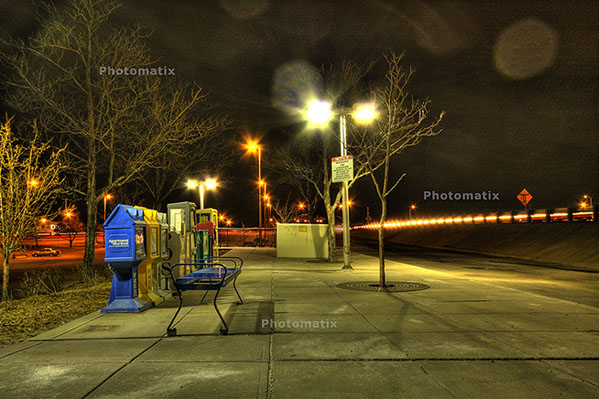
First off, an image I merged together during a trip to SC last summer.  It looked like it could make for a nice HDR, so I did some tone mapping and got this result:

originalhdr

Needless to say, it didn’t really have the “wow” factor I was looking for.  (I should also throw a mention in for the folks at HDRsoft that produce Photomatix, the HDR software utility that I was testing at the time I originally put this HDR together – still working on a review of that – I lost the trial version after re-installing XP, but will get that back shortly.)  Anyway,  given the success I’d had with some other images in HDR and the background I tried, figured it was worth the effort to blend in a different background.  Here’s the results.

hackjob

Keep in mind, this was after literally hours and hours of painstakingly selecting branches, twigs, and  what not literally zoomed in to almost the pixel level.  Still, not that flattering a result and clearly a less than “stellar” job.  I relegated that to the “learn from your mistakes” folder and had not really touched it since.

So, this was my test for the Mask pro – could it do what I couldn’t after at least ten hours of agonizing masking selections and duping to repeated layers to start up the following day?  Well, let’s see, here’s what happened.

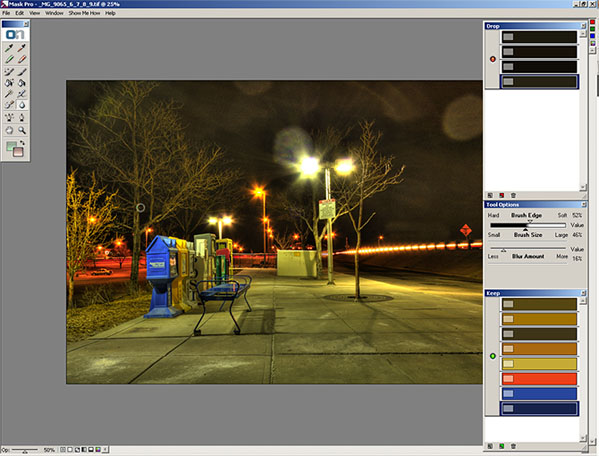
After installing Mask Pro, I loaded the tone-mapped HDR image into Photoshop.  Then, rather than taking any time to tweak, I went straight to Mask Pro (after all, it should do the work for me, right?).  After a short 7-slide presentation on the tools, my first screen looked like this:

maskpro1a

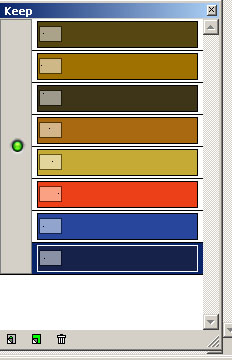
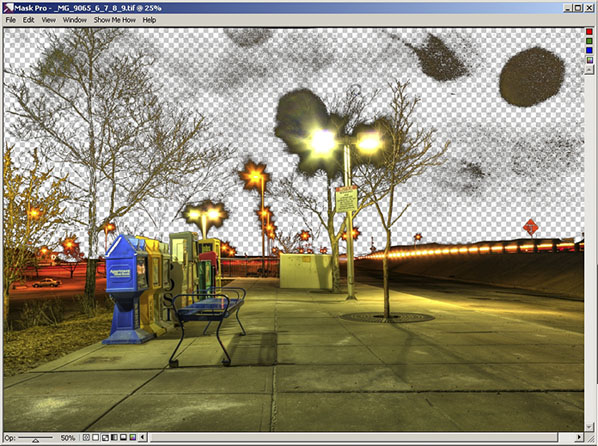
Before I go on, let me explain how the tools on the right ended up how they were.  You see, Mask pro gives you eye dropper tools to select the colors you want to keep and the ones you want to subtract.    So, I went and selected the green eye dropper to define the colors to keep.  I clicked a few parts of the branches and signage, which took the better part of 5 seconds.  The end result was this color set:

keep

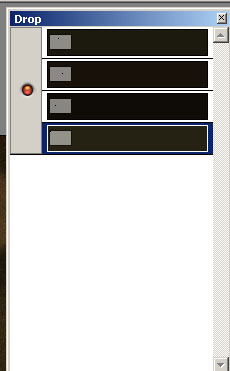
Then I switched to the red eye dropper to define the colors to drop.  I clicked a few parts of the sky.  This took another 5 seconds or so.    The end result was this color set:

drop Lastly, I clicked the Magic Brush tool, from the Mask Pro tool panel maskpro_palette

and just started painting around the sky.  I certainly did not take my time, as I was running on my Windows desktop which has a single core 2.3 Ghz celeron processor (it chugs when I load my browser fer Pete’s sake).  So, I dealt with about 5 minutes of a magic brush tool as it calculated the mask to apply as I painted impatiently across the image.  (After all, I wrote these blog posts after dinner, so time = sleep here.)

So, after about 5 minutes and 10 seconds, I have a mask that looks like this:

maskpro2

Yes, that was after 5 minutes!  I could already tell this was a wickedly intuitive and powerful tool (and I mean that in the best of ways), so I just stopped there and decided to take it back to PS for final cleanup and adding the new background.  To do that, I simply clicked the File menu, then “Save/apply” (another 2 seconds)…

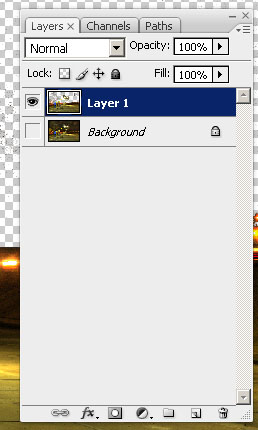
Now back in Photoshop with the original image.  It looks the same, but take a look at the layers palette:

layers2

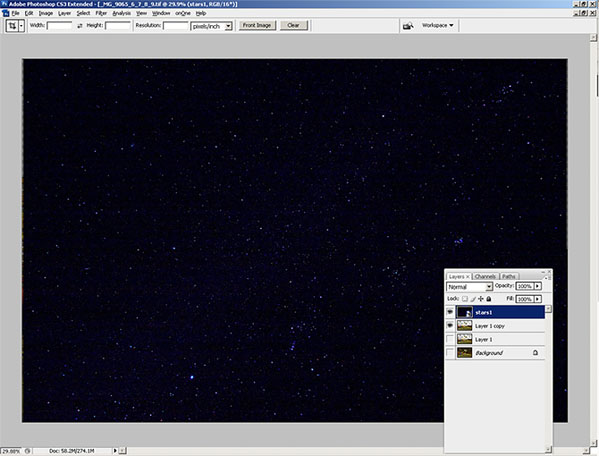
I know the low-res and smallness of captures for the blog make this hard to tell, but at this point I am pretty much ready to bring in the new background.  My only last step in PS is to duplicate the layer I just created from mask Pro to clean up the big blotch in the upper right, and a few specks in the rest of the sky on the third layer.   So, now I am ready to bring in my starry background again.  I place the object in the PS document to get this (for the record, I went with a different starry background to go for a more realistic effect rather than the Harry potter look of my swimming pool shots):

layers3

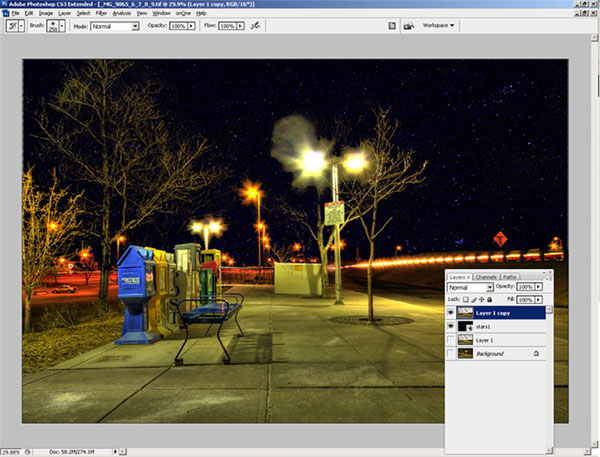
Finally, I just pulled the stars layer to sit below the Mask Pro layer and here’s the resulting layout in Photoshop:

layers4

The last bit took all of another minute, tops (remember, I am working off a slow processor.  The final result, which took literally less than 10 minutes (the first took over 10 hours):

finalhdr

Such is the power of the OnOne mask Pro – just one of the multiple plugins that are available in this Suite.  If you want this kind of power and malleability in minutes, then enter the giveaway today.  it can literally save you hours, if not days, of post processing!  Here’s the Flickr page for photo entries and here’s the link to the rules.

What can I say – OnOne rocks!  Just to give you a true frame of reference – it took me about an hour and a half to write this post – and that includes getting the screen captures, then sizing them for the blog.  I also interspersed some Twitter time and surf time as well, so it’s not like I was really in any kind of “zone” or anything.  It was just another task in an evening of multi-tasking.  The original one took me over ten hours of processing and that was with no other apps running, seriously.  I was restarting the computer just to free up the RAM for usage only by PS every evening.

This feature alone can save you days of time in the digital darkroom.  Don’t delay and enter to win today! Happy shooting and we’ll see you back here again tomorrow.

Grab the Feed

Wacom Bamboo Fun: Hardware Review

The good folks at Wacom were kind enough to donate a Bamboo Fun to me for review on the blog a while back.  In order to really get a full handle on it though, I wanted to use it within the context of my at-home work flow.  You see, I’m not a newcomer to tablets, as at work and through  previous experience, I’ve grown quite accustomed to their usage.  I’ve had to instruct people on how to use, configure the basics, and such on their computers. as well as used them in many of their varying sizes (most recently being the Cintiq).  Having said that, I’ve never really had the need to incorporate a tablet in my home work environment for a number of reasons.  Before I get into the reasons though, let go over some of the basics…and rather than a listing of pros and cons, I am following a slightly different format this time. I should also give fair warning that there are a LOT of pictures coming, so for the graphic avoiders in feeds, you may want to visit the site…

Installation

Installing this product can’t get much easier.  Regardless of whether you are running a Windows or Macintosh environment  (it really doesn’t matter a whole heck of a lot) the system will auto-detect the drivers for your Bamboo fun.  Still, it never hurts to go through the CD installation on their provided media, so I thought I’d share with you the process (and a few bonuses) of installation.  It’s pretty much identical, but I am showing the screen shots from Windows:

Here’s the main splash screen where you can choose what to do, ranging from installation to viewing video tutorials, or browsing the CD contents…

install1

I opted to do the driver installation first, and got this following message…

install2

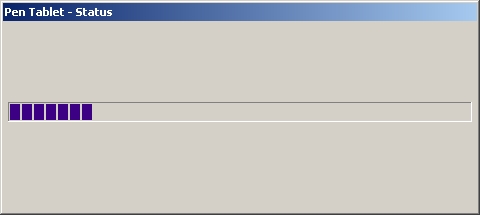
Then the notice that the pen drivers were being installed…

install3

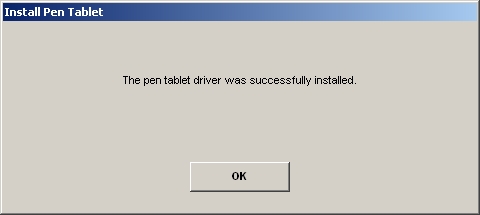
Then notification that installation was complete…

install4

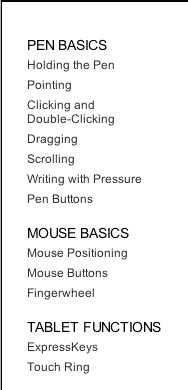
After finishing that, I was offered the video tutorials on how to do different things.  For first-time users, a very useful resource…

install5

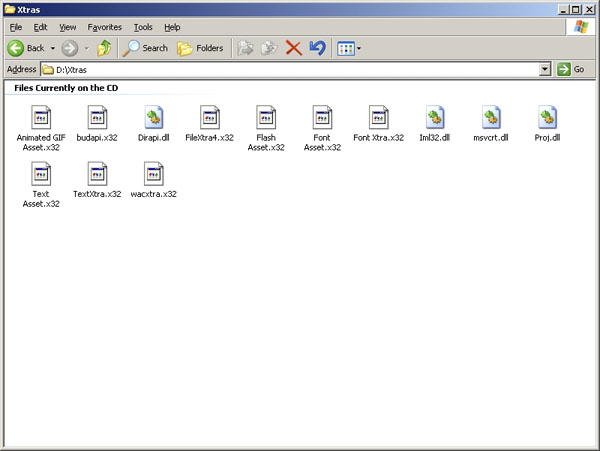
And finally the extras that are included on the CD.  I am not sure about files with an extension of x32, but believe this is a carry-over from Macromedia software like Flash.  Since I do not own Flash, I can only guess based on my own research…

install6

Ad additional CD also gives you a copy of Photoshop Elements 5, Nik Color Efex Pro 2, and Corel Painter Essentials 3.0, which also help to offset the cost the the product.  I didn’t want to open this and negate the serials or licenses of the products contained, but did scan the front side so you can see what you get in the companion CD:

bamboofun0021

Configuration

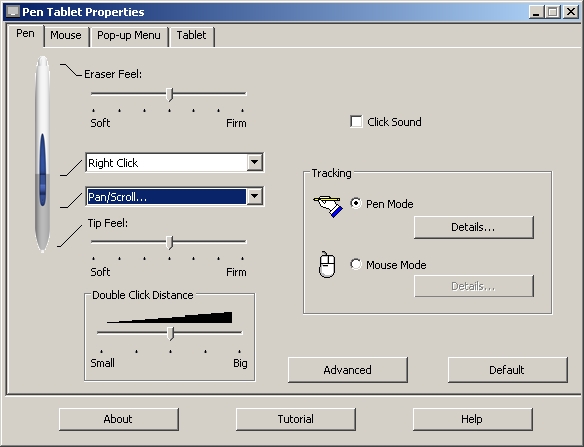
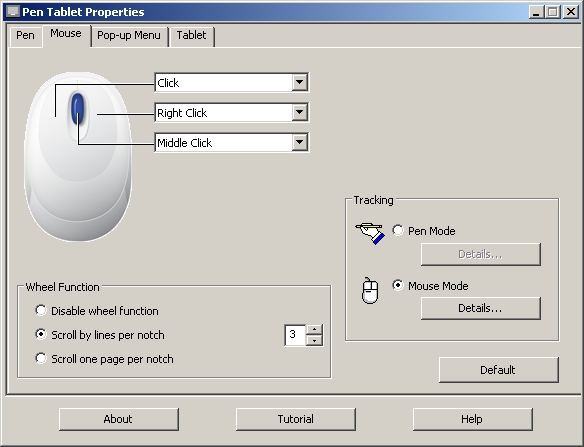
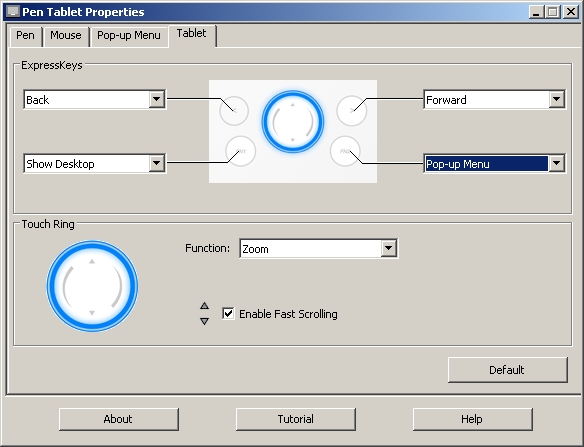
The added buttons at the top of the tablet make for some very intuitive advancements in its usability and properties.  Rather than cover each of these in detail, screen views of each tab (there are four total) should be indicative enough of the control and customization you can get:

config1

config2

config3

Pop Up Configuration

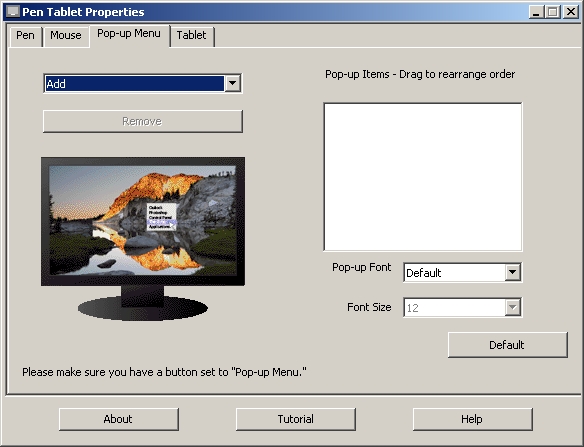
The pop-up tab is probably the only tab that isn’t completely self-explanatory, so let me delve into a little more detail here. The reason why is because you can program common keyboard combinations (like the ones I referenced in my post last Friday) to be controlled from the tablet (provided you have “Pop-up menu” selected as on option on the tablet tab (seen next)…

Here’s how you do it:

First, click the drop-down to indicate what it is you want to program on the tablet.  For me, the biggest advantage would be in incorporating keyboard keystroke combos so I have to switch less between kb and tablet.

popup1

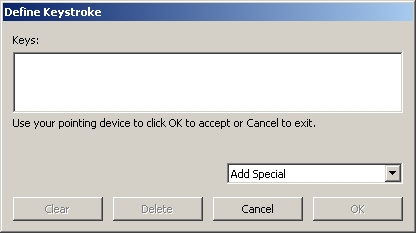
You’ll get a window now where you can define the keystrokes you want simply by typing that keystroke set in the blank space…

popup2

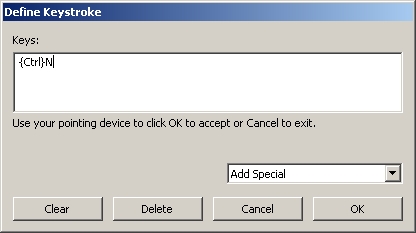
The tablet will detect your keystrokes and populate the fields

popup3

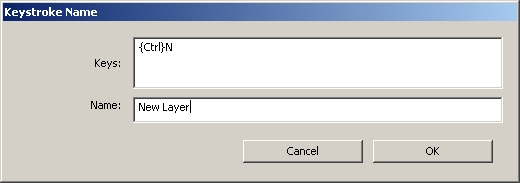
Then, give your keystroke set a name…

popup4

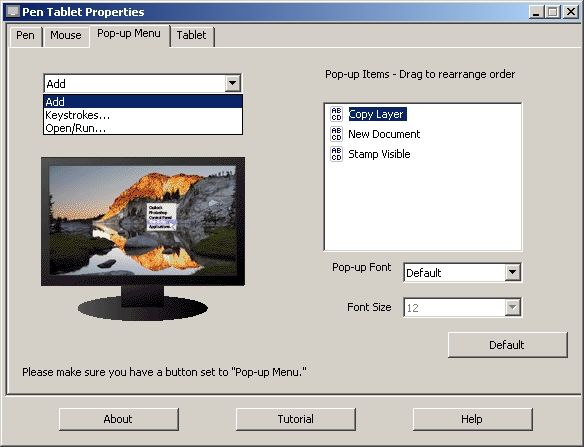
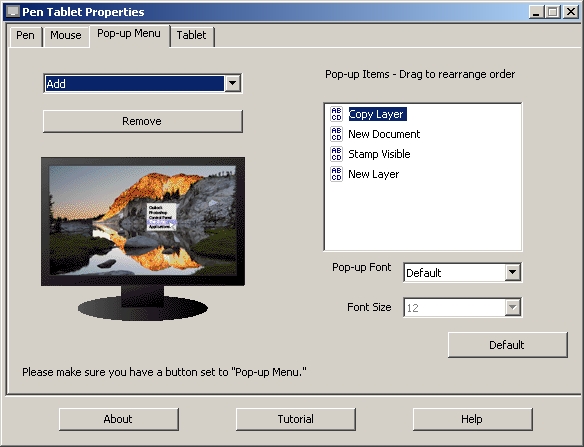
and Click OK.  You can see the ones I programmed below…

popup5

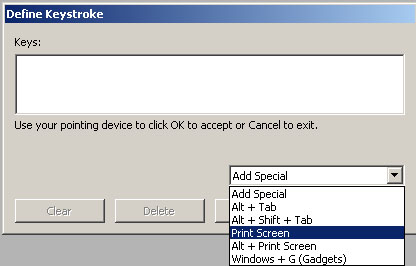
Last but not least, you can also include special keystroke combinations that are unique to your system (like Printscreen on Windows), as shown next:

popup6

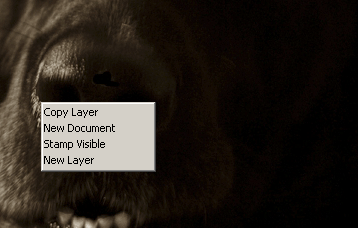
So, you can see how having the pop-up tab configured with your most commonly used keyboard combinations, as you can reduce the swapping between inputs even more!  Very cool!  And here’s what the right-click menu looks like once inside Photoshop:

popup7

But, make sure you have a button set on the tablet to “drop down” (as shown next…)

config41

Mechanics

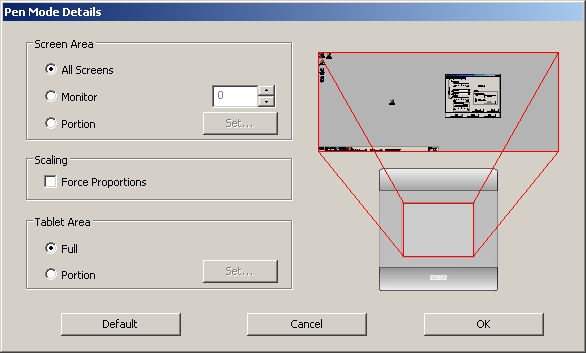
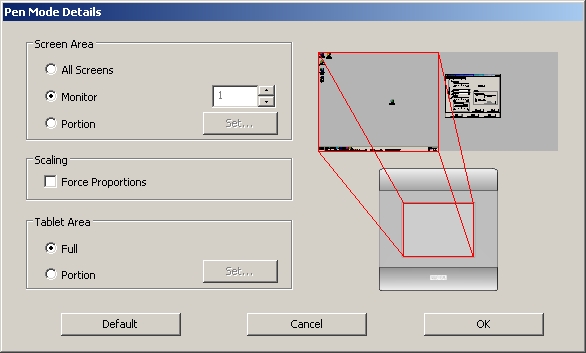
Here is where your specific work flow may have an impact.  On my Windows desktop environment, I have a 19″ and a 17″ LCD, so that’s roughly 36″ of real estate that this tablet (which measures roughly 6×4″) has to cover.  What this means is that movements on a scale that size makes everything larger proportionally speaking.  You can adjust the tablet settings under the pen mode details screen to manipulate for just one monitor instead of all screens, but if I am going to use a tablet, Idon’t want to jump between that, a keyboard AND a mouse…two inputs is all I really would want to switch between, but that’s just personal preference.  But, for those that are interested, here’s how you make that adjustment in the pen settings tab of the tablet properties.  Click on the pen tab of the tablet properties, then the details button to get this screen:

config5

From here, change the button from “All Screens” to “Monitor”.  It will default to the monitor you have set ot #1:

config6

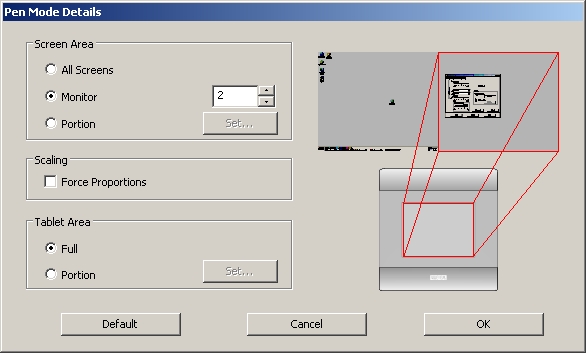
But you can use the arrows to set it to monitor two if you prefer:

config7

On my Macbook Pro, since I only had the one monitor, the experience was quite different as I had less real estate for the tablet to cover – with only a 15″  LCD of screen space to cover.  So the pen was much less sensitive to location on the touch pad given that less than half the real estate was needed to cover the range of the screen (and I noticed greater position control even when I did just the 19″ monitor versus the 15″ LCD of the MBP – it’s just a happenstance of the tablet size, and the only way to do that would be to increase the tablet size – at the expense of desk real estate space…pick your poison, ya know?)

Usage

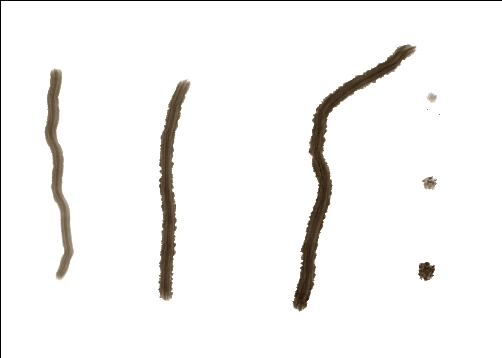
Tablets rock!  Let’s just get that bias out of the way right off.  If you want the ultimate in cursor control (and when I say cursor I mean movement of your tool, whether it be a brush, a pencil, an eraser, clone stamp, whatever, it’s just amazing).  The first major difference between a mouse and a tablet is touch sensitivity.  No matter how you tap a mouse, it delivers the same intensity or strength when it paints in Photoshop.  With a tablet, this is not the case at all.  How hard you press determines the strength of the brush.  This is truly remarkable as now you can apply just a touch, or go full hog on anything you want from painting, to clone stamping, and anything you want.  To demonstrate, I created a blank document and selected some brush settings to illustrate what I am talking about.  Take a look:  from left to right are light touches to hard pressing with the pen…followed by dots of the same strength top to bottom.

use1

So now you can control things like jitter, hardness, and a whole myriad of options that you didn’t have before (well, at least not to the same degree anyway) with just a mouse.  I know what you’re thinking now – “Great, for graphic design that’s super cool, but how can I use this as a photographer?”  Excellent question!   Ever catch a picture where the eyes are darker and you want to brighten them up?  Well, now you can with greater ease and control both of area, intensity of the lightening (or darkening) by using the pen tool for the Bamboo Fun.  Take a look at the sample below, where I took an underexposed picture of the dog and selectively lightened the eyes and teeth, here’s the before:

use5

and after:

use4

One of the best parts is that this functionality is there in whatever application you use that incorporates brushes.  I tried it in Photoshop, Lightroom, and Corel Painter Pro (I installed a demo version of the last one for this review).  The Bamboo Fun can also expand your ability to clone things out, say a stray light pole or some telephone wires, or even the nasty -ex that you want out of that super cool shot of you in Hawaii!  The possibilities are limitless both for graphic designers and photographers.

So, this now begets the question of why I don’t have one in my home environment.  The main reason is because I’ve never had the need at home.  Most of the time I am at work, and if I need to work that requires that level of control, the work hardware has always been there for me.  Granted I’ve also gotten used to the Wacom Cintiq which has a much larger surface area, so I have even a greater degree of control over the desktop, cross-hairs, and all brushes, so it’s also a matter of being spoiled – I just can’t afford a Cintiq at home, or justify its need – I am just not that much of a re-toucher either with photos or in graphics design creation.

Additionally, for me, the use is only really there in graphic design, because I am also of the mentality of “getting it right in camera”, so I don’t like to do a lot of edits in photos.  Of course no one is perfect so I do occasionally need to do some fine tuning that requires a tablet.  In cases when I do, I just take the photo in to work and do the retouching there as the tablet does give a much greater amount of control than any mouse or trackball will.

When I’ve not been successful in camera, it’s not that my home work flow is good enough, it’s just that the tools are already there for me if needed at work, so the financial justification really hasn’t been there.   As my personal usage has been increasing lately though, I must admit that I am thinking more and more about adding a tablet to my home work flow.   So, would I would recommend this?

Yes!  This would make a great tablet for anyone who does not have access to a tablet elsewhere, or if you are looking to enter the tablet market – the Bamboo Fun is a great entry level tablet, that takes up minimal desk space while offering a maximum range of precision and control.  I think for my own personal usage, I would probably prefer a larger tablet because I do have the desk space, and have been accustomed (as I said) to the Cintiq, so perhaps the Intuous 4 would be more easily incorporated…but only time will tell!)

Finally, as prone as we are to repetitive motions, and with conditions like Carpal Tunnel Syndrome becoming much more common, the tablet does offer a much less repeated motion tendency than a mouse or a tablet.  So, if you make the move to a tablet, you are only decreasing your chances of things like Carpal Tunnel and repetitive motion problems in your wrists.

Two thumbs up (in Siskel and Ebert style) for the Bamboo Fun from the good folks at Wacom.  Many thanks for the demo product, and I am sure the listening/reading audience appreicates their generosity as well.  Happy shooting everyone, and we’ll see you back here tomorrow for an exciting software review that includes the announcement of our latest contest, which is starting in July!).

Software Review – Genuine Fractals 6.0

Don’t get too excited – no software giveaway on this one folks, as I’ve not had a chance to call OnOne yet and see if they’d be interested in participating in a contest.  Instead, I am working off a trial version of one of the premiere up-sizing software programs on the market – Genuine Fractals from the good folks over at OnOne software.  Available for both Mac and Windows, this product really has developed a good name for itself in the industry.  While reputation may precede it, I have been wanting to give this product a try for some time now, so here we go!

To do this review, I decided to just share the work flow on a particular image that I happen really like, but because it was a pretty heavy crop, never really had a chance to see it in print very large as the limitations of Photoshop prevented more than a 4×6 image.   The first step was to open that image:

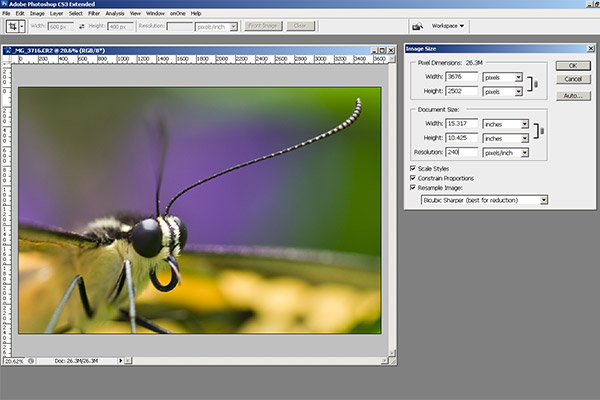
before
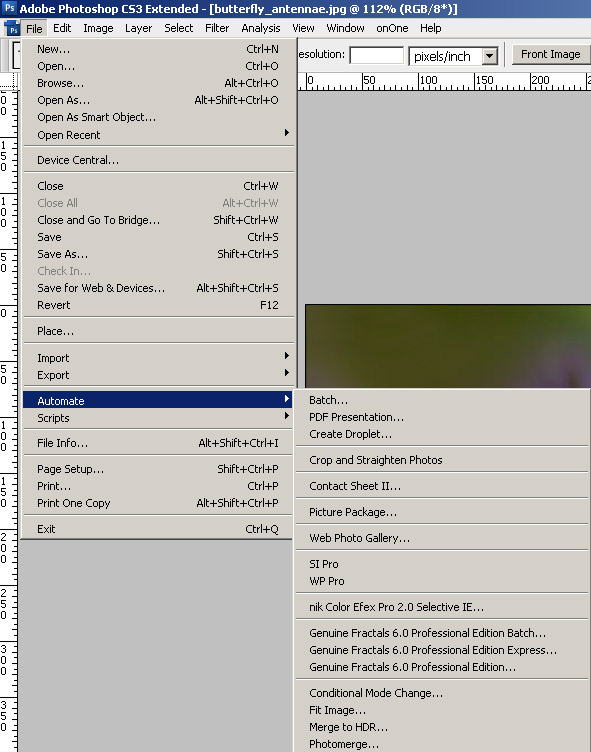
Here we’ve got this heavily cropped image of a butterfly I liked – and the capture shows the image is a 600px photo.  Way to small to print – I want at least an 8×10.  So, after installing Genuine Fractals, I loaded that in Photoshop by going to the File | Automate option and it showed up in there:

fractals1

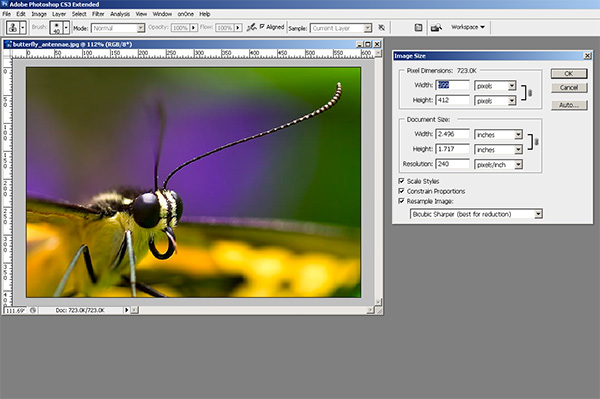
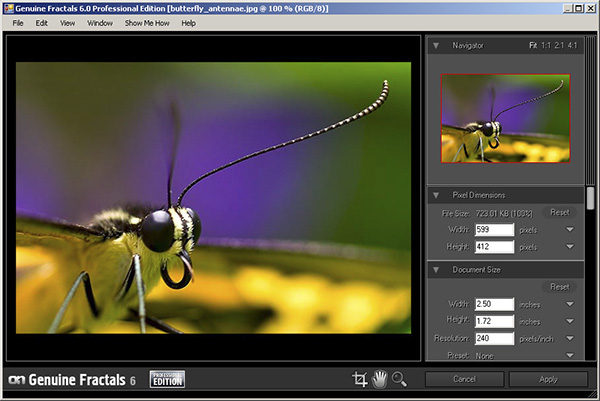
So, after selecting that, I got the GF window, which shows the current image dimensions, and the upsizing options, as shown below:

fractals2

You can see the default dimensions of 2.5×1.72 just will not work for anything useful other than a desktop background or a postage sized stamp.  I need to make this bigger.  So, I plugged in the values that would take me up to an 8×10, and in this case the aspect ratio wasn’t exactly on, so I took the short side up to 8″, and that put the long side at 11.6″ roughly.  Nothing I can’t crop out a little as I move through post, so here’s the larger sized image.

Butterfly

The little dots are the logo of OnOne software so yo can disregard that because when you purchase the software, those go away.  Instead, click on the image and zoom in on the antennae for a better idea of how it handles the up-sizing process.  I was actually pretty impressed.  Granted this image is unusable as it stands because there is too much jpg artifacting since I was working off an already processed image, but if I was going off the original raw, the results would likely be that much better – and the results are much more impressive.  Take a look at this next one.

fractals3

That”s the original file, a roughly 15×10″ image, cropped to about the same dimensions and then sized for the blog here.  I’d include a hyperlink to the re-sized version, which blew up to about 75″ on the long side, for the same approximate increase in percentages (500% – GF claims boosts up to 1000%), but it really is too huge to accommodate on the web.  Besides, since it is copyright-protected, just putting that large a file out there is like – oh I dunno – like leaving your garage door open for thieves to steal your car! 🙂 ! Think about 75 inches though!  That’s like 6 foot wide.  We’re talking billboard sized posters now, and the degradation in image quality is much less because I was working with the original file.

So, whether you are trying to recover size from an accidentally compressed image, or trying to increase an image to use in large applications – you can see how Genuine Fractals might be a route to consider.  It may be a pricey option at$300 retail, but when you sell just one billboard print – the software expense is covered.

I’d give GF6.0 a two thumbs up just because it produces such impressive results.  To me, the proof is in the pudding!  So, what do you all think of the software?  Does anyone else use it?  I’d like to hear others opinions, as well as some alternatives if you have any.  I am pretty convinced, and should I ever need to up-size, I know where I am going from here!  Happy shooting and we’ll see you back here tomorrow!

Rocket Man!

Cleaning your gear is a maintenance ritual each of us must develop that suits our own style and behaviors.  For me it’s lists…logical lists that I formulate after thinking about what makes sense to me, so I can do things the same way every time.  For me it’s all about consistency and repeatability.  While this same technique is something I recommend for others, it may not always be the best course of action if you don’t like that kind of rigidity.

However, regardless of what styles or approaches you use to clean your gear (and I’ve talked about my approach to gear maintenance in the past in detail), some of the best recommendations I can make is in reference to the types of utilities and tools you use.  So, today, I’d like to take a look at one of the tools that I have come to rely on more than any other – the Giottos Rocket Blower.

giottos

So, what makes this thing so great?  Funny you should ask, let’s get started with the…

PROS

  1. It’s got an air valve built in to prevent it from taking in dust and dirt on the intake end.  This design (I would venture to say) was a first-of-its-kind in cleaning accessories, because every other blower that I’ve seen prior to this made no such claim, which means that they hadn’t incorporated the idea into their design at all.
  2. It’s air at the ambient temperature.  Too many canned air options use chemicals that can be damaging to your sensor – my recommendation is to stay away from canned air entirely.
  3. It’s not super fast air being directed at your sensor like a missle.  Although it kind of looks like a grenade (these are fun to take through airport security! 🙂 ), the power behind the discharge of air is not like that stinging charge that comes from canned air options.  You have more control over the flow of air too, as you can give it a quick pump or a slower steadier pump depending on what you want to do.
  4. It’s not weak air like from many other pump-style – this thing really can deliver a good blast of air to get the most stubborn dust out of a sensor area, or the surface of a lens.  Just don’t use it around your dog that likes squeak-toys because it does give a little sound like that due to the air valve!
  5. It’s dirt cheap!  This retails at B&H for $15!  Low cost solutions are always a huge pro in my book.  The picture above also includes a link to the B&H page for it.  If you are a NAPP member, you can also get free 3-day shipping.  Just my cup of tea!
  6. It looks like a grenade!  Talk about a cool conversation piece.  I can’t tell you the number of airport security people that have asked me “What the hell is that?” !

CONS

  1. It looks like a grenade.  I can’t tell you the number of airport security people that have asked me “What the hell is that?”!  The cool factor wears off when you are trying to catch a plane, or it’s oh-dark hundred and you’ve not had any coffee because they won’t let that suspicious looking McDonalds or Starbucks cup through the security gate.  (That same cup of coffee that costs $6 on the other side of security has been deemed safe though…go figure!)

There you have it, 6 pros and 1 con means this product gets a thumbs up in my book.  (Surprise surprise since it’s in my cleaning kit!)  As always, if you have any ideas, suggestions, or are interested in products that have not been covered here on the hardware review days, drop your thoughts into the comments area or kick me an email (is it possible to kick something that is all 1’s and 0’s inside a computer?).  Happy shooting and we’ll see you back here again tomorrow!

Grab the feed