Video Hosting Services Review

With the increasing popularity and discussion of video (we are always hearing about the convergence of photography and videography), I thought it might be interesting to take a look at the different video hosting services, and look at their functionality. So, earlier today I recorded a video using Quicktime Pro on the Mac, and tried uploading it to 3 different popular services: YouTube, Vimeo, and Animoto. Here are the videos in that order, followed by my thoughts on each:

YouTube:

Thoughts

Price: It’s free! Nothing beats free in my book, and with the competitive landscape of technology, this is pretty hard to beat.

Quality: The thumbnail does not look right, but that’s a minor nit…on playback it seems pretty good.

Ease of use: Another pro here as well…it was easy (and quick) to upload. It took less than a minute to upload, and adding the video details was also easy. You do need a Google account to do this though, but since that is also free, the downside here is hard to find.

Accessibility: It was VERY easy to find the embed code to copy/paste into the blog. And YouTube/Google is pretty recognizable as far as things go, so it’s going to be hard to compete here. But, let’s look at the other services…

Limitations: The only one I can find is that you are limited to videos under 10 minutes. You can do HD quality, up to 2GB per video (so no data size limit), with no waiting in line for video conversion or anything like that. At first I thought 10 minute limit was, well…limiting, but after looking at the other two services, not as much.

Vimeo:

Review of Video Hosting from Jason Anderson on Vimeo.

Price: It’s free…kind of. You can go the free route, but there are downsides which I will go into shortly.

Quality: It seems on par with YouTube in terms of video quality,

Ease of use: Also on par with YouTube, and the dialogs are very similar, so kind of a 6 of one, half dozen of the other sort of comparison here.

Accessibility: Vimeo videos are just as accessible as YouTube ones are, anyone can see them if you set them up the same, so kind of an interesting dichotomy here…

Limitations: Your limitations with Vimeo are that you can only upload 500MB of data per week.  This may sound like a lot, but when it comes to video, that could get eaten up pretty quick. I didn’t see a length limit on Vimeo, but could be wrong here. Another limitation on the free account is that you have to wait in line for your videos to get uploaded. I uploaded the video 20 minutes ago, and still have another 40 minutes to wait before it will start the conversion for me. If you upgrade your free account to the Vimeo Plus one, you can get 5 GB of content, HD quality, no ads, and for $60/year or $10/month. Not too pricey, but again, in a competitive economy, it’s something to consider…

Animoto:

Not reviewable – as it turns out, Animoto only allows 30 second videos for free – everything else is a paid service. The price is cheaper than Vimeo for the service at $30 per year, and it does seem to have no limitations on video length or things of that nature, but the fact that you can only do a 30 second video on their free service seems rather lame. I realize that we need to be quick and to the point with our content, but 30 seconds? Really? This one gets a major thumbs down from me for this and on that basis would not recommend it.

Self-Hosting

In the interests of being as broad in the review process as possible, I thought it would help to also include the self-hosted option as one worth considering. There are some caveats to this though, as services and limitations would vary from one hosting service to another. I use Dreamhost, and I like their hosting, so figured it would be worth showing that here.(You can sign up from the link or from using the promo code CBPROMO to save 50% on sign-up!)

PlayPlay

Price: Free…kind of. You do have to pay the hosting company for hosting your website, but as far as I know ISP’s typically do not charge additional fees for specific types of content.

Quality: Perfect! Since you are uploading the original video, there is no degradation in video quality – but that being the case, you are solely responsible for quality control…fair warning.

Ease of Use: Again, it depends on your host. For me and the blog, it’s pretty straightforward as I am using a self-installed version of WordPress and I am familiar enough with the functions and formats to handle it, but if you don’t want to be bothered with uploading a video via FTP, then referencing that source URL in your WordPress or website with HTML and all that, it could be challenging.

Accessibility: I hate to beat a dead horse, but it also will be a function of your host, and what format you choose to upload your videos. I uploaded the raw Quicktime video, so it will be dependent on people having Quicktime on their computer. There should be a conversion utility (I think it’s called jwplayer) that converts the .mov format to flash for easier viewing on the web, but this may need to be installed in your version. It is free, but could be a limitation as Flash viewers are more common.

Limitations: You are only limited by your own comfort level here – if you don’t want to deal with all the nitty gritty details, then this could be problematic. For those that enjoy managing all their own content, this could be ideal though, it really just depends where on the spectrum you are. For me, I am okay dealing with it, but if I had my choice between fussing over the details and using a service like YouTube to host it for me so I can go back out and shoot more, record more, and research more content, I’d choose the latter.

*****

So, that’s the top three reviewed for your consideration. If I had to vote on one, I would say YouTube gets the nod. Ease of use, lack of expense, and visibility is just unbeatable. But, keep in mind, that’s just my thoughts. What are yours? Anyone have any particular favorites or preferences for video hosting? Any I missed? Benefits and downsides? Sound off in the comments!

In other blog news, don’t forget, the post from Saturday (yes, I made a Saturday post!) allows you to embed your own photos to the comments! Share your own thoughts on the best photos of 2009 – they do have to be online (embedded via URL) but it’s a great way to share your favorites with the community at large.

Finally, time is ticking away on the December Giveaway. Over $400 in prizes including books, prints, paper, and software are up for grabs so make sure you get your “Giving” themed photo to the Flickr thread before the end of the year!

PlayPlay

Flickr Plugin for Lightroom

While recently participating in a Photowalk group outing to Rocky Mountain National Park, with the fellow local photogs, I learned about this great little plugin for Lightroom that allows you to export your photos directly to Flickr…all within Lightroom!  It’s a pretty cool little plugin, and as you know, when I learn something new – so do you!

This plugin comes courtesy of Jeffrey Friedl, and one of the greatest features of it is the cost – absolutely free!  Well, that’s not exactly true, you do need to spend one cent via Paypal, but for a penny, check out what you can do:

I started off downloading the ZIP file (and it works for Windows or Mac) and expanding the archive.  Then I moved the plugin to the root of my Applications folder on the Mac (you can choose where ever you want to store plugins, you just have to tell Lightroom – and for me this is an easy place).  The icon for it looks like this:

Flickr Uploader Plugin Icon

Nothing too spectacular yet, and there’s a little bit of installation and customization needed.  Your needs may vary based on how you want to use the plugin, Flickr, and Lightroom, but the cool thing is that Jeffrey has put together a plugin for most online locales including Smugmug, Zenfolio, Facebook, Photobucket, and many more.  So, if you use another resource, it’s worth checking out.  I’ll continue here for the Flickr plugin and you can decide for yourself if it’s worth adding this tool to your workflow.

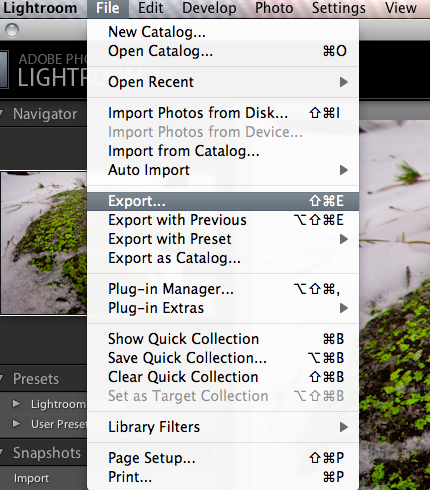
Next up, I went ahead and configured the plugin from inside of Lightroom to use my Flickr account.  Here’s what I did. To start, click on Export, just as if you are exporting to disk or some other resource

Open Export Dialog
Open Export Dialog

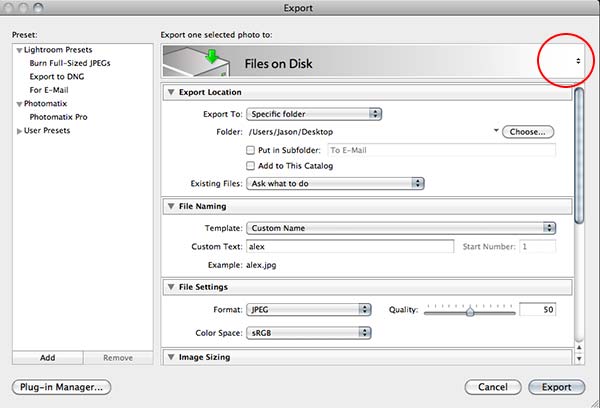
One the export dialog box is open (and here’s the tricky part), look to the far right of the gray bar across the top that says “Export to Disk”.  You’ll see two little arrows which means there are menu options:

Files on Disk
Files on Disk

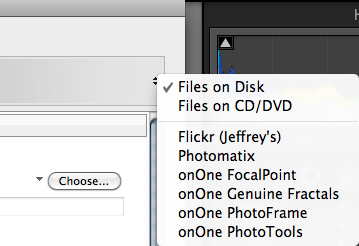
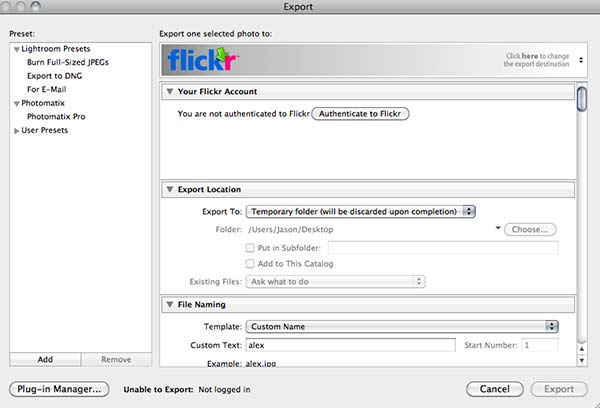
If you click on those arrows, you’ll get a new dialog box (bet you didn’t know that was there – did you? 🙂 ), and the Flickr option will show up.  Select the Flickr dialog one for our purposes here:

Flicker Exporter
Flicker Exporter

Once you select the Flickr Exporter, you will get a new dialog box that will start the authentication process that Lightroom will use to log into Flickr.  If you have multiple Flickr accounts, or specific authentication methods you prefer, these steps may change a little based on your needs.  But here, I am doing things the most straightforward way:

Flickr Authentication

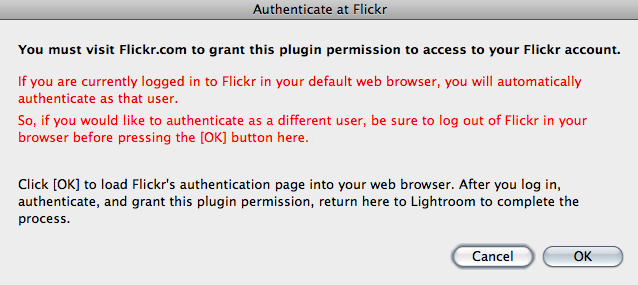
Next up, if you are logged into Flickr already, the plugin will open a page that will grant access to the plugin.  So, it helps if you are already logged into your Flickr account on the internet.  So, you’ll get a dialog box that looks something like this from the plugin to that effect:

Warning Notice from Plugin

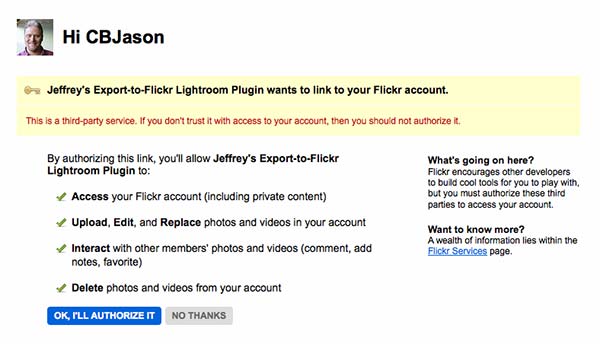
On clicking the OK button, it will take you to the grant access page, and you’ll get another dialog box that grants the plugin access to post photos to your Flickr account (which, after all, is the goal, right?).  The one notable difference you will see in yours is that my face won’t be staring back at you like here.  That is the avatar for my Flickr account, so your screen should show your avatar – if it shows something different, then you are in the wrong account (but I guess that goes without saying)!

Granting Access from Flickr Side

A second confirmation screen from Flickr will also let you know that this is a 3rd party application, and just acts as a security measure to make sure you are aware of what that means.  Click the button that says “OK, I’ll authorize it”, as shown below.  Again, while it goes without saying at this point, your dialog will look a little different different.  If it doesn’t and you see my avatar in your Flickr account, I am gonna be calling soon! 🙂

Authorization
Authorization

Finally, you will get a confirmation screen on Flickr, noting what you’ve done (they make it pretty clear what you’ve done, and how to delete it if needed on the Flickr side):

Flickr Confirmation
Flickr Confirmation

On return to the Lightroom interface, you’ll get a confirmation screen there as well – just click it to continue:

Lightroom Confirmation

On granting access, you’ll get an authorization code, which for obvious reasons I am not going to post here, but make a note of that code and enter it back when you return to Lightroom.  On completing that you will be presented with the Flickr Uploader Dialog.  Here I am going to show you a few key ones that you have to scroll down to be aware of in making your uploading preferences.

Screen shot 2009-12-14 at 9.06.37 PM
Your Flickr Account login in Lightroom

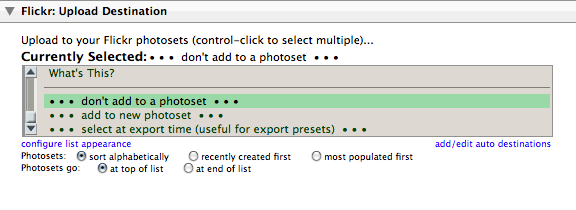
This first shot (above) shows the top part of the dialog, and shows how you are authenticating on Flickr.  Now, use the scroll bar on the right side to move down through the options.  First stop, the Photo Set.  On authenticating, the plugin will pull your complete list of photo sets from Flickr.  If you don’t have any photo sets built, then none will be here.  Since I do have photo sets, it will default to the first one alphabetically.  You can change the sort order, and specify what photo set (if any) you want the uploaded image to be added to, as desired.  For this example, I did not add the photo to an existing set, or create a new one.

Photo Set Choice
Photo Set Choice

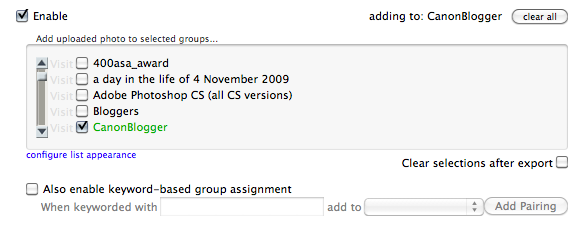
Pretty straightforward, but let’s keep scrolling through a few more key items you will want to think about utilizing or disabling depending on your work flow.  The next one I think warrants mentioning here is the groups.  One of the ways you can increase the visibility of your photos on Flickr is by participating in groups.  More people look at them, you’ll get more feedback, and sharing our photos with others is the goal anyway, so go ahead and add the appropriate groups here.  I selected the group “CanonBlogger” for obvious reasons! 🙂

Screen shot 2009-12-14 at 9.09.00 PM
Publishing to a Group

Only a few other options that I think are useful from this plugin, so we’re almost done.  Next up, is another social networking one that I tend to use fairly regularly – Twitter:

Twitter posting
Twitter posting

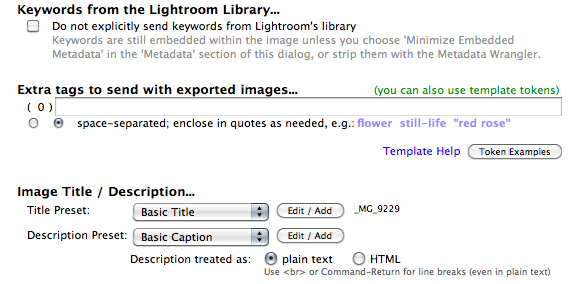
Last but not least are the meta tagging options you have available to you from the plugin interface.  The options are just to diverse to go into detail here, and I prefer to tag photos on Flickr differently than in Lightroom, so I leave these blank, but in the interests of full disclosure, here are some of the tagging and naming options in the plugin dialog:

Tagging Photos
Tagging Photos

If you think about it, for a penny, this is a pretty good deal (I went ahead and made a donation, which I would also encourage you to do as well – Jeffrey has clearly put a lot of time into developing these plugins, and he needs to eat, just like the rest of us).  So, there you have it – the process of finding, downloading, installing, configuring and using the Lightroom Flickr uploader.  As I mentioned at the beginning of the post, there are other uploaders available as well, and I am going to probably go get the one for Smugmug as I have an account there too.  It just makes the sharing of your photos that much easier.  (Who knows, the Facebook one may also make its way into my utility belt at some point once I get more comfortable with it…)

If you have questions or problems with the installation or the uploader itself, Jeffrey has a good FAQ page here that should answer most questions for you.  If not, I am sure he has an email address available somewhere for specific questions not addressed online.  For my work, I think this plugin totally rocks!  It’s going to become a staple in my work flow, and if you are into social media at all, I would highly recommend it for those purposes as well.

In talking about all of this, it bears mentioning that some of us are not fans of Flickr, Twitter, or Facebook, and while I can understand the hesitation of some, it’s really a matter of personal preference, and maximizing the time you spend on your computer.  if these outlets aren’t your cup of tea, that is totally fine.  But if you have the Flickr plugin – it is that much easier for you to participate in the Monthly Giveaways here at Canon Blogger/Learning Digital Photography!

With those thoughts, I’ll leave well enough alone as this post has gone on long enough for one day.  Happy shooting (and uploading) and we’ll see you back here again tomorrow.

Software Review: Apple iPhoto


Mac Madness (Mac Systems)

As much as we glow and sing the praises of Photoshop and Lightroom, native photo editors that are included in Operating Systems are often overlooked as alternatives for photo editing and management.  This is primarily because… well, let’s face it, because they are not very good at photo editing…or management.  But think about what we are comparing them to…comparing Windows Picture and Fax viewer to Photoshop Lightroom?  Is that really fair?  What about comparing Photoshop Creative Suite 4 to iPhoto?  Is that a good apples to apples comparison?  If you think about it – not really.  We’re talking full-fledged dedicated programs that have years of programming and design and development put into them versus an add-on component for an operating system.  It’s really an apples to oranges comparison, and as a result, the programs themsevles suffer a bad beat.

So, I decided to take a look at the native photo editors for Windows and Macintosh – those being the Windows Picture and Fax viewer and iPhoto.  Well, because Apple computers were really designed with the designer and graphics guy/gal in mind, it’s no surprise that iPhoto is more robust than its Windows counterpart.  This is not to bash the Windows Picture and Fax viewer, because it does serve a need, especially when I need to preview an image in a pinch and make some very very minor edit like a teensy crop or something.  It’s not great, but it’ll do.

For that reason, today the focus (if you’ll pardon the pun) is more on iPhoto.  Now, keep in mind, I am operating off Snow Leopard with the ’08 version of iLife here, so my iPhoto is not the latest and greatest, but the nuts and bolts are pretty much the same from what I can gather, so this review while not complete, can give a good synopsis of what works and doesn’t in iPhoto.  Let’s begin:

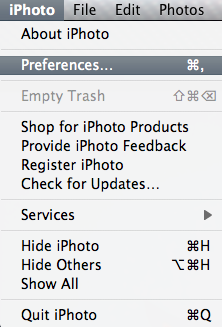
iPhoto Preferences Option

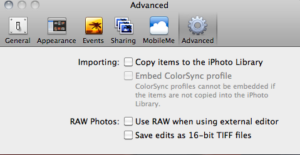
File Management:  B+ Let’s face it, we are making more and more images these days and applications need to be able to keep up.  If you don’t have some sort of back end database that can quickly render previews, without copying photos over as duplicates in low res formats that waste drive space, it’s gonna get ugly quickly.  iPhoto has the unfortunate option of copying files over on import.  While this may seem to be good for redundancy sake, since we’re all aware of the need for backups these days, but I would not recommend copying everything into iPhoto.  First off, the “copy” of your image is embedded in the iPhoto library and can only be opened in iPhoto.  If the library crashes for any reason, then those copies are gone.  I would rather have two copies accessible from any application.  Second, as your library expands, the longer it will take to load iPhoto and the more susceptible it will be to crashing.   Since this is, by design, supposed to be a “light” photo editor, you want to avoid making the footprint of the application larger than necessary.  For these reasons (and others) I would advise against copying your images into iPhoto.  To avoid this, when creating your first (or a new) library, simple click on the Preferences, then Advanced Menu options, where you can de-select the option to copy images over.


Uncheck the Copy Option


Albums and Sideshows

When it comes to managing your photos though, iPhoto rocks.  Much like Lightroom, you can build the equivalent of collections (as albums), and create slideshows from those albums.  You can also export slideshows with music which until Lightroom beta 3 was unavailable in any advanced photo editor – you needed a separate application!  Score one for the folks at Apple here!


Music in Slideshows is a Plus

Image Editing: A- Most of the basic functions are there, cropping, red-eye, image rotation, and even horizon correction.  Not much to improve upon here without entering the realm of serious photo editors, which I wouldn’t hold an OS program to…at least for now.


Editing options in iPhoto

Support:  B If your Apple product (your Macbook, iMac, or MacPro is under warranty, no problems – they got you covered.  It can include long wait times occasionally, but that’s to be expected from a company of Apple’s size.  (I know, I’ve vented about this before, but in this case, it has nothing to to with the program, because the support is there…when you can get through.)  What happens when your computer warranty ends?  So does support – it’s the nature of the beast, and support has to end eventually.  For the time being though, there is enough documentation out there on iPhoto to the point that most of us can get by with asking questions in various forums and Google research.  So, while support is not the best – it’s about an industry average, nothing to write home about, but also nothing that really garners complaints either.

There you have it, my take on the iPhoto editor.  I don’t really use it for major edits, or much more than occasional snapshots that I share on Twitter, forums, and other such venues.  Having offered up my two cents, it’s time to serve things up for the listening and reading audience.  What’s your collective take on iPhoto?  Do you like it, love it, or hate it?  Anyone using iPhoto ’08 or ’09 for managing and/or editing their photos?  What are your thoughts?  Sound off in the comments, or let me know via email.

In the meantime, that’s it for today…make sure you take a moment to get your photos into the November contest giveaway thread – there’s now less than two weeks left and the prize package is pretty cool!  The link is in the header, but here it is again for convenience:  Flickr Contest Thread Happy shooting all, and we’ll see you back here again tomorrow!


Hardware Review: Western Digital Passport Drive

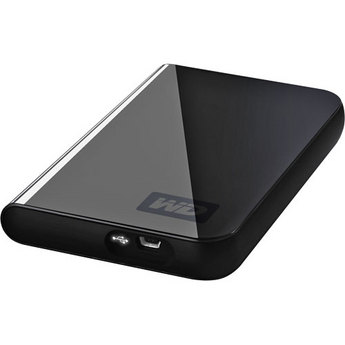
For those of you on Twitter (and following me), you know that over the weekend, my iPhoto library on the Mac was either corrupted, or somehow compromised in its integrity, because when I went to add in a few snapshots to it for sharing with the Twitter-verse, it crashed on me.  Believe it or not, I was not worried, because I had a back-up copy of all my snapshots on my Western Digital Hard Drive.  I blogged about this puppy before, in showing you how to add a second drive to your laptop in 10 easy steps.

Western Digital Passport Drive

Well, not only is the second hard drive a great way to increase the capacity of your laptop, but it also saved my bacon this weekend, because when the library was corrupted (I use the method of not importing a copy to my library and save the library on the main OS drive), it was simply a matter of creating a new library when opening iPhoto, changing the option in Preferences to not copy images in, and then sitting back and waiting the hour or so for the import to complete.

What I like about this Passport Drive though is the fact that I have dedicated storage for my photos, music, and documents independent of the OS drive.  I also can easily remove it from the laptop if needed.  Lastly, I also like it because I can expand this fairly easily.  To do that, I would just get another drive, plug it into another USB port, and simply drag-and-drop to copy to the new location.  The old primary can now be easily disconnected, become a back-up, and the new one becomes the primary.  Another great feature of these is that you can easily copy data to and from it, and with surprising ease.  I cannot verify this, but suspect that these Passport drives are solid state drives because they don’t get very hot, and it’s just been so awesome for letting my photos and music libraries expand without me thinking much about them.

The downside?  They are a little pricier than their larger drive equivalents.  With the ever-decreasing cost of storage these days though, it’s well worth the additional 20 cents per gigabyte in my opinion!  (My 320 GB was like $80 – it goes for $71 now at B&H.)  You can get these pretty much anywhere from your local Wal-Mart, to Best Buy, Newegg, B&H, and other retailers/e-tailers.

Oh, and there’s a moral to this story too:  always, always, always…back up your data! For more reviews and other information on this drive, feel free to find your favorite review resource online.  I like the ones over at TestFreaks myself (although this is a rating of the 500Gb unit), but as with any review resource, your mileage may vary.

In other blog notes of interest:

  • The Flickr contest is in its final two weeks starting today – it’s a prize package of three pretty sweet items, so be sure to get your entry(ies) in soon.  At stake is a $25 gift card to B&H, the 11th Season of Photoshop User TV, and a book from Photographer/Author, and Friend-of-the-Blog, Matthew Bamberg.  The Flickr thread is linked up at the top of the blog, but here’s a quick link for easy reference.
  • Speaking of the links at the top of the blog – you may notice that more content is being added.  The Navigation Bar is being reorganized to include more “About” pages, Archives, My Gear, and much more.  Feel free to peruse those at your leisure.  More content is coming soon too, so don’t just be checking things out in your RSS feeds – lots of content is available directly from the blog!
  • Congrats to Mary Angelini as well for her witty comment from the Scott Kelby book giveaway  –  stop by her site for a good set of photo galleries to peruse too (and to congratulate her).

That’s it for today…happy shooting and we’ll see you back here again tomorrow.

Useful Resource

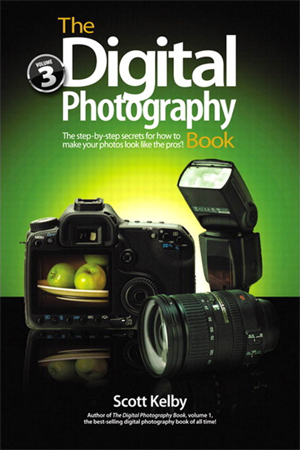
In the interests of giving people enough time to participate, here is the awaited review of Scott Kelby’s Digital Photography Book, Volume 3.  To be eligible to win this book, simply comment on this post – you have until Friday to make a comment – the winner will be announced then.  One entry only per person, and free shipping to anywhere in the US.  If you live outside the US you can still participate, but shipping won’t be free.  Details to follow for the winner…  Good luck all and thanks to those at NAPP and Kelby Media for sending the book out (little did they know I’d be turning around and giving it away again).  So, ready for the “review”?  Here goes:

Scott Kelby's Digital Photography Book, Vol. 3

The relatively recent release of Scott Kelby’s latest book on photography has met well with readers and reviewers so when I got an opportunity to read through it in some detail, figured this would be a good time to give a Canon-centric rundown.

First off, the book is interestingly organized.  Scott’s impressive background with Photoshop has lent itself well toward his particular writing style in that a work flow of sorts can be how reading material is organized.  With photography, a “work flow” is not as easy to adhere to because things will vary from one type of environment to another.  There are some basics that will be the same across the board, and given the layout of this third volume, I am guessing he found a flow for the first book or two.  For this third book though, it’s not typical “Kelby-esque” style writing.  Sure, the wit still comes through, and for those accustomed to his writing style, this is a welcome element.  The flow aspect being different though, takes some adjusting.  To that end, here’s how the book is laid out in its chapter organization:

  1. Flash Tips
  2. Studio Tips
  3. Lens Tips
  4. Product Photography
  5. Outdoor Photography
  6. Portrait Photography
  7. Sports Photography
  8. General Photo Tips
  9. Avoiding/Dealing with Problems

Because in previous works, I have been accustomed to reading something like a story as things easily transition from one element to the next, this was a bit more challenging at first.  Once I made the shift to this new style, it became easier – so, my recommendation, read this book more as a quick reference guide.  The tips, tricks, and pointers he gives on all subjects are spot on for the specific subject matter.  The content shifts quickly though with each tip lasting about a page (and this includes graphics).

When all is said and done though, would I recommend this as a book to read?  I can honestly say that though I’ve probably advanced past his introductory books, this is definitely a keeper.  Not only are there some great tips in here, but they aren’t just cheesy ones like “Don’t forget to take your lens cap off…”  These are real tips, true gristle that you can sink your teeth into.  Want to know how to use mirrors?  Scott tells you!  How about what to do if your flash isn’t bright enough?  Scott tells you!  There’s even nuts and bolts info on things like how to get specific effects with your photography in all genres of work.  I think what I like best is that he actually goes through some of the specifics for both Nikon (his camera gear of choice) and Canon equivalents, for camera and lighting settings.  This way no one is left out (unless you shoot Pentax, but then even there, the tips for photography still apply.)

The last element I think is worth mentioning is that while this book is not complete on any given subject matter, that it is still a good choice  because now you aren’t trying to get everything out of one book – you get nuggets and tricks and tools for any genre that can help you.  Even if you knew  everything in this book at one point in time, it would still be useful because we all need reminders every once and a while, so this is one to be sure to hold on to.  Scott gives enough detail to get you started in whatever field interests you – or even enough to take you from beginner to serious hobbyist, or even to maintain your skills as a general reference guide.  Is it too late?   Can I retract the “Comment Contest” and keep the book?  No worries – out it goes for some lucky reader.

I do feel that I should give some fair warning here though – this book is not for beginners.  If you’ve got a few things down, some of the basics of gear and lighting, and known your rules of composition, then yes, jump right in, the water is warm.  If the terms I just mentioned are somewhat new or you are still getting them down pat – you might want to start with his Volume 1 or Volume 2 book (or even just keep reading the blogs – I know a few good ones! 🙂 )

So, there you have it – thanks to Scott for putting out yet another must-read book (what’s he at, like 60 books now?).  Thanks also to Kelby media for sending this one out – I wasn’t sure if it would come or not.  And lastly, now it’s time to share your thoughts…did you like it?  Did it stink?  Needed more?  Needed less?  About right?  Should he switch to Canon and leave the Nikonians behind?  (Ok, just kidding on that last one…)  But sound off – this is your chance to win the book for free!

Happy shooting all, and thanks in advance for all that stop in to comment – don’t forget the month long contest going on over at Flickr to win a bunch of prizes including some more stuff from NAPP.  It’s in the Flickr tab up at the top, but I’ll link here again for convenience sake!  We’ll see you back here again tomorrow!

Let Me Light the Way

It’s kind of funny how things go in circles.  As a regular reader of the Strobist website (as I am sure many of you are), I found it interesting that David was covering the RayFlash from ExpoImaging and comparing it to other styles of ringflahses over the last couple of days.  The reason for my interest – today I am actually going to share with you some thoughts on the RayFlash specifically. Continue reading “Let Me Light the Way”

Got an App for That?

Since the next hardware review item as not arrived yet, today’s post is something of a blog announcement about a new feature I’ll be rolling out here shortly.  As you can tell from the title, it’s about applications on the iTunes store.  For users of the iPhone and iTouch, applications can be pretty handy tools (and diversionary too if you’re not careful!)

Well, as you may recall, a while back during the “Comment Contest” I asked people to contribute their favorite iPhone/iPod photography-related applications.  While the iTouch has not been fully capable of testing each of these, I’ve tried most of them and am putting together a new set of posts (don’t ask me where it’s going to go, because I am starting to run out of days in the week!) to cover the latest in Photography applications for those on the go.  So, for today, I am going to do the first application review:

Photoshop.com Mobile Application

In doing so, I figured it would be best to start at home – and by that I don’t mean here at the blog (although it would be kinda cool to develop an application where you could submit photos to the Canon Blogger critique threads and contest threads straight from your iPhone!).  No, I mean starting with the source – the editor we all know and either love or hate – Photoshop!  Believe it or not, the folks at Adobe have come out with a cool little application that you can connect to via your iPod or iTouch through a web interface at www.Photoshop.com

Here’s what it does – it allows you to store your photos online, edit, and share them with family and friends, create photo albums, and galleries.   Now before someone chimes in and says “Flickr already does that”, I will concur that Flickr is probably not going to be de-throned in the online photo sharing space any time soon.  But here’s a couple cool things that you get on Photoshop.com’s site that you don’t get on Flickr.

  • You can customize your background
  • You get more storage (2GB free)
  • More scalable service (it’s not just free and pro, there are different scales of services for whatever needs you may have)
  • You can link Photoshop.com to your Flickr account (but not vice versa)

So, it’s kind of a cool little service.  What I like about it is that the interface is much more conducive to sharing photos on the go.  For those of us with limited storage on our mobiles, it’s nice to be able to just log in to a web interface and share 2 GB worth of photos and have it look both classy and professional (sorry Flickr, but your interface needs an update…).

It’s free to join (you do need an Adobe Account though – also free), and can register a personal web space as well.  I’ve already done so, and you are welcome to view my account thus far at http://canonblogger.photoshop.com as I explore this some more to see what else is there to do.  You can create your own account at the main page of www.photoshop.com, and upload/share photos and videos in as little as five minutes too.  Some other applications I am taking a look at include HDR for Free, iHandy Level, and of course, the uploader applications for things like Flickr and Twitpic.  Some games have made their way into my iTouch (don’t know how that happened! 🙂 ), I’ll try to keep those out of the blog and keep things photo-centered.

If this topic takes traction, and people express enough interest in it, then be sure to stay tuned for future reviews and write-ups on iPhone and iTouch applications.  In the meantime – if you’ve got an application that you think is the bee’s knees, then feel free to share it here.  Suggestions for applications?  Share those too – I’d love to hear everyone’s thoughts.  As Apple is prone to say, I am prone to ask – “Got an App for that?”  Ask here and I will do what I can to find out and review for you!  Happy shooting all, and don’t forget to upload your photos for the October contest over on Flickr. The theme is FALL and it’s sure to be a good one – 3 pics a piece, and it’s underway right now.  Happy shooting and we’ll see you back here again tomorrow!

In the interests of full disclosure…

It recently came to my attention that the FTC commission has taken an interest in the reviews that bloggers provide as unbiased information on the products.  I guess this came about due to some people that gave reviews of products that were actually paid endorsements, and did not disclose this information to their readership.  The FTC is now apparently requiring that all reviewers release and disclose their relationship with the vendors of the products for which they are reviewing by December 1st.

So, in the interests of full disclosure, I have compiled a page to disclose exactly what I get for the review of products written here.  As most of you are already aware, the answer to that is nothing, with a few notable exceptions.  The products that I have reviewed here on the blog are entirely done via donations from vendors (where the products are then put up for giveaways in the monthly contests), or on loaner programs where the products are reviewed and then returned to the company.  The rest of the products I have reviewed are of my own gear which I have already purchased with my own money!

For those interested in viewing the page, it’s titled “Supporters of the Blog and Podcast and is displayed in the sidebar.

*****

Okay, with the legalities out of the way, just a couple other blog maintenance things to mention:

  • The next podcast is going live tomorrow!
  • The latest contest is underway over at Flickr (you can win a free copy of Noise Ninja from PictureCode – the theme this month is Fall)
  • The 2nd issue of the monthly newsletter is also under construction, so if you are interested in being a featured artist, let me know!

Wow – what a bunch of “official” sounding stuff – so unlike me!  Let’s change that up – share with me your thoughts on the FTC position.  Do you like it?  Agree?  Disagree?  Think they are off their rocker?  Call me the fence sitter, but I can see why they are doing it, but I think they’ve taken it too far.  What do you think?  Got any of your own bureaucratic wonders to share?  Sound off  – maybe if we get enough feedback saying that no one likes it, they will reconsider their position on “all bloggers”! 🙂  (Kind of like “rocking the vote”!)

Anyway, that’s about it for today, so Happy Shooting and we’ll see you back here again tomorrow!

Hardware Review: XRite Colorimeter

Eventually you knew it was coming – the subject of color management.  Now before you mosey along, or your eyes glaze over, rest assured, this is not going to be the typical discussion of color management.  I am not going to talk about LAB color vs CMYK, vs RGB, or anything like that.  And even though the term “colorimeter” may sound like something Marvin the Martian was going to use to destroy Earth in the classic Bugs Bunny cartoon (that was the Illudium Q-36 Explosive Space Modulator), there is nothing overly scientific in today’s post.

Well, that’s not entirely true – it is scientific, but I certainly will not portray to understand any of that.  Instead, I am going to show you how easy it is to calibrate your monitor using this device.  Now I am looking specifically at the one from X-Rite (I own the Gretag Macbeth version from before X-Rite bought them), but color management has become as easy as a couple of mouse-clicks these days.  So, you don’t have to know anything about color gamuts, RGB, CMYK, LAB, or anything like that to know you are getting color accurate images.  Check it out…

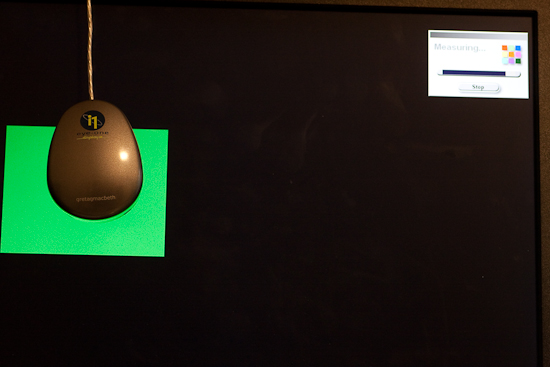
After installing the software from the CD, simply connect the device and start the software.  The device is the colorimeter (also known as a calibrator in some circles), and it is shaped like a computer mouse or a hockey puck.  It has a cable that connects it to your computer via USB, and is good for either CRT, LCD, or laptop displays.  Additional software components also enable you to calibrate things like projectors, scanners, and much more.  Here though, I’ll be showing you how it works with a computer monitor.

Once the puck is connected and placed on the monitor, simply go through the wizard to calibrate everything from Contrast, to Brightness, and your RGB colors.  It’s pretty straightforward…just open the display settings for your particular monitor type, and increase or decrease the values until the indicator is as close to center as you can get it.  You’ll notice that I am calibrating a Dell computer monitor, and it is a Windows-based computer, but the process is just as simple on a Mac.  (I just got my Windows notification though, so figured it’d be easier to kill 2 birds with one stone there.)

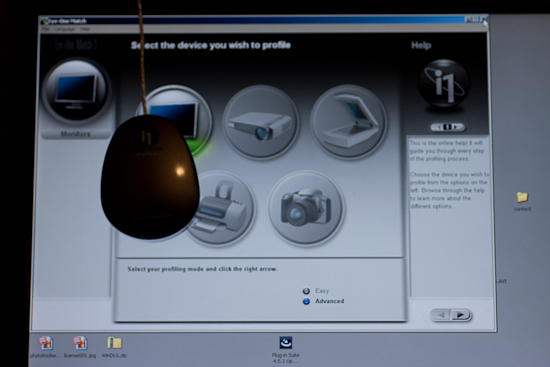
Here’s a couple of screen shots to give you an idea of the process.  The first step when launching the software is to specify your white point and monitor type (if you are calibrating a laptop, pick the LCD).  Next up, decide whether you want to go the easy route or the advanced route.  I would recommend the advanced route, as even that is very easily accomplished, and these are the screen captures I am using here:

CRT or LCD
CRT or LCD

Next up is the screen capture of the contrast display.  In the upper left, the software shows the current contrast setting compared to the desired setting.  On the left is the colorimeter.  The Brightness (or Luminance) window is pretty much the same layout, so I am not going to repeat the screen capture here.

Calibrating the Contrast

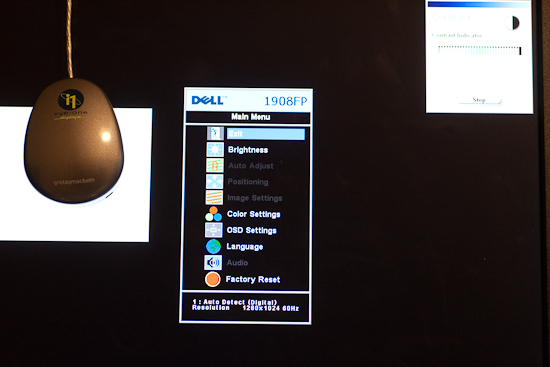
Here’s a screen capture of the first stage in setting the color values for my Dell 19″ LCD.  The software readout is on the upper right, the colorimeter is on the left, and dead center is the display menu for the Dell monitor.

Calibrating the Color

Once your contrast, brightness, and color settings are defined for the monitor you are using, the software will run through and configure the graphics card, monitor, and display output settings.

Calibrating the Color 2

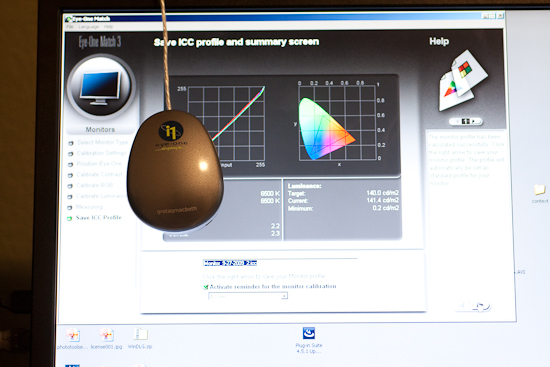
Once all the settings are complete, a profile is creating in your system folder.  For Windows, that is in the system32 folder.  You can give it a specific name, and set the schedule on which you will be reminded for a new profile to be built anywhere between 1-4 weeks…more on this in a minute.

Setting the Monitor Profile

As you can see, it is as straightforward and simple as can be – even on the advanced settings where I defined the color (RGB) settings.  So, why doesn’t everyone do this?  Good question!  This device cost me roughly $200, which is likely not cheap by average standards for equipment (especially that which cannot be attached to your camera!), but if you really want to get quality results, the price is minimal.  I have mine set to update every 2 weeks (my LCD display has a tendency to shift colors easily, and LCD’s in general are known for color shift especially as they get warm and cool down when turned on and off.)  The benefits are huge though as your prints will be more accurate whether you print at a lab or print at home.  In the case of the former, no color correction is needed (and if you use MPIX Pro, there is no color correction done), and in the case of the latter, you will use less ink and paper in test runs before getting the results you want.

Keep in mind that this is just the procedure using the X-Rite, and I am sure others could just as easily recommend the Spyder Pro series, or some other colorimeter.  With that in mind, if you have an inkling one way or another, feel free to share your own experiences in the comments.  Which colorimeter do you use?  Do you like it?  Not so much?  What do you like/dislike about the process?

Whether you like the X-Rite method though, or some other model – calibrating your monitor is an important part of working with a color managed work flow if you want to produce accurate and quality prints.  After all, it is still about the print.  Don’t forget to share your thoughts in the comments!  Until tomorrow, happy shooting and we’ll see you then!