Adobe CS5 FAQ

Ever since Adobe announced the impending release of the latest Creative Suite 5, there have been many questions circulating in various online communities and outlets.  Although I was not one of the beta testers, I’ve been following the developments rather closely, and have seen a lot of questions repeated over and over.  Many of the answers to these questions I’ve put together from reading various reliable outlets, including Adobe web pages, reading content from Adobe folks blogs, and from the fountain of information available to me as a NAPP member (and if you’re not a NAPP member, you should consider becoming one – it’s probably one of the best deals out there, including educational materials, discounts, and a ton of other member benefits)!

So, without further ado – here’s the most common questions I’ve seen on Adobe Creative Suite 5:

1.  I own  ***** – can I upgrade to CS5?

Pick your product, it doesn’t really matter too much if it’s a single product upgrade (not part of a suite).  If you want to upgrade  to Photoshop, CS5, here’s the list of products that are eligible for the upgrade path to CS5, courtesy of Adobe (I added the product to my shopping cart, and got this list of eligible products and the pricing path (upsell versus an upgrade):

  • Photoshop Elements 6, 7, or 8 on Windows – (upsell = $599)
  • Photoshop Elements 4, 6, or 8 on Mac  – (upsell = $599)
  • Photoshop CS4, CS3, or CS2 (Regular or Extended) – upgrade = $199

2.  What if I purchased CS4 recently – do I have to pay for the upgrade to CS5 now too?

While there is no official “window” from Adobe, all indicators suggest that if you have recently purchased CS4, you may be able to get an upgrade.  Some sites claim the window is between certain dates such as April 12th and August 10th, but I’ve not been able to verify this information independently so the site is not linked here

3.  What about Lightroom – can I upgrade to Cs5 from that since it’s part of the Adobe Photoshop family?

No.  Although there are similarities, Lightroom is a different software path than the Creative Suite, and you cannot upgrade from LR to CS5 anymore than you could upgrade a Dell to a Mac

4.  Speaking of Macs, can I upgrade my Windows software to a Mac equivalent or vice versa?

Adobe does allow for this in what is called a “cross-grade”.  You must sign a release that states you have destroyed the other media, and pay a small fee (I think it’s something like $20) to do this.

5.  What about converting from one Suite of products to another, or converting to a single product?

While I don’t have the space to cover extensive details on the many options, and this is not official Adobe policy (I could not find anything specifically addressing all the possible conversions), I think it’s a safe assumption that you can downgrade from a more expensive suite to a lesser expensive suite or product, but not vice versa.  So, say for instance you had the Master collection.  It is likely that you could downgrade that to a web collection or a design premium.  It is also likely that if you had a suite of products, you could downgrade to a single product within that suite.  However, adding additional products to your existing ownership for free is not likely.  As the old saying goes, “there’s no such thing as a free lunch.”

6.  Are there any discounts available?

Of course there are – and if you are an eligible member of any one of a number of communities, you are eligible for discounts on products from Adobe.  The most common ones I know of include educational discounts, governmental agencies, and NAPP.  The other question that usually arises from the “discount” one is whether you can apply multiple discounts, and the answer here is no…Adobe does restrict you to one discount per purchase, so if you are a NAPP member and also a teacher or college student, you cannot apply both discounts.  Pick the one that gives you the best savings, and be happy to are eligible – many people are not.

7.  So, where do I purchase CS5?

You can’t yet – the announcement that Adobe made was kind of a teaser, to build excitement and to sort of “ramp up” for the eventual release date.  It’s all part of the marketing, hype, and advertising of upcoming products.   Also, keep in mind that Adobe, like any other software developer, has approved channels for distribution.  So, when it does become available, make sure you find a reseller in your area through their partner page.

8.  When will it be available for purchase?

Well, you can pre-order it any time you want.  But if you want an official release date, take a seat with everyone else outside of Adobe headquarters, because that information is not available (that I can find anyway).  There are several indicators that suggest the release will be in early to mid-May based on their history (Adobe usually does product releases on about an 18 month cycle, or ever year and a half) with the Creative Suite of products.

9.  What are the differences in all the packages?

Excellent question!  This is the one that vexes a lot of people, but thankfully, Adobe has put together a comparision page that not only show syou the products that go into each package, but the retail cost of each.  Rather than regurgitate all that information here in some confusing chart, simply bookmark this link:  Adobe Product Comparison Chart

10.  Are you going to upgrade?

Yes I am.  I will probably not be an early adopter, primarily because I have a couple other purchases to make first (hardware, a lens, and some lighting gear), but the advancements in CS5 are probably among the most significant of any version in the last 7 years!  I may also need to upgrade my computers to handle the  processing requirements.

That’s it – the top ten questions I’ve seen (and been asked) about Creative Suite 5!  Got your own questions?  I may not have the answers, but I can either give you my best guess, or pass the question on to someone who may know the answer, so feel free to sound off in the comments.  Also, if I got anything wrong, or if you can shed additional light, all contributions are welcome!

Happy shooting all and we’ll see you back here again tomorrow!

Accidentally interesting

Last night I was working on a deadline for the PhotographyBB March Magazine issue (check for that to come out shortly – another couple weeks), and found myself trolling through my archives of images searching for examples to help illustrate my point.  I came across a shoot I did solo a while back where I was down in South Carolina.  I was on a dock trying to catch the fading sun to the west, and catching your stereotypical sunsets in SC isn’t easy because there’s too much LAND in the way…not enough water!

This was actually where I first learned the value of checking your entire surroundings because sometimes the best shot may be behind you.  I turned around and caught this image:

Plain Boathouse

Nice enough, but not really something I wanted to include in a portfolio of sorts to include in the now well-known PhotographyBB Magazine!  Then I noticed something…apparently I had tried multiple exposure settings while on a tripod…I was bracketing!  I had the same f-stop, same ISO, but the shutter speed was changing.  Back then I was shooting with my venerable XT (now sold), and the whole idea of bracketing and even HDR was just not even close to being on my radar.  Yet here I am now years later, trolling through archives with an opportunity to go back in time.

So, I pulled the 4 or 5 images together, cobbled them over to Photomatix and ran some tone mapping (didn’t even look at the settings, just was testing a whim to see if it would produce anything).  Well, let’s just say it was…interesting.  It clearly showed my sensor was absolutely filthy (sky splotches everywhere), and I clearly hadn’t learned the fine tuning of checking the edges or even cutting off important lines (like ship masts) from the composition.  Nevertheless, the result was…accidentally interesting.  I’ll leave it to you to judge:

SC Boathouse

Ammo in the armaments

Last night the DALPUG (Denver Area Lightroom Users Group) had their bi-monthly meeting and host Brian Reyman walked us through some of the features of the Lightroom 3 Beta.  It was a gret seminar and offered an opportunity for many to get an idea of what to expect.  I had not realized that there are many work flow options out there because when queried, the audience responded with quite the variety of software approaches.  We didn’t officially count votes, but it seemed roughly along these lines:

40% Lightroom 2

40% Photoshop CS (no query here on version #)

10% Aperture

10% Elements or some other platform, including GIMP, Corel, and others…

If you think about it – the first software platform you learn for editing photos is usually the one where you really cut your teeth, grind your fingers to the bones, and once you know it, you just know it.  So, for a new software application to come out and challenge the fact that you have this established work flow, suggesting that there is a better way can often be both disheartening and somewhat defeating.  After all, some of us can even remember dodging and burning negatives in a dark room not too long ago.

It was quite an epiphany though to see people from such a wide variety of backgrounds – some younger than me (in their 20’s), many in my age range (30’s – 40’s), and others even senior to me (50’s and up) coming out to learn about this new-fangled technology of Lightroom 3.

What it brought to mind for me was a fundamental dichotomy in the way photography has transformed us.  We have learned so much and in such a little time frame, yet there are always barriers to learning more, not the least of which is our own prejudices.  We learn something, we know something inside and out, and then something new comes along that changes the paradigm.  It’s no wonder there is still so much confusion over what “the best” way to work through images is.

One the one hand, if you have a flow, and it works – why change something that does what you want it to do, and it’s something you not only know, but are reasonably good at?  Meanwhile, on the other – what if you are spending countless hours doing something much slower than you wish it could be and this new carrot is being dangled?  Do you stick to your guns or do you lay that gun down and find a new one that fires better?

It’s a struggle to be sure, and while sticking to your guns can be a good thing in the face of a changing technology, for those of us that stick too long, we can ultimately find ourselves actually staring down the barrel of a gun.  It’s all ammo in the armaments and the important lesson I learned is that while the principles may not change the tools to flex those principles are always changing.

So, the answer for me is to stick to my guns in principle, but be ready for a new rifle and prepare to adapt to meet the needs of that new tool, because odds are, the new one will ultimately do it better, faster, and cleaner than anything that came before it….eventually!

Sort of a philosophical musing for today, but nonetheless one I wanted to share, and hopefully get some feedback on.  Are you an early adopter?  Do you come out guns blazing with new technology whenever it becomes available, or do you stick with the rounds that you know how to fire until the proven replacement has been demonstrated and taught?  Sound off in the comments, and come on back tomorrow for yet another round! 🙂

Borders and Logos, it's Photoshop, Oh My!

That’s right, we’re back to a photoshop tip again on the blog, and this one comes courtesy of question I read in the NAPP community forums.  The person there had asked about pricing on some photography for a large company’s set of employee photos and his concern was about the post production time in creating the border and logo that the company wanted on each.

The community quickly sprung to action, pointing him in several directions, and it occurred to me that I had never done this sort of tutorial before!  It’s not too difficult but there are some pitfalls to be aware of when dealing with borders and logos in photos, especially if you are trying to program these steps into an action or script.  Suffice to say, I figured this was as good a time as any to jump back into Photoshop and keep the digits (and brain) fresh!  So, here’s a new video tutorial on creating borders and logos!  Enjoy!

Your thoughts and feedback are welcome and encouraged as always!  Thanks for stopping in, have a great week, and be sure to stop back in tomorrow for more photo goodness!  Oh yeah, and don’t forget the March contest is in full swing where the winner will go home with one of these super cool Cheetah Quickstands – the theme is wild and the link for submissions is here!  Happy shooting and we’ll see you tomorrow!

[display_podcast]

Against my better judgement…

For those of you that have been following the blog for a long time (and let me know who you are, because I want to ask why!), you may recall that I used to put out video tutorials on how to do various things inside of Photoshop. After plodding around with that for a while, I came across the gurus of NAPP and realized that several were already doing it, and doing it much better than I ever could.  So, rather than re-inventing the wheel, I abandoned the video tutorials in favor of just sharing my “wisdom” in the form of the written word (blog posts and articles) and audio tips (which are now part of the Learning Digital Photography podcast).

Well, when I recently twittered with excitement over the newly released calendar of some of my favorite images for 2010, someone asked me about the template I used to create those images.  I honestly answered that I didn’t really use a template as the website www.lulu.com just let me upload the images and they handled the rest.  On realizing that they were talking about the images on my Photography Website, I recalled that a template was used for those images.  I could have done a written post about this, but those take a lot of time to put together (lots of screen grabs, lots of writing, and lots of uploading), so I instead decided to put together a new video on how to create a template for your photos inside of Photoshop.  The video may take some time to load, so please be patient as this is a self-hosted video production! 🙂

[display_podcast]

Keep in mind – this is just one way – in Photoshop there are always many ways to reach similar results, and as the old adage says, there’s more than one way to skin a cat!  Anyway, this is for you @mitz!  Enjoy, happy shooting, and we’ll see you back here tomorrow!  Oh, and lest we forget, there are very few days left in the January giveaway!  For your chance to win a free copy of Photomatix Pro from the folks at HDR Soft, get your Circle-themed photos in the Flickr Contest Thread by midnight on Friday (Mountain Time – GMT-7).

P.S.  For those that like my videos and want to see the archives, check out the Learning Resource Page from the sidebar for more materials.  And as an additional side note, this is post #600.  No fuss, no muss, no fanfare, but yet somehow I landed back on video tutorials – which is kind of how it all started!  Somehow, ,ind of poetic, eh? 🙂

Photoshop Teaser…

The Denver Area Lightroom Users Group (DALPUG) had their bi-monthly meeting tonight, and it was a lot of fun.  Brian Reyman (the leader) gave some great insights on digital asset management and some really cool Lightroom and Photoshop tips and tricks.  He reminded me that it’s been a while since I’ve played in Photoshop, or done tutorials here on the blog for that matter.

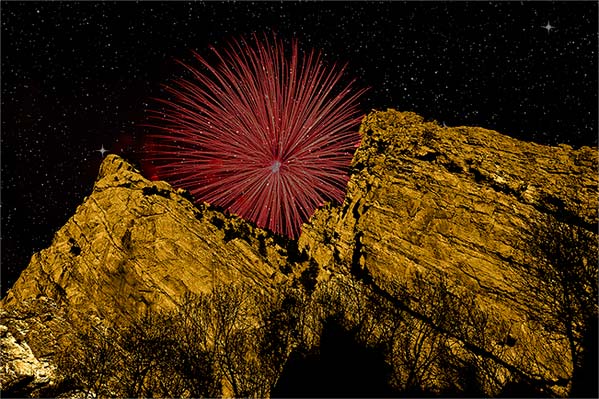
So, in the interests of putting some sort of creative graphic design effect together, I started playing around in Photoshop when I got home with a few different tools, effects, and all that fun stuff.  When all was said and done, the effect of all of this playing produced something that I thought would be worthy of a Photoshop tutorial.  However, I did run out of time to put all the screen shots and steps together for a blog post, so here is a teaser of what you might be seeing later this week!

The End Result

Rocky Mountain Fireworks

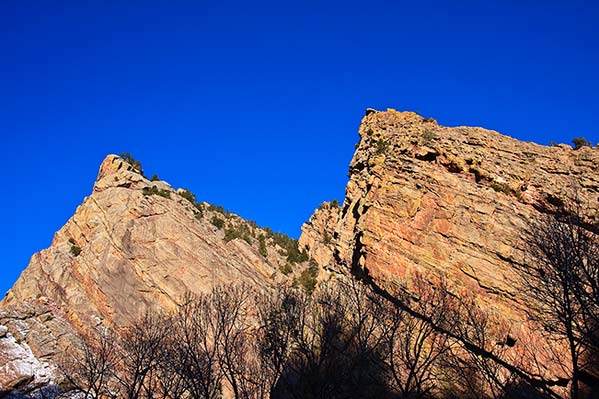
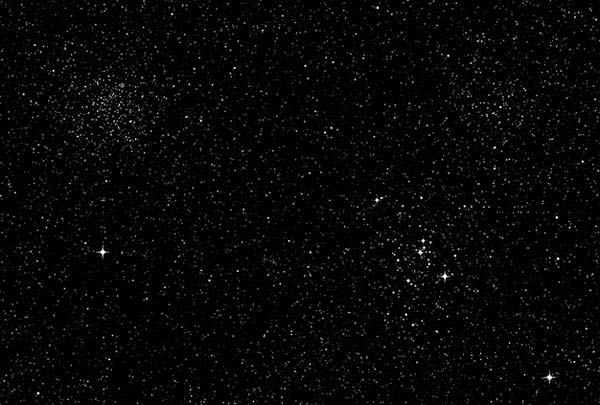
The ones that got me there…

Mountains

Fireworks

Starfield

The final result is a little surreal, but using the various effects were fun.  It also took some rather plain photos and turned them into…well, something not so plain!  🙂 When’s the last time you played in Photoshop?  Can you identify the effects used here?  Share your own pictures in the comments (remember, we have image upload now!), as well as any thoughts and or feedback.

Special thanks and shout outs to Brian for hosting the DALPUG meetings and for encouraging our creativity- he puts a lot of time and effort into these and it shows!

Only a couple blog notes for today, first that the Monthly Giveaway only has a limited amount of time left for submissions, so make sure you submit your Circles themed photos to the Flickr thread before the deadline!  Happy shooting and we’ll see you back here again tomorrow for more creative encouragement!

I’m dreaming of an HDR Christmas

Last night I got the bug to try something I’d seen before – the classic Christmas-y look with a score of music and a shallow depth of field.  It was straightforward enough and after putting a piece of sheet music on the piano, and trying it that way, wasn’t getting the drop off in depth-of -field as I had hoped for.  So, I took a different approach and put the music sheet flat on a table, knowing the dof would drop off that way, with the foreground out of focus and receding off in the background too.

So, the second one came out okay, but the plain background of the table didn’t really work all that well…it needed something else – Christmas lights!  So, I got an extra garland that wasn’t used in the house and threw that down, encircling the paper.  But something was still missing…a little color.  What goes with green and white?  Red!  Enter a blanket strategically placed underneath it all to add a touch of color.  So, took a few shots, and liked it, but the shadows seemed kind of muted, and the lights were getting a little blown out.  Hmmm…could I be dreaming of an HDR Christmas?

An HDR Christmas
An HDR Christmas

The fact that the little star burst off the one light happened was purely incidental, but I think helped the overall composition.  How about the reading audience?  What are your thoughts?  Does it work?  Need something else?  What about your own holiday-themed work?  Feel free to share thoughts, feedback, samples and such in the comments!

In other Friday news, CB now has a Facebook fan page, so if you get a minute – stop by the Facebook page and sign up.  I’ll be sharing more photos, tips, tricks, and such there in the weeks to come as well, and you won’t know unless you’re a “fan”!  For those of you getting your news from the feed, the direct link to the Facebook page is here.

Don’t forget, the December Giveaway is also still underway – over $400 of super cool prizes including software, books, prints, and papers!  Just a cornucopia of prizes, all waiting to be given away for free! Just enter your photo at the Flickr thread:  December Giveaway. The theme this month is GIVING. Interpret however you like and good luck to all.  The rest of the contest details are here.

That’s about it for this Friday – have a great weekend everyone! Going on a sunrise shoot in the mountains tomorrow wit the Meetup group here in Denver, so it is going to be an early riser for me tomorrow.  Start time of 4am!  More on that next week!  Happy shooting and we’ll see you back here on Monday!

DALPUG

Denver Adobe Lightroom & Photoshop Users Group

No, this isn’t spam, the blog has not been hacked, and I am not speaking in tongues here.  DALPUG refers to the Denver Adobe Lightroom & Photoshop Users Group.  Started relatively recently by a guy I know named Brian Reyman, it’s a great local resource for photographers to not only learn from one another, but also to network and get an opportunity to see some of the latest developments in the industry.

I had a chance to attend the meeting last night, and the mini-workshop that Brian ran on plugins included quick looks at things like OnOne Software, Topaz Labs, Nik, and a bunch of others.  Not only were they showing you how to use the plugins, they were offering up giveaways too!  It’s a great group, offering people opportunities to learn, share, and network with others in the field in the area.  Definitely worthy of a diversion from the regular blog schedule to give some shout outs here today.

I’ve also learned that these sorts of groups are all over the place – Adobe sponsors user groups across the globe!  So, here’s a chance to sprad the word about your area groups.  Got one you know about?  Attend any regularly?  Let me know here in the comments and link to your website or user group site so people can find you!

Short but sweet, so keep on shooting and we’ll see you back here again tomorrow!

Software Review: Noise Ninja

With the October Contest underway where the winner will walk away with a fully licensed copy of Noise Ninja, courtesy of the folks at PictureCode, today is a great day to give everyone an idea of what makes this program one of the industry leaders.  Since I have talked about the presence of noise in your images before (read that post here), re-hashing the principles of what introduces noise and the artistic benefits and image quality downsides of it in your images isn’t really needed.

Instead, here I will simply share some of the interface, and a few before and after shots here so you can get an idea of how well this software handles noise in your images.  So, enjoy!

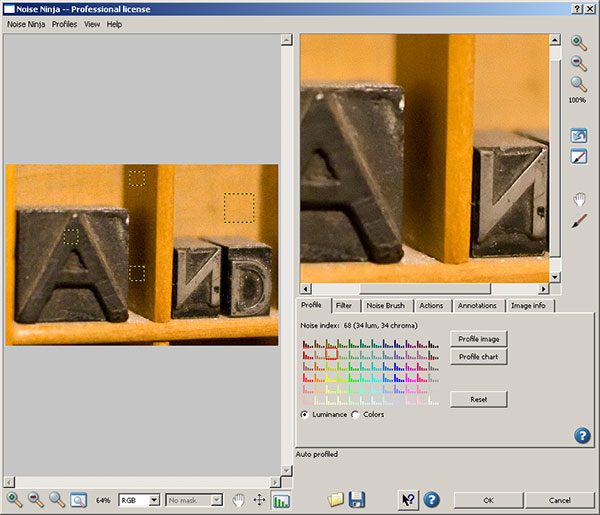
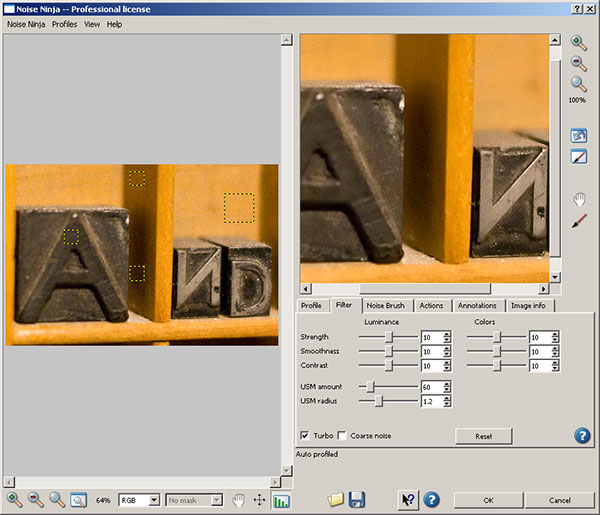
First up (after entering your license code), you’ll have a screen that looks like this:

Noise Ninja
Noise Ninja

You can see the yellow squares in the image on the right that shows the sections scanned to determine the noise profile for the image selected.  On the right, a closer view of what the image will look like (or at least a close approximation) after the noise reduction is run.  You see how you can make certain adjustments on one of several tabs.  On this main tab, you can see the options for Image Profile, Profile Chart and radio buttons for luminance and color values, along with the reset option.  I actually leave these alone most of the time.

On the second tab is where I vary my noise reduction adjustments (and I would venture to guess most people make their valuation adjustments based on the image used).  Here’s the options available to you:

Noise Ninja
Noise Ninja

You can see here that many more detailed adjustments can be made to the strength, smoothness, contrast, USM amount, radius, color noise, and then checking whether you want the processing done quickly (turbo) and applying the settings to coarse noise situations.  I made my adjustments to 12 for the strength, smoothness and contrast (and typically use these ones for most images with noise).

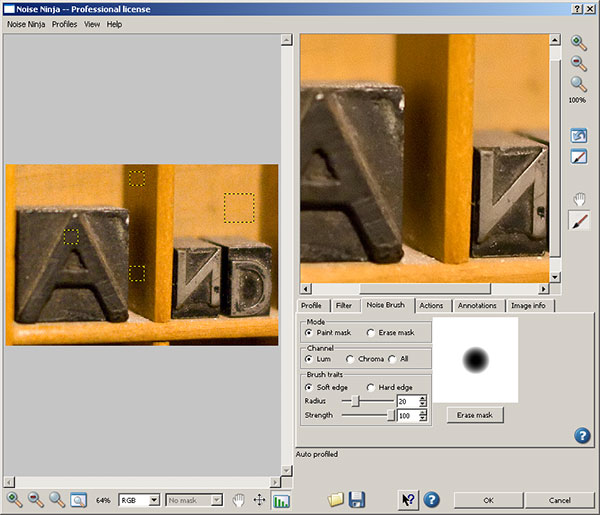
In the next tab, as shown below, you can see the noise brush, where you can apply the noise on a paint mask or an erase mask, specify the channel (luminance, chroma, or all) ad the quality of the brush trail by not only the type of edge, but also by radius and strength.  (This is very handy if you want the noise reduction faded across the image so as to leave some noise behind for artistic effect!  Normally I don’t make adjustments here either – but it is fun to play!)  Take a look at the interface:

Noise Brush
Noise Brush

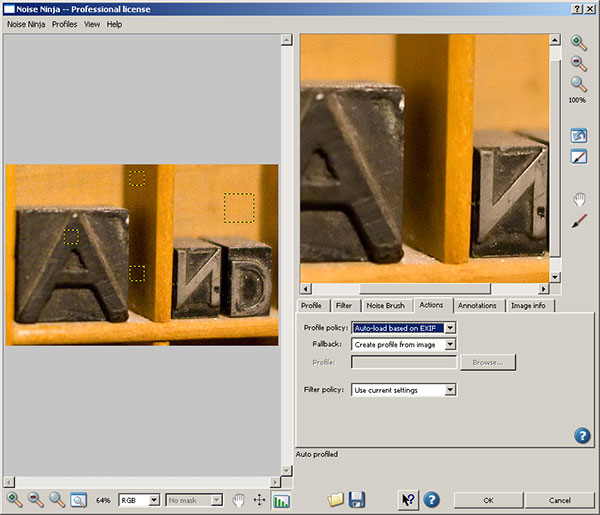
The Actions tab, as shown next, defines how Noise Ninja operates when it’s loaded.  Specifically, here is where you can tell NN wither the profile is by default configured based on EXIF data or to create a profile from the image, or to use a specific profile. This can be very handy as well if you are batch processing a lot of photos that were shot under the same or similar circumstances so that a profile doesn’t have to be loaded each and every time.  The fallback, and filter policies can also be defined here as well.  Here typically I leave the default settings alone as I prefer not to batch profess since my type of work is more geared toward fine art and individual edits rather than massive quantities.  To each their own I guess – take a look at the interface:

Noise Ninja Actions
Noise Ninja Actions

The next tab is the annotations tab.  I almost never use this, as this is a place where you can add additional EXIF and metadata.  Since I prefer to take the values from camera rather than adding my own specific notations, this tab doesn’t get any use from me – but it can be handy if you want to vary settings based on things like manufacturer, Model, FIlm type Megapixel count, ISO level, etc.  A second tab lets you add even more…see the interface captures below for reference.   Noise Ninja to me is isn’t about editing exif data though – it’s about noise reduction, so I skip these tabs.  Take your pick:

Noise Ninja Annotations Tab
Noise Ninja Annotations Tab 2

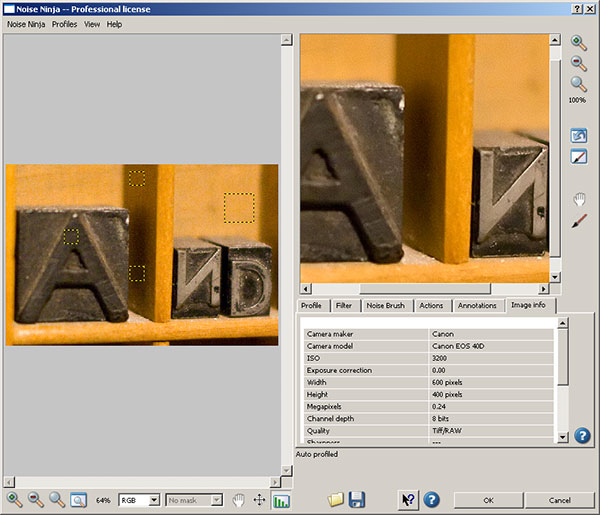
I do occasionally reference the Image Info tab though, because some useful information can be obtained there as well.  Things like the manufacturer, model, and more specifically, the ISO setting at which the image was taken.  ISO settings can be an indication on the amount of noise that was introduced due to camera settings and thus, how much can be reasonably applied.

Noise Ninja Image Info

You can see that my first image, shot at ISO 3200, was subject to some pretty intense noise on the 40D.  So, I ran the process, and take a look at the before and after results:

Before

Before Noise Ninja processing

Some pretty heavy noise, as expected, so let’s just look at the image after processing:

After

After Noise Ninja processing

See the difference in grain?  Yeah, I was impressed too.  But is it always the case?  I ran another couple images through NN and got the same or similar results on other objects in my print box.  (Which, by the way, is a great resource for test shots when looking into lens and gear performance on a wide variety of things like noise, white balance, macro, depth of field, and much more.)  Here’s another sample crop just to show you for comparison sake:

Before NN Processing 2

and after…

After NN Processing 2

Again, some impressive results.  When push comes to shove, results is where it counts in my book and PictureCode delivers at a superb value.

Now granted, there are other noise handling programs out there, and if you ask a dozen people what they use, 5 will say one, 5 will say another, and 2 will offer up another alternative.  When push comes to shove, it really is up to personal preference on which one “works best”.  For me, it doesn’t really matter as long as you are aware of what noise is, what it can do to an image, and how to fix it.  The tool you use is up to you.  I think Noise Ninja is probably recognized well enough for a reason, and the results here seem to suggest why.

The rest I’ll leave up to personal preferences, and if you would like to contribute your own thoughts, by all means, share them here in the comments or with me via email.  If you want to try it – you can download a free copy from the folks at PictureCode here –  or simply participate in the October Contest over at Flickr and win a copy from them for free!

That’s it for today – happy shooting all, and we’ll see you back here again tomorrow!

Got an App for That?

Since the next hardware review item as not arrived yet, today’s post is something of a blog announcement about a new feature I’ll be rolling out here shortly.  As you can tell from the title, it’s about applications on the iTunes store.  For users of the iPhone and iTouch, applications can be pretty handy tools (and diversionary too if you’re not careful!)

Well, as you may recall, a while back during the “Comment Contest” I asked people to contribute their favorite iPhone/iPod photography-related applications.  While the iTouch has not been fully capable of testing each of these, I’ve tried most of them and am putting together a new set of posts (don’t ask me where it’s going to go, because I am starting to run out of days in the week!) to cover the latest in Photography applications for those on the go.  So, for today, I am going to do the first application review:

Photoshop.com Mobile Application

In doing so, I figured it would be best to start at home – and by that I don’t mean here at the blog (although it would be kinda cool to develop an application where you could submit photos to the Canon Blogger critique threads and contest threads straight from your iPhone!).  No, I mean starting with the source – the editor we all know and either love or hate – Photoshop!  Believe it or not, the folks at Adobe have come out with a cool little application that you can connect to via your iPod or iTouch through a web interface at www.Photoshop.com

Here’s what it does – it allows you to store your photos online, edit, and share them with family and friends, create photo albums, and galleries.   Now before someone chimes in and says “Flickr already does that”, I will concur that Flickr is probably not going to be de-throned in the online photo sharing space any time soon.  But here’s a couple cool things that you get on Photoshop.com’s site that you don’t get on Flickr.

  • You can customize your background
  • You get more storage (2GB free)
  • More scalable service (it’s not just free and pro, there are different scales of services for whatever needs you may have)
  • You can link Photoshop.com to your Flickr account (but not vice versa)

So, it’s kind of a cool little service.  What I like about it is that the interface is much more conducive to sharing photos on the go.  For those of us with limited storage on our mobiles, it’s nice to be able to just log in to a web interface and share 2 GB worth of photos and have it look both classy and professional (sorry Flickr, but your interface needs an update…).

It’s free to join (you do need an Adobe Account though – also free), and can register a personal web space as well.  I’ve already done so, and you are welcome to view my account thus far at http://canonblogger.photoshop.com as I explore this some more to see what else is there to do.  You can create your own account at the main page of www.photoshop.com, and upload/share photos and videos in as little as five minutes too.  Some other applications I am taking a look at include HDR for Free, iHandy Level, and of course, the uploader applications for things like Flickr and Twitpic.  Some games have made their way into my iTouch (don’t know how that happened! 🙂 ), I’ll try to keep those out of the blog and keep things photo-centered.

If this topic takes traction, and people express enough interest in it, then be sure to stay tuned for future reviews and write-ups on iPhone and iTouch applications.  In the meantime – if you’ve got an application that you think is the bee’s knees, then feel free to share it here.  Suggestions for applications?  Share those too – I’d love to hear everyone’s thoughts.  As Apple is prone to say, I am prone to ask – “Got an App for that?”  Ask here and I will do what I can to find out and review for you!  Happy shooting all, and don’t forget to upload your photos for the October contest over on Flickr. The theme is FALL and it’s sure to be a good one – 3 pics a piece, and it’s underway right now.  Happy shooting and we’ll see you back here again tomorrow!