Say Cheese?

Ever wonder why we’ve heard photographers say that when taking your picture?  Think about what happens when you do – your facial features open up, your mouth opens slightly, and you get a little upward curvature in the corners of your lips.  (Unless of course you concentrate on specifically not doing that.)  Whoever thought this up eons ago was well ahead of the curve, because knowing how to take good portraiture encompasses entire volumes of books on the subject.

Volumes exist on what lenses to use, how to light, depth of fieldand much much more, but perhaps the most valuable information on how to take great portraits comes not just from technical awareness, but from personal interactions, and how to get people to act natural yet emotive and to let that come through in your work.  While no blog post could entirely exhaust the subject, here are ten quick tips on taking better portraits:

  1. Establish a connection – portraiture is about connecting with someone through the image.  If you don’t connect with them through the camera, then there will be no connection in the print.  Make sure you connect with your subjects in some way.  Get to know about them, because that knowledge can transform your vision into really beautiful works of art.
  2. Relax the subject – Connecting with your subject means they feel comfortable around you – now the key is to get them to feel comfortable in front of the camera.  Many times this is much easier said than done, but when you do get them to relax, the poses will come more fluidly, and you’ll get better results.  One way I do this is to just start taking pictures of things around us as we talk and connect.  The whole idea of hearing the shutter can be scary to some people, so by hearing it almost to excess and know it’s not on them can mitigate the “scary” factor.
  3. Choose a background – if you are in a studio environment, this is fairly easy, but if you are on location, keep your eyes out for backgrounds that provide contrast to the subject.  Are they wearing light clothes?  Look for a dark background.  What about props to give a little more meaning.  Are they sports fans?  Have them hold a football, or stand by a basketball hoop.  Backgrounds can help give more definition to your subject.
  4. Have a purpose – try to think of reasons why you are taking the picture.  Is it to record an event, or is it for a model?  What about a head shot for a business executive?  If you think of why you are taking the picture in the first place, that can help give you ideas for how to compose it.  For the event, it’s about the moment, while the portrait it’s about just the person, so give some thought to how to enhance their best qualities and minimize flaws.
  5. Create separation – this is crucial to giving definition to your subject while minimizing distractions.  In the on-location areas, look out for things like power lines, nearby light sources and other objects that may detract from the subject.  Here it also helps to keep a wider aperture so that any distractions can be effectively blurred out of focus to minimize their impact.
  6. All about the angles – Some people have great profiles.  Striking features can be accented from certain angles and can give greater impact and meaning.  Shooting from below can suggest power and strength (for the business executive), while shooting from above can minimize a body style that is more robust.  Even profile shots can be stunning if done right (hint:  try shadows there).
  7. Lights, lights, lights – photography is all about painting with light, so portraiture is no exception.  Whether it be modifying existing light with reflectors, diffusers and shoot throughs, or creating your own light with strobes and flashes positioned off to the side or from above, lighting can create a wide variety of moods and bring images to life, especially in portraiture!
  8. Watch the eyes – for any subject, whether human or animals, we like to have the eyes in focus.  It’s just the nature of people to look at the eyes in a subject, so make sure the eyes of yours are tack sharp.  Seeing a persons eyes have often been said to be a mirror to their soul.  You can get playful eyes, soulful eyes, sad eyes, sparkling eyes, weepy eyes, tear-stained eyes, angry eyes, hungry eyes, passionate eyes… (you get the eye-dea!)
  9. Clean that skin tone – this means make sure that you are keeping the tones in check.  If the skin is too orange or too blue, add or remove some flash or ambient light.  Here the key is in white balancing your images.  Take along a grey card (even something as small as a 3×5 card can work) and you can set your white balance off that – your skin tones will be spot on if you do – and save you tons of post processing time.
  10. Less is not always more – let’s all just admit it, it’s a digital world.  Those pictures are really just data packets and with data being as cheap as it is, we can afford to take more shots.  This can help with blinkers, and if you want to try several poses or wardrobe changes, or lighting changes, or location changes, or group changes (think weddings). or weather changes (think sunlight versus rain, versus cloudy), or….I think the gist is clear again here.

So, there’s ten nuggets.  I tried to be brief yet have some detail, but you can never have enough time or space to really cover something with so much to talk about in a short blog post.  With that in mind, what about your thoughts on portraiture?  Add to the pool!  Got any ideas, DIY tricks or nuggets that work for you?  Share them in the comments or via email.

Before signing out for the day, I’d like to give some special thanks to a few people.  First to Derrick Story for the helpful link from his blog post today about the tethered shooting write-up.  It’s always nice to get what I like to call “a nod from the Gods”, but not only did he write a post about my write-up, he also submitted it to the Imaging Insider, who subsequently included the write up on their site.    Second up, I’d also like to throw some NAPP-Love back to Karen from “Pursuing Photoshop” (a.k.a. Mitzs in the blogosphere, also a member of NAPP) for her link back to the Adobe Photoshop Lightroom contest currently running here on the blog – thanks Mitzs!

Oh yeah, and finally, don’t forget the Photoshop Lightroom contest I announced in last week’s podcast – it’s running over in a thread on Flickr, and the images are starting to come in.  Some really nice ones so far, but there’s plenty of time left in May to enter!  Good luck to everyone!  Well, enough content for one day, so happy shooting and we’ll see you back here tomorrow.

Shooting tethered with Canon gear


I’ve not seen much coverage of how to shoot tethered using the Canon proprietary software, so for today’s post, I thought it might be useful to offer the Canon perspective here (since the blog bears the moniker of my camera vendor of choice).  For those who are Nikon shooters, I would highly recommend reading the post Scott Kelby did a while back that shows how to shoot tethered into Lightroom.  While he walks you through the Lightroom element, he then discusses the Nikon approach… the counterpoint here is to take a look at the Canon approach.

To start off – a little explanation of what tethered shooting is would be helpful.  Tethered shooting means you have your camera connected to your computer or laptop (usually a laptop for portability purposes).  This allows you to shoot straight into the computer with direct saves.  There are a couple advantages to tethered shooting.  First off, you don’t need any media cards, because the camera is transferring straight to the computer.  Second, regardless of what size LCD you have on the back of your sensor, nothing will compare with a 15″ or 17″ monitor.  You can see greater detail, see a broader tonal range, and get a much better handle on the finder points of composition when it comes to things like posing, lighting, and minimizing distractions that you could likely miss when using a 3″ LCD of your camera.

Okay, so now that we know when and why you would shoot tethered, and given an appropriate nod to Scott Kelby for his coverage of the Nikon version, here is a Canon-centric approach to tethered shooting.  Since the Lightroom component is already pretty well covered, I will just be limiting the discussion to showcasing the settings, screens and considerations to take into account when configuring the EOS Capture Utility.

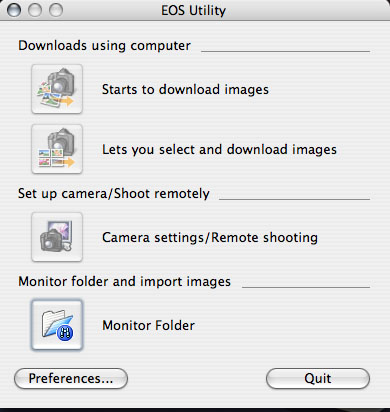
When you first start the EOS Capture Utility, you get a rather unassuming window that doesn’t look like much:

Startup Screen for EOS Capture

It’s pretty straightforward – the top button would be used to download images if you are importing from all your images off a CF card.  The second button would enable you to select which images to import off a CF card.  More relative to this content is the Camera Settings/Remote Shooting button and the Monitor Folder button.   I’ll get to those in a minute.  Lastly, it’s helpful to draw your attention to the Preferences button on the lower right – this is the one  I’d like to take a closer look at now.

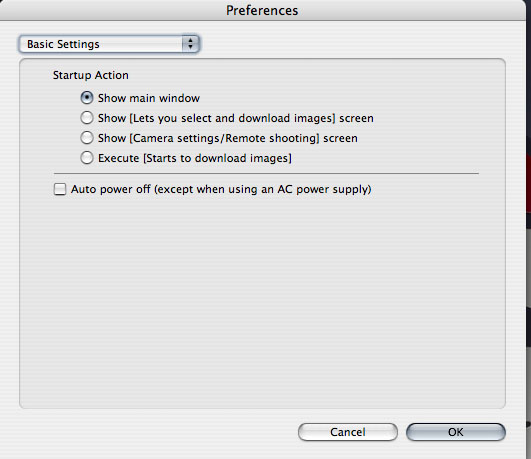
When you click on the Preferences button the window will change:

eos2

From here, you now have access to all the details of how you want to configure your tethered shooting options, starting out with the basic settings (see the drop down menu in the upper left).  This first setting tells the EOS Utility what screen you want to show when you first start the software.  This really is a matter of personal preference, but I would recommend the main window so that if you want to change your preferences, you can do so easily and quickly – often with software preference settings will require you to restart the program, so if that must happen, it’s always best to do that at start-up.

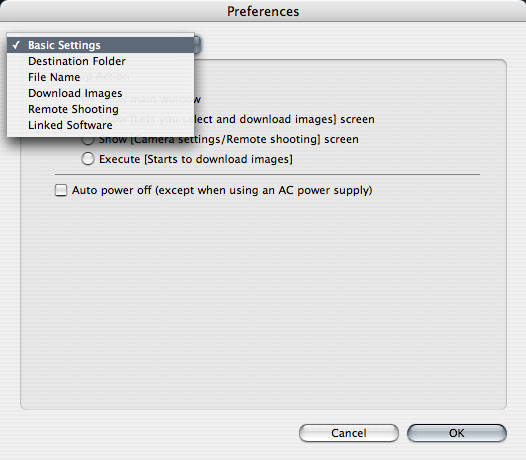
Moving right along, let’s take a look at the other preferences settings:

eos3

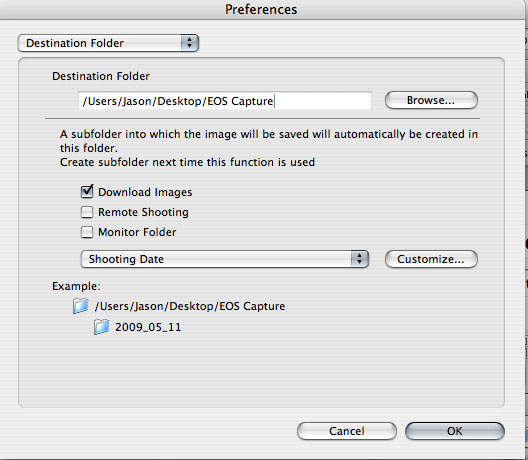
The Destination Folder Preferences

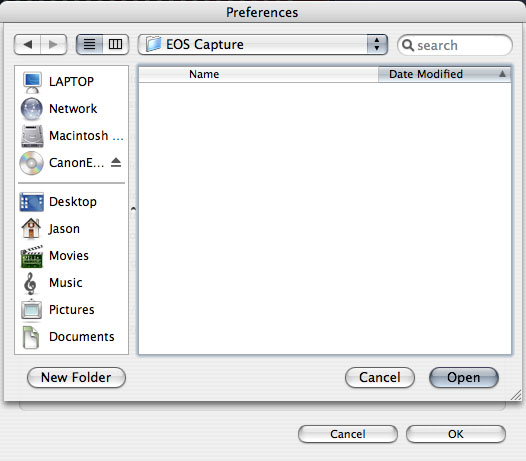
This should be pretty self-explanatory, but in the interests of covering each aspect, this is where you can specify what folder you want to save your images to on connecting your Canon camera to your computer.  For the purposes of this demonstration, I created a folder called EOS Capture and put it on my desktop to use as the destination folder.  To point the EOS Utility to your destination folder of choice, simply click the browse button, as shown:

destination2

Note that the EOS Utility does a nice little thing here – it creates a subfolder by date so helps to keep your images organized whether you are downloading images, doing remote shooting (tethered shooting), or set a monitored folder for some third party application (like Lightroom).  If you are going to be doig remote shooting, here is where you would likely select the remote shooting option so that when the camera gets connected, that specific task will create a subfolder and get you ready that much quicker.  Here, since I don’t have the full hardware connection, I am just going to leave it on the default setting and select the folder I created on my desktop:

destination


File Name Preferences

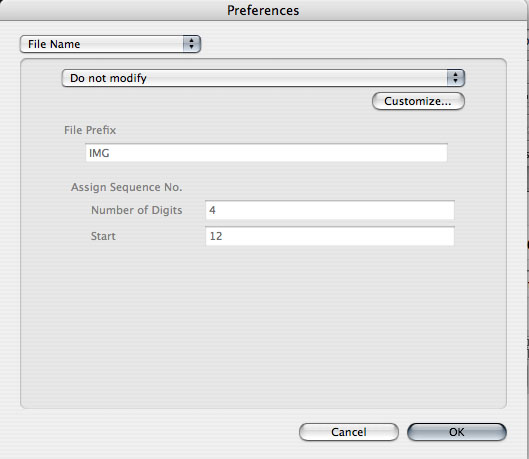
If you want to change your image names from the default of _IMG_1234.jpg to another more descriptive naming convention (say JamesSmith.jpg this would be the place to do it.  The options are shown below:

filename1

If you choose to modify your images, you can elect from many options, including the option to customize for your needs – just click the drop down menu to select your options.  By default it’s set to Do Not Modify so I’l just leave that here to show your options for filename formats:

filename2

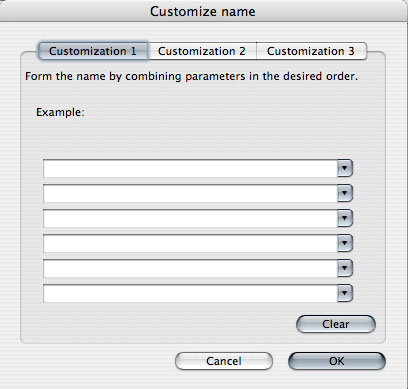
The next option here in your filename conventions is where you can define custom naming conventions, either by subject name (JamesSmith), event (SmithWeddding), or whatever convention works for you:

filename3

Feel free to customize these as you prefer for your own shooting conditions and, well….preferences!  Moving right along now…

Download Images Preferences

download

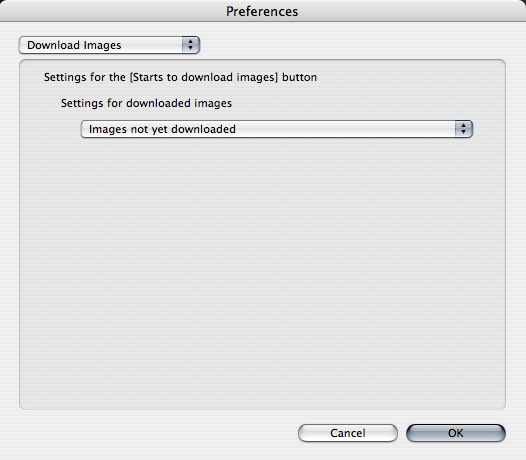
Here is where you tell the EOS Utility what to do with images as they are generated.  It’s pretty straightforward… the options are:

downloadoptions

Remote Shooting Preferences

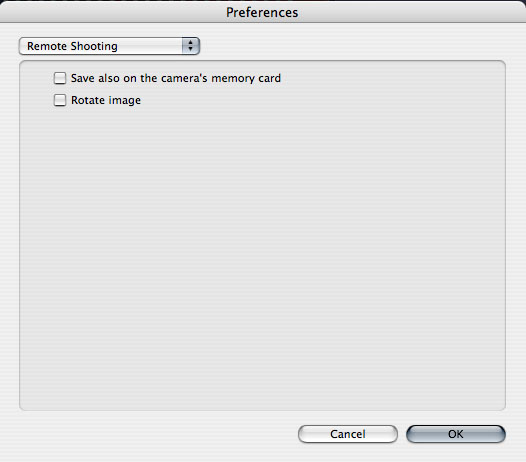
The remote shooting preferences here are also pretty straightforward:  Do you want to save your images to a card or not?  Do you want the software to rotate your images if needed to show the right orientation?  Depending on your preferences, check or uncheck these boxes:

remote

Linked Software Preferences

Last but not least, do you want to use another piece of the Canon Software family of products to work on your tethered images , whether it be Digital Photo Profesional (aka DPP) or ImageBrowser:

eossoftware1

Since my work flow incorporates the Adobe product line (Lightroom, Photoshop, etc.), I would suggest choosing “None” here, but again, that’s why these are called preferences.

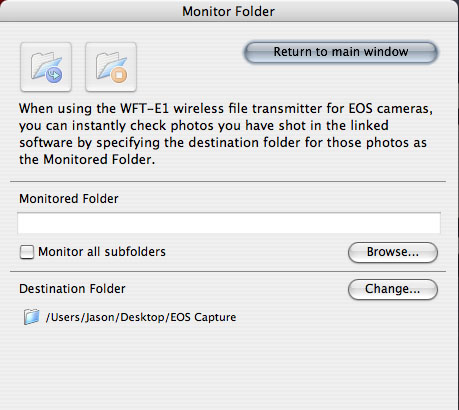
Once these Preferences are set, go ahead and return to the main window, then click the Monitor Folder option, because there is two last items that merit discussion here:

The Monitoring Folder

monitor_folder

Note that the folder has been specified for me, but Canon has generously recommended that I take advantage of a specific Canon hardware connector to connect the camera and computer – the WFT-E1 Wireless Transmitter.  These are available from most camera retailers and e-tailers, but I like B&H so that is the one linked (and the price is fairly reasonable at $999.99, so if you get one, let me borrow it to review here on the blog! 🙂 ).  Basically what this allows you to do is shoot “tethered” to the computer, but without the tether…pretty cool stuff!

The Software Version

I created this post using the older version of the EOS Capture Utility, primarily because I had not used it since I owned my XT.    As with any software though, as camera bodies are added to the vendor family of products, the software must update too.  On capturing all the images for this post, I did not think the software would be what updated, only the camera drivers.  Clearly, that was not the case as the software itself has undergone a colorful transformation since then, and is now at its most recent update as of just last month at 2.6.1  You can download it and update via the 40D web page here (where I got mine just earlier).  The upshot though, and why I am keeping the original screen shots, is because functionally nothing has changed – there are just more camera drivers added to the library. To get your own drivers for other Canon cameras to use with the EOS capture, go to the main page here and select your camera…

Finally, I wanted to share a very short video from what the new interface looks like and how to use it when shooting in “tethered” mode:

So, there you have it!  My down-n-dirty summary of the Canon EOS Capture Utility – with photos, text, and video!  A virtual cornucopia of media to look at the feature set.  Enjoy the material!  I’d love to hear your thoughts, hear your feedback and get suggestions (other than checking the software for updates before I write the post! 😀 ) on future material that may be useful.  Don’t forget too – that contest to win a copy of Adobe Lightroom (which you can use to edit shots taken in tethered mode!) is going on through the end of May, so don’t delay – get those contributions in today!  One shot could be worth a free copy of Adobe Lightroom!  That’s it for today – have a great one, Happy Shooting, and we’ll see you back here tomorrow for the latest in photography composition.

The Sigma 70mm Macro

Next up in my gear bag is the Sigma 70mm Macro lens.  This is one sweet lens.  With an aperture that goes down to f2.8 this is legally classified as “fast glass”.  It’s got some super nice bokeh, and has an impressive range for it’s sweet spot – ranging from roughly f2.0 – f11.  Seriously, it’s tack sharp through that entire range.  It’s got the characteristic touch and handling of all Sigma lenses with its brushed matte black coating.

Other features include the manual on/off switch for auto-focus, which is typical for most lenses these days, but one thing I particularly enjoy is the limiter.  While this is also characteristic for macro lenses, it helps to keep you within a certain range of focus so it doesn’t have to search as long before finding that tack sharp point.  This toggle can be turned on or off any time, so it really helps when you are in Macro mode or shooting portraits.  Oh yeah, did I mention this does a nice job at portrait work?  The 70mm fixed focal length means I don’t have to get too up close and personal like you would with a 50mm lens, but I also don’t have to be as far away from the subject so it’s still fairly easy to interact with subjects.

If I had to list downsides, they would be that without the limiter on, it can take a while to focus, and that it is somewhat noisy when it is searching.  I am very spoiled by the USM features of Canon bodies, and wish I had the Sigma equivalent (HSM – Hypersonic Moter), but that was just not available in this lens at the time (and don’t think it is to date…).  Lastly, I don’t like how the lens shade prevents you from capping the lens when out in the field.  If the lens hood is on, the cap simply cannot be in place.

As with any fixed focal length lens, it forces you to compose with your feet (if you want a tighter shot, step forward a few paces, and if you want to go wider, step back).  But it does give you tack sharp results each and every time.

Here are a few sample shots I took with this lens, both in normal mode and in macro mode over the weekend for this post.  My in-laws were in town so we did the tourist-y thing.  First off, we visited the Hammonds Candy Factory where pictures are not only welcomed, but encouraged – so, my camera in ahd with 70mm attached (intentionally only went out with one lens each day…), I got some good samples of each category, except Macro (you need a tripod most times when shooting Macro work – at least I do in anything but the brightest light!):

Still Life

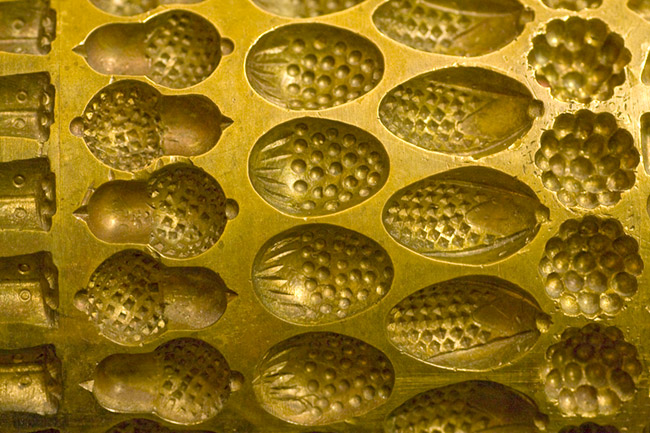
Candy Form Press
Candy Form Press

Some of the wonderful candies at Hammonds

Candy Swirl
Candy Swirl

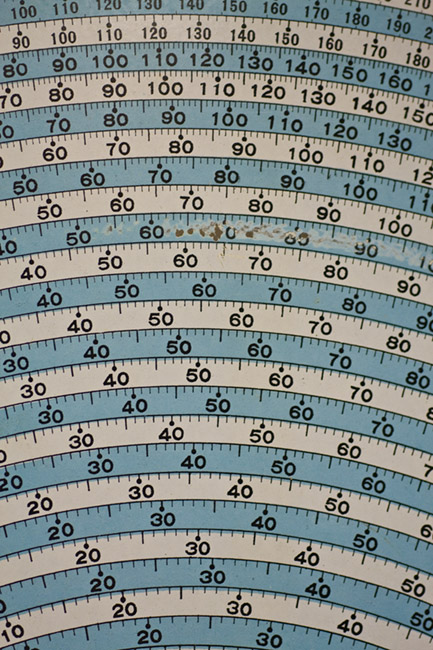
Weights and Measures

Weights and Measures

Portrait

Cute as a teddy bear!

There you have it – the 70mm Macro f2.8 from Sigma – the third lens in my bag.  Coming up next week, the 70-200L f4.0.  it’s an oldie but a goodie!  What do you think?  How does the Sigma 70 Macro stack up based on what you’ve read here?  Like it?  Love it?  Hate it?  What other macro lenses do you have experience with?  Share your thoughts in the comments!  Happy shooting and we’ll see you back here again tomorrow!

Don’t forget about the Adobe Photoshop Lightroom Contest announced over on Learning Digital Photography!  Win your own copy of LR by sharing images in the Flickr thread here!

Photo Contest – Win Adobe Lightroom

Happy Saturday all.  It’s a rare weekend post here – since Friday was silent.  Two things – first off, Happy Mothers Day to all the mothers out there!  Second, as the podcast on Tuesday announced, don’t forget the first ever Learning Digital Photography Contest is under way – all during the month of May, submit your shots to the Flickr group (2 entries per person) for your chance to win a copy of Adobe Photoshop Lightroom 2.0!  Not only is it a great chance to win this wonderful program, but a great way to get increased visibility of your work and to network with others.

Information is available in the podcast, but you are welcome to just submit your entries directly to the Flickr group.  This is a prize package worth $300 retail, so definitely one worth entering!  Good luck and happy shooting!

Podcast

Flickr Pool

Creative Vision – or not!

When looking at image composition, many of the things we use as our foundation are the typical rules of the trade – things like the the Rule of Thirds, Sunny 16, Golden Mean, etc., etc., etc.  While these rules are all well and good, and they definitely are some of the fundamentals that we all incorporate as we see to create beautiful images – they do not constitute the entire picture (pardon the pun).  As photographers, we should also be challenging ourselves to look at things in unique and new or innovative ways.

For instance, take the Eiffel Tower.  This particular piece of architecture has been around for so long now that photographers have had an opportunity to capture this from pretty much every angle and in virtually all lighting conditions.  You would be hard pressed to come up with a new angle or an unused lighting style for this monument.  So, what if you take a trip to Paris – should you not even bother with a picture?  Of course not!  Snap away, be a tourist  want and get your other half mugging next to the Tower.

The same could be said for the Sistine Chapel, the Venus de Milo, or any other of thousands of historically significant and/or interesting works.  And seriously – what do you think would happen if you went on a trip to Paris, came back and said “Nope, no shots of the Eiffel Tower, been taken too much already, no sense in taking yet another shot of it.” If your family is anything like mine, people would look at you and wonder – “But, you’re a photographer!”

The point here is that you don’t always have to be “on” and looking for that next great shot.  In fact, the minute you stop trying so hard to find inspiration, in general, the faster inspiration finds you.    Let the boring snapshots happen – they’re fun, and a great way to connect with others.  Imagine being at some social function and you’ve got your camera.  Are you looking at the light, wondering what aperture/shutter settings you can feasibly hand hold at without over cranking your ISO, or are you enjoying the time spent with family and friends?  Before you answer that – answer this – which circumstance do you think will provide more inspiration and creativity?

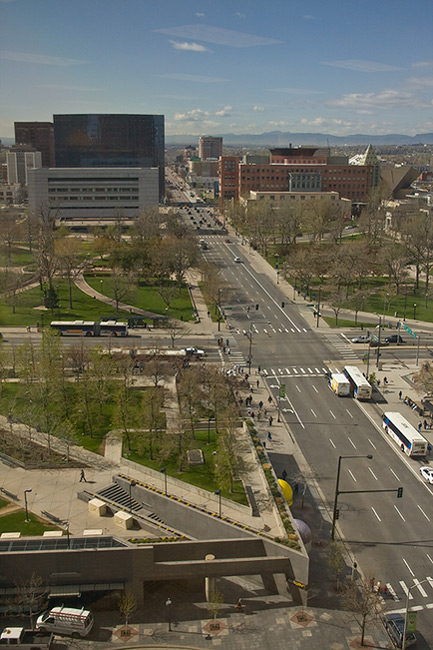
Just the other day I was delivering some computer stuff to another building, which happened to be 14 floors up.  Sure, I have my camera with me – and I looked out the window.  Aerial photography has always intrigued me, but I had never given it another thought – until the other day.  So, didn’t really think much and pointed my camera out the window, just having fun and taking a few snaps of the scenes:
denverabove1

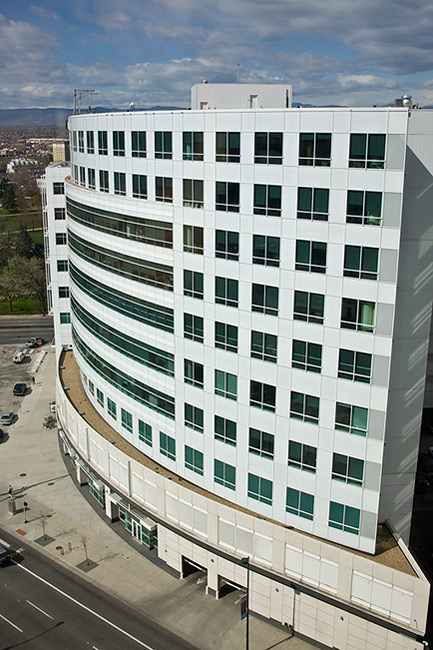
Quite the boring shot eh?  Certainly not even close to being on par with something like the Eiffel Tower, the Louvre, Venus de Milo, or anything like that.  It’s pretty much a scene of nothing.  But from nothing, and from not even trying to always be “on” you can find your creativity and inspiration.  This shot was taken only ten seconds apart from the previous one:

denverabove2

Okay, so it’s still not as breath-taking as any of the other historical monuments, but you gotta admit, that curved line of the building receding into the distance is kinda neat, eh?  This isn’t really looking for props or accolades though.  The point here is to not let yourself become too preoccupied with achieving your next great “hero” shot on every capture.  That is only setting yourself up for failure because no one can attain that.  Sure, it’s important to try and stretch your creative muscle, and try new captures, and experiment with new styles, using different lighting and all the stuff that goes hand-in-hand with being a photographer, but remember, before you can be a photographer, you gotta be a person!

Enjoy photography, but don’t forget to live your life!

Don’t forget to pick up the feed for the blog and the podcast – all during the month of May, you could be shooting to win a copy of Lightroom!  One of the best ways to do that is to just go out and have some fun.  Forget about the details from time to time and just enjoy life – because that is when you will most likely get your hero shots – when you least expect them.  So, just enjoy life, and enjoy photography – the rest comes naturally!  Happy living and we’ll see you back here tomorrow!

Win a copy of Adobe Lightroom 2.0!

box_lightroom2_150x150

Just last week, I had the distinct honor of interviewing Tom Hogarty, Senior Product Manager for Adobe Lightroom.  Needless to say, I postponed the podcast for a few more days so I could include the interview.  He really gave a good breakdown of the function of Lightroom, what to expect from it, how to incorporate it into your work flow, and what (in general) we can likely expect to see in the future of image processing development.    We spent a good deal of time going over the nuts and bolts, so under the general heading of Software discussions today, I’d like to introduce you to Adobe’s Lightroom.

Lightroom is a very different way of handling your images.  Rather than taking a single image at a time through something like Photoshop, Adobe Lightroom allows you to not only address single image edits, but also manage an entire library of images.  The key here is management, because that’s what Lightroom really does – it takes the idea of asset management and incorporates it into a program so that you don’t even have to think about it!  Rather than belabour the point here though, it would probably be best to encourage everyone to just download the podcast and give it a listen.  Not only do we discuss Lightroom, but we also take a lot of listener questions, both specific to Lightroom and general photography questions too – and, oh yeah, a contest!

That’s right – Adobe was kind enough to donate a copy of Photoshop Lightroom 2.0 to some lucky listener.  At an estimated retail value of almost $300 ($299), this is by and large, the best contest I’ve could ever come up with!   It’s very exciting!  I’d love to share the details here, but if I did that, you wouldn’t listen to the podcast.  So… want to know the details?  Listen to the podcast! In the meantime, here’s the show notes on the things we discussed and where to get the latest and greatest info on the product:

Be sure to stop over at Twitter and start following these folks, because they are the ones who you can really learn a lot from!  Then don’t forget to listen to the podcast for your chance to win a copy of Adobe Photoshop Lightroom 2.0!  Happy Shooting and good luck one and all!

Oh yeah, here’s the teaser link for the contest:  Learning Digital Photography Flickr Group

Comparison photos from 10-22mm

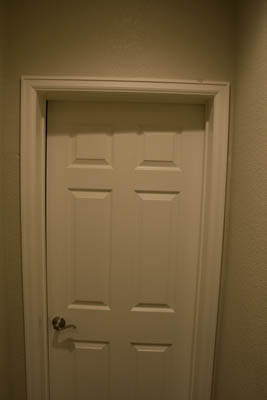
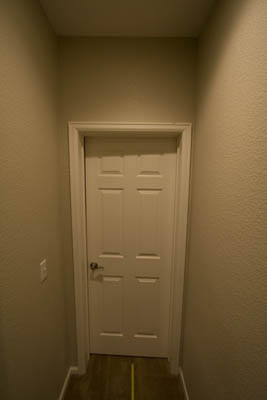
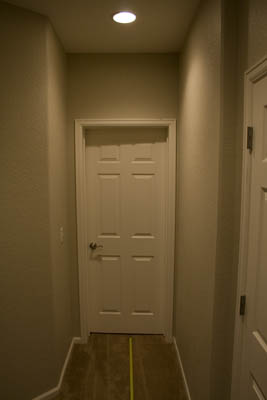
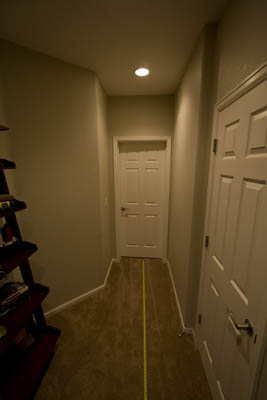
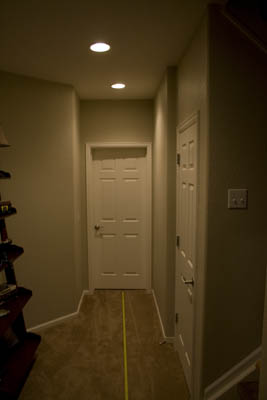
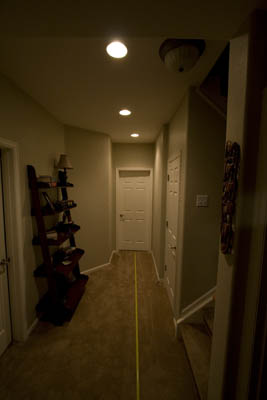
Earlier this week on the blog, the 10-22mm Canon was reviewed, and in the comments, Julie asked if I could provide some comparison shots.  So, in the interests of demonstrating the perspective change (and provide a few sample shots of things I thought came out well), here’s a plethora of photos.  First, the comparisons… all shots were done at 1/50th, f5.0 and ISO 800 from a range of 5 feet, 10 feet, and 15 feet, and pointed straight on at the door.  No post processing was done in order to preserve as “raw” a comparison as possible…

At 5 feet on the kit 18-55mm

_mg_9396

Now5 feet  with the 10-22mm:

_mg_9397

Notice how much more of a range of view the 10-22 has even at 10 feet?  So much more can be seen now both high and low (notice the tape measure I have in there for scale?)!  Moving right along…

Here’s 10 feet on the kit 18-55

_mg_9401

And the 10-22 at 10 feet:

_mg_9398

Again, even more range of view both top to bottom and left to right (see the book case?)  But as we go wider the differences get even more pronounced!

Finally, the kit 18-55 at 15 feet:

_mg_9400

And the 10-22mm at 15 feet:

_mg_9399

So, you can see why wide angle lenses work well in real estate, eh?  Wide angles are particularly useful in capturing architecture, and their prominence in this specific field is very well known!

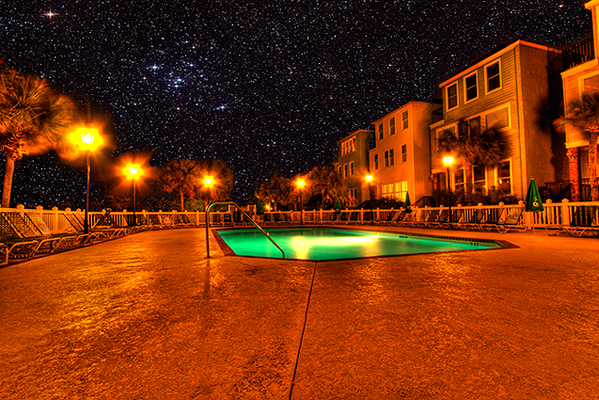
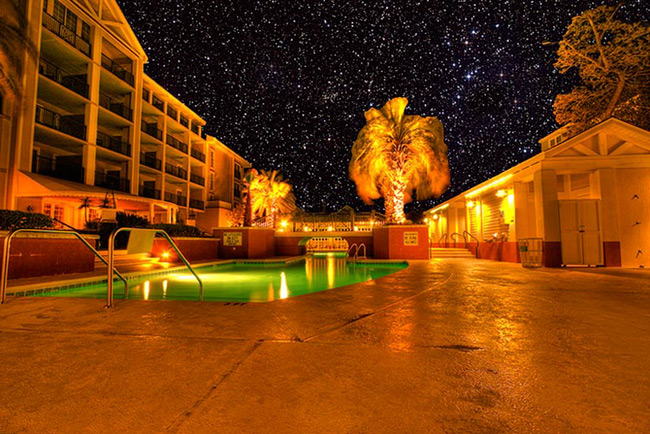
Other genres of photography can benefit from its use though.  Remember the HDR shots I put up last week?  These were both taken with the wide angle:

final_hdr_blog1

2a_blog

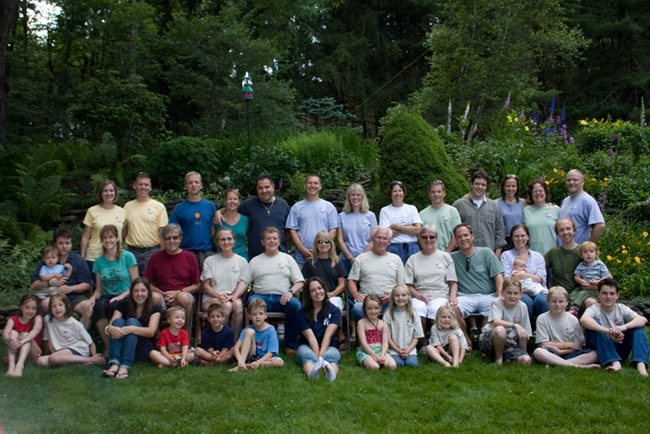
So, landscapes can also benefit from using a wide angle lens.  But what about portrait work?  Here is where the “group” mentality can come into play.  Here’s a shot from a family reunion I took after acquiring this lens (that’s me on the far side, camera right):

gang_web

You want to be careful about using it for close-up portrait work though, because distortion can work against you, producing unflattering looks (I am intentionally using a super small file size here because it’s really not flattering at all if used wrong):

bad_wide

But of course, this is how the now famous “dog” pictures were developed, so you can try it yourself for unique looks:

moo_wide

So, that’s the ups and downs, the los and highs, the pros and cons of the 10-22.  In closing, here’s a parting shot I took from the island in SC where we were having family photo ops and fun!

wide1

Try getting that without a wide angle!  🙂  Happy shooting and we’ll see you back here tomorrow!

The Rule of Thirds Really Does Work!

When it comes to composing our images – we are always looking for new ways and angles to capture things.  Often though, sometimes the traditional methods work too though.  In fact, I would venture to guess that if shown 100 pictures where the standard rules of composition were followed, and then 100 pictures where standard rules were deviated from, the former would have more shots that found a widespread appeal.  The rationale?  Standard rules usually will work – that’s why they are the standards.  Things like the Golden Mean, the Rule of Thirds, and Sunny 16 are all basic rules of composition and exposure, and if you want to ensure things “just work” – traditional rules really will work the majority of the time.

For the purposes of this post, I am going to talk about one of the most basic rules – the Rule of Thirds.  The Rule of Thirds (or ROT) basically says that if you divide your image area up into a grid, where the horizontal andvertical areas are divided equally into thirds – you will get cross-sections that define where your points of interest should be – often called hot points.  Here’s a diagram to help demonstrate:

rotgrid1a

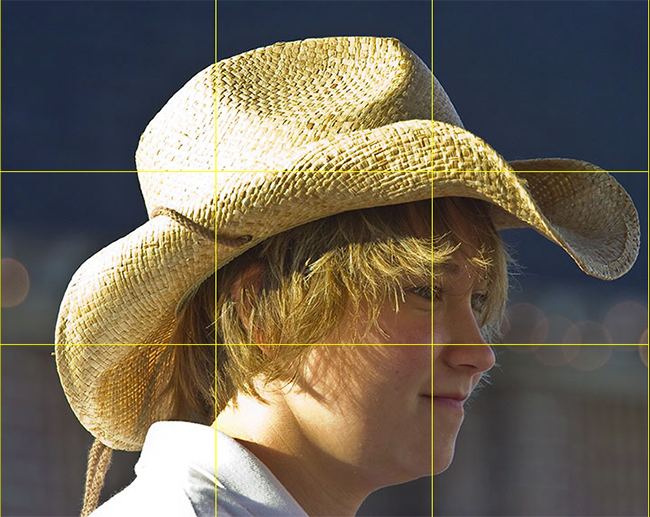
So, here the frame is divided (roughly) into thirds both vertically and horizontally.  Where the lines intersect, I’ve created red circles to indicate the “hot points”.  These are your points of interest.  If all else fails, placing your subject matter in these areas (or close to them) will dramatically improve your composition.  Here’s a great example:

rotgrid2

Here’s a shot of a carriage girl I took back in Charleston.  See where the cross-sections are?  I changed the color of the grid to make it easier to view – so you can tell that her eye is right on the marker for the right-most third grid line.  This really helps the composition that her eye is there instead of elsewhere (often times, there is a tendency to place the eyes closer to the center of the frame – resist that temptation to give your shots that extra oomph!).

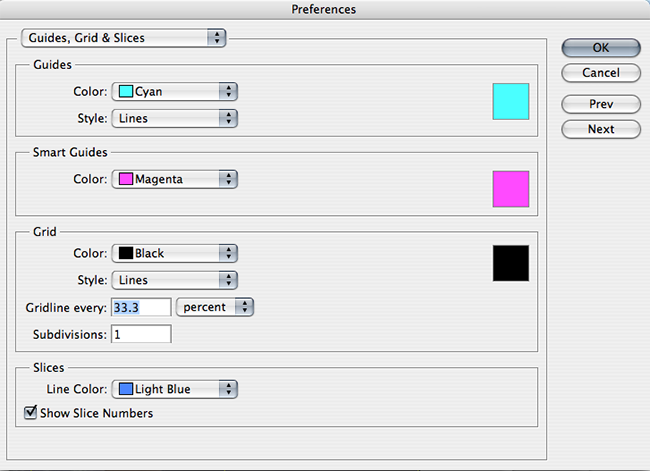
In fact the ROT concept s such a well-known standard, the folks over at Adobe have incorporated that element into their crop tool – so that you can crop your images to adhere to this rule.  Since I will likely get someone to ask – you can create this ROT grid in other variants of Photoshop (CS family), but going to your application preferences and selecting the Grids, Guides, and Slices option.  In there, change your grid size to display lines every 33.3% and number of grids to 1.  Then choose a strong color so that when you display the grid – you can see it!  Click OK and you are done – from now on, to show the ROT grid when cropping or editing in the CS family – simply use the CMD/CTRL key and the apostrophe ( this doohickey  ‘   ) to toggle the grid on and off.  Here’s a capture of the area you need to make the changes:

rotgrid4

There you have it – the Rule of Thirds grid – what it means and how to use it!  Any other rules of composition you would like explained?  Feel free to email, share your thoughts, ideas, suggestions and feedback in the comments or privately (if you rather would preserve anonymity).  In the meantime, go out, take some shots and practice visualizing that ROT grid in camera – that’s what will turn your snapshots into great shots!  Getting it right in camera!  Happy shooting and we’ll see you back here again tomorrow!

Adobe’s DNG Converter

For many of us, an upgrade of one element in our tool kit comes with many unforeseen consequences and additional expenditures.  Just as a new camera body can necesitate the need for larger memory cards, hardware upgrades can also come with software upgrades.  The reason?  Camera file formats!  As camera vendors develop new proprietary formats for their raw file formats (CR2 for Canon and NEF for Nikon as the two predominant players in the game), the need has always existed to update your software to accommodate the new formats for body upgrades.

The best example of this was when I did my upgrade of the Canon XT to the Canon 40D just last year (or was it two years ago now?)…at the time I was using Adobe Photoshop CS2 to process my files.  Well CS2 development stopped as CS3 development started.  My Canon 40D was stuck in between application life cycles, and as a result, I was no longer able to process my CR2 files from the 40D natively in CS2.  Granted, I did upgrade to CS3 because of my interest in the field, but for those that either may not be interested in the software upgrade, or cannot afford to upgrade, there is a free alternative from Adobe – the Adobe DNG converter.

This is a really cool utility and it gets updated on the same schedule as the Adobe Camera Raw utility that is unique to the image-editing applications of all Photoshop applications (CS4, LR, etc.).  The Adobe DNG stands for a Digital NeGative so it may help to think of this as a way of preserving your original data, yet still making it accessible, regardless of what other developments happen in the software world down the road.  I know, we all think that Adobe will be around forever, but the same was also thought of Kodak 20 years ago – and now those Kodak CD’s are becoming difficult to manage.  With that little nugget, it may be useful to consider the Adobe DNG option.  Additionally, the Adobe DNG negative has been submitted to the ISO standards setting organization for acceptance as a universal conversion utility, and are releasing it under the GNU licensing, so it will hopefully always be available for anyone.

With the stage set then,  for those who are not able to or not interested in upgrading, here is a brief tutorial of the Adobe DNG converter (in it’s current iteration as of 4/27/09), with screenshots.  If your folders of images look like this:

dng6

Then the Adobe DNG Conversion Utility may be for you.  It starts pretty easily…you can download the Windows or Mac versions of it from here:

Windows DNG Converter

Mac DNG Converter

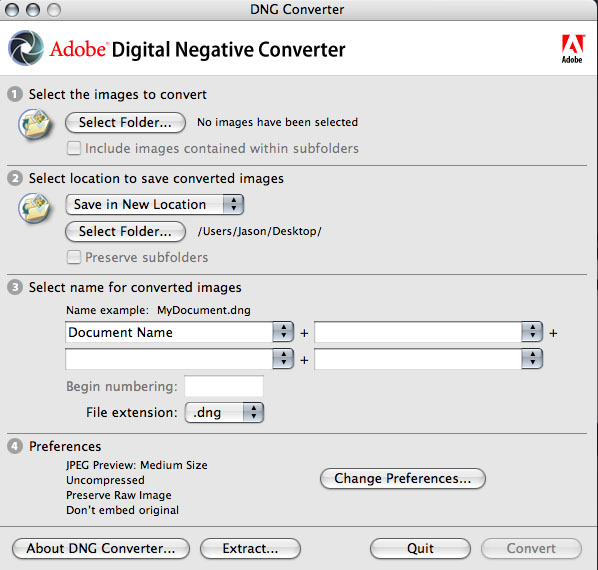
Once you download and install this utility (did I mention it’s free?), start the application to get this screen:

dng1

First off, specify the path where the images are that you want to encapsulate into the DNG format.  You can specify one folder, or you can specifiy a folder and all its sub-folders (in case you want to convert an entire library or set of images at once).  Then specify the output folder and naming convention you want to use.  Once that’s been decided, it’s time to select your preferences for how you convert your images.

dng2

Click on the “Preferences button” to specify how you want to conversion to occur:  Do you want full size conversions or do you want to reduce the image resolution sizes for smaller storage requirements?  (I always choose full size for maximum flexibility.)  What about compression?  Adding compression can further reduce the footprint that each DNG file has on your hard drive.  (It’s a judgement call, but I choose not to compress, again to maximize flexibility down the road.)  What about conversion methods?  You can convert to a linear format, but I don’t like this option because it’s a one-way street (you can’t go back).  Last but not least, what about inclusion of the original raw file?  In most cases I would actually recommend that.  It may increase file size, but this way you have access to the original raw date if your software needs ever change and you have access to software that can better handle the raw data you currently may not be able to manage.  All these are things to consider.  Hopefully, this short explanation of your options and the pros/cons will help in deciding how to proceed.

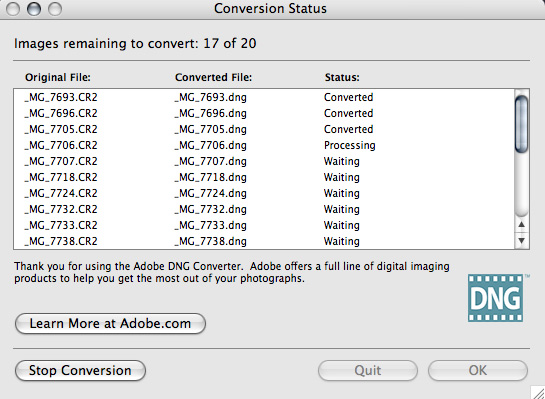
From here it’s pretty straightforward – you’ve specified everything from your input folder to your output folder, naming conventions, and conversion preferences, so now, simply click the button on the lower right to start the conversion process.  You will get a dialog window showing you the progress:

dng3

If you like, you can always click the button in the lower left to stop or abort the conversion process in case you specify the wrong folder or for some other reason.  Once the process is complete, the window will show all converted images.  Simply click “OK” to close the DNG converter utility from that window, as shown below:

dng4

Finally, open the destination folder, and voila!  Your image files will now have thumbnail previews again:

dng5

There you have it, your files are now prepped for one of the easiest, simplest, and most cost effective ways (did I mention this is free?) for both management, archiving, and accessibility – 3 very important things to consider in your image management workflow.

Granted, as with anything else, the Adobe DNG converter utility is not for everyone, as we all have work flows that call for different approaches.  So, what approaches do you use?  Feel free to share your own thoughts, processes, and suc in the comments or via email.  Happy shooting and we’ll see you back here tomorrow!

Experimenting with Photomatix and HDR

For a while now I’ve been meaning to devote some time to experimenting with HDR – specifically comparing Photomatix and Photoshop in their production of HDR photographs.  The industry preference toward the former is there for a very good reason.  Photomatix produces much better results.  Just look at this final shot (be sure to click the image for a larger view – the blog restrictions on size really don’t do it justice):

final_hdr_blog

Now, in the interests of full disclosure, I did do some additional post processing work even after the HDR processing to get the above results.  But Photomatix was superior for a number of reasons.    For starters – Photomatix gives you options in what type of output you want.  Here are the two results, side-by-side, that I got from Photomatix:

sidebyside

The first was the result of  processing from the Tone Compressor tab and the latter of Details Enhancer tab processing.  As you can see, the first produced a smoother sky, but left the foreground a little flat, while the latter had more texture and, well… dynamic range to it.  So, I decided to go with the latter in my post processing.  The Photoshop alternative, however, produced something even less desirable than either of the above.  Take a look:

ps_hdr

Not only are the luminosity levels less interesting, but there’s literally no tone curve application.  No color, no tone curve mapping, and decidedly no interest when you consider the options from Photomatix.  I am in the process of putting together a tutorial of how I got the final result, so be on the lookout for that in the next few days.  In the meantime though, I’d like to take a moment to say “Thanks” to fellow NAPP member,  Elizabeth Gast (a.k.a. Firgs,) for the kind thoughts she has over on her blog – Design by Firgs – where she talks up a shot I took a while ago that is premiering on hew new series “Accidentally Awesome” today, so be sure to stop over there and give her a shout-out!  Until tomorrow – Happy Shooting!