The Vetting Process

It seems that the more I shoot in various capacities, the fewer shots I take in any given scenario, primarily because I am thinking “yeah, the light’s not right”, or “I don’t have the right lens”, or some other obstacle is preventing me from getting the shot I really want. Whether it’s me being more selective in the shots I take, or something else, is entirely open…case in point, at a recent sports event, I captured less than 500 photos. Of those 500, only 24 got pulled for client delivery, and of those 24, I was really only particularly happy with 2-3 of those shots. Is that being too picky?

The Whole Schmear
The Whole Schmear
The Choices
The Choices
The Selects
The Selects
The Hero
The Hero

So, (and I know this will be specific to the type of photography), the question comes to mind for me: What is a good pull rate? Should I be keeping half my shots? 25%? 10? What percentage should I be pulling from a shoot to deliver to a client?

Clearly, many of the images are thrown in the digital dumpster, but I am wondering whether I should be keeping more for delivery, or for “recovery” at a later date when software improves even further? Is it even worth keeping those? What are the odds I’ll come back in five years saying “If only I had a shot of a hockey player in a white-and-blue jersey center-framed against a white and yellow wall”? My guess is slim to none, so why bother keeping those shots?

Hence the question – what is the average pull rate for photography work? Only client pulls? Client pulls + 10%? +25%? Would really be interested in hearing what others deem to be “acceptable” pull percentages, so please – sound off in the comments and let me know your thoughts…

In the meantime, keep on shooting, and we’ll see you back here again tomorrow!

Five Key Elements of Tripod Leg Purchasing


Mac Madness (Mac Systems)

It doesn’t matter whether you are a seasoned veteran or new to the field, the purchase of a tripod  is something that we all consider and eventually make the plunge with in the field of photography.  Let’s face it, we get sharper shots, are forced to plan composition more carefully, and in general, a tripod will improve your photography ten-fold over not using one.  Having said that, there are degrees of effectiveness in a tripod, and as in most things – you typically get what you pay for. Continue reading “Five Key Elements of Tripod Leg Purchasing”

Colorado – Not Just Sunsets!

While working through the material for today and next week, a friend called up and asked if I’d be interested in joining him for a stroll through downtown during sunset.  Being one to never turn down a sunset, or a photo walk, or city architecture, I readily agreed.  So, we met near downtown Denver.  Gregg and I had been talking about setting up a sunset shot of the city skyline for some time now and we’d had some ideas for a good place to scout it out.  But, tonight his motive was different. Continue reading “Colorado – Not Just Sunsets!”

Creating HDR Panos with PTGui

A while back I had approached a few companies about putting together an article on how to create panoramas.  One of those companies was PTGui – and I’ve finally had a chance to put together a few images through their software to take a look at the processing and stitching quality.  First impressions are good…what I especially liked is that the software has the ability to render both panoramas as well as HDR processing algorithms.  While a dedicated work flow that addresses panoramas and then a separate work flow to address HDR work may yield better results, I’ve gotta say that PTGui does an impressive job for a multi-function program: Continue reading “Creating HDR Panos with PTGui”

Water and Light

The idea of writing with light is nothing new to photography, the very word itself means to paint with light (from the Greek photo, meaning light, and graphos meaning write), the most successful photographers through time are ones that have incorporated an effective use of light in their work.

While reading through the Sept. issue of Rangefinder, I found myself re-visiting the subject yet again, and with artists who I’ve seen and admired before, including Clark Little and Eric Curry (you may have seen Eric’s work featured over on David Hobby’s Strobist site periodically…brilliant lighting setups!).  The whole idea gave me a moment of pause – how much of my own work has been cognizant of the power of light? (It was a very Joe McNally/National Geographic type of moment if such a moment could be attained by an aspiring one rather than successful ones like those mentioned above.)

Nevertheless, taking cue from their inspiration, I perused my own portfolio for the theme of light.  It was actually quite extensive, so much so that another theme had to be incorporated to pare things down further.  Since Clark Little’s work has always been a source of inspiration and envy, I decided to go with a water pairing.  How have I managed to capture both water and light effectively?  The exercise was a good one, and looking at your archives with a new vision or perspective has always been one I encourage.  So, without further ado, here’s my take on combining the themes of water and light:

As inspiring as it was for me, take this cue as a source of inspiration for yourselves…pick a theme (or two), and peruse your archives (or go shoot with the theme in mind), and see where your creativity will take you.  Got ideas for creativity along these lines?  Share ’em in the comments too, as ideas for inspiration are all around us.  Check out what everyone says in the comments section below!

Happy shooting all, and we’ll see you back here again tomorrow!

Five Ways to Deal with Harsh/Low Lighting

A common question I get here is how to deal with harsh or low light situations.  This is a great question, and for event photographers, it’s simply part of the job to recognize various lighting conditions and address them accordingly.  Today, I’d like to share  Five Ways to Deal with Harsh/Low Lighting:

1.  Cranking the ISO and hoping to fix in post

With advancements in technology, noise handling both in camera and in post production has resulted in some astonishing results that in previous years would have been literally unrecoverable.  While we should always endeavor to make our images shine as best we can in camera – advancements in tools of the trade simply give us more options and we would be foolish not to use them.

Here’s a good example of a shot that was done at a high in-camera ISO setting, that was recoverable to a good quality image.  It may not necessarily be of “stock photography” caliber (you really need every pixel to be perfect for stock photography), but for event photography, I would consider this acceptable quality.

Removing Noise

2.  Implementing additional light sources (Flash, video lights, etc.)

Adding light

3.  Using a tripod/monopod in conjunction with longer exposures to increase odds of sharp captures

Long Shutter Speed

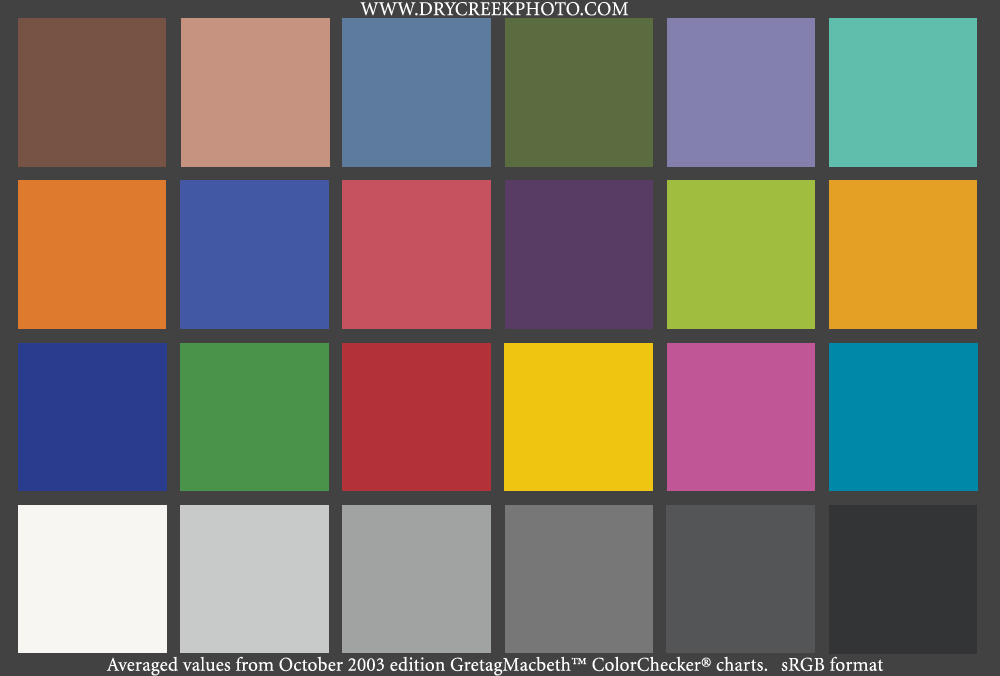
4.  Use a gray card to get good white balance/off-set the ambient lighting conditions.

Having your subject hold a color balance card (or even just a gray card) in the scene for one shot is a great way to counter-act the effect of difficult lighting, including everything from halogen lights, to fluorescent, tungsten-florescent mixes, and the garish hue from sodium vapor lights common in locales like stadiums and street light settings.

http://www.drycreekphoto.com/images/Charts/MacbethCC-sRGB.jpg
Gretag Macbeth Color Wheel
Sample Graycard Shot

5.  Use supports from the surroundings to brace your camera

Using a tree, a wall, or even the ground to help stabilize your camera can reduce the shutter speed considerably to help when shooting in low light situations.

Use a wall for support

As much as we may try to hand hold our cameras, blur is unavoidable due to our heartbeats, finger tremors, breathing, and a host of biological factors, the best we can do is help to minimize that blur by using supporting mechanisms and techniques to get as stable a shot as we can.  Even when we can hand-hold, matching that color from the scene is much easier to do when you start from a known vantage point, whether it be your own flash, or a controlled ambient scene.  So much to think about and so little time…where do you want to go from here?

Hint:  Sound off in the comments – would love to hear others thoughts, tips, and tricks for dealing with low and/or harsh lighting! Special thanks to Kerry Garrison of Kerry Garrison Photography for sharing a sample image from his own portfolio when I couldn’t track my own down in the library (bad me for not keywording fully!)…

kL2HNZVO

Copyright Isn't Just for Photographers….

The web makes for an interesting place, and often I get emails from folks asking for suggestions and recommendations on how to best protect their images from being used without their permission (and let’s not mince words here – nobody wants to have their work stolen).  Often my response is a bit of this and that, suggesting to make images “web-safe” (i.e. low resolution so they can’t really be re-printed), and to limit the images you publish.  (The more you put out there, the more you have to monitor.) Continue reading “Copyright Isn't Just for Photographers….”