How you hold your camera is so important, yet so many of us take our camera grip for granted, assuming that we will naturally hold it in the most stable way available. For some, it does come naturally, but for most of us, bad habits can take root before we even know it. To that end, there’s a couple pointers I’ve put together on How To Hold Your SLR and How To Hold Your P&S. To wrap things up, today I’d like to share a couple tips on How To Hold Your Phone Camera.
Video seems to work for demonstration purposes, so again, YouTube to the rescue:
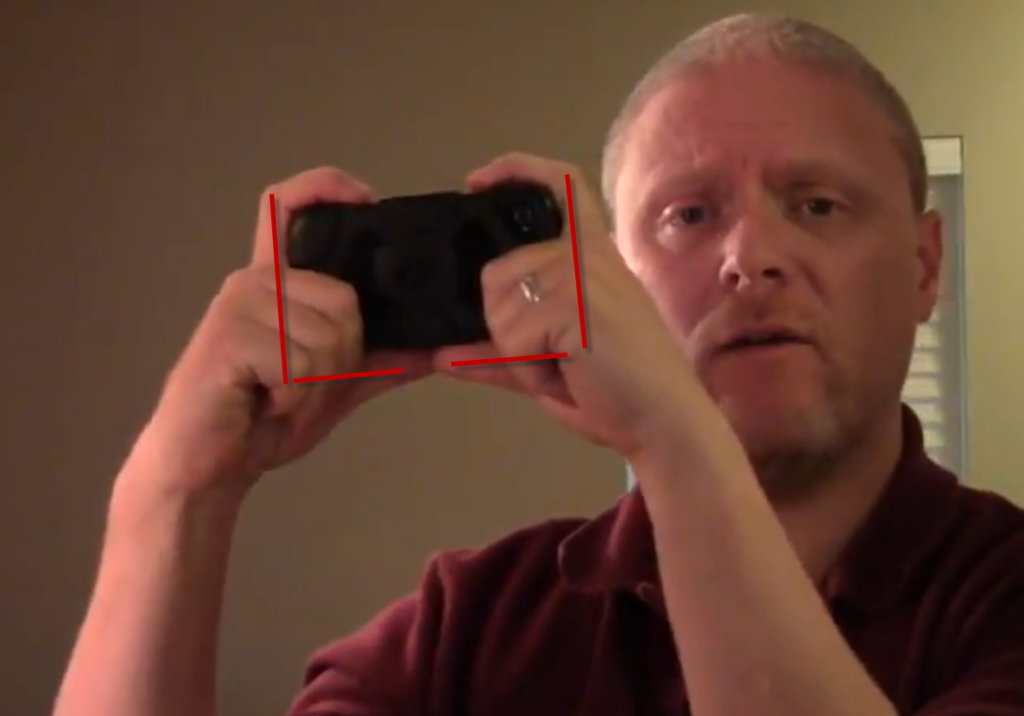
The takeaways from the video? Three simple ones:
1. Finger Curl – curl your middle fingers around the front lower side of your camera phone – this will add stability and will help subconsciously you to keep your armed tucked in
How to Hold your Smart Phone
2. Arm Tuck – Since I just mentioned it, avoid sticking your arms out – either to the side or in front of you. Extended your arms reduces stability and tends more toward camera shake. Keep your arms tucked in, elbows into your tummy by your waist.
3. Double L – Make an L with both hands and cradle your camera phone into the corner of each hand. Position the phone so that your camera lens is on the topside. That way, your thumb (either left or right depending on phone model) will be at the ready for the trigger on the edge of your phone (don’t use the on-screen one).
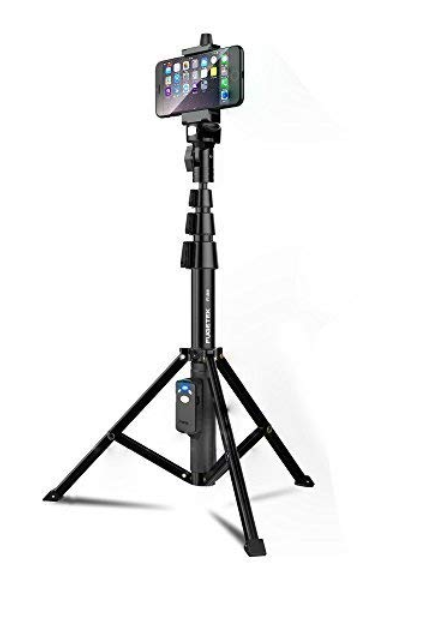
As always, there is no hard and fast set of rules to follow – using these techniques will not guarantee a stable shot. If you watch the video – notice even as I demonstrated, the camera shifted slightly even in my grip. The best way to hold any camera is not with your hands but with a tripod!
There are options out there for phone cameras now too – I like this one:
Got your own tips, ideas, or suggestions for hand holding a camera phone? What works for you? Do you use a tripod or a monopod? What gear would you recommend?
A while back I teased about a forthcoming lens review (nearly 3 months ago actually, in the Teaser Alert), and after several project shoots, the holidays, and scheduling delays, I am finally getting my act together to bring you the latest gear review…that of the Sigma 50-500mm. As a word of caution, you should be forewarned that the Sigma line-up of lenses that I have reviewed has become quite extensive. Right away this should tell you two things:
Sigma has been quite generous with me in terms of making a variety of lenses available. They likely are doing this for a number of reasons, but primarily because they know that I will give a fair, honest, and 9 times of out 10, a positive review of their equipment.
I like Sigma lenses! It should be no secret by now that I do like their lenses. They are optically on par with what one would expect from lens manufacturers by todays standards. Heck, sometimes I think the optical quality even exceeds that of the main brands out there (of course here I mean Canon and Nikon). The price is almost always right on – sometimes the price tag is a little high for my taste, but the advantage that Sigma has is that they are what is considered a “third party lens”, and because of that designation, their pricing is a notch below comparable lenses made by either Canon or Nikon for equivalent glass.
So, when Sigma came calling (actually I called Sigma), with the 50-500, the game face was put on. Right off the bat, here Sigma has been more than generous because I have now had this lens in my possession for nearly 3 months! I’ve posted a few photos from this lens over the past three months, so you may see some repeated images here, but they serve the purpose of demonstrating the various settings that I have used to shoot and test this glass. Having set the stage, let’s get started with the review. In the past, I’ve talked about things in terms of Pros and Cons, listing first the things I like, then the things I was not as much a fan of. While it has worked to a degree, I am trying to make things more uniform in the review section, so will start adhering to some more concise points and then indicating whether it is a pro or a con. Ladies and gentlemen, I give you the
Sigma 50-500mm f4.5-6.3 Review
1. Focal Range: The focal range is how lenses are most commonly identified, and this is the measure of how much “zoom” there is in the lens. Here, the description says it all. This lens ranges from a widest point of 50mm to an impressive “zoom” of 500mm. On a crop sensor camera, that means you are looking at a range of 80 to 800mm! By any standard, this is a pretty wide range, encompassing a difference of nearly 700mm in focal adjustments. I am going to call this one a Pro.
2. F-Stop Range: The f-stop range is the measure of the minimum (or maximum depending on your way of thinking) aperture the lens can handle at various lengths. When dealing with a zoom lens, as you move further out, the elements have to compensate for the change in the length by increasing the size of the opening of the aperture, so you will see adjustments as the lens “zoom” increases. The Sigma 50-500mm is dialed in to a minimum aperture opening of f4.5 to f6.3. So, at the widest zoom of 50mm, the lowest aperture setting you can get is f4.5. Likewise, if you zoom this all the way out to 500, the minimum aperture is f6.3. So, don’t be misled by the numbers, shooting this lens at 500mm will not afford you the f4.5 that is capable at the widest setting any more than the f2.8 is available on a 70-200 at the longest zoom. When you have zoom lenses, there is a compromise in aperture capabilities that must be met when zooming out, and such is the case here. I did some experimenting at various focal lengths, and here are some apparent limits at different zooms:
Focal Length
Minimum Aperture
50mm
f 4.5
70mm
f 5.0
100mm
f 5.0
135mm
f 5.6
200mm
f 5.6
250mm
f 6.3
300mm
f 6.3
400mm
f 6.3
500mm
f 6.3
Given the technology of aperture limitations in zooms, I would say that the Sigma is on par with what the expectations would be for this range. To build this lens for any lower aperture settings would make the lens both heavier and longer. I don’t even want to think about what it would do to the price either! It’s not the greatest in aperture abilities, but it’s no slouch either. I’m going to have to thrown an “Even” flag on this.
3. Noise: I brought in the noise consideration based on my first Sigma lens I ever purchased, the 70mm Macro (f2.8) which did not have HSM. The inclusion of HSM in almost every lens since has been a Godsend. This holds true for the 50-500mm as well. It’s super quiet and has convinced me that I will never stray off the Hyper Sonic Motor (or USM on Canon glass, ever gain! ‘Nuff said. Pro
4. Size/Weight: My last big lens I reviewed here was the 18-250. It was a respectable weight, but this is by far the heaviest lens I’ve ever tested. Weighing in at a shade upder 4.5 lbs (that’s 1970 grams for you Metric folks), it can cause some serious arm strain after extensive shooting. I would recommend using either a monopod or a tripod for this lens whenever possible. It also bears mentioning here that due to the weight of the lens, you want to support it in the provided collar. Supporting the rig by the camera can result in some serious shear force, which can rip the lens right off the camera. Other size considerations involve the length of the lens both fully closed and fully extended. This will draw some eyes at either end…whether it be the short side (8.5″) or the long side (12″)! Here’s a comparison shot with it next to several other lenses so you can get an idea of its relative size:
Another consideration to take into account about this size is the filter required. For those interested in using the ND filters to protect front elements, you will need a 95mm filter to cover this – not a cheap thing to purchase by any means. Ultimately the size/weight considerations really will depend on your personal ability to handle it effectively. For me, most of the time it was not a factor, so I’ll acquiesce and call it a Pro.
5. Build Quality: In line with expectations, the Sigma quality showed here. Their now easily recognizable textured exterior exudes professionalism, and just feels good in your hands. Given the weight of the lens, you don’t want to hold this gingerly, but at the same time, if the body took a slight bump from another lens in your bag, the “other lens” would likely bear the brunt of it. No questions here. It’s a Pro.
6. OS/IS/VR: Due to the limited aperture range, and the weight, the presence of OS is invaluable. Using the OS allows you to keep your aperture value low, allowing for bother faster manipulation and shorter shutter speeds, as well as some nice bokeh in the background when your distances are good. What was extra nice about this is the ability to toggle between the vertical and horizontal planes to control vibration in different circumstances. When I was on a monopod, I switched to OS 2 to help control vertical (or up and down) vibration. When shooting handheld, I was on OS 1 most of the time, under the premise that my own face, body and camera holding helped to minimize the vertical and thus needed more help with horizontal. When I was on a tripod, I turned it off per normal procedures for when using OS/IS/VR. In my book, having versus not having OS/IS/VR is definitely a Pro.
7. Cost: The average retail market for this lens is approximately $1500. Given the focal range, the aperture range, and other considerations thus far, it seems to be pretty competitive. The Canon lens with the longest zoom range is their 100-400 and that factors in at $1800. Nikonians can salivate over their 80-400 for $1850. Both price in over the Sigma lens, and it still gives an extra 110-150mm of variable range. For my own personal budget, that’s a tougher call because while I would love to own this lens – I would have to sell something else to do so, and am not sure I want to dispose of anything else in my camera bag at the moment…the jury is out on this for me personally, but for those interested in purchasing any time soon: Pro
8. Image Quality: Image quality is always subjective to the viewer/shooter, so here I will just let everyone defer to their own tastes by sharing a few sample images taken over the last few months:
Kissing Squirrels
Chopper Series
Miscellany:
Other features that bear mentioning here include the locking mechanism and the focusing rings. I thought about including the latter in the build quality, but decided to bring it in here for discussion. First, the locking mechanism is a handy feature to have for keeping the lens locked in place to prevent lens creep. The idea is a good one, but for this particular lens, it would not lock in the “zoomed” position, where I would have thought lens creep would be more of an impact, than in the “closed” position. Having said that, from the lunar shots I did (as shown above), the fully extended lens did not experience much, if any, creep. This could be because the lens was recently brought back from a service stop where knobs and buttons and toggles were all tightened and such.
This brings me to the focusing rings. The rear focusing ring is the one used for fine tuning and the front ring is for zoom. This was an adjustment for me as my other zoom lenses have these rings reversed (where the zoom is on the back ring and the focus is on the front ring). it forced me to change my style of shooting a little, but since I was working off a lens-mounted setup most of the time rather than a camera-mounted setup, my shooting habits were already being adjusted anyway. The last part is that the zoom ring did seem a bit tight to move. Whether this is by design or because of the recent factory adjustments, I am not sure, but it was just a tad stiff to adjust.
Summary:
All in all, the Sigma 50-500mm is a great lens. It stood up for the challenges of both wildlife and aerial photography, as well as lunar and even a portrait shot of the canine companion. The compression it exhibits at the far end (which is characteristic of these long zooms) is to be expected, but I would probably not be using this for landscapes unless I was in a pinch and had no other lens with me. Still, it could be done, depending on what kind of landscape you are trying to capture. The zoom really had no noticable effect on image quality without going into some serious pixel peeping, and thus, meets or exceeds all criteria that I can think of. I would definitely make a positive recommendation on this lens for either a wildlife or sports shooter where distance from subjects is often greater than 10-15 feet. (The minimum focusing distance at 500mm is something like 6 feet!)
That does it for today – I hope you enjoyed the review and photo gallery from the Sigma 50-500. Here’s the final results/scores I give the lens:
Category
Score
Focal Range
8
F-Stop Range
7.0
Lens Motor Noise
8.5
Size/Weight
7
Build Quality
9.5
Optical Stabilization
8.0
Cost
7.0
Image Quality
8
Have you shot with this lens? Share your own thoughts in the comments or with me via email. Likewise, if you have a lens you would be interested in having me review, feel free to drop me a line or share your requests through the comment area as well. Special thanks to Sigma for giving me such an extended testing period to review the lens, and we’ll see you here again soon! Happy shooting!
The subject of today’s post: The Sigma 18-250mm lens review! You read that right – Sigma has a lens that covers the range of 18-250. This allows you to go from relatively wide angle shots at the 18mm end to zooming pretty far in at 250mm on the opposite end. But, is the quality really there?
I took the lens through its paces over the weekend and here’s what I found out about the Sigma 18-250! In the interests of full disclosure, I should also note that this was actually requested by myself for review, and that I am not being compensated in any manner by the good folks at Sigma. So, this is, in fact, a loaner and I am required to send it back no later than June 26th. Since I will be busy next weekend, decided I should get the review shots done with this weekend so the lenses can be shipped back on schedule.
Pros:
Weight – this has a nice solid feel to it. With I think a total of 13 elements in here, it’s no surprise that it doesn’t feel the slightest bit flimsy. The weight adds a certain durability, but I still took things carefully as this is only on loan from Sigma for the purposes of this review. Compared to the 70-200, it certainly felt heavier, but I am not sure what the comparative weights are. All in all though, I think the weight is a good thing.
Noise – Excellent! My prior experience with Sigma is my own 70mm Macro, which does not have the HSM (hypersonic motor). That thing is NOY-ZEE! This, on the other hand, rivals the USM operation of Canon lenses. Compared to the 70-200L glass I own, the two are pretty close to each other in terms of silence in operation. The test I did for this was switch focus to manual, then take the lens all the way out to the opposite end of its last focus point. I then switched it back on to AF and listened for the motor operation. Sure, I could hear it when listening, but man was it quiet!
Range – This is without a doubt, my most favorite element (bad pun) of this lens. The fact that I could go from wide angle work to close up work with such ease makes this an ideal lens for things like photo walks (which are becoming more and more popular), or for just a go-to lens on a regular basis without having to switch out.
OS – Optical Stabilization – the equivalent of IS on Canon lenses. While I don’t own a Canon IS lens for direct comparison, I will say that it went a full stop faster than my 70-200mm CanonL f4.0 did at the same focal length/light. In a day and age where fast glass is becoming pretty much the standard, I would say this meets the mark.
Size – This lens is remarkable compact – standing at almost half the height of my 70-200 comparison lens. Think about that – a wider range of zoom and half the length. I can store this vertically in my bag, saving precious cargo space for other accessories and accouterments. Alongside would be the 70mm Macro, the 10-22mm, lensbaby, flash and other such items. Very tempting for that reason alone.
Feel – The signature brushed metal feel of Sigma lenses is present here and it just exudes “cool” and “professional”. No bells or whistles, no fancy L rings or anything, just brushed smoothness. Gotta love it!
Image Quality – The bugaboo, the real deal, the end result – the pictures! So how does it stack up? Pretty well actually, but rather than wax on, I’ll just share some images I took for you to judge the IQ – just remember to distinguish IQ from compositional quality! 🙂 Here’s the results…
Cons:
Weight – Yes, I am listing weight as both a pro and a con – the weight did get to me after a while of shooting on the 40D. While it’s durability is not in question at all, the heaviness can get on your wrist and forearm. I should put this qualifier out that I am still recouperating a tender arm from our move last July, which I am for the most part over, but it still flares up with extended use. So, things like shooting for a day can wear on me. Lighter is always better, but if I had to choose between durability and lightness, the former would win every time. Take what you wish from this con then…’nuff said.
Cost – It retails at B&H for $529, which is always a big price tag to swallow no matter what you are buying. Then again, when you look at a comparable lens from Canon that has the OS/IS built-in, the Canon counterpart goes for almost twice that at $1025 (and you still don’t get the same range of focus). While it may be a lot to pay on first glance, you really are getting quite a bit of bang for your buck.
Truth be told, I couldn’t find much else to nit on. I also liked the fact that they made this lens so you can put the lens hood on while also leaving the cap able to attach. Don’t ask me why, but I like that… Believe it or not, the lens also performed fairly well with portrait work too. I did a few test shots with yours truly as the subject and even got one I liked! So, would I recommend this lens? Absolutely! To see a complete gallery of photos I took this weekend, including the portrait ones, and even a few of the moon last night with a TC attached), follow this link:
Well, that should be enough content for the day (I know, my reviews are long-winded), so get out and shoot (with a Sigma if you like! 🙂 ), and we’ll see you back here tomorrow. Happy Shooting! Don’t forget – would love to hear reader thoughts and ideas for product reviews – let me know in the comments or via email!
As with most things, your camera needs maintenance too – and I’ve waxed here periodically about establishing a maintenance schedule, cleaning schedules, and the whole schmear – but I’ve never addressed the specifics of cleaning that most important piece of equipment – the sensor in your camera. As I dive in here, it bears mentioning that I am not advocating any one of these over another – just sort of laying the foundation on the various ways that are available:
1. Having someone else do it – Most camera stores offer this service for around $50, so if the idea of getting anything near your sensor just gives you the heebie-jeebies, by all means, this option is a good one for the nervous Nelly.
2. Air Blowers – These are rapidly becoming one of the more popular options as they are relatively cheap, easy, and don’t require messing around with chemicals. You simply put your camera into the cleaning mode, insert tip of the air blower near the sensor and puff it a few times remove and you are done. Some claim fantastic results with these while others say stubborn dust won’t come off from this method. The advantage of this approach is that you never have to touch your sensor (technically the filter in front of the sensor) with anything! The downside is that results may not get everything off.
3. Sensor swipes – Certain swipes are made just for camera sensors that use hydrostatic charges to remove dust from your sensor. It’s got an advantage in that it’s a dry cleaning approach so requires no chemicals. I have heard of some who are reluctant to use this as foreign fibers and materials can get in the swipe which could scratch your sensor.
4. Chemical cleaning – Pec Pads, Eclipse alcohol and sensor swipes all combine in this method to give the most thorough cleaning, virtually guaranteed to remove even the most stubborn dirt from your sensor. The risk – doing it wrong can permanently damage your sensor and the cost of buy-in is a lot higher than other methods. Once you buy-in though, the long term cost drops rapidly!
Since I only mentioned it briefly at the beginning, I should also clarify that the idea behind cleaning your sensor is actually a misnomer – all of these solutions are cleaning the filter in front of the sensor – the sensor technically never gets cleaned unless you use option 1 – sending it in for a cleaning. All the camera vendors (Canon, Nikon, Pentax, etc.) offer this service, but the downside there is multi-faceted in that it’s usually more expensive, you have to go without your camera for a period of time, and there’s shipping involved!
What methods do you use? I know some people that combine multiple approaches, while others simply just shake it out once and a while (heck, I read a story once of a guy that used his t-shirt! – not sure how valid it is, but you get the gist). Sound off in the comments with your own cleaning products and approaches!
So often, photos that inspire you are ones taken from new angles, or from angles that you can’t normally get to, or think to get to. Monopods are great tools in this regard…you can extend a monopod up over your head for more of an aerial perspective, or even turn it upside down to get an angle that might be otherwise pretty awkward or uncomfortable to get into just to get a unique shot. I love my monopod!
While the good money will always add features and functions that don’t exist on lower end models, I do think that even the most basic of monopods can be useful – to the degree that even going with a Wal-mart brand or generic named vendor can be a sound investment. If you are talking about just getting to a place you can’t get to on your own (or even with a tripod), the difference between aluminum and carbon fiber on a monopod doesn’t have as much impact here in my opinion.
Now if you are going for the stability factor, yes, a sturdier monopod would likely yield better results, but how much better do you expect from a single-legged support mechanism? Seriously – even with your own two feet, you can get pretty steady with your shots if you use a good holding technique, tucking your arms in, leaning on a wall or tree, and going between breaths (or shooting between heartbeats as my former Drill Sergeant said in the Army.) How is one foot going to get you more stability than two feet? On it’s own, not much, so I don’t sweat much over the vendor here…
Check out these low angle shots I got with just a Wal-mart tripod and some creative thinking:
The Denver Art Museum, shot near midnight. The camera again, was upside down (I rotated it in post), and I held the foot of the monopod to get this low view. EXIF Data: ISO 100 33mm f/8 8 second exposure (it’s a tad blurry when you zoom in…)
This serene harbor was shot with the monopod, and the camera braced up against a tack shop. EXIF data: ISO 100 18mm f/11 5 second exposure
I shot this waterfall with the camera upside down and me holding the foot of my monopod while the camera was as close as I felt comfortable putting it close to the base of the waterfall. EXIF Data: ISO 100 21mm f/11 2.5 second exposure
This shot was taken with my monopod and the camera braced against a streetlight. EXIF Data: ISO 800 22mm f/22 4 second exposure
I’ve not been in the gear market for a while, but while discussing some technical stuff with colleagues over in the NAPP forums, had some time to check pricing in various outlets for used gear, and there are some deals going on these days! In my previous experience, used gear would go for roughly 10-15% less than the new retail equivalents. That percentage is apparently a bit low now as some gear is selling for up to 25% off new pricing! So, if you’re in the market for gear, check out the used market for some serious savings! Here’s a few items I saw in just a mere matter of minutes:
Nikon D7000: New = $1200, Used = $1000 (16%)
Sony A580 kit: New=$899, Used = $699 (23%)
Sigma 50mm f1.4: New=499, Used = $420 (15%)
Canon 500mm f4: New=$7000, Used=$5600 (18%)
Canon 5D Mark II: New=$2500, Used=$2135 (15%)
There’s more out there, but that’s just a sampling of what you can expect to see. The nice thing is many of these items include useful accessories like bags, straps, cases, and media cards as incentive pieces…savings add up even more (about a 20% average in my estimation). For what it’s worth, I used the forums from Fred Miranda to look up used gear pricing and B&H for retail equivalents. Your mileage may vary.
Buy Sell Listings
What sort of discount would you expect to pay for used gear over it’s new counterparts? Is 15% the new minimum? 20%? 30% What’s considered a “good deal” anymore? Since I’ve not been in the market to buy anything lately, am totally not sure where things are except what I’ve seen above. Those sound good to me but I have not scoured all of the internet to be sure…so, let me know if you’ve had similar or different experiences. Likewise, if you’ve got any of your own deals you’ve noticed recently? Sound off in the comments!
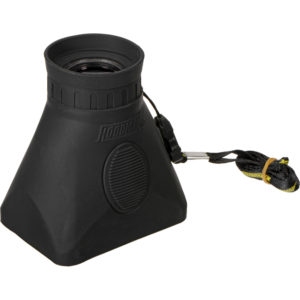
As mentioned previously in the monthly contest series post, this month the featured vendor is none other than Hoodman. Their patented and widely recognized CF cards and loupes are proudly made in the U.S.A. (the only ones I know of that can make this claim), and are virtually indestructible. They have generously donated one of their Loupes for the contest winner, and allowed me a chance to review it as well. So, without further ado – here is the latest in the hardware review category for the blog:
Hoodman Loupe
The whole purpose of the Hoodman Loupe is to block stray light from hitting your LCD. In sunlight or hazy scenarios, it can often be challenging to view your screen, and even change settings if you own a newer camera. Given it’s simple function, the review aspect of this really is a simple matter to determine, does it do the job it claims to do or not.
Not only did it completely block all ambient light with ease, the Hoodman Loupe also seemed to make the on-screen photo much more brilliant and crisp than I had remembered before using it. That surprise was further mitigated by seeing how compact the Hoodman Loupe actually is – at roughly 2 inches long and an inch deep. Not only did it perform adequately, but at this compact size, the Hoodman Loupe is an easy addition to your camera bag with the minimal footprint it takes up in space.
Most rubber or manufactured products attempt to make things slick of shiny and in so doing, the product becomes quite slippery and difficult to hold. Not so with the Hoodman Loupe, as the rugged rubberized exterior was nicely made, and I was pleased to get an easy grip on it. Although easy to hold when in use, I was not as thrilled with the ease of porting. The short trap that they provide to carry it around your neck is much too short for me. Now granted, I am 6’1”, but certainly no giant, and the size was just awkward for me. While the quick release snap does attenuate it to a certain degree, the idea of keeping it tethered somehow is a little more reassuring (I have a penchant for losing small items when taken away from my body…LOL) The accompanying carrying case was a nice addition, but did serve to really make it easier to carry…this seems to only serve as a storage container for when not in use so you can differentiate it from other gear in your bag.
I did recall after using this that a DIY solution was suggested by Larry Becker, of NAPP notoriety (he does the weekly NAPP News segments and writes his own blog at Larry’s Cheap Shots), and think his belt clip idea is both innovative and and highly functional. If the folks at Hoodman made this accessory and slapped their brand on it, I’d be half inclined to purchase the entire kit from them directly.
It’s a fairly simple idea in total, and not much else to say other than – it works! The sturdy construction, and compact nature of it is perfect for any photographer who wants to utilize their LCD. For those of us with older cameras where shutter, aperture, ISO, and all other settings done via dials and the top viewer, it may not be as relevant, but for shooters using more recent gear like the Canon 50D, 60D, and 7D, the back screen is used much more to make these adjustments, so a device like the Hoodman Loupe could be a huge aid in making sure you’ve got your settings where you want them. For $80, you almost can’t go wrong! This is definitely the accessory you never thought you needed, but you really did!
Remember, this very Loupe is being given away at the end of the month, so for your chance to win this cool accessory, don’t forget to submit your BLOCK themed photo in the Flickr thread here. Good luck to those who enter, and thanks again to the folks at Hoodman for their sponsorship and contribution!
A while ago I was thinking about what would be the best way to set up all the hardware for a studio scenario and blogging about it with the reading audience. The idea of the Tether Table came to me quickly and on approaching the folks at Tether Tools, it was met with equal enthusiasm. So, in short order, one was dispatched to me for review here on the blog – this will be the one given away in the upcoming end of month finale for the March Flickr Contest. So, without further ado, I give you:
The Aero-Master Tether Table
The Tether Table is a pretty straightforward device – it comes with the table itself, made out of T6 Aerospace Aluminum (whatever that is). Regardless of what the official name is – this table is pretty solid – I have no doubts as to whether it might bend under the weight of a laptop. What I found to be really nice is that it spins onto a tripod (sans head of course) quite nicely, and just as easily fits over the top of a light stand. The stability is also pretty equal between the two once it’s locked down.
So, how does the table lock down? There’s four little Allen screws that tie the female acceptor tube to the bottom of the table through the top. Their design makes them lay seamlessly flat so no worries about your laptop getting off kilter. Here’s a few sample shots to show you the design:
The other part that bears mentioning is the additonal kit item (not included normally with a Tether Table) is the Jerkstopper – a handy little device that attaches at both the laptop and camera end to avoid getting cables tugged out of your connection points. They really help to keep equipment from falling, plugs or connectors from getting ripped or damaged, and the add-on value is well worth the $22! Here’s the product shot from Tether Tools site to give you an idea…
The first problem I found was that it does require either a light stand or a tripod. So, if your camera normally goes on a tripod (mine does) and you have an external flash that goes on the light stand (mine does), then either the flash has to become more of a portable device (enter the wireless trigger system), or you need to get another light stand. I initially lucked out in that I am/was running the triggers through their paces for my good friend Kerry Garrison over at Blackbelt Lighting for an upcoming review this Friday, but the need for another light stand has become pretty clear to me. When I am using two-light setups though, things could get complicated, but that’s a personal gear issue, nothing really to do with the Tether Table itself, so no harm no foul there.
The second problem I found was budgetary. While the sturdy construction and clean polished look and feel are certainly features I can appreciate, being on a budget, the cost of entry to obtain a Tether Table of this caliber is a little pricey for my blood. At $179 for the Table and another $22 for the Jerkstopper kit, we’re over $200 and while it’s not inconceivable, it’s certainly rich for the enthusiast blood. For most professionals it is easily justified and likely something you can itemize in an invoice if needed. So, not completely out of reach, but up there for sure. Oh well, no one ever said photography was going to be cheap!
When all is said and done, I do think it’s a worthwhile investment. These can be invaluable in a studio or on-location shoot where you need to be moving around in between shots. The benefits of both the Tether Table and the companion Jerkstopper could be invaluable in a number of environments, including macro photography, food photography, portrait photography, and most product photography where a dedicated preview monitor would be super handy to have! To that end, I will be sad to see it go, but alas, the Contest Series gets priority! Thanks to the folks at Tether Tools for their generous contribution, and best of luck to all the participants! (If you haven’t entered your photo yet, the theme is FLAT, and the contest link is both here and at the top of the page!)
Have you got an idea for a product review? Is there something you’d like to see a test drive on? Sound off in the comments and I’ll try my darndest to make things happen! See you next time here on the blog. (And don’t forget the Facebook page where the “Behind-the-Scenes” video is posted on using this very table!…”Likes” and comments there are always appreciated too!).
Over the holidays, the SLR was in great demand for the family portrait work, and I pulled it out periodically for some “street-style” photography. I found myself instead getting out my 4 year old P&S camera, which is very long in the tooth to say the least. So, I’ve decided that it’s time to retire the one and venture into new territory. I am currently waffling between three cameras:
Decisions, Decisions, Decisions
The G12 is a compelling camera. The features I am liking are the LCD resolution, the f2.8 on the lens, and the manual controls over the exposure triangle (shutter, aperture and ISO). It helps that I can also shoot in RAW which would fit my existing work flow. The biggest cons for me are the proprietary battery, the MP count (I’d rather have 8 than 10 for this size sensor – makes for better noise handling in my opinion), and the price tag. (Really? $500 for a P&S Canon? I can get an entry level SLR for that price…take it down $100 and you’d have a lot more buyers!)
The Powershot SX130 IS is equally compelling. With the larger 3″ LCD, acceptance of regular AA batteries, and manual controls, it’s tempting to go with this option. The problem is that the Megapixel count is so high. I wasn’t thrilled with the 10MP count above, so 12 here makes me very nervous. After all, let’s face it that Canon’s handling of noise is not at the standard of the Nikonian crowd. Here it’s also not the budget-buster that the G12 is either – a very enticing element to consider.
The Powershot SX 120 IS is no slouch either. Saving a little more coin is always a good thing (it retails $20 cheaper), and is back down to 10MP for the sensor. The problem here? Saving $20 also compromises the ability to control things manually. Frame rate is also noticeably slower too. That’s a lot to lose to save a few pennies. I likely will not go this route as it’s just too much being sacrificed for a minimal short term savings.
So, it’s really between the G12 and the PowerShot SX130 IS. I think I am leaning toward the latter simply because I am not going to sacrifice as much in functionality. Still have to check out some reviews and DXOMark ratings though. A final answer should be forthcoming soon, but that is the upshot of where the Christmas Cash is gonna ching! Of course, new gear is always coming out and Spring time is no exception. That will lower the cost of entry on these current generations considerably, so I might hold off for a month – see what happens in the market to these three!
Some, of course, will ask why I didn’t consider the new SX30 or the A12000. Truth be told, in Canon’s line-up, the A series is a notch below the SX series for a reason…it’s just as beefy! As for the SX30, I read several reviews on it and the noise level at even ISO 400 seems high to what people were expecting. I’m just not willing to throw money at a P&S for no reason other than “because it’s new”.
Let’s turn the perspective outward…anyone out there get any Yuletide Yen they’ll be using for new gear items? What are you getting and why?
It’s no secret that prices for things tend to adjust based on the season. For instance, gas grills are cheaper in the winter, as are fans, air conditioners, and pool chlorine. Conversely, sweaters, warm clothing, and snow shovels can be had for bargain basement prices in the summer. But where do digital cameras and other technology items fit into the picture? My line of thinking is that such items are less susceptible to seasonal trends. But, apparently, there are trends that can be deciphered for pretty much anything – camera gear included.
The most recent issue of Consumer Reports suggests that pricing trends for digital cameras tends to be the best during March and April, then again in September and October. This kind of makes sense after I thought about it because that’s typically when the vendor rebate programs are rolled out, and you can apply discounts to existing models that are probably already marked down as new products are pending release. Vendors have to clear out old inventory sooner or later, and the rebate programs are a way to do that.
So, does that mean the Powershot G11 you just got for your spouse, sibling or parent was a bad buy? Not necessarily…but if you are looking to add gear to your own inventory, you may want to consider holding off until the months Consumer Reports suggests to see the biggest savings. Want to see what the seasonal trends are for other items? I’d highly recommend getting your own subscription to CR, but for those interested in seeing what they suggest for 2010, here’s a summary from my own issue:


")


")
")


