Category: news
Cleaning Your SLR
I’ve written several times on the blog about cameras, sensor dust, and cleaning your SLR. You can review those here, here, and here (5 Ways to Clean, 5 Times to Clean, and 5 Ways to Avoid Dust). I’ve also elaborated a bit on the various options for cleaning your SLR from the no-contact to the wet and dry methods, but I’ve never really addressed the fundamentals behind camera dust in question. So, when someone asked recently on Quora about the Self-Cleaning Mechanisms in SLR’s, I figured a more complete write-up might help. This was posed on Quora recently, and in the interests of sharing the points I made there to any of the reading audience here, figured it’d be worth inclusion. So, without further ado – here’s the full skinny on SLR’s and self-cleaning:
Self-Cleaning Mechanism

The self-cleaning mechanism of SLR’s has many larger concepts that need to be addressed to fully understand what is happening, but in basic principle, a camera will use the battery to either shake or vibrate the dust off, or, it will negatively charge air particles that will attract the dust off the sensor and let the now airborne dust fall down to the dust trap at the bottom of the sensor. Having said that, there’s a couple additional points to make in this question that can help:
Sensor Cleaning Versus Mirror Cleaning
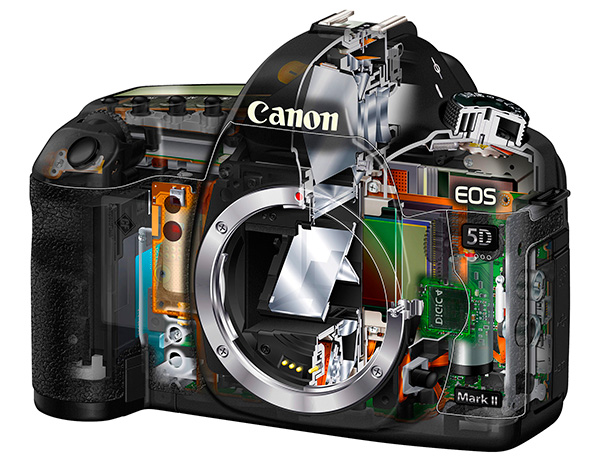
The internal self-cleaning addresses the sensor itself, whereas DIY cleaning methods really are addressing the mirror that reflects an image onto the actual sensor. Unless you want to lock the mirror up (such as on older cameras) and clean the actual sensor, any cleaning efforts you do on newer cameras is really only addressing the mirror. Because of that, the internal sensor cleaning will address the sensor cleaning adequately, but does not address the mirror in the SLR (until of course the dust trap fills up and needs to be emptied by an authorized professional from Canon, Nikon, or other third party). When it comes to cleaning the mirror, you will have to do that yourself.
Is the dust really being removed?
While the self-cleaning function does “remove” dust from the sensor, through either vibration (or shaking), it’s not really removing the dust from the camera. Here is where the larger question of “where does it go” remains unanswered for the most part, and also where the usefulness of the feature sort of falls flat. Inside cameras that have this feature, there is a dust trap at the bottom of the sensor that catches dust when it is shaken off the sensor and/or sensor mirror. Simple laws of physics suggest that eventually this trap will get filled, which means it needs to be emptied, or you need to send a camera in for cleaning.
Preventative Maintenance
While I have personally found that the self-cleaning feature is useful to a degree, the fact that dust is not being removed entirely from the camera detracts from its value, as well as the consideration that difficult or stubborn dust is not removed sort of devalues the benefits in the long term. Instead, incorporate a system when using your camera to avoid introducing dust in the first place, such as some of those mentioned already, including, but not limited to:
1. Keeping the camera pointed down when changing lenses
2. Using a changing bag
3. Turn the camera off before removing a lens
4. Change a lens as quickly as you’re able – the longer the face is open the more chance of additional dust being introduced.
5. Keep your camera clean and try to change lenses in less dusty situations (i.e. not in the middle of a sandstorm)
DIY Mirror Cleaning
There are several methods of dust removal you can use such as the use of a Rocket Blower (also use with the camera pointed down), mirror wipes, lens pens, and other similar products. These are often categorized as no-contact and contact cleaners. Within the contact cleaners, there are also sub-categories: wet and dry cleaners.
No Contact Cleaners
No contact cleaners (blowers) use a puff of air to dislodge dust from the mirror and when used properly, the dust will fall out of the camera entirely. A great product in this category is the Giottos Rocket Blower.

Contact Cleaners – Wet Versus Dry
Dry cleaners generally refer to the brushes like Lens Pens that act like a paintbrush of sorts that sweeps dust off the mirror. Conversely, the wet cleaners use a pad and a liquid that is swiped across the mirror to swab the dust off with a quick drying agent (usually some form of an alcohol) – the one I’ve used is a combo of Eclipse solution and PecPads. Both of these often come with increased risk of damaging your camera, so I would only recommend these for those comfortable with the mechanics of cameras in general. The dry cleaners are less likely to damage, but still carry some risk, so keep these in mind in your cleaning approaches.
Top Ten Travel Gadgets
After the last two weeks of traveling, I am a little whupped already. But, in every cloud is a silver lining, as I noticed a few items that I would find useful on every trip. With the idea of travel items in mind, I started asking my travel companions and online friends and forum members about what they consider “essential” travel accessories. Photo gear made the list on several levels, including one that made the top ten! So far I’ve seen 25 different items recommended by various people.

The ones that made the top ten:
| Rank | Item | # Votes |
| 01 | Emergency/First Aid/Medical Kit | 6 Votes |
| 02 | Eye Shades | 4 Votes |
| 03 | Extension Cord | 3 Votes |
| 04 | Ear Plugs/Noise-canceling headphones | 3 Votes |
| 05 | International Adaptor | 3 Votes |
| 06 | Swiss Army Knife | 2 Votes |
| 07 | Bottled Water | 2 Votes |
| 08 | Travel Blanket | 2 Votes |
| 09 | iPad/Netbook | 2 Votes |
| 10 | Camera | 2 Votes |
So, we made the top ten travel gadgets with the camera! Some other notable items that included camera type things were batteries, USB drives, and an extension cord (for charging electronics)! Kind of a cheesy post for Friday, but it does make me wonder what people would consider their top ten photo accessories for their camera bag! ![]() What’s the census out there in photo land? Got your own travel gadgets you must have? Or even camera gadgets for your photo bag? Sound off in the comments, and if enough crop up repeatedly, a poll may be in the future! Have a great Halloween, and don’t eat too much sugar!
What’s the census out there in photo land? Got your own travel gadgets you must have? Or even camera gadgets for your photo bag? Sound off in the comments, and if enough crop up repeatedly, a poll may be in the future! Have a great Halloween, and don’t eat too much sugar!
*****
P.S. Don’t forget, this weekend is the last chance to enter for your chance to win a free Lensbaby Composer, courtesy of the folks over at Stack Exchange!
Which Photos Count
There’s an age old axiom that says you truly are not an expert or well-versed in any field until you’ve practiced it for 10,000 hours. Think about that number. Ten thousand! That sounds pretty daunting. It means taking a lot of photos to get to that level. Let’s just assume for a minute that in photography, 10,000 hours = 10,000 photos. That would still take a lot of time to build out a photography portfolio
If you take one photo a day, it will take you 10,000 days to become fluent with photography, or 27 years! One good photo a day means it will take you twenty seven years to become fluent in the field of photography. Look at how that extrapolates out:
Two photos/day = 5000 days (14 years) Four photos/day = 2500 days (6 years) Eight photos/day = 1250 days (3.5 years) Sixteen photos/day = 625 days (2 years)I don’t know about you, but the last time I took sixteen good photos in one day was…well, um, never really! I could go into a long soliloquy about learning the craft encompassing more than just taking good photos. And it’s true. You learn when you take bade photos, because you’ve eliminated a process that doesn’t work. You also learn from reading articles, books, attending seminars and workshops. Learning a craft is much more than just one photo, but the math still holds true. So, even if you spend four hours a day learning about photography, it will be a long time before you are fluent (at least 6 years anyway, right?).
The caveat now is that learning a trade or craft is more than just study and reading – it’s also doing. So, in all of this, let’s say it breaks down to about 25-25-50 in percentages. I say this primarily because you learn so much more from doing than studying and reading. In the field of photography, this means taking pictures. You have to take pictures (both good and bad) to become a good photographer. Now comes the stickler – the question that I was asked and is the title of this post: which photos count?
When learning, and studying your craft, does the crappy iPhone photo count? The stupid cheesy grin shot you did with your “bff” at the beach? My answer (surprise surprise) starts with “It depends…” That’s the first part…the second part is:
What did you learn from that photo?
If the answer is – “I learned that on camera flash works with a portrait and the sun setting behind you”, then yes, it counts! If the photo is “Well, I learned that on camera flash in a studio shot of a digital telephone doesn’t work too well because of excessive specular highlights”, then hell yeah, it counts! The converse also holds though too. If you take a snapshot during your vacation with yourself and your s.o (significant other) at Plymouth Rock, and it never sees the light of day past your refrigerator, then no, it does not count! If you learn or gain nothing from a photo you took, it doesn’t count. Here’s some shots from my history that I’ve learned from – can you tell which ones I shot at the beginning of my foray into the most recent? (Don’t cheat and look at the meta data…which ones are first, middle, and last chronologically?)


The Falling Photo Bubble
 Over the course of the last several days, a conversation has been happening in the NAPP forums regarding the “photography bubble”. I am calling it this because just like the tech boom, the housing bubble, and other historical events, the photography industry seems to be having something of an adjustment in recent weeks and months. Have you noticed it too?
It’s happening in many communities, workshops, seminars, and other such events where participation has dropped considerably. From what I understand of things, communities everywhere are seeing marked drops in the active member rolls. Many colleagues who teach workshops and seminars have also noticed a drop-off in attendance and interest. The economy is certainly having an impact on the disposable income of many enthusiast photographers. But it’s not just that…
Even the Worldwide Photo Walk, which only two years ago drew crowds that maxed out four different locales around Denver (at 50 participants per walk) is now barely cresting the 100 member count among only three active ones. The downtown Denver one is maxed out for 16th Street Mall, but the Louisville one and the Boulder one still have several openings. Know what the requirements for these are? Nothing! They’re free!
All you need is a camera. It can be a camera from your phone! It can be a film camera! A pen camera, or even a pinhole camera would be enough to go out and take photos with. Yet the attendance has dropped more than 50% from a mere two years ago. Probably the biggest indicator for me is the amount of Meetup activity. Leaders and managers for photo walks are not as active, and walks are getting fewer people.
So that means attendance at free sessions has even waned to less than 50% of where it was even two years ago.What happened? Now a lot has changed between now and two years ago. Economic times are harder…I get that big time! But a larger trend is occurring in photography, and I think we should be standing up to take notice. Why?
I suspect a certain degree of market saturation has happened, believe it or not. Many people have hung out shingles. There’s been so many workshops, seminars, and conferences held – everyone believing that there is an infinite desire to learn from anyone wiling to teach, lead, or share. While the capacity to learn is endless, the capacity of the market to sustain an infinite amount of instruction is likely not sustainable.
The market has peaked! Just like the tech bubble of the 80′s, the housing bubble of the 90′s, and even (as a friend put it in the forums) the CB radio bubble of the 70′s, the bubble has burst. People are starting to hang up their hats, cameras, and photo gear. Many have said “enough is enough”, and simply just don’t have the time, energy, or interest to sustain their habits, creative endeavors, and SOHO businesses in photography. The market waxes and wanes, and the time to wane has come to pass…
It’s kind of sad to one degree, because it’s never easy to sustain a creative vision or energy in a shrinking market. Monetizing that vision is even more difficult because the almighty dollar has been stretched to capacity – and as a result, I suspect that as the dust starts to settle in the coming weeks and months, many will have stopped their craft. As I said, a sad thing, but lest we all be concerned that our own craft will die, or go silent, it’s times like these that we must muster the energy, motivation, and vigor to continue on. Not necessarily unimpeded, but at least try to continue…it’s those that continue through the best and the worst of times that will be more successful in the long run!
***
What kind of indicators have you seen that the market for photography, and photo education has seen a peak? Has your own interest or ability to participate waned in recent weeks and months? What trends have you seen in your own market and demographic with regard to the photo community?
Learning Digital Photography: Episode #57
You heard it right, the latest and greatest episode of the LDP Podcast is now live and downloadable from your favorite outlet. Six long weeks in the making and with the patience of my special guest, Kevin Mullins, this is Episode #57!

For those of you that may not have heard of him, Kevin Mullins hails from across the pond to get together on a podcast and talk shop on photography. A well-established wedding photographer in the UK, Kevin is probably one of the most talented wedding photographers I know. He joins me in the latest episode of the Learning Digital Photography Podcast to talk about the documentary style of photography and the impact that has on how you both shoot and manage your business. You can download it from iTunes or directly from the website via the following links. Below the links are the show notes…enjoy!
Talking Points
- Approaching group shots versus cookie-cutter portrait poses
- Work flow of the wedding day – how things start, where to budget time, & how things end.
- Gear preferences
- Pre-planning the event in Documentary Photography
- Still and video convergence
Links Mentioned:
[display_podcast]
Hardware Review: Hoodman Loupe
As mentioned previously in the monthly contest series post, this month the featured vendor is none other than Hoodman. Their patented and widely recognized CF cards and loupes are proudly made in the U.S.A. (the only ones I know of that can make this claim), and are virtually indestructible. They have generously donated one of their Loupes for the contest winner, and allowed me a chance to review it as well. So, without further ado – here is the latest in the hardware review category for the blog:
Hoodman Loupe
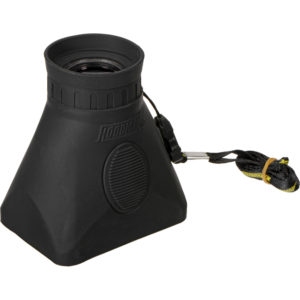
The whole purpose of the Hoodman Loupe is to block stray light from hitting your LCD. In sunlight or hazy scenarios, it can often be challenging to view your screen, and even change settings if you own a newer camera. Given it’s simple function, the review aspect of this really is a simple matter to determine, does it do the job it claims to do or not.
Not only did it completely block all ambient light with ease, the Hoodman Loupe also seemed to make the on-screen photo much more brilliant and crisp than I had remembered before using it. That surprise was further mitigated by seeing how compact the Hoodman Loupe actually is – at roughly 2 inches long and an inch deep. Not only did it perform adequately, but at this compact size, the Hoodman Loupe is an easy addition to your camera bag with the minimal footprint it takes up in space.
Most rubber or manufactured products attempt to make things slick of shiny and in so doing, the product becomes quite slippery and difficult to hold. Not so with the Hoodman Loupe, as the rugged rubberized exterior was nicely made, and I was pleased to get an easy grip on it. Although easy to hold when in use, I was not as thrilled with the ease of porting. The short trap that they provide to carry it around your neck is much too short for me. Now granted, I am 6’1”, but certainly no giant, and the size was just awkward for me. While the quick release snap does attenuate it to a certain degree, the idea of keeping it tethered somehow is a little more reassuring (I have a penchant for losing small items when taken away from my body…LOL) The accompanying carrying case was a nice addition, but did serve to really make it easier to carry…this seems to only serve as a storage container for when not in use so you can differentiate it from other gear in your bag.
I did recall after using this that a DIY solution was suggested by Larry Becker, of NAPP notoriety (he does the weekly NAPP News segments and writes his own blog at Larry’s Cheap Shots), and think his belt clip idea is both innovative and and highly functional. If the folks at Hoodman made this accessory and slapped their brand on it, I’d be half inclined to purchase the entire kit from them directly.
It’s a fairly simple idea in total, and not much else to say other than – it works! The sturdy construction, and compact nature of it is perfect for any photographer who wants to utilize their LCD. For those of us with older cameras where shutter, aperture, ISO, and all other settings done via dials and the top viewer, it may not be as relevant, but for shooters using more recent gear like the Canon 50D, 60D, and 7D, the back screen is used much more to make these adjustments, so a device like the Hoodman Loupe could be a huge aid in making sure you’ve got your settings where you want them. For $80, you almost can’t go wrong! This is definitely the accessory you never thought you needed, but you really did!
Remember, this very Loupe is being given away at the end of the month, so for your chance to win this cool accessory, don’t forget to submit your BLOCK themed photo in the Flickr thread here. Good luck to those who enter, and thanks again to the folks at Hoodman for their sponsorship and contribution!
Spring Photo Projects
With Spring in the air (if not already sprung), many of us are out and about brimming with photo ideas after being couped up for a chilly winter. What’s that you say? No photo projects brimming yet? No problem – here’s a few to get you started:
1. The Call of the Birds: Avian photography has always been something of an art form, with many of the hard core, die hard types venturing way out into the boonies of mountains, hills, lakes, and other far-reaching places. For the rest of us though, it’s tough to find the resources (time and money) to go to the birds, so another option is to bring the birds to you! Buy some bird feeders and see what comes! My folks have several bird feeders in upstate New York, and every time I visit, there are birds flying everywhere. Pine cones with peanut butter, humming bird feeders with sugar water, and even just a plain old bird bath with feed from your local DIY store can bring a bounty of birds to your doorstep!


2. Join a photo group: We’re everywhere! From ASMP groups to NAPP groups, Meetup groups, and WPPI, you can find groups for pretty much anything ranging from professional development, to studio lighting, and just groups of photographers that like to get out and shoot together for the love of the craft and the camraderie of it all! I’m a member of several local groups, all via the site Meetup.com, and I don’t have to pay a cent to participate! (I do contribute though, just because I like supporting such efforts…)
3. Shooting in a park: Get some photographer-friends, family-friends, or just some friends to join you in a park. Set up a blanket, a few light stands, and have some park-type food available: (crackers, cheese, water, whatever). Add an ipod with some speakers for a little music. Offer gag prizes for people who dance, act silly, or pose for the camera. Process the photos and post online so they can share, download, add to Facebook, Twitter, or print! Low cost, fun, and helps to build your portfolio!
The ideas are only limited by your creativity! Got your own ideas for photographic opportunities this Spring? Sound off in the comments to share, encourage, and inspire others! Happy shooting, and we’ll see you back here next time!
P.S. Don’t forget the April photo contest on Flickr – win a BacklitBox of your favorite photo! Flickr Contest Thread
That Face!
Last week I wrapped things up with three tips for posing your subjects better, and boy did that launch a flurry of questions…so many that I think the next podcast will be dedicated to tips on posing your subjects. There’s so much to take into account, it really shouldn’t be that much of a surprise.
However, until then a few nuggets here and there will have to do. (I am trying to coordinate with friend-of-the-blog Kevin Mullins to have a go at a podcast and this would be a great subject for him as he’s an accomplished wedding, event, and photographer from across the pond. Kevin, I promise we’ll find a date here soon!)
So, the nuggets for this week are facial features – because at the heart of the portrait photographer is bringing out the beauty in your subjects’ face! Here’s a great set of tips for bringing out the best in your subjects! When shooting subjects it helps to keep in mind the three basic facial positions: full front, 3/4 pose, and profile positions:


For subjects with round or wide faces, it helps to raise the camera angle slightly so as to look down to them just a little bit. This elongates things a little more and minimizes the width perception. It also helps to approach them with a pose that has a 3/4 look rather than a full frontal look.
For subjects with a thin face, just the opposite holds true – have their full face looking toward you with the camera and try to keep the camera at eye level with your subject. Going up or down below their eye level will only serve to elongate a thin face even more.
For subjects with a large nose, it can often help to have them also face the camera directly. By doing this, their nose will point straight into the camera to help minimize its size, and lets viewers see the rest of their pretty face!
For subjects with a smaller nose, it’s time to shift back to the 3/4 look…this will bring more depth to their face and “enhance” things a little…
Other tips I’ve picked up that are not specifically related to facial positioning include things like:
- People Deep-Set Eyes – Point light into their eyes. Light coming too far from the sides will accentuate the depth.
- Glasses – Bounce the light off the ceiling where possible. If not, position the subject so that glasses are pointed away from the lights.
- Dark Hair – Make sure that the background provides enough contrast so hair doesn’t just blend into it. Hair lights or a light on the backdrop are extremely helpful. Also make sure the background doesn’t show through hair.
- Double Chin – A slightly higher camera angle will be more flattering than straight on. It also helps to have the subject leaning forward.
- Large ears – Use a ¾ face pose or a profile.
There you have it! Great ways to capture portraiture, specifically when working with facial angles. Special thanks go out to my good friend Evan Ashenhurst for sharing some of his portfolio for this article. You can see more of his work on his website at: Ashenhurst Photography
A final footnote – since I will undoubtedly get a few questions about which lenses are best to shoot portraiture with, my favorite is the nifty fifty actually. Amazingly sharp and the 1.8 depth of field is to be envied among all glass. If you’re in the market for a portrait lens, you’ll definitely want to check this bad boy out. Here’s the Canon-mount, a steal for less than $150 retail!

Focus Stacking: A Primer
With all the talk and hooplah over things like dynamic range, HDR, Megapixels, and the latest and greatest bells and whistles in photography, some of the staples in composition are often over-looked. Focus stacking is one such area. Most folks kind of look at me quizzically when I bring this topic up, primarily because it is rather niche and unique, but it does rely on principles of composition that have been around for a while.
First off, focus stacking is used mostly in genres like macro photography, where intricate detail is needed across a range wider than what the aperture will allow for during composition. The principle is much like the layered approach to HDR imagery – where you stack layers of images with different compositions on top of each other and blend the right portions through the entire image.
Where focus stacking differs from HDR is the types of images that you are layering. In HDR images, you are compositing images with different exposure values over one another. In focus stacking, you are not changing the exposure values, rather just the point of focus. As depth of field drops off both in front of and behind your focusing point, the subject will blur. While this may be an appreciated blurring technique in some cases, in other cases, getting different depths of field from different focusing points can make for a tack sharp macro throughout the range of the subject.
As is most often the case, explaining a photography concept is best done with images, so let’s take a look at an example. For easy demonstration, I took a white cordless phone and placed it on a black background. This way color issues are kept to a minimum…

Notice on the first focusing point, the sharpest point is right near the front? It also quickly drops off into the background as I was shooting at f2.8 The low aperture number means I will have a very shallow depth of field, which is what is causing the blurred background. To bring the rest of it into focus, I need to “stack” more shots that have a different point of focus. So, let’s add another few to the composite:


The end result from stacking all these together can be accomplished by any one of a number of methods ranging from the most time-consuming of doing it manually inside Lightroom or Photoshop, and the most efficient one of using 3rd party software. While several options do exist, the one that has become pretty much the industry standard is that of Helicon Focus! Their quality of processing is, bar none, among the best I’ve seen. More on that likely later this week.
In the meantime, here’s the result of an image that has been focus-stacked:

It’s a quick edit, and done with only having focus-stacked 5 images. If I wanted a really detailed depth of field on something more important than a cordless phone from circa 1990’s, I’d likely have taken at least 10-15 images and massaged them through Helicon Focus more carefully. More details on this entire process are coming up later this week, including reviews of the Tether Table (which will be given away this weekend as the March contest comes to an end), Helicon Focus, and the light triggers from Blackbelt Lighting.
For a behind-the-scenes footage video, stop over to the Facebook page! (Be sure to “like” it and share a comment while you are there…)