Five Fabulous Photo Fixes! (for Friday)

Woo Hoo! Friday is finally here – time to go out photoggin’ again! Tonight I head up with the better half to Columbia to celebrate an in-law birthday. Then, Saturday, back to Charleston for a photo shoot with some fellow photogs from Flickr (hey, that’s some cool alliteration, and it was unintentional there! 🙂 ). Then Saturday evening I am meeting up with some good friends from my days at the College of Charleston. We’ll probably turn a few up that night!

Then, Sunday a current co-worker will be stopping by the house to help me assess some options for further upgrading the house. The screening in of the patio did not go quite as planned, as the contractor got the heave-ho from me a few days ago so now it’s up to me (and Dean) to finish what he didn’t, and fix what he screwed up.

In other news, I’d like to take a brief moment and thank Zack for chiming in on yesterday’s post with his thoughts on flying. Very informative, and after sharing a few emails, (and shots), I’ve got to say he’s got the knack for photography! Great portraiture on his site, and lots of fun to peruse. Here’s the link, so feel free to stop in on Zack’s photos and share your comments with him. Best of luck with the photography Zack – here’s hoping it goes well! 🙂

Oh well , so much for weekend fun, eh? Well, the good news is I’ve been doing a little reading and thinking, and you know what that means – a new Fabulous Five for Friday!

Specifically, I’ve put together five pretty common ways and suggestions from a wide breadth of reading materials that the pros seem to agree on to improve your pictures. I’ve given it a little twirl of my style and perspective, but the nuts and bolts should be pretty much in line with what I’ve come to understand are the fundamentals of photography. So…with no further ado – here’s the Top Five for Friday:

Five Fabulous Photo Fixes

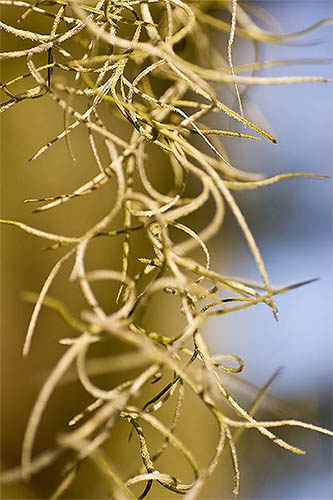
  1. Choose interesting subjects
  2. Be aware of lighting and its impact
  3. Watch out for distractions
  4. Be aware of your gear choices
  5. Watch for colorful contrasts

Details in the download…

Wednesday Weblinks

As I corrected the missing links from yesterday’s podcast, I started surfing my usual photo sites, and I came across this neat site sponsored by Kingston, called Icons Of Photography (IOP). Four well-known photographers offer up their professional albeit short critiques of user-submitted images. I read through a few and all seemed very well-meaning and kind in their deliveries. What a great resource for the budding photographer: Icons of Photography Thanks to the contributors, Harry Benson, Colin Findlay, Gerd Ludwig, and Peter Read Miller for their generosity in sharing views and perspectives on their contributions to the field.

For those of you equestrian aficionados, there’s a new photo contest for 2008 tailored to your interests from the folks over at Equestrian Magazine. (I personally have tried to take a few photographs of some horses and they make for challenging subjects sometimes, so good luck!) Here’s the contest link for those that are interested. Good luck!

Another little tidbit for photo news of the week – as a former graduate student in Political Science – I watch political news fairly regularly. While I try to stay away from divisive content and hotly debated subjects, I do have reason to share a political story here: New Photos from Lincoln’s second inauguration have been discovered and added to the repository for the Library of Congress. Truly amazing shots and in great detail considering the era: 22MG tiff files are available with no constraints on usage (in other words, they’re in the public domain!). Rather than try to reproduce smaller thumbnails here that simply will not do them justice, here’s links to the Library of Congress Announcement and the 4 images:

Image 1 Image 2 Image 3 Image 4

Last but not least – my last hobby before photography was scuba diving (I can never seem to take up something cheap like writing poems or anything along those lines), so I try to peruse news about scuba from time to time. While underwater housings have been around for a while, a company named Aquatica has confirmed they are making an underwater housing for the Canon Mark III. I went to the company’s website, and they have quite the variety of housings that are guaranteed to protect your gear underwater. Like all high quality gear though – it has a price. On the order of $2 G’s US. (That’s two thousand dollars…) Very cool website though and makes me think about mirroring the two hobbies together once again. (I am sure my wife would divorce me though…)

That’s it for today. What photo news have you heard today? Sound off in the comments or to me via email.

Thanks, and as always, happy shooting and watch those apertures!

BRRRRR!!!!

Here’s what’s going on as I enjoy MLK day off…first, the Sunday football yielded Super Bowl berths for New England and the Giants. The frozen tundra of Lambeau Field (as Chris Berman says), was quite cold at 0 and the wind chill at -20! Makes the teens of SC seem timid. Nevertheless, it’s cold here in South Carolina too. At times like this, it makes me wonder whether or not Global Warming really is a problem.

The South Carolina Photography Guild had their monthly shoot yesterday at Middleton Plantation, and while it wasn’t in the teens, it was still very chilly, as we bundled up against the wind and elements. I came away from the trip with several decent shots – enough to put into my galleries as a dedicated album! I’ll share a few shots at the end of this post.

Today I am going to purchase Photoshop CS3 Extended edition. I have been toying around with the trial version for long enough, so figured it’s time to bite the bullet. Lightroom may also become a purchase option too, depending on funds. That will likely take place this afternoon. I am also going to try and get the tutorial through production today for publication tomorrow morning, so that may be out early too (doncha love Monday’s off?) 🙂

Scott Kelby’s blog, Photoshop Insider, got a fair amount of traffic last week as he produced a “wish list” of sorts for Lightroom where people could sound of in the comments. This was one of those rare opportunities to let developers know what you think, because my guess is he’s got their ear as one of the leading trainers for the Adobe platforms in the country! I added my two cents for multiple paper profile support (on or around #120 I think). See if you can find me! 🙂

Last but not least, I saw a few posts around the web for the SoPoBoMo – if you ever wanted to put a book of your imagery together, now’s your chance!  Check them out and sign up today (I couldn’t commit to the time frame because of some other pending things during that same period.  Neat stuff though…

Not much else going on for Monday yet (it’s only 9am), so I’ll leave with a few photos from our outing yesterday:

floral_macro1.jpg

branches.jpg

Weekly Web Gems

Usually I will put some stuff together while at work for posting when I get home, but today was rather busy, so this is going to be off the cuff. I just sat down and hit my blog list (see the “Top 7 of ’07”) and busted a gut at Scott Kelby’s blog. He posted a clip of Dan Margulis doing his kelby Training tutorial, where Dan really gets his dander up acting out a Shakespearean scene. The final segue into the LAB color space is where I just lost it. This guy is wicked smart and making me realize I still have years to go before I know even half as much as he does in LAB. Anyway, check out Photoshop Insider for a very “heady” intro to the LAB color space – if you’re into color, you’ll get a kick out of this.

The other web gem for today is the iTunes listing. Canon Blogger is now on iTunes! I know I mentioned this yesterday, but a link has been set up in the sidebar with a very “Web 2.0” style graphic that links there. Stop in and download/review some episodes today. (You might be one of the first ever to review Cannon Blogger! 🙂 )

The poll for software preferences was closed yesterday. The winner was LR, followed by CS3, and CS2, taking 35%, 30%, and 17% respectively of the total of 215 votes. Here’s the vote totals:

poll1.jpg

Having looked at the software, the new poll now looks at the hardware (or gear) selections. Clearly there are other options out there besides Canon, and we often will choose multiple vendors for our choices. We’ll go with this one for a month too, so make sure you vote on the sidebar.
Last but not least, I need some help! I’ve been perusing some Flash tutorials and unfortunately, Flash animation is just not something I can dedicate the amount of time needed to get a good handle on things and create a dynamite intro for the vidcasts. So…any Flash gurus out there? Throw a link up to your flash movie proposals into the comments section, and the winning flash suggestion…well, wins! (I’ll think of something cool to throw to the winner…)

That’s it for Wednesday – off to watch the Apple Expo! Until tomorrow – happy shooting and watch your apertures!

Monday Minutia – Top 5 B/W Conversion Techniques

Given the activity and response I received from the “Top 7 of 2007”, it seems the blogging world really enjoys lists. It makes sense if you think about it too. Lists are nice, simple, bullet points that don’t require more than a few seconds to take in. There’s not a lot of prose or bloated paragraphs of meaningless text to scan through. In fact, creating lists does seem to be a common practice bloggers use to attract attention to their sites.

The internet is inundated with lists, whether they provide value or not and on as many topics as you can shake a stick at. The gamut is pretty well covered from A to Z, including The Best Academic Institutions to The Best Zoos of the U.S. Naturally, photography and it’s many sub-fields also pepper the list. So the question becomes one of “How do you filter out the good lists from the bad lists?” My answer to that is to try and raise the bar in terms of the value behind the lists. To that end, the Monday Minutia proposes 5 of the best ways to convert images from color to black-and-white. So…without further ado, here are my Top Five Black and White Conversion Techniques

  1. In Camera – most cameras these days have a B/W mode in their list of menu options and settings. Selecting this as your starting point gives you a true black and white baseline to start with. This approach will probably strike a chord with the “purists” in the crowd.
  2. Camera Raw Conversion – If you aren’t working in camera raw, here is a big reason to think about it – converting images to black and white in camera raw allows you to make a conversion while retaining access and malleability to all image data. The camera raw dialogs that you should use to make conversions here include the saturation slider, then exposure and shadow sliders, followed by the Brightness slider. Don’t forget to play with the contrast slider a little to enhance the effect as desired. Last but not least, for advanced adjustments, the calibration tab can have effects similar to the Channel Mixer.
  3. Channel Mixer – with your image open in Photoshop (7.0 or higher), you can select a specific color set you want to remove from or add emphasis to in an image. The traditional color sets or red, green and blue are available, as well as a constant (think brightness), and a check box for monochrome.
  4. Hue/Saturation Adjustment – whether as a dedicated layer, or directly to an image, the Hue/Saturation allows you to account for different intensity levels of a wide range of colors, from Red, Yellow, Green, Cyan, Blue, and Magenta. You can also adjust the range of color within one of the default ranges for each set by adjusting the left and right limiters of the color wheel at the bottom of the dialog window.
  5. Grayscale Conversions – most black-and-white images aren’t true black and whites, because a little color from a specific range is added back in for emphasis. To make an image truly a b/w, it would only have a range of black and white. This can be done using the grayscale option in Photoshop. Often, this is used as the last step in a digital approach to black and white photography so that saturation and brightness level loss is minimized.

So, that’s it for today – my Top Five B/W Conversion techniques. What techniques do you use? Feel free to use the comments or my email to share your methods. Naturally, being the multimedia-oriented blog, I will have a PDF version of this post available for download later this evening. Until then, happy shooting and watch your apertures! 🙂

As promised, here’s the PDF version…although I noticed some of the characters (dashes and quotes) didn’t convert as nicely as I’d hoped…

Friday Photo Fun

Well, the funnies take a back seat today as I wanted to share some thoughts on image restoring with those who are tuning in. My father gave me a shot of my great-great grandfather holding a slug he was shot with during the Civil War. I had it scanned, and then took the digital version into Photoshop for some work. It’s okay, but his right arm looks a little “off” to me. I’ll give it some more work, but think it should work to give him a nice 8×10 back.

If anyone has thoughts on this, or would like to share their own photo restorative efforts, feel free to share in the comments or email and I can append this post with those. Thanks for tuning in, have a good weekend, and Happy Shooting!

before_after21.jpg

Thursday Thoughts 2.0

Recently I made a post on the blog sharing my seven favorite blogger resources from 2007.  I titled the post “The Best 7 of ’07”, and published on Monday (or thereabouts.)  After making the post, I’ve seen quite a few trackbacks to it from the sites I referred to.  I’d like to first say thanks to all those that took the time to both notice, and reply in kind.  In following the trackbacks, I’ve also found a few new resources and fellow blogger and photography-related websites that have some appeal.  I also noticed amidst all this fun surfing a few surfacing eddies that have prompted my mind to wander.  It’s these wandering musings that I am sharing today.

Chief among my musings is the association with Canon.  In order to quell any intial thoughts to the contrary – the idea behind the web address (and blog) was to share my thoughts and ideas as a photographer – who happens to use Canon gear.  I do enjoy the Canon brand.  However, I am not blind to the fact that there are other gear options out there that provide alternative choices for photographers of all ilks.  In fact, while my body and direct acoutrements are Canon-branded, outside of a shutter release, the body, and 2 or three lenses, nothing else in my gear bag has the Canon stamp on it (or even the bag for that matter.)  It also bears mentioning that I am not getting paid to endorse any one particular brand or another on this blog – I simply share my thoughts on photography, tips, tricks, tutorials, and other tangential subject matter.  I have no affiliation with Canon and they have none with me.  As the blog continues to develop and mature, the look and feel may change a little bit, my gear choices may change, but I suspect the Canon line will continue to be my choice, simply because it’s what I’ve learned on and am most comfortable with.  Additionally, as we all know, when making an initial camera purchase, you are not just buying the camera, you are also buying into a camera-system.  To this end, I suspect that I will always maintain some times to Canon gear (simply because much of my admittedly limited equipment now centers around that system).  While I can obviously never be completely neutral since I am somewhat biased toward Canon gear, the gear selections of others is a matter of personal choice, and I hold no negative associations with anyone for using Nikon, Sony, Olympus or any other brand.

In order to demonstrate my complete lack of allegiance to any brand beyond the basic ones (for example, I couldn’t easily use a Nikon flash on a Canon camera), I thought it might be useful to share my entire gear lineup with the blogging community, and my thoughts on each component.  So, I will be putting together a web page “My Gear”, and linking that to the Tutorials/Resources area.  Once up, people are welcome to peruse my array of gear and equipment, as well as read my thoughts on each component.  For the time being though, here is a short list of what I own:

  • Canon EOS 350D (Rebel XT)
  • Canon 18-55mm f3.5 – 5.6 (kit lens)
  • Canon 70-200 f4.0 – 5.6 (zoom)
  • Sigma 70mm f2.8 Macro
  • Canon 550EX II Flash
  • Canon Wireless Remote Shutter Release
  • Bogen 3021BPro Tripod
  • Bogen 488 RC Ball Head
  • Desktop:  Dell Dimension 2400 2.4 Ghz Celeron Processor 2.0 GB RAM
  • Laptop:  Macbook Pro 15″ 2.4 Ghz Core 2 Duo Processor, 2.0 GB RAM

I am in the market for a wide angle lens, but as of yet have not settled on a lens that will complement both my current gear list and my photography goals.  If others have a gear list they’d like to share or suggestions/ideas on wide angle lenses for this gear setup that would be good for landscape photography, by all means, add it to the comments section.

Thursday Thoughts – Part 1

I was catching up on the video recording today and realized that I had downloaded the last two Photoshop User TV shows from the end of December and this week but had not listened to either. So, I remedied the situation and watched both. Man! That last show had just tons of info in it. I couldn’t keep up they went so fast through stuff (especially at the end). Then, I thought – how can ANYONE keep up with that? I bet it’d be neat to have a condensed text version of all those shortcuts! Well, guess what, I am a little tired, but here’s a condensed version (PDF). Thanks and major shout outs to the guys at Photoshop User TV – always ahead of the curve and the rest of us (me anyway) are just watching in amazement at the prodigious amount of material y’all put out. For those of us with less time though, here’s a lite version. if you’re handy with PS – it helps. if you still are learning the ropes, better watch the video over at Photoshop User TV .

Shiny Web 2.0 Text Effects Tutorial

As promised, the Tuesday tutorial is up today for viewing. The web version will be linked first, with the iPod/iTunes version for download listed second. A brief note on this – I’ve made some adjustments to the video quality, and am trying to keep the sizing consistent, so these are set to display now at 1024×768 which is the standard resolution for a 15″ LCD monitor. If you are at 15″ or higher, you shouldn’t have any problems. I’ve also added a graphic to the web flash, and cleaned it up a little more in my production software. The effect is a little more polished, but I may tweak the html a little as time permits. The PDF version of this will also be up shortly too, as the video moves pretty fast (I cover a lot of ground in this one…)

For the Wednesday Web links, since I am talking about text effects in the tutorial, it seems only fitting to mention a few resources for fonts on the internet. Here’s a couple I know of…if anyone has their own suggestions or resources, feel free to share them in the comments section. So, here’s the font sites I’ve used and heard good things about:

www.dafonts.com – Great resource for tons of free fonts online.

www.myfonts.com -If you need a professional set of fonts with a little more polish and visual appeal, some really well done ones are available here.

www.minifonts.com – This should be self-explanatory, but this site specializes in mini fonts. Tiny ones used in avatars for example, or in favicon images for websites (note the new one used for Canon Blogger – refresh your cookies if it’s a fuzzy CB logo)

Now, on with the tutorial materials:

Web Flash Version

PDF Download

[display_podcast]

Tuesday Tutorials Temptation…Trashed

Well, I came home from work today, set up the tutorial for recording (with my new preamp in place for truly the best audio recording thus far), and after a few dry runs, recorded everything with no interruption. When I went to review it, I realized that the “microphone” option in my recording software was not checked. I never recorded the audio! So, the hype and setup for the Tuesday tutorial has thus been a tease, as I had to trash it. (Doncha just love my alliteration? It literally rolls off my fingertips! 🙂 )

I will re-record it tomorrow (with audio) and finish production on it tomorrow, so it’ll be a day late this week. For the time being though, I got this question in an email from Dave in California:

Hey Jason,

Can you do a video demo on how to set up and use the ST-E2 with multiple
flashes and different light ratios?
That would really helpful.

-Michael

This is a great idea Michael, and I would love to do one – but alas, I do not have multiple flashes, nor the ST-E2. Additionally, my recording capabilities are limited to on-screen subject matter, as I do not have a video camera. I could tell you how it’s done according to some stuff I’ve run into on other sites, but that kind of defeats the purpose of preparing tips, tricks, and tutorials for you to read on Canon Blogger directly. So, I’d love to see if anyone else has the means to do so! That’s right – open audition night for CB – submit a video clip (in AVI or MOV format please) of the set up, and I can port that into the format. Naturally, the original recorder would retain all copyright, and I would be more than happy to help promote your work if you have a website.

The terrible truth about me and lighting is that I tend to prefer ambient light. I do have a 550 EX, and have used it on occasion, but am not very well-versed in off-shoe lighting techniques. I’ve read all about it and know it’s the way to go, but I’ve just not pulled the trigger (or should I say “tripped the shutter”? ) on doing much of that yet. A great resource for learning about this is one of my favorites too: Strobist, a site run by David Hobby that truly is the mecca for anyone with lighting questions. If you have a question, post it in the comments and believe it or not, you will likely get an accurate answer, usually within about an hour or so. His site is just hoppin’! Not meaning to leave you in the dark Michael, but lighting suggestions and recommendations are really out of my league. I did find something within the vicinity of an answer on SportsShooter, so check this out along with Strobist for more details.

Feel free to throw me audition tapes! 🙂 Thanks to Michael for the great idea, and I’ll be sending you an email shortly. In the interests of full disclosure, I would also like to help Michael out by offering a link up to his website – he’s got some really cool photography set up at Sage Photography. My one recommendation would be to add title tags to your header info. Each page comes up with a title in my browser of “Untitled Document.” Does not help with Google crawling…

In lieu of a tutorial, I would like to point out a key factor in the behind-the-scenes of the tutorial – stamp visible! This is a great utility in Photoshop that lets you create a new layer out of all existing visible layers that is fully editable. This is great if you want to have multiple versions of a base workup, you can create multiples with this function. The keyboard combo is Command + Option + Shift + E. (In Windows it’s Control + Alt + Shift + E). Quite a large keystroke set to remember, but it sure provides the ability to take things to the next level! I’ll show it to you in action tomorrow – I promise! In the meantime, Happy Shooting!