Contest Updates

Today I thought it would be appropriate to take a moment and give some contest update announcements.

  1. First off, don’t forgot the OnOne Software Plugin Suite contest that is going on all month.  Share your images over in the Flickr thread (with a theme of “Numbers”) to be eligible.
  2. Second, the winer of the Fotoquote Pro discount is contributing commenter Fred from the comments posted in June.  Fred won the discount code for a copy of Fotoquote Pro – congrats to Fred.
  3. Third, the next contest is also going to be an exciting one because the folks at Wacom have generously offered to let me give away the Bamboo Fun I reviewed a couple weeks ago.  That will be going live next month though, so definitely something to look forward to there!

Last but not least, if there are products you would like to see reviewed, given away as prizes in photo contests and such, just share your product ideas with me here in the comments or via email (you all know it by now – jason AT canonblogger DOT com).

I know, it’s a lame way to self-promote things, but the lucky listeners and readers also ultimately benefit from these types of giveaways, so please let me know what types of things you would like to see in future giveaways.  (Still working on a few ideas myself, but hearing from readers and listeners is the best way to generate content you like, so let’s hear from the audience!)

Happy shooting out there, and we’ll see you back here tomorrow.  I should have the next podcast up and ready for your weekend listening enjoyment too!

Win, Listen, and Bang!

This week’s show is a doozy – I talk about the latest contest, (#3 for 2009), have a fun conversation with Jason Loucks, then tackle some tips on photography fireworks.  Of course the show always takes care of a couple listener questions and answers, so it’s 45 jam-packed minutes of photography fun.  Here’s the show notes:

The Third Photo Contest, sponsored by OnOne software.  Rules and entry information are posted on Tuesday’s blog, and you can enter your photos here.

Here’s the sites and twitter folk we talk about during the show:

  • www.freelanceswitch.com
  • www.smashingmagazine.com
  • www.tutsplus.com
  • www.css-tricks.com & Chris Coyer on Twitter
  • www.w3schools.com

Shooting Fireworks

  • Use a tripod
  • Make sure you have spare batteries (and fully charge all batteries)
  • Shoot with a low ISO
  • Set your shutter between 4-8 seconds for best results
  • Try adjusting the zoom in or out for attention grabbing light trails

Enjoy the show, hosted by the folks over at Personal Life Media!  Happy shooting, and be sure to share your own tips and tricks for shooting fireworks by tomorrow and I’ll try to put all of them together along with some (hopefully) inspiring photos for enjoyment.  In the spirit of the show, don’t forget the trailing question:  What was your first camera?

Software Review – Genuine Fractals 6.0

Don’t get too excited – no software giveaway on this one folks, as I’ve not had a chance to call OnOne yet and see if they’d be interested in participating in a contest.  Instead, I am working off a trial version of one of the premiere up-sizing software programs on the market – Genuine Fractals from the good folks over at OnOne software.  Available for both Mac and Windows, this product really has developed a good name for itself in the industry.  While reputation may precede it, I have been wanting to give this product a try for some time now, so here we go!

To do this review, I decided to just share the work flow on a particular image that I happen really like, but because it was a pretty heavy crop, never really had a chance to see it in print very large as the limitations of Photoshop prevented more than a 4×6 image.   The first step was to open that image:

before
Here we’ve got this heavily cropped image of a butterfly I liked – and the capture shows the image is a 600px photo.  Way to small to print – I want at least an 8×10.  So, after installing Genuine Fractals, I loaded that in Photoshop by going to the File | Automate option and it showed up in there:

fractals1

So, after selecting that, I got the GF window, which shows the current image dimensions, and the upsizing options, as shown below:

fractals2

You can see the default dimensions of 2.5×1.72 just will not work for anything useful other than a desktop background or a postage sized stamp.  I need to make this bigger.  So, I plugged in the values that would take me up to an 8×10, and in this case the aspect ratio wasn’t exactly on, so I took the short side up to 8″, and that put the long side at 11.6″ roughly.  Nothing I can’t crop out a little as I move through post, so here’s the larger sized image.

Butterfly

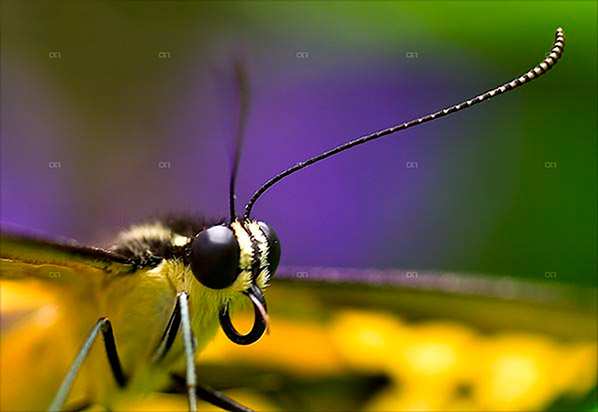
The little dots are the logo of OnOne software so yo can disregard that because when you purchase the software, those go away.  Instead, click on the image and zoom in on the antennae for a better idea of how it handles the up-sizing process.  I was actually pretty impressed.  Granted this image is unusable as it stands because there is too much jpg artifacting since I was working off an already processed image, but if I was going off the original raw, the results would likely be that much better – and the results are much more impressive.  Take a look at this next one.

fractals3

That”s the original file, a roughly 15×10″ image, cropped to about the same dimensions and then sized for the blog here.  I’d include a hyperlink to the re-sized version, which blew up to about 75″ on the long side, for the same approximate increase in percentages (500% – GF claims boosts up to 1000%), but it really is too huge to accommodate on the web.  Besides, since it is copyright-protected, just putting that large a file out there is like – oh I dunno – like leaving your garage door open for thieves to steal your car! 🙂 ! Think about 75 inches though!  That’s like 6 foot wide.  We’re talking billboard sized posters now, and the degradation in image quality is much less because I was working with the original file.

So, whether you are trying to recover size from an accidentally compressed image, or trying to increase an image to use in large applications – you can see how Genuine Fractals might be a route to consider.  It may be a pricey option at$300 retail, but when you sell just one billboard print – the software expense is covered.

I’d give GF6.0 a two thumbs up just because it produces such impressive results.  To me, the proof is in the pudding!  So, what do you all think of the software?  Does anyone else use it?  I’d like to hear others opinions, as well as some alternatives if you have any.  I am pretty convinced, and should I ever need to up-size, I know where I am going from here!  Happy shooting and we’ll see you back here tomorrow!

Rocket Man!

Cleaning your gear is a maintenance ritual each of us must develop that suits our own style and behaviors.  For me it’s lists…logical lists that I formulate after thinking about what makes sense to me, so I can do things the same way every time.  For me it’s all about consistency and repeatability.  While this same technique is something I recommend for others, it may not always be the best course of action if you don’t like that kind of rigidity.

However, regardless of what styles or approaches you use to clean your gear (and I’ve talked about my approach to gear maintenance in the past in detail), some of the best recommendations I can make is in reference to the types of utilities and tools you use.  So, today, I’d like to take a look at one of the tools that I have come to rely on more than any other – the Giottos Rocket Blower.

giottos

So, what makes this thing so great?  Funny you should ask, let’s get started with the…

PROS

  1. It’s got an air valve built in to prevent it from taking in dust and dirt on the intake end.  This design (I would venture to say) was a first-of-its-kind in cleaning accessories, because every other blower that I’ve seen prior to this made no such claim, which means that they hadn’t incorporated the idea into their design at all.
  2. It’s air at the ambient temperature.  Too many canned air options use chemicals that can be damaging to your sensor – my recommendation is to stay away from canned air entirely.
  3. It’s not super fast air being directed at your sensor like a missle.  Although it kind of looks like a grenade (these are fun to take through airport security! 🙂 ), the power behind the discharge of air is not like that stinging charge that comes from canned air options.  You have more control over the flow of air too, as you can give it a quick pump or a slower steadier pump depending on what you want to do.
  4. It’s not weak air like from many other pump-style – this thing really can deliver a good blast of air to get the most stubborn dust out of a sensor area, or the surface of a lens.  Just don’t use it around your dog that likes squeak-toys because it does give a little sound like that due to the air valve!
  5. It’s dirt cheap!  This retails at B&H for $15!  Low cost solutions are always a huge pro in my book.  The picture above also includes a link to the B&H page for it.  If you are a NAPP member, you can also get free 3-day shipping.  Just my cup of tea!
  6. It looks like a grenade!  Talk about a cool conversation piece.  I can’t tell you the number of airport security people that have asked me “What the hell is that?” !

CONS

  1. It looks like a grenade.  I can’t tell you the number of airport security people that have asked me “What the hell is that?”!  The cool factor wears off when you are trying to catch a plane, or it’s oh-dark hundred and you’ve not had any coffee because they won’t let that suspicious looking McDonalds or Starbucks cup through the security gate.  (That same cup of coffee that costs $6 on the other side of security has been deemed safe though…go figure!)

There you have it, 6 pros and 1 con means this product gets a thumbs up in my book.  (Surprise surprise since it’s in my cleaning kit!)  As always, if you have any ideas, suggestions, or are interested in products that have not been covered here on the hardware review days, drop your thoughts into the comments area or kick me an email (is it possible to kick something that is all 1’s and 0’s inside a computer?).  Happy shooting and we’ll see you back here again tomorrow!

Grab the feed

Extra Extra, read all about it!

It’s a rare Saturday that I make a blog post, but while waiting on a contractor to install some wireless at work, I had some time to do some writing and in the process, I came across an article I put together back in 2008 titled “5 Ways to improve your Photographs”.

Though the article is dated, the ideas behind it are the essence of timeless content – this will always apply to photography.  So, I’ll throw this back out there, a year after the fact, for everyone to enjoy!

5 Ways to Improve your Photography

Happy shooting and we’ll see you back here on Monday!

Grab the Feed

Friday Fab Five

For something new here on the blog, I thought it might be fun to share some of my favorite keyboard shortcuts in Photoshop.  The idea here is that people will share their top five in the comments area and we can get an idea of many more keyboard shortcuts than we ever could have found out on our own (unless of course you are some Photoshop guru like The Photoshop Guys and the trainers/instructors of the world that do this for a living and already know all the shortcuts.)

So, anyway, here’s my Friday Fab Five Photoshop shortcuts and what they do:

  1. CMD/CTRL+J = duplicates your existing layer
  2. CRTL+ALT+SHIFT+E = Stamp Visible  This takes all your visible layers and merges them onto a new layer.  Increases file size, but very cool
  3. CMD/CTRL+’ = (yes, that’s apostrophe) – it activates the grid in your preferences.  Since my grid is set to every 33.33% and one subdivision, it basically shows a Rule of Thirds grid overlay on my images – very handy for compositional cropping
  4. Left and right brackets – decrease and increase your active brush, whether it’s for clone stamp, healing brush, eraser, history brush – whatever
  5. Alt+Eyedropper = you can drag the eyedropper outside of Photoshop to sample a color in another application (great for color matching)

So, those are my five for this friday – what are yours?  Sound off in the comments!  In the meantime, have a great weekend and happy shooting! I’ll leave you with my favorite What the Duck cartoon of the week:

wtd732

Grab the Feed

Seven Super Summer Tips

Since the podcast went live yesterday, the compositional theme was kind of put on the back burner, so I’d like to bring that back to the forefront today with something everybody likes…a list!

For some reason lists of bullet points seem to generate a lot of feedback, and garner the most interest, so here we go with a set of what I am calling “Seven Summer Super Photo Tips”

  1. Shoot early, shoot late – it’s the “Golden Rule” – and I think we all know about it, so this is just a reminder.
  2. Shoot often – seriously, the eye does not improve creatively without practice, so get out as often as you can
  3. Shoot outside your comfort zone – Like landscapes eh?  Shoot some portraiture, macros, or event work.  Nothing gets creative juices flowing better than a challenge.
  4. Shoot lower than you stand – or higher, whatever – take a different vantage point as that can make all the difference.
  5. Shoot with one lens – Preferably with a prime as this will force you to zoom in or out with your feet, changing your perspective and getting your skills down really rote on the focal length you chose.
  6. Shoot with a friend – nothing makes the post shoot high more gratifying than chimping your shots with a photo buddy.
  7. Shoot for yourself – often photographers are thinking of what clients want, what an editor would like to see, or what may sell well on a stock site.  While it’s true that money puts bread on the table, it’s often liberating to shoot without the pressure of a paycheck.  Your results may surprise you!

So, there they are – seven super summer shooting photo tips!  There’s got to be more thoughts out there though on how to get the most of your imaging eforts, so let’s here from everyone – what are your best tips and tricks for capturing the world around you?  Sound off in the comments.  As always, happy shooting and we’ll see you back here tomorrow.

Grab the feed

The Un-review Software

This week I am going to talk about the lack of software in the weekly software review.  That’s right – the lack of it! You may be sitting there wondering which software item I am going to talk about, promote, or diss in some way shape or form, but instead of that, I actually want to talk about the general trending of software, hardware, and system resources.  Why?  Because we demand a lot from our computers these days.  Think about it – we want our computers to do many things from surfing the internet, to designing graphics, office functions, building websites, and yes, processing ever-increasing image file sizes.  At what point do we say we are asking enough of our computers?

Lately my main desktop computer had been getting slower and slower and slower, and it seemed no matter what I did whether it was beefing up the RAM, adding a faster hard drive, processor, or the like, and even re-installing the OS every 6 months – it was just getting pathetic.  At one point, I clocked abut 5 minutes for Firefox to start – on a fresh boot!  The culprit?  I am asking my computer to do too much.  I finally said enough is enough – and am re-purposing the computers in the house.  We have a grand total of five computers and each has a unique function:  from Office to web, to image processing, and podcasting.  And that’s just it – each computer has a task.  Yet I have not been disciplined about asking the computer to only perform its assigned task.  I revert to the one desktop and the one laptop.  The end result:  the systems s……l……o……w…… d……o……w……n…….

With a grand total of 78 programs at last count, it’s no wonder my cmputer was screaming “Mercy!”.  So, enough is enough.  I vowed to make each computer perform only one set of tasks, as explained above.  The end result:  removing about 50 applications from the main computer.  It took the better part of an evening (4 or 5 hours) but at the end, the computer is now screamingly fast again – and Firefox loads in seconds, not minutes.  The reason – purposing your computer for a specific software function.

So, instead of looking at adding new software all the time to your computers, you may want to take a look at the computer itself – is it doing the job you want, or are you asking too much?  Think about purposing your resources more efficiently.  Do you really need that HP 3600 printer driver on there from 4 years ago?  What about that trial version of Elements you downloaded a few months ago?  And the 4 instances of Tweetdeck you have there?  Really?  Clean out your software and watch your computer performance increase a notch or two as a result.  It’s just like us humans – we can get more done when we’re asked to do less all the time!  We’re faster, more productive, and yes, more focused on the task at hand.

So, check that installed software list and try cleaning things out from time to time – your computer will thank you!

Happy shooting and we’ll see you back here again tomorrow!

Hardware review: Sigma 10-20mm

The review you’ve all been waiting for – the one to compete with my Canon 10-22mm review from a few weeks back!  Well, there is no clear and decisive winner, so the wind is probably taken out of all the sails of those who were waiting for some smack-down talk.  The reason?  Some aspects I like better on the Sigma, and some on the Canon version of this lens.  So, I’ll refrain from declaring a “winner”, and just give you the lowdown on this lens, what I like, and what I don’t.  So, without further ado: Continue reading “Hardware review: Sigma 10-20mm”