The Rule of Thirds Really Does Work!

When it comes to composing our images – we are always looking for new ways and angles to capture things.  Often though, sometimes the traditional methods work too though.  In fact, I would venture to guess that if shown 100 pictures where the standard rules of composition were followed, and then 100 pictures where standard rules were deviated from, the former would have more shots that found a widespread appeal.  The rationale?  Standard rules usually will work – that’s why they are the standards.  Things like the Golden Mean, the Rule of Thirds, and Sunny 16 are all basic rules of composition and exposure, and if you want to ensure things “just work” – traditional rules really will work the majority of the time.

For the purposes of this post, I am going to talk about one of the most basic rules – the Rule of Thirds.  The Rule of Thirds (or ROT) basically says that if you divide your image area up into a grid, where the horizontal andvertical areas are divided equally into thirds – you will get cross-sections that define where your points of interest should be – often called hot points.  Here’s a diagram to help demonstrate:

rotgrid1a

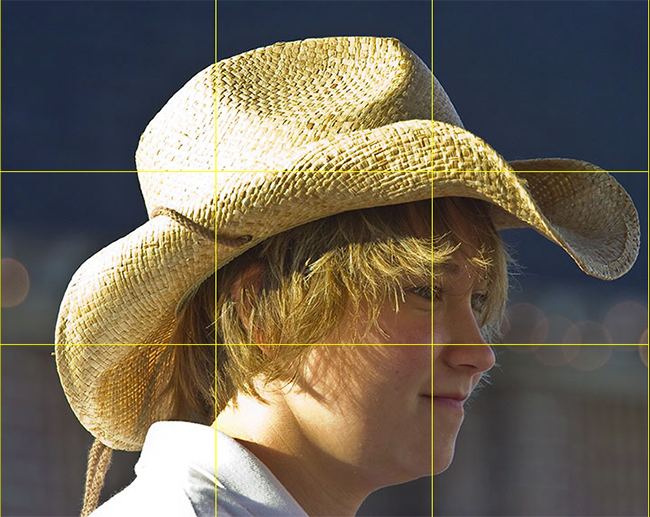
So, here the frame is divided (roughly) into thirds both vertically and horizontally.  Where the lines intersect, I’ve created red circles to indicate the “hot points”.  These are your points of interest.  If all else fails, placing your subject matter in these areas (or close to them) will dramatically improve your composition.  Here’s a great example:

rotgrid2

Here’s a shot of a carriage girl I took back in Charleston.  See where the cross-sections are?  I changed the color of the grid to make it easier to view – so you can tell that her eye is right on the marker for the right-most third grid line.  This really helps the composition that her eye is there instead of elsewhere (often times, there is a tendency to place the eyes closer to the center of the frame – resist that temptation to give your shots that extra oomph!).

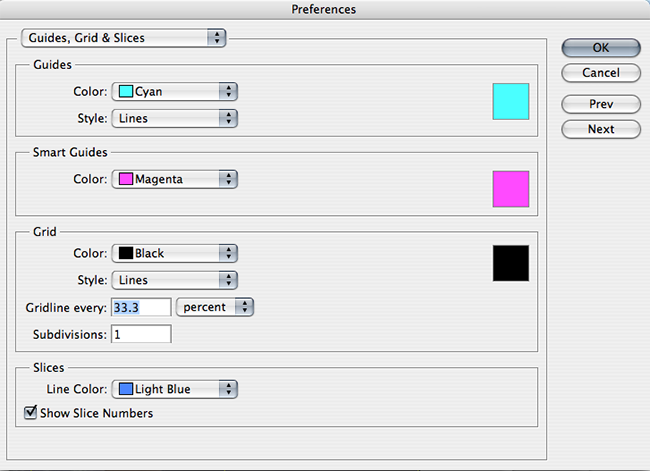
In fact the ROT concept s such a well-known standard, the folks over at Adobe have incorporated that element into their crop tool – so that you can crop your images to adhere to this rule.  Since I will likely get someone to ask – you can create this ROT grid in other variants of Photoshop (CS family), but going to your application preferences and selecting the Grids, Guides, and Slices option.  In there, change your grid size to display lines every 33.3% and number of grids to 1.  Then choose a strong color so that when you display the grid – you can see it!  Click OK and you are done – from now on, to show the ROT grid when cropping or editing in the CS family – simply use the CMD/CTRL key and the apostrophe ( this doohickey  ‘   ) to toggle the grid on and off.  Here’s a capture of the area you need to make the changes:

rotgrid4

There you have it – the Rule of Thirds grid – what it means and how to use it!  Any other rules of composition you would like explained?  Feel free to email, share your thoughts, ideas, suggestions and feedback in the comments or privately (if you rather would preserve anonymity).  In the meantime, go out, take some shots and practice visualizing that ROT grid in camera – that’s what will turn your snapshots into great shots!  Getting it right in camera!  Happy shooting and we’ll see you back here again tomorrow!

Adobe’s DNG Converter

For many of us, an upgrade of one element in our tool kit comes with many unforeseen consequences and additional expenditures.  Just as a new camera body can necesitate the need for larger memory cards, hardware upgrades can also come with software upgrades.  The reason?  Camera file formats!  As camera vendors develop new proprietary formats for their raw file formats (CR2 for Canon and NEF for Nikon as the two predominant players in the game), the need has always existed to update your software to accommodate the new formats for body upgrades.

The best example of this was when I did my upgrade of the Canon XT to the Canon 40D just last year (or was it two years ago now?)…at the time I was using Adobe Photoshop CS2 to process my files.  Well CS2 development stopped as CS3 development started.  My Canon 40D was stuck in between application life cycles, and as a result, I was no longer able to process my CR2 files from the 40D natively in CS2.  Granted, I did upgrade to CS3 because of my interest in the field, but for those that either may not be interested in the software upgrade, or cannot afford to upgrade, there is a free alternative from Adobe – the Adobe DNG converter.

This is a really cool utility and it gets updated on the same schedule as the Adobe Camera Raw utility that is unique to the image-editing applications of all Photoshop applications (CS4, LR, etc.).  The Adobe DNG stands for a Digital NeGative so it may help to think of this as a way of preserving your original data, yet still making it accessible, regardless of what other developments happen in the software world down the road.  I know, we all think that Adobe will be around forever, but the same was also thought of Kodak 20 years ago – and now those Kodak CD’s are becoming difficult to manage.  With that little nugget, it may be useful to consider the Adobe DNG option.  Additionally, the Adobe DNG negative has been submitted to the ISO standards setting organization for acceptance as a universal conversion utility, and are releasing it under the GNU licensing, so it will hopefully always be available for anyone.

With the stage set then,  for those who are not able to or not interested in upgrading, here is a brief tutorial of the Adobe DNG converter (in it’s current iteration as of 4/27/09), with screenshots.  If your folders of images look like this:

dng6

Then the Adobe DNG Conversion Utility may be for you.  It starts pretty easily…you can download the Windows or Mac versions of it from here:

Windows DNG Converter

Mac DNG Converter

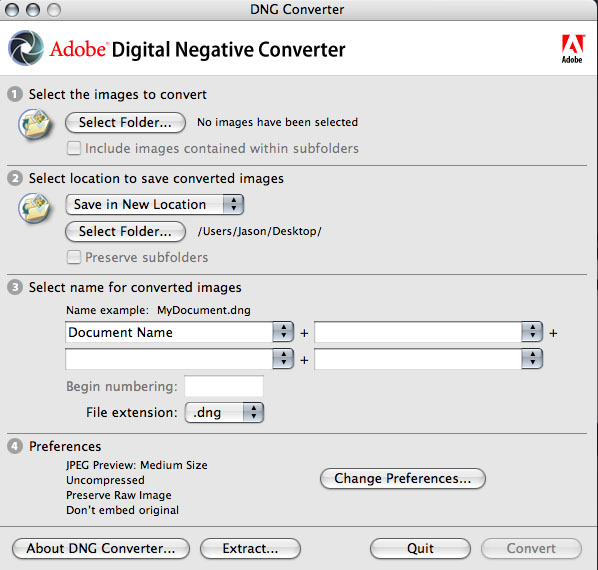
Once you download and install this utility (did I mention it’s free?), start the application to get this screen:

dng1

First off, specify the path where the images are that you want to encapsulate into the DNG format.  You can specify one folder, or you can specifiy a folder and all its sub-folders (in case you want to convert an entire library or set of images at once).  Then specify the output folder and naming convention you want to use.  Once that’s been decided, it’s time to select your preferences for how you convert your images.

dng2

Click on the “Preferences button” to specify how you want to conversion to occur:  Do you want full size conversions or do you want to reduce the image resolution sizes for smaller storage requirements?  (I always choose full size for maximum flexibility.)  What about compression?  Adding compression can further reduce the footprint that each DNG file has on your hard drive.  (It’s a judgement call, but I choose not to compress, again to maximize flexibility down the road.)  What about conversion methods?  You can convert to a linear format, but I don’t like this option because it’s a one-way street (you can’t go back).  Last but not least, what about inclusion of the original raw file?  In most cases I would actually recommend that.  It may increase file size, but this way you have access to the original raw date if your software needs ever change and you have access to software that can better handle the raw data you currently may not be able to manage.  All these are things to consider.  Hopefully, this short explanation of your options and the pros/cons will help in deciding how to proceed.

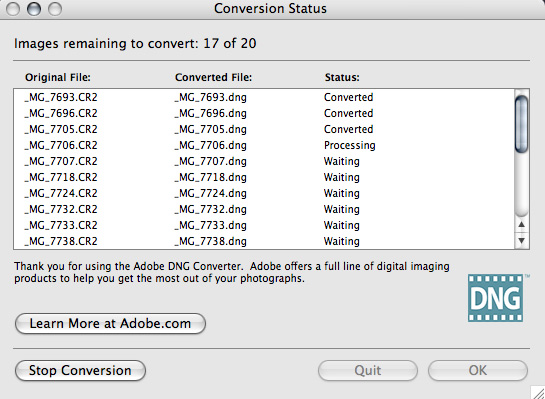
From here it’s pretty straightforward – you’ve specified everything from your input folder to your output folder, naming conventions, and conversion preferences, so now, simply click the button on the lower right to start the conversion process.  You will get a dialog window showing you the progress:

dng3

If you like, you can always click the button in the lower left to stop or abort the conversion process in case you specify the wrong folder or for some other reason.  Once the process is complete, the window will show all converted images.  Simply click “OK” to close the DNG converter utility from that window, as shown below:

dng4

Finally, open the destination folder, and voila!  Your image files will now have thumbnail previews again:

dng5

There you have it, your files are now prepped for one of the easiest, simplest, and most cost effective ways (did I mention this is free?) for both management, archiving, and accessibility – 3 very important things to consider in your image management workflow.

Granted, as with anything else, the Adobe DNG converter utility is not for everyone, as we all have work flows that call for different approaches.  So, what approaches do you use?  Feel free to share your own thoughts, processes, and suc in the comments or via email.  Happy shooting and we’ll see you back here tomorrow!

News, Artists, and Inspiration

Welcome to the show notes for week #17 of Learning Digital Photography.  Here’s the show notes for this week’s podcast…

First off, I’ve done some further tweaking to give a little more consistency and structure to the show for your listening pleasure.  The three segments that I am going to try to regularly stick to will be:

  1. News, Events, and Information from around the community and industry – here I’ll share nuggets, information, and other useful snippets from the most recent days and weeks of activity within the photography community.  Sometimes I’ll share information that’s available elsewhere, and other times I’ll offer my own perspectives on the news and events that shape the industry.
  2. Authors and Artists from within and related to the industry of photography are also an area I would like to devote some time to since the Thursday Thoughts series has not seen much attention lately (not that I am planning to either – I think it’s just on sabbatical!), and I had the good fortune of actually sitting down with an area professional recently which provided a source of inspiration for this weeks show.
  3. Sources of Inspiration – As artists I think we are always searching for and discovering new sources of inspiration.  Often these can come from well known venues such as photography magazines, galleries, and the like, but I am not adverse to featuring unusual or new sources either.  This week, I will be featuring an unusual source of inspiration, so make sure you stop in for this segment too!

To find out why these links are all up and on the blog, make sure to stop over to Personal Life Media and grab this weeks show! For the link grabbers, here you are:

That’s it for today all! Enjoy the show, and we’ll see you back here bright and early tomorrow (well, maybe not so early, as I still have an on-going problem with the sandman! LOL) Happy shooting!

P.S. I am still including a copy of the show locally, so you can grab it from here if you like too. Don’t forget, we still have a poll going on re: Twitter and Blogging, so if you’ve not voted yet, vote here!

[display_podcast]

HDR, Web links, and a podcast!

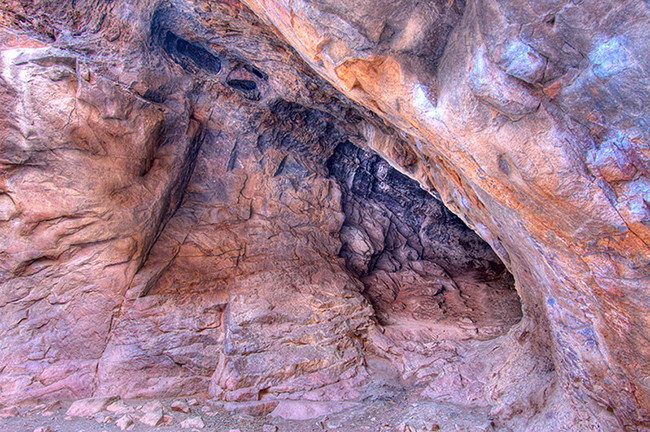
fissure2

So, this last weekend I went on the photo meetup group outing for the month of February into Eldorado State Park, south of Boulder, and had many an opportunity to capture some landscape and macro work. Some great views were had and I only hope that they all come out as well as this one did. While hiking up a trail of slippery snow and ice (it was cold out Saturday morning), I saw this fissure that was pretty intense looking because it was only partially lit. I thought about it for a second and decided to bracket some exposures to see if it would turn out with some HDR massaging. Not only did it turn out better than I would have thought, I was also very pleased with how Photomatix did with this. I would highly recommend this software to anyone interested in HDR work. Not only is it more intuitive than Photoshop, the results were much more gratifying! You can buy Photomatix for PS, Lightroom and for either Windows or a Mac over at www.HDRsoft.com.

Some other web links I learned about recently also include www.fotoblur.com and www.usefilm.com Both are much more cognizant and respective of photography copyright than other social and photo networking sites like Flickr and Facebook (we all know about the Facebook Terms of Service fiasco, right?). One thing I like about both Fotoblur and Flickr is that you are limited in how many images you can upload daily. This requires you to be more careful about what you publish, and as a result, you are more thoughtful and objective of what work is worth posting and sharing online.

Last but not least, the podcast that I had intended to put out last week was delayed for a few days as I put the finishing touches up on a home improvement project. (We finished out one of the basement rooms – expect to see some photos on that makeover forthcoming!) The good news is that not only is the basement room on the verge of completion, but that the podcast is up for this week. Naturally, the title of the podcast will match the blog post title, as the show notes follow closely to todays content. Stop on over to Personal Life Media for the show, or pick it up in iTunes! (Don’t forget to leave your thoughts in the review section of iTunes too…the more the merrier!)

Until tomorrow, when I’ll have some more HDR shots to share, keep on shooting – hope all your shots are good ones!

Thursday Thoughts with… Andrew Rodney

This is an historic day for CB, because our next guest here for the Thursday Thoughts series takes thing to a whole new level of quality information.  Our guest this week is none other than Andrew Rodney.  He has agreed to carve some time out of his already busy schedule to contribute to the series here.  Who is Andrew Rodney?  Andrew is a renowned instructor, NAPP Hall-of-Famer, published author (of Color Management for Photographers, Hands on Techniques for Photoshop Users), and well known contributing writer to several magazines including PDN, Publish, Photoshop User, Electronic Publishing, Digital Output, MacWeek, Digital Photo Pro and Professional Photographer.  He also regularly contributes to the forums of the NAPP community, and is considered by many to be one of the best around at color management and is a regular contributor for the Epson Print Academy.  (Which is coming to Denver in April too!)

CB:  Hi Andrew, and thanks so much for taking the time out of your schedule to participate in this.  I’ll get right to things…first with a few of the standard questions.  How long have you been a photographer?

AR:  I started as a kid. My dad gave me his camera, an Exakta VXIIa 35mm that at the time was pretty cool camera with interchangeable viewfinder. Plus it was a left-handed camera. Like many, my first experience in the B&W darkroom was one of amazement upon seeing ones first print come up before my eyes. I assisted a very good commercial photographer in LA in the early 1980s after which he kind of forced me to go to Art Center to get a degree in photography. I left the fall/winter of 1983 to work for the LAOOC who were staging the LA Olympics that summer. I got to shoot for them for 7 months, including the games themselves. It was my first introduction to sports photography and Fujichrome! I went back to Art Center, got a degree in 1988, shot locally doing mostly editorial and corporate/annual report work. Left LA in 1994 for Santa Fe and a new career that wasn’t income generated from shooting.

CB:  What kind of gear have you used over the course of your career?

AR:  From Exakta I went to Pentax, then Nikon, then Canon (as well as Hasselblad, Sinar). I shot with a lot of Kodak DCS cameras too, dating back to the original DCS-1. Now I’m using a 5D-MII, which I’m very impressed with. I’ve been lucky over the years to be able to shoot with a lot of digital capture devices I could never afford to buy. Betterlight scan backs, Leaf and Phase backs and so on.

CB:  So, you’ve clearly been shooting since the film era.  Did you have any particular favorite or are you still shooting with it?

AR:  I became a big fan of Fujichrome, despite its original reputation in 1984 when we were testing it for the Olympics (Fuji was a sponsor). Prior to that, I was a Kodachrome shooter. I can’t recall the last time I shot film that wasn’t for some Film vs. Digital test. I don’t miss film at all, sorry. I had to do a lot of scans in my time, like working all night in the darkroom, it gets weary after awhile.

CB:  I must say, testing film for use in the Olympics is sufficiently impressive!  How about your computer setup?  Do you prefer Macs, PC’s, Linux, or some other variant?

AR:  Mac, since 1988. In the old, old days, Photoshop only ran on a Mac!

CB:  Fair point…and now for the zany question of the day, Chocolate, Vanilla, or Strawberry?

AR:  Chocolate if forced to pick just one.

CB:  With all the sundry stuff out of the way, let’s move into an area with a little more granularity. Photographers often enjoy hearing helpful and constructive critiques of their work, as we are aware of how much we can grow from it.  However, we’ve also all had the “nice shot” and “cool” comments when we’ve shared our work.  What was the singular most useful critique or comment you’ve ever had on work you’ve shared publicly?

AR:  My god, that’s a though one! A great deal of the learning process at Art Center was the “crit”, from both instructor and fellow students. I think that total honesty with the understanding that much of this is subjective is key. That said, I spent two weeks on the Amazon River doing a photo tour with Jay Maisel who is one of the best instructors I’ve ever had. His approach to working with light, color and gesture is always in the back of my mind when shooting. If you ever have a chance to hear Jay speak, it could change the way you look at the world as a photographer. I don’t recall who first suggested that its critically important to scan your frame prior to capturing an image when time permits, really thinking about what’s in the frame and why its important to the image. Cropping after the fact is equally important because sometimes you really need to study the image after capture. Jay really reinforces the idea of ensuring everything in the cropped final is important to the total image. I really love Lightroom’s non-destructive cropping. It pays to revisit images you haven’t looked at in some time and seeing if indeed, the crop works or not.

CB:  Kind of makes me want to go back and look at some of my past images using Lightroom now!  What about giving critiques though?  If someone was asking you for an honest critique of their work, what 3 factors would you look at most (excluding friendships or family relatives, we’re talking professional or fellow photographer-types here)?

AR:  There’s that initial first look that either pulls me into the image or it doesn’t. Going back to Jay, I ask myself “is does this image say anything about light, color, gesture or more than one”? Second, I ask myself,  “Would I want to have this image on my wall, can I view it over and over again and see something new”? There are many images that I find successful that I might not want to view every day. Third, ask myself if I find the image successful due to the image or the presentation (which try to dismiss if possible). I’m seeing a trend these days with images that are printed really, really large because the size makes the image seem more important or more successful. But size doesn’t count; it doesn’t make a lesser image better.

CB:  Wow, I’d not thought of the impact that print or presentation size can have on how imagery is received, but that’s a great point!  Let’s move into something more software and technique oriented.  Being as well-versed as you are in color-management, you know that as Photoshop and other software programs mature and develop, new ways to create images are presenting wider options and possibilities. If you had to choose between the gear or the software as the only way to create, which would it be and why?

AR:  The gear. I’m finding less and less the need or desire to do work in Photoshop once I’ve used Lightroom, my modern digital “darkroom” to process the Raw images. I have to have software! The Raw (even the JPEG) is useless without a way to interpret what is nothing more then a big pile of zero’s and ones. The gear and latent film image, without a processor is equally inadequate. The software doesn’t create the image, so we have to rely on the photographer and some capture device. Some of the newer software is interesting in how it attempts to allow the user to produce some “looks”, like HDR that were not possible or darn difficult in the analog days. I find however that many prosumer photographers (if I can use that term), even some pro’s use software to mimic a “look” someone else has created and I think that’s usually a shame. I have to wonder if we really need plug-in’s that automatically make your image look like someone else’s style.

CB:  So, in looking at images you’ve captured with your gear, if you had to pick three pictures out of your entire portfolio to represent your approach to photography, or your artistic vision, which ones would you pick (feel free to share images here)?
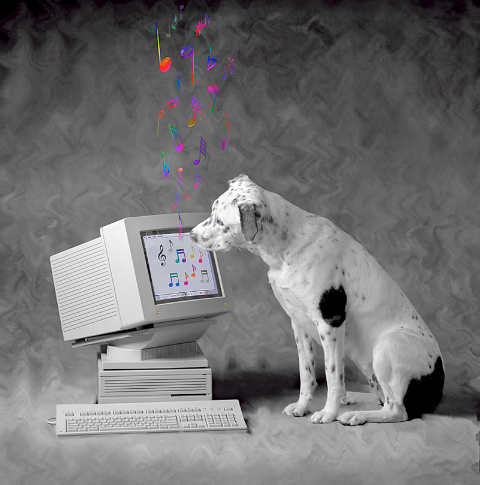
Tosh

The image called “Tosh” (Macintosh my dog at the time) that became my logo is near and dear to my heart and was one of a series of such images I did in the early Photoshop days (I started on version 1.0.7).
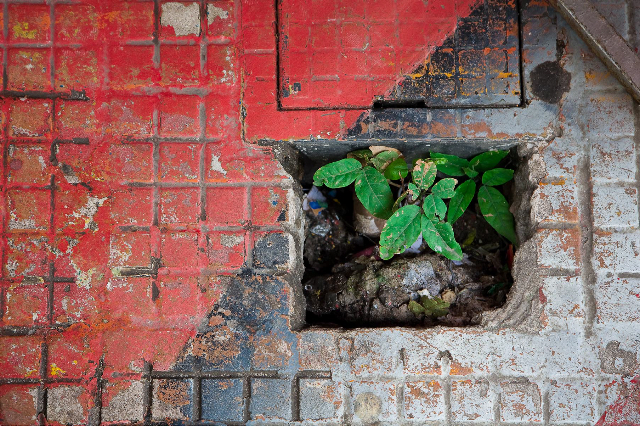
Digital Dog Photography

Digital Dog Photography

Two recent images from my trip with in 2007 were influenced by Jay (who I’ve known since I graduated from school). I’m uncomfortable with the term “artistic vision” although I do recognize that there’s some creativity involved in making (my) images.

CB:  These shots are fabulous, and it’s nice to learn a little background of your well-known image of “Tosh”!  Thanks so much for sharing these.  Any final thoughts you’d like to share about the state of photography or any catch phrases that you keep in mind when shooting?

AR:  I’m still so surprised that many users who are shooting Raw don’t realize that the LCD preview on their cameras and the histogram isn’t based on the Raw but the JPEG. And they don’t fully associate the differences in shooting for Raw versus JPEG in terms of proper exposure (Expose to the Right). As for catch phrases, I hate the term “accurate” color. You can’t define accurate without measuring the color and 99 times out of 100; measured color produces quite unattractive imagery on a display or output to a print. So when I shoot, I try to view the scene as I hope to express it on output, knowing neither the JPEG preview nor what I first see of the Raw data in my converter is going to be accurate to my memory vision of the scene. It’s still our job to render the print from what we “saw” when we captured the image or wish to visually express.

CB:  Let me say it for the record right here, that I did not know the histogram is based off the jpg and not the raw image.   As for the rest of your closing thoughts, you’ve definitely given me some food for thought, as well as the rest of the readership.  Andrew, again, thanks so much for taking the time to participate.  Have a great time at Photoshop World – I wish I could be there to take a class from you!

Well gang, that’s it for today.  There’s really nothing I can say to really “wrap things up” like I usually do.  You can find Andrew on the web at his website: Digital Dog, as well as through the NAPP forums.  There’s just tons of information on his website, including articles, links, ICC profile services, and much much more, and he is always very helpful to everyone in the NAPP forums!  Suffice to say, after hearing from Andrew, my own position on the learning curve just seemed to drop a little further.  Thanks so much to Andrew, and let’s hope we can take the insights he has shared with us here on the Thursday thoughts series and strive to make our own work better.  Happy shooting and we’ll see you back here tomorrow!

The Meat is in the Maintenance

With another week come to a close, I got a late start in recording and putting together the podcast for today, so it’s going up a tad late.  However, as the old saying goes, good things come to those who wait.  This week, I look at some of the photo news, relevant to Canon users, photographers, and just some good old news tidbits.  In the “meat and potatoes”of the week, I look at what should be included in an extensive maintenance schedule for any photographer, including cleaning, software, firmware, batteries, data, backups – literally the whole schmear!  It’s quite the meaty helping on maintenance, so be sure to bookmark, download, listen, and whatever it is others do when enjoying podcasts as this is sure to be useful info for lots of people!

I also remind everyone of how you can win a Think Tank Photo Streetwalker!  This is a $150 value bag, and there are still a few opportunities left to participate in the random drawing.  Make sure you tune into the third segment to find out how (sorry, but only domestic US residents are eligible…) this can be yours for a simple song!  (Hint:  Make a post to the blog and you will probably be entered to win!)

Finally, I take a few listener questions from Josh and LaRae (thanks for the comments and email), as well as your weekly photo tip.  I made same changes to the recording process that I think have cleaned it up quite a bit, so I’d really like to hear some feedback on what people think of the difference in audio quality this go around!  Please don’t be shy, and make sure you let iTunes know they’ve dropped the feed!

Have a good weekend everyone.  Happy shootin, and we’ll see you back here Monday morning!

Camera Profiles

So, today I had the day off work, and was catching up on a few things.  I read through most of my piled up photo magazines, caught up on some NAPP tutorials, and some overdue email replies to various asundry things.  One of the tutorials I watched was from Matt Kloskowski on installing camera profiles for ACR in both LR and CS3/CS4.  It’s pretty cool stuff.

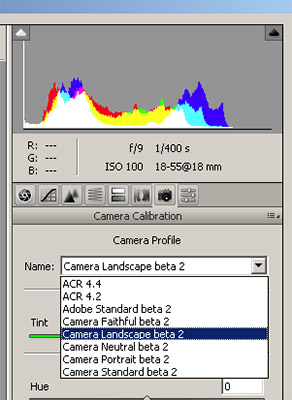
Basically, Adobe has worked with various camera vendors to get the ACR to approximate the same colors that are shown in the vendor proprietary software (Digital Photo Professional for Canon and Capture NX for Nikon, and a whole host of others.)  Matt did a great job of showing how close it gets while even still in beta.  I was convinced enough to go ahead and download the plugin to use in CS3.  Fair warning though, you do need at least ACR version 4.5 or higher to use these profiles (I have 4.6 installed).  Since my bodies are Canon-specific my interface may look a little different, but thought I’d share the screenshot of what it looks like for me:

My thoughts are that the Camera Landscape beta is the closest to what DPP shows.  Since it’s all happening in camera raw, as Matt stated, it just gives you a better starting point with less editing to get to your final results.  I really can’t wait to see how this develops and moves out of beta.  Just hope that Adobe sees fit to release the final shipping version for CS3 owners as well as CS4.  What about others – has anyone else installed this?  How do your pictures look?  Are they close to your vendor software?  Feel free to jump in with the comments!

In other news for Friday, this is the last day to participate in the economy-photography poll from the sidebar.  You RSS readers – stop in and vote, we’re trying to break 30, and only have until midnight!  Other than that, it’s been a great day – I even got some cool shots of the dog after our walk with the sunlight glistening in her eyes.

I’ll leave with my favorite What the Duck of the Week.  Happy shooting and we’ll see you back here again on Monday – have a great weekend!

The Weekender – Web stuff and some thoughts on CS4

The last few days have been insanely busy with work and home obligations, so out of necessity I have not had time to devote to content for the blog.  My apologies for abandoning the readership temporarily, and without warning.  I’ll endeavor to give advance notice before that happens again.  So, with that out of the way, I thought today it might be useful to get a wrap-up of what I have been seeing and reading around the forums, blogs, and internet that’s photography-related.

  • Jeff Revell, who has become quite well-known for his photowalking blog made a few interesting posts recently.  In one of them, he did a reminder on updating your firmware.  Great idea Jeff – if you’re interested, I actually put together a post with all the Canon firmware updates as of a few weeks ago.  The other one was ab out the Epson Print Academy season for 2009 has been published.  I had been meaning to go to one of these for a while, and for a mere $150 think it is definitely worth the cost.  They’re coming to Denver and it’s a mere block or two from where I work so I will most assuredly be in attendance this go around.
  • Scott Kelby, master instructor of Photoshop, Lightroom and author of more books than I can count, is also bringing his tour through Denver some time in December.  Check out the schedule here if you want to see him live and in action at what he does best!
  • David Ziser has offered up a Digital Wakeup Call DVD worht $75 to some lucky participant if he gets 20 ideas on how to incorporate video into your selling packages for photography businesses.  Not a bad deal for 5 minutes of your time!
  • Don’t forget, I’ve expanded the poll here at CanonBlogger to go longer than the 1 week, so the numbers are a more accurate representation.  What features do you like about the curreng generation of camera bodies on the market?  What motivates you to buy?  Share your thoughts on the poll to the right.

Last, but not least, the hubub on most forums lately has been surrounding the release of CS4 and LR2’s latest updates.  The reason for all the hoopla comes every time there is a new release to the software, and it’s a cycle that likely will not end.  Rather than just pile on and vent, I thought for the second half of this double-feature wrap-up, I’d share some thoughts on why people are frustrated rather than just saying “people are frustrated”.  So, here’s a different perspective.

Software is not a tangible asset

Software is not like a camera body, or a car, or a television, it’s something that lives on your computer.  Thus, the value of it is not as easy to see.  We are very much a society that thrives on all our toys, and software just isn’t the same as having the latest body, or flash or television or car.  It’s not something we can touch and feel and show off to our friends.  It’s only on our computer.

Necessity

With software, we are sometimes obligated to upgrade.  I personally had to upgrade because CS2 did not offer a raw converter for the Canon 40D.  Sure, there’s the Adobe DNG converter for free, and I actually have incorporated that into my work flow for the Mac where I don’t have CS3, but that does present another step in the process of a work flow that I was previously happy to not have to deal with.  Anyway, the point here is that if you don’t upgrade your software, you will find yourself unable to maintain a stable and consistent work flow (since you re upgrading other gear all the time too).

Competitive Pricing

With other technologies, competition keeps prices under control.  Camera vendors like Canon, Nikon, Sony, and the rest all have to compete with one another for your business.  Adobe really has no competition in the market place.  Okay, sure, there’s Corel, and the GIMP, but come on, who are we kidding?  Adobe is the market when it comes to photo editing software.  All the others are simply “alternative programs”.  Without a competitor, Adobe can price things however they want, knowing that those of us who have already invested are pretty much committed to maintaining our work flow by keeping the software interface as consistent as we can.  To their credit, upgrades are cheaper than the full blown versions of the software, and there are often promotions and suc (educational pricing is the best way to go imho – take a community college class once every two years and you will save anywhere fro $300 to $700 on pricing for the CS products).

Release Schedule

Do we really need to upgrade our software and work flow every 18 months?  With cameras, (which are released on the same schedules for most SLRs), most people I know wait at least 2 generations before upgrading.  Another analogy that has been made here is to cars – anyone upgrade their car every two years?  What about televisions?  Do we really upgrade our televisions every 18 months?  Unlikely…and even if we do, is the old television still usable?  Often times, the older version is relegated to the basement or a childs bedroom, or even sold second hand.  Who buys outdated software?  No one that I know of…

So, there’s the second half of the weekend post.  What do you think?  Am I off base?  Is the software market competitive?  Do you think the pricing is fair and equitable?  What about the upgrade schedule?  Does 18 months sound about right?  Sound off in the comments!

Again, sorry for the lack of material over the last two days.  Hopefully this will make up for the lack of content on Thursday and Friday.  Now, since you’ve finished this, take that last sip of coffee, pack up your gear and go have fun shooting!  (In other words, Happy Shooting!)  We’ll see you back here again on Monday.

The last of the panoramas (for now)

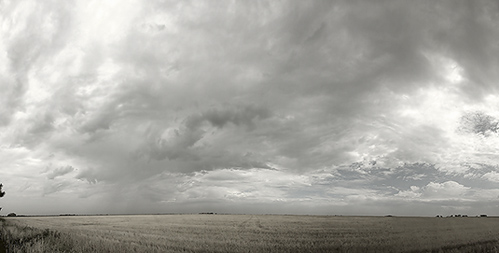
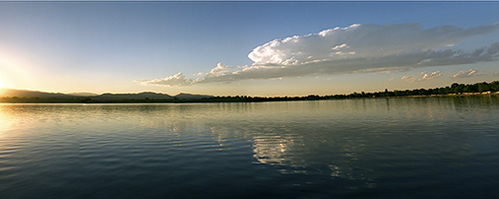
As promised, I have a black-and-white version of the original panorama from the trip across the country finished. Also, as I finally had some down time with the camera, I took off in search of some sunset scenery (I am used to sunrise shots from SC, so now I have to switch to sunsets being on the western side of the country!). I found one two days ago, and the scene really screamed “this is a pano” to me, so my first shots from Colorful Colorado are also for the benefit of panoramic photography! Enjoy these shots. The latter of the two (the sunset) was my inclusion in the upcoming Geographic Composition series hosted by Jason D. Moore so be sure to stop in there tomorrow for a look at the others in this regular event. The theme this go-around was “transitions”, and I thought this was an appropriate shot – my first shot in CO, and the water, to mountains, to sky, plus some super nice color transitions to boot.

Black and White Panorama of the Kansas Skies

Colorado Sunset Panorama

Jason D. Moore – Geographic Composition Series: Transitions

Well, that’s all for today, Thursday. Remember, Jason’s Geographic Composition Series collection will begin tomorrow, but since I am posting this rather late (9PM Mountain time), the readership will likely see this tomorrow morning. Until tomorrow night then, happy shooting and watch those apertures!

Slideshow Secrets

As I thought about the tutorial for today, I pondered doing a quick set of tips for Photoshop, like CTRL+J for a duplicate late, CTRL=ALT+SHift+E to stamp all visible layers on to a new layer, and other such trinkets.  While debating which ones to include I was continuing the process of winnowing down the last of my photo magazines to just the articles I wanted to keep.   I was also thinking that perhaps a subject would come to me that could add a new dimension to the blog, when as luck would have it – the subject came to me.

From back in October of 2006 – nearly two years ago, I saw an article in PCPhoto that took a look at tips for making great slideshows.  Written by Chuck Summers, it reminded me of the days of yore when my dad would crank up a slide projector to have us watch slideshows of ourselves in Florida, the Grand Canyon, and other family adventures.  Well, the digital age is most definitely upon us, and one area I’ve not gotten into much is that of slideshows.

Chuck did a great job with this article, and I’ve condensed it down here to the nuts and bolts of each tip (twelve total, which makes for great alliteration – it pains me to dodge the obvious usage!)  Anyway, here’s his 12 Slideshow Tips:

  1. Determine the Theme and Purpose of Your Show
  2. Set a length
  3. Methodically edit your images
  4. Maximize image effectiveness
  5. Prep images
  6. Set Image Order
  7. Determine transitions
  8. Title Slides
  9. Choose music to set the mood
  10. Time the Presentation
  11. Preview, Evaluate and Revise
  12. Test Projection Needs

While very informative, and logical in layout (I like logic!), what the article did not present is software recommendations.  I’ve read various bits and pieces around but have not had reason to delve into it thus far.  However, with a cross country move coming up, I thought it might be fun to take images that capture the trek from the East Coast to the Rocky Mountains and compile them into a slideshow when done.

To do that though, I need some software that is designed for slideshows.  I know Photoshop and LR can do these functions, but as an old hat, I like a specially designed piece of software for each function.  Thus, I can’t help but wonder what would be the best software to accomplish these ends.  I recall Proshow Gold as a name, but forget who produces it.  In the interests of full disclosure, I feel that I should also state that I actually have not really tried the slieshow functions in either PS or LR, so am appropriately ignorant on both counts.

So, what should it be?  Should I use Proshow Gold, Photoshop, Lightroom (I am using the Beta 2 via invite), or is there some other software out there that is better purposed to these ends?  Any slideshow superstars care to share their own secrets on software and other tips for making great shows?  Feel free to educate me in the comments.

Meanwhile, happy shooting, watch those apertures, and see you here again tomorrow.  (Perhaps a video tutorial is in the air for then…ya never know! 🙂 )