Flickr Plugin for Lightroom

While recently participating in a Photowalk group outing to Rocky Mountain National Park, with the fellow local photogs, I learned about this great little plugin for Lightroom that allows you to export your photos directly to Flickr…all within Lightroom!  It’s a pretty cool little plugin, and as you know, when I learn something new – so do you!

This plugin comes courtesy of Jeffrey Friedl, and one of the greatest features of it is the cost – absolutely free!  Well, that’s not exactly true, you do need to spend one cent via Paypal, but for a penny, check out what you can do:

I started off downloading the ZIP file (and it works for Windows or Mac) and expanding the archive.  Then I moved the plugin to the root of my Applications folder on the Mac (you can choose where ever you want to store plugins, you just have to tell Lightroom – and for me this is an easy place).  The icon for it looks like this:

Flickr Uploader Plugin Icon

Nothing too spectacular yet, and there’s a little bit of installation and customization needed.  Your needs may vary based on how you want to use the plugin, Flickr, and Lightroom, but the cool thing is that Jeffrey has put together a plugin for most online locales including Smugmug, Zenfolio, Facebook, Photobucket, and many more.  So, if you use another resource, it’s worth checking out.  I’ll continue here for the Flickr plugin and you can decide for yourself if it’s worth adding this tool to your workflow.

Next up, I went ahead and configured the plugin from inside of Lightroom to use my Flickr account.  Here’s what I did. To start, click on Export, just as if you are exporting to disk or some other resource
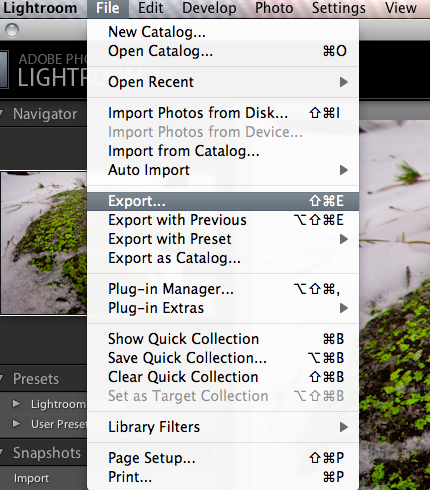
Open Export Dialog
Open Export Dialog

One the export dialog box is open (and here’s the tricky part), look to the far right of the gray bar across the top that says “Export to Disk”.  You’ll see two little arrows which means there are menu options:
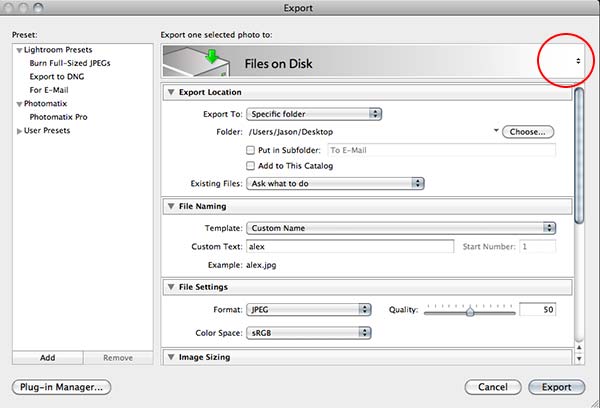
Files on Disk
Files on Disk

If you click on those arrows, you’ll get a new dialog box (bet you didn’t know that was there – did you? 🙂 ), and the Flickr option will show up.  Select the Flickr dialog one for our purposes here:
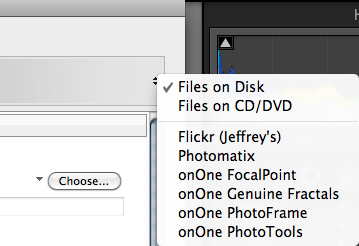
Flicker Exporter
Flicker Exporter

Once you select the Flickr Exporter, you will get a new dialog box that will start the authentication process that Lightroom will use to log into Flickr.  If you have multiple Flickr accounts, or specific authentication methods you prefer, these steps may change a little based on your needs.  But here, I am doing things the most straightforward way:
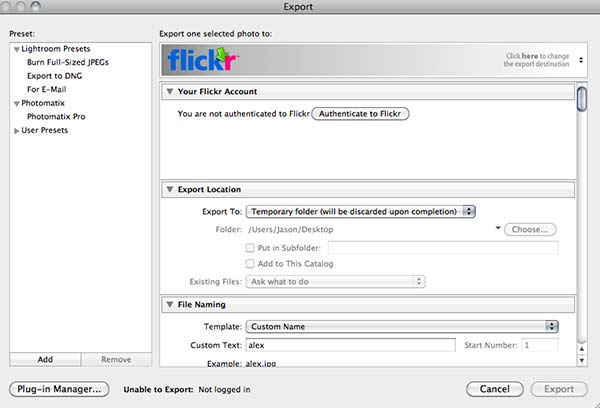
Flickr Authentication

Next up, if you are logged into Flickr already, the plugin will open a page that will grant access to the plugin.  So, it helps if you are already logged into your Flickr account on the internet.  So, you’ll get a dialog box that looks something like this from the plugin to that effect:
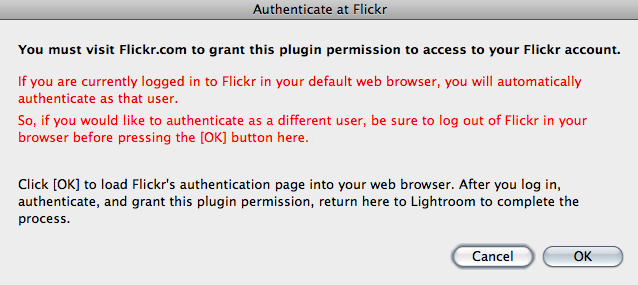
Warning Notice from Plugin

On clicking the OK button, it will take you to the grant access page, and you’ll get another dialog box that grants the plugin access to post photos to your Flickr account (which, after all, is the goal, right?).  The one notable difference you will see in yours is that my face won’t be staring back at you like here.  That is the avatar for my Flickr account, so your screen should show your avatar – if it shows something different, then you are in the wrong account (but I guess that goes without saying)!
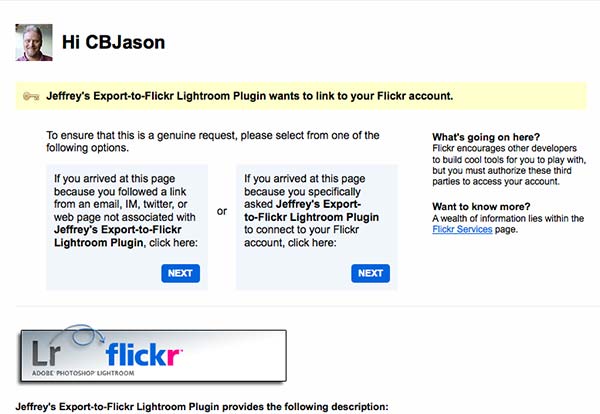
Granting Access from Flickr Side

A second confirmation screen from Flickr will also let you know that this is a 3rd party application, and just acts as a security measure to make sure you are aware of what that means.  Click the button that says “OK, I’ll authorize it”, as shown below.  Again, while it goes without saying at this point, your dialog will look a little different different.  If it doesn’t and you see my avatar in your Flickr account, I am gonna be calling soon! 🙂
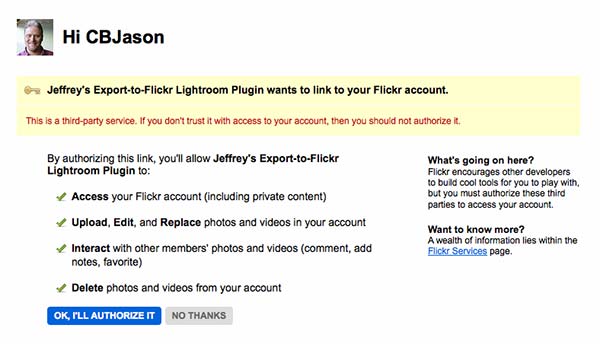
Authorization
Authorization

Finally, you will get a confirmation screen on Flickr, noting what you’ve done (they make it pretty clear what you’ve done, and how to delete it if needed on the Flickr side):
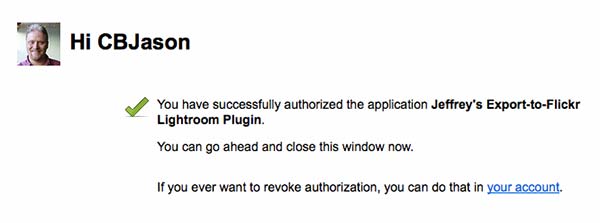
Flickr Confirmation
Flickr Confirmation

On return to the Lightroom interface, you’ll get a confirmation screen there as well – just click it to continue:

Lightroom Confirmation

On granting access, you’ll get an authorization code, which for obvious reasons I am not going to post here, but make a note of that code and enter it back when you return to Lightroom.  On completing that you will be presented with the Flickr Uploader Dialog.  Here I am going to show you a few key ones that you have to scroll down to be aware of in making your uploading preferences.

Screen shot 2009-12-14 at 9.06.37 PM
Your Flickr Account login in Lightroom

This first shot (above) shows the top part of the dialog, and shows how you are authenticating on Flickr.  Now, use the scroll bar on the right side to move down through the options.  First stop, the Photo Set.  On authenticating, the plugin will pull your complete list of photo sets from Flickr.  If you don’t have any photo sets built, then none will be here.  Since I do have photo sets, it will default to the first one alphabetically.  You can change the sort order, and specify what photo set (if any) you want the uploaded image to be added to, as desired.  For this example, I did not add the photo to an existing set, or create a new one.
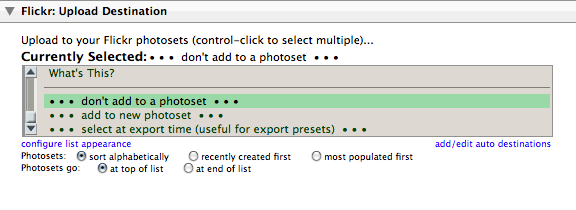
Photo Set Choice
Photo Set Choice

Pretty straightforward, but let’s keep scrolling through a few more key items you will want to think about utilizing or disabling depending on your work flow.  The next one I think warrants mentioning here is the groups.  One of the ways you can increase the visibility of your photos on Flickr is by participating in groups.  More people look at them, you’ll get more feedback, and sharing our photos with others is the goal anyway, so go ahead and add the appropriate groups here.  I selected the group “CanonBlogger” for obvious reasons! 🙂
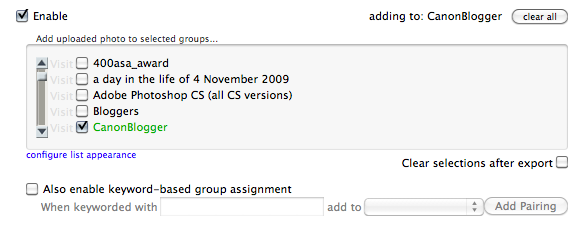
Screen shot 2009-12-14 at 9.09.00 PM
Publishing to a Group

Only a few other options that I think are useful from this plugin, so we’re almost done.  Next up, is another social networking one that I tend to use fairly regularly – Twitter:

Twitter posting
Twitter posting

Last but not least are the meta tagging options you have available to you from the plugin interface.  The options are just to diverse to go into detail here, and I prefer to tag photos on Flickr differently than in Lightroom, so I leave these blank, but in the interests of full disclosure, here are some of the tagging and naming options in the plugin dialog:
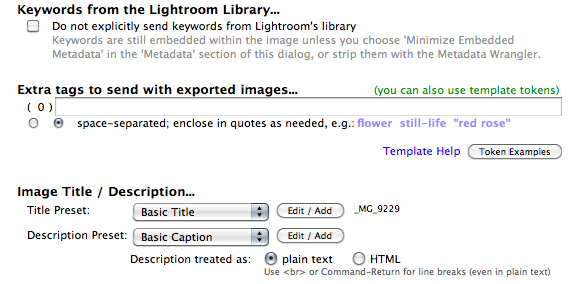
Tagging Photos
Tagging Photos

If you think about it, for a penny, this is a pretty good deal (I went ahead and made a donation, which I would also encourage you to do as well – Jeffrey has clearly put a lot of time into developing these plugins, and he needs to eat, just like the rest of us).  So, there you have it – the process of finding, downloading, installing, configuring and using the Lightroom Flickr uploader.  As I mentioned at the beginning of the post, there are other uploaders available as well, and I am going to probably go get the one for Smugmug as I have an account there too.  It just makes the sharing of your photos that much easier.  (Who knows, the Facebook one may also make its way into my utility belt at some point once I get more comfortable with it…)

If you have questions or problems with the installation or the uploader itself, Jeffrey has a good FAQ page here that should answer most questions for you.  If not, I am sure he has an email address available somewhere for specific questions not addressed online.  For my work, I think this plugin totally rocks!  It’s going to become a staple in my work flow, and if you are into social media at all, I would highly recommend it for those purposes as well.

In talking about all of this, it bears mentioning that some of us are not fans of Flickr, Twitter, or Facebook, and while I can understand the hesitation of some, it’s really a matter of personal preference, and maximizing the time you spend on your computer.  if these outlets aren’t your cup of tea, that is totally fine.  But if you have the Flickr plugin – it is that much easier for you to participate in the Monthly Giveaways here at Canon Blogger/Learning Digital Photography!

With those thoughts, I’ll leave well enough alone as this post has gone on long enough for one day.  Happy shooting (and uploading) and we’ll see you back here again tomorrow.

DALPUG

Denver Adobe Lightroom & Photoshop Users Group

No, this isn’t spam, the blog has not been hacked, and I am not speaking in tongues here.  DALPUG refers to the Denver Adobe Lightroom & Photoshop Users Group.  Started relatively recently by a guy I know named Brian Reyman, it’s a great local resource for photographers to not only learn from one another, but also to network and get an opportunity to see some of the latest developments in the industry.

I had a chance to attend the meeting last night, and the mini-workshop that Brian ran on plugins included quick looks at things like OnOne Software, Topaz Labs, Nik, and a bunch of others.  Not only were they showing you how to use the plugins, they were offering up giveaways too!  It’s a great group, offering people opportunities to learn, share, and network with others in the field in the area.  Definitely worthy of a diversion from the regular blog schedule to give some shout outs here today.

I’ve also learned that these sorts of groups are all over the place – Adobe sponsors user groups across the globe!  So, here’s a chance to sprad the word about your area groups.  Got one you know about?  Attend any regularly?  Let me know here in the comments and link to your website or user group site so people can find you!

Short but sweet, so keep on shooting and we’ll see you back here again tomorrow!

Cabo Creativity

Last week’s first ever 5-day series of written work “The Five Elements of Control” featured 5 distinct ways in which you can control and increase the impact of your work.  Those elements were through controlling for luminance, color, geometry, context, and composition. Hopefully, the perspective can be one many will find useful in elevating their own work.  In taking the task to heart, today (my first day back after a week-long break in beautiful Cabo San Lucas), I am sharing a slideshow of some of my favorite recent shots.  So, rather than suggesting others incorporate these techniques, I am trying to apply them to my own efforts as well. Here is where you get the chance to be the critic for my work, so by all means, share your thoughts, comments, feedback, and perspectives below.

In other blog and podcast notes, don’t forget, the $500 giveaway for the Thinktank Photo Multimedia Bag and Topaz Labs plugin bundle is still going on over on the Flickr site.  We’re in the last week for submissions so we can wrap things up by the end of September, so time is drawing nigh!  The thread to share your pictures (and the guidelines) is here for those interested.  It’s a great opportunity to take advantage of some great products from Topaz Labs and Thinktank Photo (and thanks go out to the sponsors for their generous contributions)!

In case you haven’t noticed the sidebar, there are now short little audio tips being offered up courtesy of the folks over at Audioboo.  The latest comes  the shores of Cabo San Lucas with the peaceful waves of the Pacific crashing in the background!  So, for the feed readers out there, stop on over to the blog and check out the audio tips – some hopefully good stuff there too.

Thanks also to the recording capabilities of my wife’s point-and-shoot camera, you are in for a special treat tomorrow in the form of a Quicktime video!  Until then, here’s the promised stills from the trip.  Happy shooting everyone and we’ll see you back here again tomorrow.  (Don’t forget to let me know your thoughts and feedback in the comments!)

Mexican Harbor
Mexican Harbor
Negative Space
Negative Space
The Power of the Waves
Umbrella Dots
Umbrella Dots
In Honor of Escher
In Honor of Escher
Through a Window
Through a Window

As a little postscript, since many will ask, I did my post processing in Lightroom and Photomatix (yes, some of these are HDR images).  One image did reveal a pretty heavy dust spot on my sensor, so that one did see a round-robin through Photoshop for that one speck.

Teaching to Learn…

For those of you that don’t know – there is a cool little feature available for iPhone and iPod Touch users called AudioBoo, where you can record up to three minutes of audio soundbites and share online.  It’s a pretty neat little feature, and allows for short bursts of ideas.  I shared just such a recording (they are called “boos”) this evening after I left the Exposure Denver photo club meeting.  You can listen to the recording here or continue reading below my thoughts on the Exposure Denver experience!

Speaking of which, the gang from the group was so cool – everyone was so welcoming!  They asked me to come in and share some tips and insights on Lightroom, which I was quite flattered but honored to do. If you want to learn more about Exposure Denver, follow the link to their blog where they have news of upcoming events, activities and more.  These folks take it to the next level with regular galleries, themes, critiques, reviews, and yes, you can sell prints at the shows!  A lot of thought, time and preparations go into the group and everyone contributes!  It was quite an energizing and motivating dynamic and has me very excited in ways that I have not even explored yet photographically and creatively.  My head is literally bursting with possibilities.  And why is this?

Because I was thrust into a teaching role, on a subject I am (or was) admittedly not an expert in!  I have no idea how it all started anymore, but this further confirms what I’ve known from prior experience in another field – the best way to learn about something is to try and teach it to someone else.  It forces you to get up to speed, get current, and learn more than you did before.  This happens in three ways:

You do research to prepare your class note, talking points and handouts.  I learned so much just from pulling all these resources together.

Others in the class will know things you don’t.  Without fail, this always happens.  There is no way you can expect to know more than everyone else on a subject you are teaching unless you have 20 years of age and experience over the audience.  But I was not in front of kindgarteners this evening – these were peers (and several were even a few steps ahead of me).  We each brought value to the table and while some probably learned a lot from me – others schooled me!  (But in a good way!)

So, if you want to really get your fingernails dirty, dig into something and know it better than you ever did before:  try teaching it!  I did and learned more than I ever have before about Lightrooom.

Creative Composition – Vignetting Photos

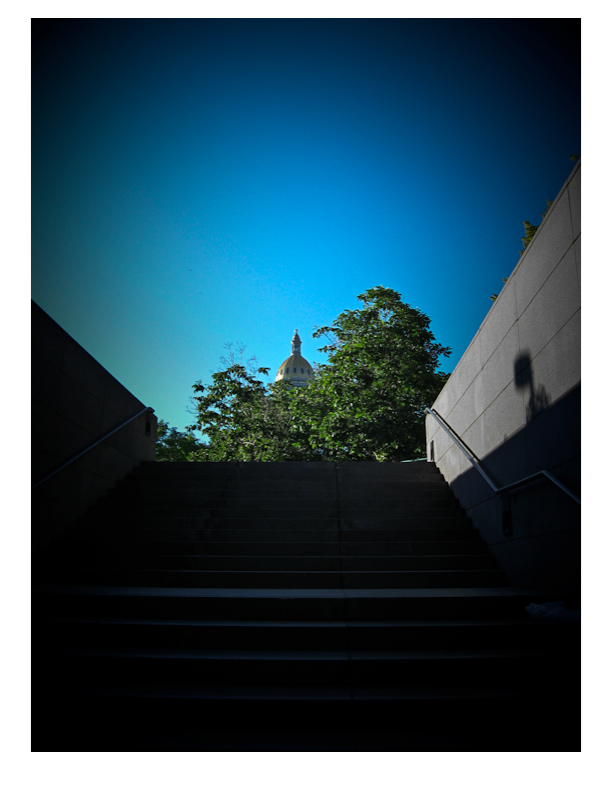
In general we learn that placing your subject dead center in the frame is something to avoid – creatively speaking it can kill a picture.  While this holds true as a general rule, I was walking into work yesterday morning and the sky was a brilliant blue, with the capitol bulding of Denver right dead center in front of me, and I thought that might make an interesting attempt at breaking the rules if only I had my camera….and then it dawned on me, I did have a camera.  Granted, not my trusty 40D, but the smaller Powershot As500 IS.  So, on a whim out it came and I snapped off a few frames of it.  The vertical came out the best compositionally speaking, but it still lacked something to bring it into what I would consider the “creative” realm.  After all, it is a rather mundane shot, and something you would expect the typical tourist to capture.  So, how could I create interest…and then it dawned on me:  vignette!  That would bring the eye in more, focus attention where I want it to go. So, into Lightroom I went, and sure enough it did create a little more visual interest.  I thought I’d share that view with you here today:

vignette

Granted this is still something that I would probaby personally consider a snapshot from my library of countless snapshots, but it does serve to illustrate that post processing in software can create more visual appeal and vignetting is one way to achieve those ends.  So, the next time you are about to toss a shot, ask yourself:  Could I improve this with a little vignette?  Give it a whirl – you never know whegn a little vignette might surprise you!

On that note, it’s always helpful to remember that post production work can make or break a shot.  Yes, the better your images are to start with, the less work you have to do in post, but that is not to say that post processing is a bad thing…so regardless of whether it’s a little dodging here, burning there, perhaps a litle vignette, or even applying some plugin processing from your OnOne Plugin Suite 4.5, always be willing to explore!

Oh wait – you don’t have the OnOne Plugin Suite 4.5?  Well, go figure, just the luck – today starts the July photo contest here on the blog, and entries are now being accepted in the Flickr thread here for some lucky reader to win their very own copy of the Plugin Suite from OnOne!  Pretty cool as this is a retail value of $500 for this package, so you can imagine the creative possibilities!  Feel free to capture away, and share your favorite shot in the contest.  You can find all the rules from the announcement post yesterday, but get out and shoot for your chance to wina free copy of this great software suite!

For those of you expecting the podcast today – year-end in state work means processing financials so we were working late today to get a lot of T’s crossed and I’s dotted before the clock struck midnight – so the podcast did not roll out today, but I promise it will roll out tomorrow and I’l be talking more about the photo contest then too, as well as answering viewer and reader questions, so if you have any to throw out in the mix, now’s your last chance to get questions in before the show goes live tomorrow!  Got a questio about photography, gear, software, tips, tricks, techniques?  Share it in the comments or with me via email.  Happy shooting for now and we’ll see you back here tomorrow for the podcast.

Grab the RSS Feed

Wacom Bamboo Fun: Hardware Review

The good folks at Wacom were kind enough to donate a Bamboo Fun to me for review on the blog a while back.  In order to really get a full handle on it though, I wanted to use it within the context of my at-home work flow.  You see, I’m not a newcomer to tablets, as at work and through  previous experience, I’ve grown quite accustomed to their usage.  I’ve had to instruct people on how to use, configure the basics, and such on their computers. as well as used them in many of their varying sizes (most recently being the Cintiq).  Having said that, I’ve never really had the need to incorporate a tablet in my home work environment for a number of reasons.  Before I get into the reasons though, let go over some of the basics…and rather than a listing of pros and cons, I am following a slightly different format this time. I should also give fair warning that there are a LOT of pictures coming, so for the graphic avoiders in feeds, you may want to visit the site…

Installation

Installing this product can’t get much easier.  Regardless of whether you are running a Windows or Macintosh environment  (it really doesn’t matter a whole heck of a lot) the system will auto-detect the drivers for your Bamboo fun.  Still, it never hurts to go through the CD installation on their provided media, so I thought I’d share with you the process (and a few bonuses) of installation.  It’s pretty much identical, but I am showing the screen shots from Windows:

Here’s the main splash screen where you can choose what to do, ranging from installation to viewing video tutorials, or browsing the CD contents…

install1

I opted to do the driver installation first, and got this following message…

install2

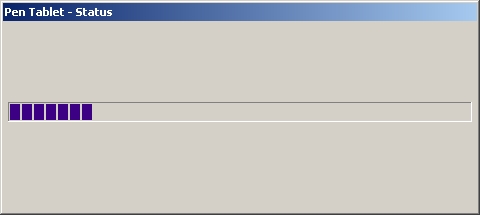
Then the notice that the pen drivers were being installed…

install3

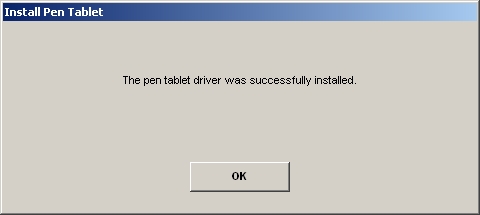
Then notification that installation was complete…

install4

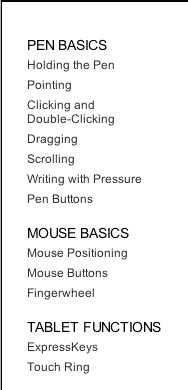
After finishing that, I was offered the video tutorials on how to do different things.  For first-time users, a very useful resource…

install5

And finally the extras that are included on the CD.  I am not sure about files with an extension of x32, but believe this is a carry-over from Macromedia software like Flash.  Since I do not own Flash, I can only guess based on my own research…

install6

Ad additional CD also gives you a copy of Photoshop Elements 5, Nik Color Efex Pro 2, and Corel Painter Essentials 3.0, which also help to offset the cost the the product.  I didn’t want to open this and negate the serials or licenses of the products contained, but did scan the front side so you can see what you get in the companion CD:

bamboofun0021

Configuration

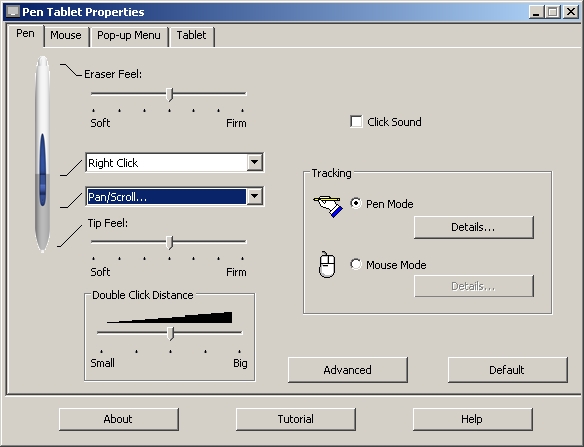
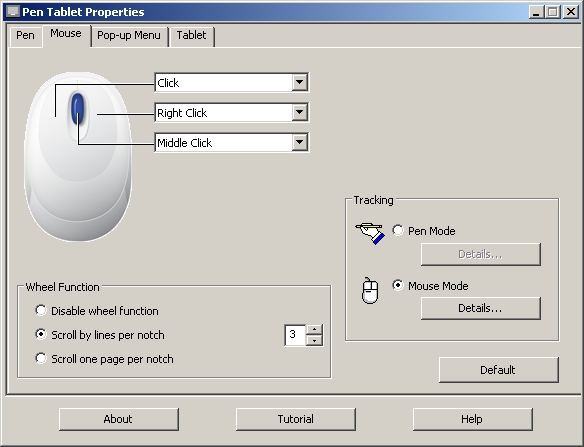
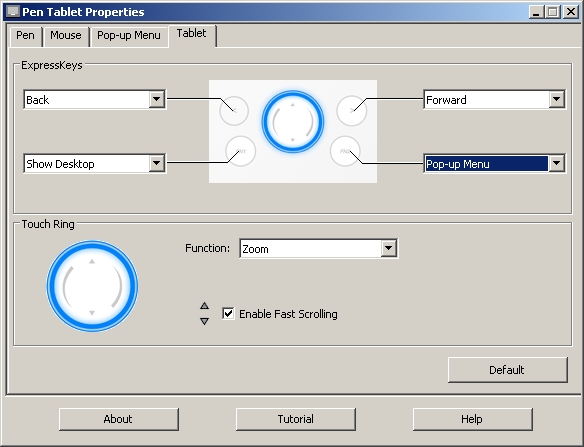
The added buttons at the top of the tablet make for some very intuitive advancements in its usability and properties.  Rather than cover each of these in detail, screen views of each tab (there are four total) should be indicative enough of the control and customization you can get:

config1

config2

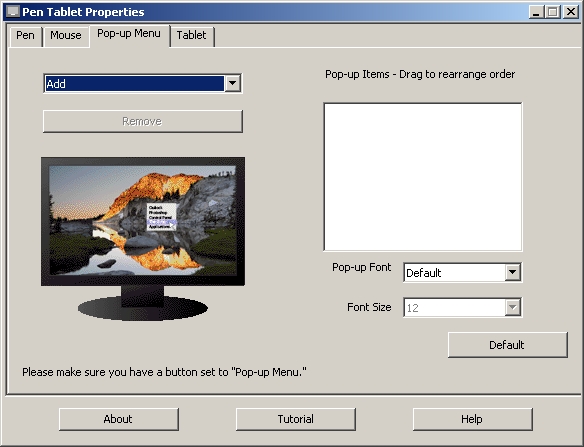
config3

Pop Up Configuration

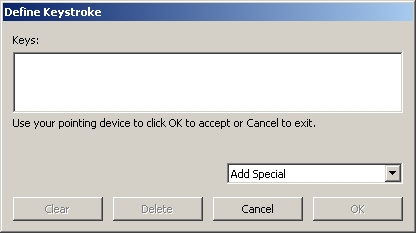
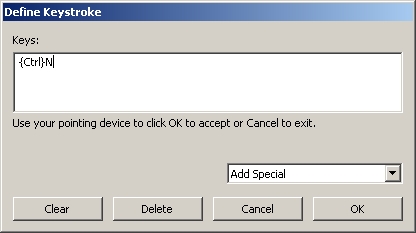
The pop-up tab is probably the only tab that isn’t completely self-explanatory, so let me delve into a little more detail here. The reason why is because you can program common keyboard combinations (like the ones I referenced in my post last Friday) to be controlled from the tablet (provided you have “Pop-up menu” selected as on option on the tablet tab (seen next)…

Here’s how you do it:

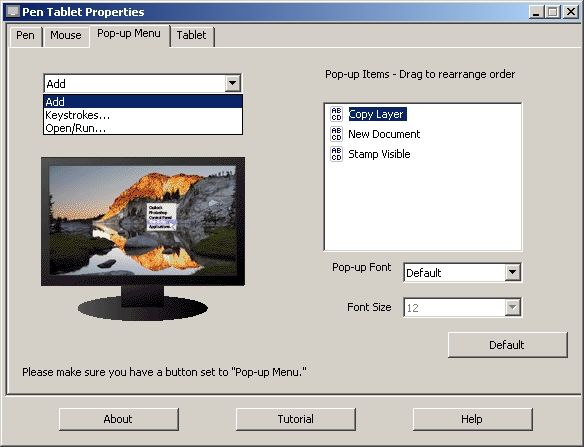
First, click the drop-down to indicate what it is you want to program on the tablet.  For me, the biggest advantage would be in incorporating keyboard keystroke combos so I have to switch less between kb and tablet.

popup1

You’ll get a window now where you can define the keystrokes you want simply by typing that keystroke set in the blank space…

popup2

The tablet will detect your keystrokes and populate the fields

popup3

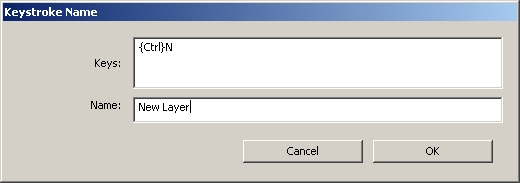
Then, give your keystroke set a name…

popup4

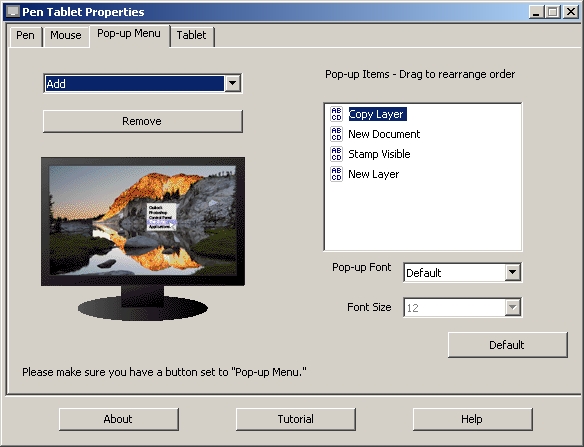
and Click OK.  You can see the ones I programmed below…

popup5

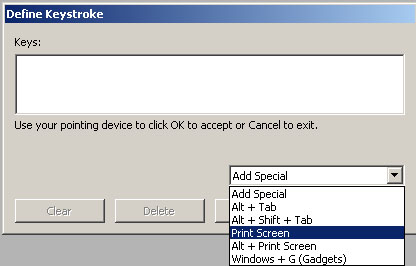
Last but not least, you can also include special keystroke combinations that are unique to your system (like Printscreen on Windows), as shown next:

popup6

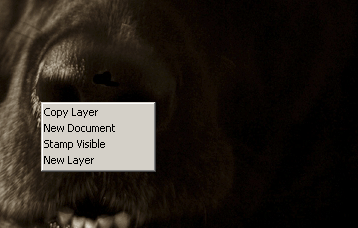
So, you can see how having the pop-up tab configured with your most commonly used keyboard combinations, as you can reduce the swapping between inputs even more!  Very cool!  And here’s what the right-click menu looks like once inside Photoshop:

popup7

But, make sure you have a button set on the tablet to “drop down” (as shown next…)

config41

Mechanics

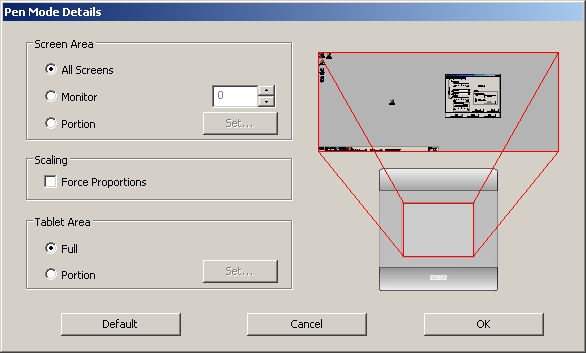
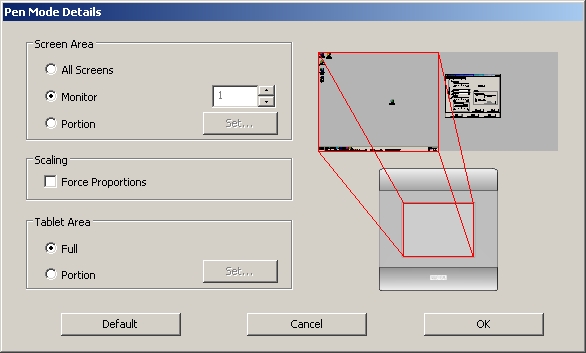
Here is where your specific work flow may have an impact.  On my Windows desktop environment, I have a 19″ and a 17″ LCD, so that’s roughly 36″ of real estate that this tablet (which measures roughly 6×4″) has to cover.  What this means is that movements on a scale that size makes everything larger proportionally speaking.  You can adjust the tablet settings under the pen mode details screen to manipulate for just one monitor instead of all screens, but if I am going to use a tablet, Idon’t want to jump between that, a keyboard AND a mouse…two inputs is all I really would want to switch between, but that’s just personal preference.  But, for those that are interested, here’s how you make that adjustment in the pen settings tab of the tablet properties.  Click on the pen tab of the tablet properties, then the details button to get this screen:

config5

From here, change the button from “All Screens” to “Monitor”.  It will default to the monitor you have set ot #1:

config6

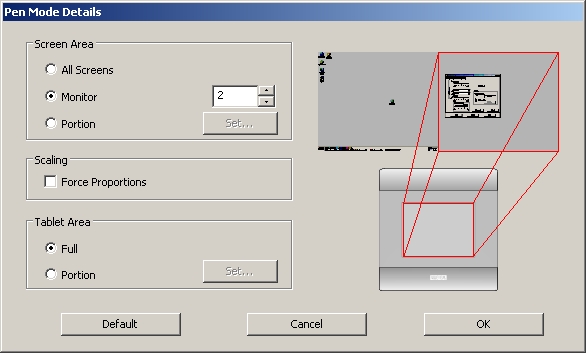
But you can use the arrows to set it to monitor two if you prefer:

config7

On my Macbook Pro, since I only had the one monitor, the experience was quite different as I had less real estate for the tablet to cover – with only a 15″  LCD of screen space to cover.  So the pen was much less sensitive to location on the touch pad given that less than half the real estate was needed to cover the range of the screen (and I noticed greater position control even when I did just the 19″ monitor versus the 15″ LCD of the MBP – it’s just a happenstance of the tablet size, and the only way to do that would be to increase the tablet size – at the expense of desk real estate space…pick your poison, ya know?)

Usage

Tablets rock!  Let’s just get that bias out of the way right off.  If you want the ultimate in cursor control (and when I say cursor I mean movement of your tool, whether it be a brush, a pencil, an eraser, clone stamp, whatever, it’s just amazing).  The first major difference between a mouse and a tablet is touch sensitivity.  No matter how you tap a mouse, it delivers the same intensity or strength when it paints in Photoshop.  With a tablet, this is not the case at all.  How hard you press determines the strength of the brush.  This is truly remarkable as now you can apply just a touch, or go full hog on anything you want from painting, to clone stamping, and anything you want.  To demonstrate, I created a blank document and selected some brush settings to illustrate what I am talking about.  Take a look:  from left to right are light touches to hard pressing with the pen…followed by dots of the same strength top to bottom.

use1

So now you can control things like jitter, hardness, and a whole myriad of options that you didn’t have before (well, at least not to the same degree anyway) with just a mouse.  I know what you’re thinking now – “Great, for graphic design that’s super cool, but how can I use this as a photographer?”  Excellent question!   Ever catch a picture where the eyes are darker and you want to brighten them up?  Well, now you can with greater ease and control both of area, intensity of the lightening (or darkening) by using the pen tool for the Bamboo Fun.  Take a look at the sample below, where I took an underexposed picture of the dog and selectively lightened the eyes and teeth, here’s the before:

use5

and after:

use4

One of the best parts is that this functionality is there in whatever application you use that incorporates brushes.  I tried it in Photoshop, Lightroom, and Corel Painter Pro (I installed a demo version of the last one for this review).  The Bamboo Fun can also expand your ability to clone things out, say a stray light pole or some telephone wires, or even the nasty -ex that you want out of that super cool shot of you in Hawaii!  The possibilities are limitless both for graphic designers and photographers.

So, this now begets the question of why I don’t have one in my home environment.  The main reason is because I’ve never had the need at home.  Most of the time I am at work, and if I need to work that requires that level of control, the work hardware has always been there for me.  Granted I’ve also gotten used to the Wacom Cintiq which has a much larger surface area, so I have even a greater degree of control over the desktop, cross-hairs, and all brushes, so it’s also a matter of being spoiled – I just can’t afford a Cintiq at home, or justify its need – I am just not that much of a re-toucher either with photos or in graphics design creation.

Additionally, for me, the use is only really there in graphic design, because I am also of the mentality of “getting it right in camera”, so I don’t like to do a lot of edits in photos.  Of course no one is perfect so I do occasionally need to do some fine tuning that requires a tablet.  In cases when I do, I just take the photo in to work and do the retouching there as the tablet does give a much greater amount of control than any mouse or trackball will.

When I’ve not been successful in camera, it’s not that my home work flow is good enough, it’s just that the tools are already there for me if needed at work, so the financial justification really hasn’t been there.   As my personal usage has been increasing lately though, I must admit that I am thinking more and more about adding a tablet to my home work flow.   So, would I would recommend this?

Yes!  This would make a great tablet for anyone who does not have access to a tablet elsewhere, or if you are looking to enter the tablet market – the Bamboo Fun is a great entry level tablet, that takes up minimal desk space while offering a maximum range of precision and control.  I think for my own personal usage, I would probably prefer a larger tablet because I do have the desk space, and have been accustomed (as I said) to the Cintiq, so perhaps the Intuous 4 would be more easily incorporated…but only time will tell!)

Finally, as prone as we are to repetitive motions, and with conditions like Carpal Tunnel Syndrome becoming much more common, the tablet does offer a much less repeated motion tendency than a mouse or a tablet.  So, if you make the move to a tablet, you are only decreasing your chances of things like Carpal Tunnel and repetitive motion problems in your wrists.

Two thumbs up (in Siskel and Ebert style) for the Bamboo Fun from the good folks at Wacom.  Many thanks for the demo product, and I am sure the listening/reading audience appreicates their generosity as well.  Happy shooting everyone, and we’ll see you back here tomorrow for an exciting software review that includes the announcement of our latest contest, which is starting in July!).

And the winner is…

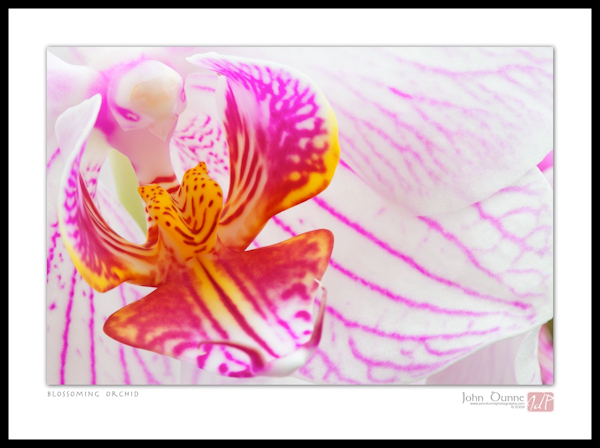
Blooming Orchid, by photographer John Dunne, of Ireland.  He’s got quite a nice portfolio of images too over on his Flickr photostream, so do stop over and give him a little kudos, pat on the back, congratulations, etc. as he’s won the Adobe Lightroom Contest here at Learning Digital Photography!  His winning image (surprise surprise) is a blooming orchid, shown below:

entry6

Congratulations again to John for this beautiful shot.  I know I said it before but it is worth saying again that the decision was a very difficult one to make as there were so many excellent images contributed!  Thanks also to the folks over at Adobe for their generous contribution, and to all the participants for making this first contest a huge success!

Happy shooting and we’ll see you back here again tomorrow!

Grab the Feed

And then there were three…

First off, some software news that we all may want to stay abreast of – Adobe has released the latest updates for Camera Raw and Adobe Lightroom.

The ACR update applies to CS4 users, Elements 7.0 users, and Premiere Elements 7.0 users, and includes raw conversion algorithms for the Canon 500D, the Powershot XS1 IS, the Nikon D5000 and several Hasselblads, as well as some other camera updates for Olympus, Sony, and Pentax.  It’s version 5.4 and is now out of beta and available for download.  The updates for Windows and Mac are available here:

Camera Raw

For Lightroom users, the update takes you to the latest stable release of version 2.4.  So, if you are running version 2.3 or earlier, this update is a recommended one for you.  It basically is the same as the ACR update for Photoshop and other programs, but since there’s no secondary GUI for the converter portion, it’s just built into the program update.  You should be able to over-install it on top of your current installation, but as with everything else, I always recommend backing up your system and important files prior to updating things like this that can have an impact on your entire library.   The downloads for Windows and Macintosh are available here:

Lightroom

Now, onto the more exciting news…speaking of Adobe and all, as you may recall, there was a contest held here at Canon Blogger on the Learning Digital Photography podcast a while back and the winner is slated to get their very own copy of Lightroom from the folks over at Adobe.  Well, I am happy to announce here today that The Adobe Lightroom Contest has entered it’s final phase here at Canon Blogger/Learning Digital Photography!.

As you  may recall, as alluded to above,  a few podcasts back, I had the honor of sitting down with Tom Hogarty and talking shop about Lightroom, it’s purpose, development, and lots of fun stuff about photography in general.  At the end of the show, Mr. Hogarty generously donated a copy of Lightroom to some lucky listener of the podcast.  We started a photography Flickr thread, and the entries started pouring in.

After 58 entries came in that met the criteria we were looking for, the contestants were narrwoed down to 10 finalists, which were then compiled and put on display here at the blog (and you can see all of them here).  We now have narrowed the field down to three possible contenders for the grand prize of the Lightroom software.  We’ll talk a little more amongst myself and Mr. Hogarty to see which is the “best of the best”, but the three that we are now in our final phase of considering are:

Blooming Orchid


Black-and-white Magnolia Blossom


The Foggy Lighthouse

Once we have the grand prize winner determined, one of these three people will have a copy of Photoshop Lightroom arriving on their doorstep soon.  Thanks again to all the entries – we’ve actually worked quite diligently on this to really get a sense of which image captures the essence of both photography, what Lightroom processing can do for your creativity, and also purely on the artistic merit.

Again, thanks to all the entries for the contest – the latest one is still going on for another week – the winner will get a 33% discount code to FotoQuote Pro – and to enter that all you have to do is make an entry here on the blog!  (Limit one entry per person per day).  Keep on shooting and sharing – happy shooting and we’ll see you back here again tomorrow!

A dash of splash

First up – another web gallery of water drops – this time with a neutral black background that I developed in Lightroom.  I am tellin’ ya – this product is just too cool!  Photo management, editing, tagging, and gallery production all in one – what’s not to love?

Also up today, a little shout out to Dave Zarzacki, who owns a like new Canon XSi in mint condition, but just doesn’t need it in his gear bag (he’s trying to round out his collection with an SLR that will take all his current lenses).  It’s a great deal which includes the following:

  • XSi body (black) – $640 value from B&H
  • Canon 18-55 IS lens – $60 value as part of above kit from B&H
  • Tiffen UV filter – $7 value from B&H
  • 2 4GB SDHC cards – $25 value from Amazon
  • Gary Fong Puffer flash diffuser – $20 value from B&H
  • M-Rock Yellowstone bag ($54 value)

Individually, this would sell for over $800 easily, and Dave is only asking for $650 plus shipping.  I know the guy personally and can say that he knows how to take care of gear – this stuff will not have a scratch or scuff and will work as though new.  A great deal for someone starting out!  Any takers?  Drop me a line to get his email address and information.

Finally, for today, the Sigma lenses are in, and I can’t wait to start the review process on these this weekend!  Already found a few features that are just too cool for school!  Some other gear review items are on deck too – but I want to hear from you!  What do you want to learn more about in the way of products, gear, accessories, and such?  Sound off in the comments or with me via email!

Happy shooting all and we’ll see you back here tomorrow!

Grab the feed