Blur, Baby… blur!

Hey all, this week’s show is done and boy are you in for a treat!  Not only is there some pretty ground-breaking news from the computing world, but the theme for this podcast is blur!  I take a (hopefully) clear look at different types of blur you can get in your images, what can work, what will not work, and how to correct for different types.  Got some great listener questions and answers that tie in very nicely to the theme, and as, always the photo tip of the week.  Here’s the show notes:

News Links – HP Z800 Specs (listen to the show to find out why this is so amazing it’s the only news story!)

Focal Length/Crop Factor/Shutter Speed settings –

  • 50mm converts to 85 crop factor, which means a shutter speed of 1/100th
  • 100mm converts to a 160 crop factor, which means a shutter speed of 1/160th
  • 150mm converts to a 240 crop factor, which means a shutter speed of 1/240th
  • 200mm converts to a 320 crop factor, which means a shutter speed of 1/320th
  • 300mm converts to a 480 crop factor, which means a shutter speed of 1/480th
  • 400mm converts to a 640 crop factor, which means a shutter speed of 1/640th
  • 500mm converts to a 800 crop factor, which means a shutter speed of 1/800th
  • 600mm converts to a 960 crop factor, which means a shutter speed of 1/1000th

Listener Questions:

  • DOF Preview button
  • Battery Length
  • Portrait Lenses

Be sure to stop over to the good folks at PLM to get the podcast, and check out the Lensbaby Composer – a great resource for managing blur in your photos!  Happy shooting all and we’ll see you back here tomorrow!

Thursday Thoughts with… Scott Eccleston

I am happy to report that the weekly series where I interview fellow photographers and share their thoughts and perspectives here on the blog.  This week, I’d like to welcome Scott Eccleston to the stage.  Scott has his own blog and shares his thoughts and ideas on a regular basis so be sure to stop over at his site where he shares Weekly Photo Tips!

Without further ado, here’s the latest in the revived Thursday thoughts series, with Scott Eccleston!

Q:  Hi Scott, welcome and thanks for agreeing to participate in the latest edition of the Thursday Thoughts series.  Since everyone always wants to know some of the basics, so let’s get a few things out of the way at once here…first up, ow long have you been a photographer?

A:  I got my first digital point and shoot in 2003…

Q:  So, that means you’ve been shooting digital for about 6 years now.  What kind of gear do you shoot with (i.e. Canon, Nikon, Sony, Olympus, Pentax)?

A:  Nikon, not to feed into the “Nikon vs. Canon” feud, it was because of familiarity. My first camera was a Nikon, then I upgraded to a Nikon 8700 (looking back, it was not much of an upgrade), then a D70, then to a D200, and now a D300 (but there is this persistent fantasy that involves a D3x)…

Q:  No worries about brand wars here – I think the CB readership knows it’s about the person behind the lens (and in front).  What about film?  Ever dabbled in that prior to digital?

A:  No film, never shot film – as Vincent Versace says “film is what you grows on your teeth when you don’t brush”  😉

Q:    Who’s Vincent Versace?  Just kidding!  What about post production – do you work on a mac, PC, Linux, or some combo?

A:  PC…

Q:  And let’s go completely off topic for a moment:  Chocolate, Vanilla or Strawberry?

A:  STRAWBERRY!

Q:  Nice!  Well, now that we’ve gotten the basic sundry stuff out of the way, I like to get others insights on various aspects of your work – and this often starts with the critique.  Photographers often enjoy hearing helpful and constructive critiques of their work, as we are aware of how much we can grow from it.  However, we’ve also all had the “nice shot” and “cool” comments when we’ve shared our work.   With that setup, what would you say was the singular most useful critique or comment you’ve ever had on work you’ve shared publicly?

A:  It was a critique about composition – “cinematic approach to photography”. Film makers (and film shooters) do not have the luxury of cropping; thought and planning are an important part of their image composition. Because I started shooting digital I adopted the “I’ll crop that out” that evolved into the “I’ll fix that in Photoshop” mindset that is too common with digital shooters. Confession, I began as a lazy photographer, I used Photoshop as a sledgehammer, now I use it as an emery board. I use it so infrequently now that when I do, it takes me a moment to orient myself to the workspace. And I don’t use it to “fix” an image, I use it for a black and white conversion or to edit something I had no control over at the time of the shoot (like blemish removal). I learned that if I spent more time getting it right in camera not only did I spend less time in post production, I was getting better quality images.

Sorry, I was rambling, but this is fundamental building block in my evolution as a photographer (and I could ramble on, and on, and…).

Q:  Heh, again, no worries – I’ve been known to wax on and on myself.  Speaking of waxing, just the other day I was…oh, wait, sorry, getting off topic there.  Back on the subject of critique… if someone was asking you for an honest critique of their work, what 3 factors would you look at most (excluding friendships or family relatives, we’re talking professional or fellow photographer-types here)?

A:  The first thing would be to determine if they really want an “Honest Critique”. 😉

  1. Intent
  2. Technique
  3. Execution

Q:  What happened to the rambling nature?  Again, just kidding, but I like the approach – it shows how you approach capturing your own images!  Speaking of capturing your own images, as we’ve seen the post process mature in programs like Photoshop and other software options,  new ways to create images are presenting wider options and possibilities. If you had to choose between the gear or the software as the only way to create, which would it be and why?

A:  GEAR! The software should be used to complement your work, not create it.

Q:  Heh, well, it shows in your skillwith which you execute your imagery.  Speaking of which, you’ve got a great body of work!  In that vein, if you had to pick three pictures out of your entire portfolio to represent your approach to photography, or your artistic vision, which ones would you pick and why?

A:  Each of these images represents a first for me…

Scott Eggleston

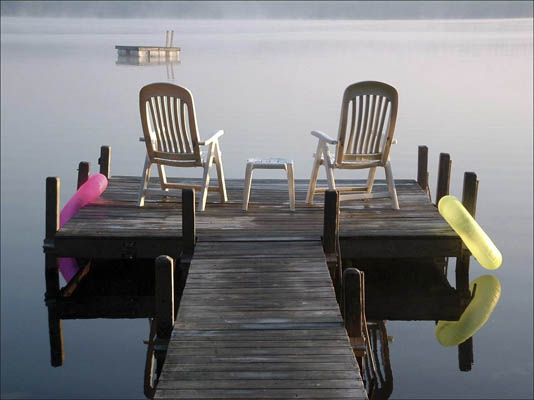
This was taken with my point and shoot and was the first image that said something to me, that evoked an emotion. It was the image that made me want to learn more about photography (and spend a ton of money on gear in the process).

Scott Eggleston

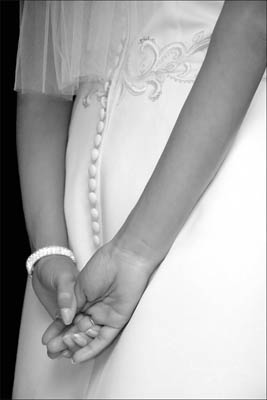
This was the first of my images that said something to others. I was new to the Portland (Maine) Camera Club and had just started submitting to print competitions, during the critique one of the judges (who is a well established professional photographer) said “this is one of the best black and whites I have seen here”.

Scott Eggleston

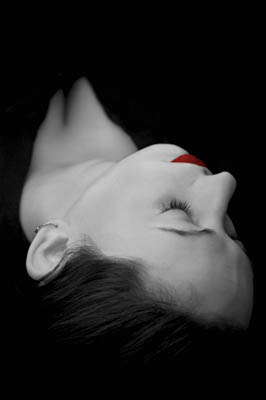
This is the first time I had an idea for an image that came out exactly as I had envisioned it.

Q:  Wow!  These are great ones, and I can see why you chose them.  Thanks so much for taking the time to share your thoughts, work, and input here on the blog.  Are there any final thoughts you’d like to share about the state of photography or any catch phrases that you keep in mind when shooting?

A:  There are two things about the state of photography that have drawn me in and make me want to stay:

  • When photographers discover new things, new techniques, instead of hiding it like a closely guarded secret; they share it with the rest of the world. Sites like Strobist and people like you are great examples of this.
  • In keeping with that theme, most photographers seem to have little interest or desire in being better than another photographer, they just have a desire to be a better photographer.

Thank you for inviting me here Jason.

Thank you Scott, the pleasure has been all mine (as is the same for the readers of the blog)!  Remember, you can find out more about Scott, his Weekly Photo Tips, and his professional body of work on the web too, so be sure to stop over and enjoy everything he has to offer!

How do you like to sound?

In preparation for the next podcast, due in no small part to a technical difficulty with Garage Band, I’ve set up a dedicated computer and recording space (call it my dedicated recording studio) and the audio quality is off the charts better than anything I’ve done before.  Ironically, the new topic for this weeks podcast is also about sound – the sound of shutters and how they can impact the feel of the camera, and how they can effect a moment is significant enough to warrant consideration.  Make sure you tune in for this one from the good folks over at Personal Life Media to get all the news, info, and latest from Learning Digital Photography!

Here’s the rest of the show notes:

Here’s the links from news items I talked about:

Listener Questions

  • How do you fix the Canon 99 Error?
  • What does the term “sync speed” mean?
  • What does kerning refer to in typography?

Listen in to the podcast over at Personal Life Media for the answers and full details on all the show segments.  In the meantime, what does your shutter sound like?   It doesn’t even have to be a Canon camera, listen to your camera whether it’s Canon Nikon, Olympus, Sony, Pentax, Panasonic, Leica, Hasselblad, etc! Find out why in the podcast up now over at Personal Life Media!  Thanks for stopping by the blog, and for all your kind words during the flu bug bout.  Enjoy the podcast, then go out and do y’all some shootin’!  See you back here tomorrow!

Setting bracketing exposures – shutter priority

As promised yesterday, today I will be talking about bracketing your exposures based on shutter priority.  After a couple comments yesterday that it seemed unusual to bracket on aperture rather than shutter speed, I felt that in this companion post I should acknowledge that, it is.  The reason for the post?  One of the downsides I mentioned is that your depth of field will change considerably from a wide open setting to that of, say, f22.  That can also be an upside though because as you merge bracketed exposures into an HDR image, you can also add depth of field if you make the adjustments in aperture priority over shutter priority.

Additionally, I led off with aperture priority because it’s not the norm, and as most readers will know – I try to approach things from a new perspective when possible.  Finally, as I followed up with in the comments section, the simple fact of the matter was that I could not remember whether 250 or 200 was the absolute middle point for shutter speeds (this is the risk of adding gray above the brain, rather than to the brain! *grin*).  So, I led off with the post where I knew the numbers rote! 🙂

So, in the interests of full disclosure, shutter speed is a more common way to go when making bracketed exposures.  After verifying my numbers in camera, here’s how it breaks down using shutter speed to bracket multiple times:

fstopshutter

I also realized that I did not give the step-by-step yesterday, so here’s the process I would follow:

  1. First, meter the scene, set your camera to ISO 100 and exposure priority and adjust to 1/250th of a second.  Check where your f-stop is.
  2. Second, switch to manual, and adjust all settings to match that metering.
  3. Third, adjust the shutter speed down to 1/30th of a second, and fire off 3 exposures and the camera will bracket over and under one stop.
  4. Fourth, adjust the shutter speed up to 1/250th of a second, and fire off a second set of three exposures (the camera will bracket over and under one stop).
  5. Finally, adjust the shutter speed up to 1/2000th of a second and fire off your last set of three exposures.

Voila!  You now have 9 exposures to merge together for a bracketed workup to take advantage of a high dynamic range, or for exposure blending, as desired.  Of course the same rules from yesterday also apply:

  • Be shooting on a tripod
  • Be using a remote release (or timer)
  • Be using mirror lockup
  • All other settings remain constant
  • and that lighting conditions aren’t changing appreciably
  • You are set to manual focus
  • Your lens is set to its hyperfocal distance

Any final thoughts to share on how to bracket exposures?  Anything I missed or additional tips to share?  Feel free to sound off in the comments section!  In the meantime, Happy Shooting and we’ll see you back here again tomorrow!

The Lensbaby Composer

For those of you that are regular podcast listeners, you know I talked recently about the Lensbaby Composer and what it can do for your photos.  In the podcast you heard the terms “selective focus” but the term is kind of hard to explain without a visual, so I thought I might be able to do it better justice with a visual here today.  Take a look at this setup:

lensbaby1

So, if you are looking at a scene from camera view 1, and you want the sharpness of your image (your viewers attention) to focus on something at point B, it’s easy to do this.  Simply drop your aperture wide open and the depth of field will throw points A and C out of focus naturally.  Pretty easy, no photo editing, no trickery or anything involved – the mechanics of apertures and depth of field handle this for you.

Well, take a moment to consider things from the viewpoint of Camera Two.

lensbaby2

You still want the focus to be at point B, but because both A and C are also positioned relative to the camera at the same place (they are not in front of or behind the point of focus, they are merely off to the sides of the point of focus), dropping your aperture wide open will not throw A and B out of focus – they still there, just as sharp as point B.  Well, up until now, you’ve always had to take images taken under situation 2 and bring them into image editing software to blur, dodge, burn, and otherwise minimize the attention that points A and C got from the viewer eye.

Well, what the Lensbaby does, through it’s unique combination of lens elements that include an actual curved optic and a curved field of focus, giving you a round spot of focus, so that it allows you to set point B as a single point of focus, so that A and C will fall off in sharpness, bringing the viewer back to your desired point of what to look at.  (The eye will almost always naturally look for sharpness and light in images…)

So now, dodging, burning, blurring and other darkroom and software techniques are no longer needed!  The Lensbaby allows you to create these visions in camera, not afterward in post processing.  What does this mean for you?  More time shooting, and less time photo editing!  Who doesn’t want that?

The coolest part of the new partnership with Lensbaby is that they’re also offering anyone reading the blog or listening to the show an opportunity to get a 0.6x wide-angle/macro conversion lens for the Composer lens totally free! Imagine taking your creative visions to a whole new level with the Composer lens from Lensbaby – and then add the macro capabilities, and literally, the sky is the limit!  Your creativity knows no boundaries with lens-work like this!  So, if you are looking at adding the Composer lens to your gear bag (and you can purchase it from any retailer), then look no further, because from here you can get a free 0.6x wide-angle/macro-conversion lens from Lensbaby as a way of saying thanks.

Expanded creativity + Free gear = lots of fun

Sounds like a perfect equation for me!  So, stop on over to the partner website they made just for Canon Blogger listeners and readers to get your free lens today.  This is a limited time offer, and I am not sure when it will end, but the Composer and the companion 0.6x wide-angle/macro conversion lens (which you can get for free) would have been very useful this last weekend on the Eldorado shoot.  Remember the rock fissure?  Imagine if I had a chance to fade the DOF out away from the rock completely?  What about the rear window reflection?  Imagine if I could have faded the front window part out of focus completely?  Both of these shots might have ended up in my portfolio!  As they are, I’ve got two snaps that while interesting, will likely never get added to the print portfolio…

Does this help clarify how the Lensbaby works and what it does?  I know it’s a very simplified version, and the folks at Lensbaby have a lot more resources to help explain it than I do so be sure to visit their partner landing page here to learn more about it!  If you’d like to see some samples of the lens at work, (my lens hasn’t arrived yet) make sure to stop over to the gallery page here too!  Got some pics you’d like to share?   Link them here in the comments section (or even share then with the good folks at Lensbaby – they like to hear feedback from the field so share your thoughts and shots with them too!)  Finally, to learn all the details about this promotional offer, stop over to the page the folks at Personal Life Media have set up here.

If you do have pics and thoughts to share here, feel free as always to drop me an email, and you could be on the show!    For those interested in buying the composer, make sure to visit this link here to get the free macro conversion lens!  Questions, comments, feedback and ideas are welcome at my email address (as always) is jason <at> canonblogger <dot> com!

Check them out today – then get back out and keep on shooting!  Hope all your shots are good ones and we’ll see you back here tomorrow!

The Power of Action

Until this last weekend, I had very limited experience with astrophotography.  The concepts and techniques of the field are well documented, and I have read several articles on the subject.  What this last weekend demonstrated to me, (and what I often tell everyone who reads this blog), is that there is no better way to learn something than to just get out and do it!  This is the power of action!

Over the course of a pleasantly long weekend with my wife, we had an opportunity to view an absolutely breath-taking night sky, without the pollution of light interference.  The pure darkness of the mountains, coupled with the lack of urban and suburban sprawl, revealed the brilliance of the night skies to me.  As I shared the moment with Tracy, a part of me finally caved and said “Sorry, but I’ve got to take a picture of this!”  Admitting defeat as a camera widow, she went inside, and I tried to recall the articles with their knowledge:

  • Tripod (critical for stability!)
  • Shoot wide (calls for fewer adjustments during long exposures which also means longer shutter speed allowances)
  • Shutter release (never release the shutter manually on such scenes – increases too much vibration)
  • In camera noise reduction…(long exposures tend to create noise as a consequence)
  • Higher aperture (for greater depth of field)
  • And then there was something about the shutter speed…no more than…what?  I could not for the life of me remember!

So, with the digital mantra in place, I tried many different exposures.  My first attempt was a 30 second exposure at f8.0 and ISO 100.  The on-screen results were not that great.  So, I took things to the extremeon my next shot, 30 second exposure, f8.0 and ISO 3200.  The result:  I saw stars on screen!  Excited at the prospect ofcapturing the scene, I promptly returned to the secluded getaway mentality, forgetting the cardinal rule of digital:  to shoot many, many shots, and at many, many settings.

What I also forgot is that in astrophotography there are more than the above considerations to take into account.  After getting home and realizing my blunder, I re-read the articles and remembered that as a general rule, ISO should never go above 800, and because the earth is always moving, you should never shoot an exposure longer than 5-10 seconds, because stars will blur by then.  (As was evidenced during post processing…)

So, the result was nothing too rewarding.  Certainly nothing that will get me fame in fortune in National Geographic or anything like that.  I did manage to massage something close to what we saw with some post work (including some serious Noise Ninja assistance, drastic curves adjustments, the glowing edges filter, and a little black and white conversion, just for starters…

Night Skies

While the end result is “not too shabby”, it certainly is nothing like these stellar (literally and figuratively) shots from Astropix.com I must admit that I am now considering adding to my gear collection, and that I need to refresh on the techniques of astro-photography, the best method for learning is to simply get out and shoot.  Want to capture the light?  Then here’s teh call to action, because it is, after all, the only way to capture the world around you in images!

For those interested in learning more about astro-photography, here’s a couple resources I’ve got in my bookmarks (how I wish I had my computer with me at the time!):

If anyone has their own links, resources, tips, tricks, suggestions, and ideas for astrophotography, feel free to share them in the comments.  In the meantime, thanks for stopping in and we’ll see you back here again tomorrow.

Wanna Get Lucky?

How many times have you seen a picture where it just made you say “WOW!  I wish I could capture something like that!”  And, you ask the person, “How’d you get that shot?”  Typically you’ll get an answer like “Just got lucky I guess.”  Well, I am not sure I buy into that.  Does luck really factor into taking good pictures?  Perhaps on rare occasions it does, because as the old saying goes, “Even a blind squirrel can find a nut occasionally”

But consistently taking good pictures requires more than luck.  It requires certain key elements that anyone can incorporate to increase their “keeper ratio”.  Today, I’ll look at 5 ways to increase your keepers.  So, here’s 5 ways to get lucky!

  1. Plan ahead.  Just the mere act of planning for a shot can help.  If you know you’re going to be in the mountains, take a wide angle lens with you.  If you know you’re going to be at a party, take that nifty fifty.  Wildlife?  Take a zoom!  Remember, prior planning not only prevents poor performance, but it also can help you take better pictures.
  2. Learn the technical stuff.  Know the technical stuff.  Memorize it.   There are certain fundamentals you just have to know, and by taking that sundry stuff and migrating it to a point where it’s in the back of your head and you don’t even have to think about it, then they can become tools.  If you understand apertures inside and out, then you can really use depth of field to create better pictures.  The same goes for planes of view, angles of view, composition rules, and all that other stuff.
  3. Take lots of pictures.  As the old saying goes, practice makes perfect.  So, stop reading forums, blogs, magazines, books, and all that stuff from time to time (except for my blog of course!), and get out there and practice, practice, practice!
  4. Look at the pictures of others.  Not only is appreciation of others work inspiring in its own right, but you can also train your eye to see what makes some images just “work”.
  5. Dedicate some time each day to do something related to photography.  It can be any of the above, from taking pictures, to editing pictures, looking at the works of others, studying your manual (learning about apertures, shutters, etc.), or any other photography-related ideas.  You can only improve your skills by repeated use.  Since I’ve referenced other idioms, another one could apply here:  If you don’t use it, you lose it.  Just like musicians who practice every day to get better, if you don’t practice your craft regularly, you won’t get better.

So, there you have it, 5 ways to improve your luck.  And this is just from my own perspective.  As is always the case when it comes to opinions, there are probably many more out there.  Got your own ideas about ways to “get lucky”?  Share them in the comments section or via email.  In the meantime, Happy Shooting – hope everyone can “get lucky”!

The Crop Factor…

First off, my apologies for the absenteeism yesterday.  After a really fun photo shoot with some friends in downtown Denver (more on that next week), I got home super late (by working standards – my shift is 7-4 and I need to take a bus an hour to get there…so I leave at 6, which means I am up at 5!), and went almost straight to bed!  Hopefully the content today will make up for this, because it’s time to talk about (cue fanfare music)…the crop factor!

Now, before anyone gets all uppity because sensor crop factors have been discussed ad infinitum, just relax, because this isn’t about sensors (well, a little, but indirectly).  I am talking about cropping your pictures in camera.  We all do it, often to improve composition, or to focus in on one area of an image – but what about those undesired crops?  What am I talking about?  I am talking about images where it looks really great “in camera” but when you go to print it, the native aspect ratio won’t work for the size you want to print to.  See, most SLR cameras (non-full frame anyway) have roughly an aspect ratio of 2:3.  This means that you can print at this ratio without losing anything in your image.  But, if you want to print at a different aspect ratio, then something has to be cropped out.

So, what aspect ratio will work with the 2:3 proportions? Who all remembers their grade school math?  All you have to do is multiply each side of the ratio by the same number.  So, prints that work are …

  • 2×3″ prints (2:3 x 1:1 = 2×3)
  • 4×6″ prints (2:3 x 2:2 = 4:6)
  • 6×9″ prints (2:3 x 3:3 = 6:9)
  • 8×12″ prints (2:3 x 4:4 = 8:12)

You get the gist…but here’s the thing – the only “standard” print size that really fits our native camera aspect ratio is the 4×6″ print.  What if we want an 8×10″ print?  Well, cropping is required then.  This means losing some of your image.  So, this also means that you need to think about this during image composition in camera – if you like it – and want to print it – remember to frame things so that the crop won’t lose key elements of the picture.  Here’s a perfect example:

isla_original

I took the above shot on a trip down in Isla Mujeres.  I absolutely love this shot.  The problem is that my proportions are lost when I crop to print an 8×10.  Take a look at the 8×10 crop:

isla_crop

It still looks pretty good, and I love the colors still, but some of the impact has been lost by cropping out the frame on both the left and the right.  See how the brown “framing element” has been lost?  I could have cropped less on that side and more on the orange side (even though the orange side is still cropped to a degree), but hopefully you’ll see the difference easily enough because it’s really the orange, yellow and blue that I think are the fundamental colors that hold my eye for this shot.  Suffice to say, I still loved it enough to print and frame an 8×10…but that’s not the point here.

The point is to try and remember to frame your composition in camera with “the crop factor” in mind.   By taking these measures into consideration, you can really have many more printable memories.  So, when you go out shooting this weekend, keep the crop factor in mind.  Happy shooting, enjoy the weekend, and we’ll see you back here on Monday!

Defining Your Image Composition

Composition in photography can have many origins.  You can take a pretty concrete subject and place it in an interesting environment.  The Rule of Thirds is one that is often used when creating photographic compositions.  Other times, the way that lines or curves within a scene are the compelling factor.  Architectural images use the idea of linear direction to compell the viewer.  Finally, the nature of light can also be a huge factor when composing an image.  After all, when looking at the word “photography”, it’s pretty clear how integral light can be to capturing your vision.  The Greek root “photos” literally means “light” (while “graphos” means to draw or paint – so photography really could be pretty succinctly defined as “painting with light”.)

So, we have three elements that can contribute to image composition:

  • Positioning your subject
  • Directing viewer via leading lines
  • Compelling the viewer via light

While there are no hard and fast rules in any form of artistic expression, these are three fundamentals that I try to keep in mind when capturing the world around me.  Sometimes I’ll find my images successfully utilizes only one of these elements.  Naturally, there are also times where two are executed well.  Naturally, I am luckiest though, is when all three are effectively brought into an image.

Here’s an example of what I am talking about.  Can you identify which elements of image composition are present?  Is there a defined subject that is well positioned?  What about compelling lines to define the image?  Finally, is there anything that draws your eye from the light or shadows?  Sound off in the comments, and let me know:

Brick Circle
Brick Circle

The Show Must Go On…

While the folks at Personal Life Media continue to work behind the scenes at getting the show re-branded, I’ve been encouraged to keep producing podcasts so, this week, the podcast returns.  I have a couple fun segments including a more detailed back story from The Boneyard Beach post earlier this week, the Think Tank Photo Review, and some blog/podcast housekeeping including the inside scoop on how you can win the Streetwalker bag I reviewed!   Be sure to get this week’s episode so you know what to do.   The bag is valued at $140!!!

As you may have noticed if you’re picking up the feed, I am also uploading all the “What’s This” images to the Canon Blogger Flickr Pool.  As that content arc has ended, I thought it might be fun and of interest to see the entire gallery of photos that have gone up on that subject over a period of roughly 23 weeks.  (Almost half a year of images there to rack your brain on!)

As we head into the weekend, be sure to take your camera with you -never know when a photo opportunity will present itself, so as the Boy Scouts always said:  “Be Prepared!”  Happy shooting and we’ll see you back here Monday morning!