The Canons Keep Coming!

Last week we had the pleasure of visiting with Nicolesy on the show, and this week another Canonite graces us with his presence.  It’s none other than Rick Sammon! We had a great conversation that touched on quite a few things including learning and teaching strategies for seminars and workshops, different stages of learning, and even broached underwater photography.  I also got the scoop on his latest developments including his iPhone app, a new book that is forthcoming, and much more!  All that on Episode #42 of LDP!  Here’s the notes!

Learning Digital Photography – Episode #42:  Seminars and Workshops

  1. News
  2. Conversation with Rick Sammon
    • Seminars and workshops
    • Learning styles
    • iPhone App
    • New Book
  3. Listener Questions and Answers
    • Go long or go shallow?
    • Best zoom lens under $1000
  4. Rick’s Contact Info

Be sure to either grab the podcast from the host feed over at PLM or over on iTunes.  Remember to share your thoughts and feedback at either place or here on the blog…your feedback and thoughts are what keeps the content coming through the pipes!  In the meantime, keep on shooting and don’t forget to tune back in tomorrow for my wrap-up of the weekend sunrise photo shoot!  Happy shooting all!

Geek Factor Alert

Today’s post comes courtesy of a comment posted to Twitter from a friend (who shall remain nameless) asking about whether a particular camera was compatible with their computer.

Being the eternal geek, I jumped right in (figured the water was warm), and suggested that it shouldn’t matter because they are using a card reader…right?  As it turns out, they were not, instead tethering the camera to the computer to transfer files.  While this method is needed for instant viewing (see the tethering via Lightroom post using Canon here and Nikon here), it’s not recommended for transferring of your photos and video off a card that is in your camera.  I tried to find a post on this to point the person to and realized that, son-of-a-gun, I had never really discussed this in detail.  So… here we go! 🙂

There are a number of reasons why it is a good idea to use a card reader and not connect your camera to your computer for transferring images and video:

  1. Data loss/corruption – The chances for losing data is so much higher because you are relying on the computer detecting the camera, and the proprietary interface between that and the computer (with drivers and software and all that jazz).
  2. Battery drain – Unless you have an AC adapter, using your camera to transfer pictures to your computer can be a serious drain on batteries…even with rechargeable batteries.  And, if you are transferring images to your computer and your camera batteries happen to die, guess what can happen…(see #1 above)!
  3. Software installation – When connecting your camera to your computer, often times you will need to install software in order for the computer to recognize the camera.  Easy enough sure, but do you really want to bog down your computer with unnecessary software?  What if that software is written to preload whenever the computer turns on?  Now computer performance is decreased, you have less space for other things.  Sure, hard drives are increasing in size and decreasing in cost all the time, but consider whether you will ever use the software for anything other than image transfer.  If yes, then absolutely, use it.  But if not – why bother?  From an IT perspective, if there is a way to do something without installing software, that is always preferred to adding another layer because adding that layer adds a breaking point (or point of failure), and it’s just another item that needs maintenance and updates.  After all, let’s face it.  Software is not as cleanly written as it used to be…
  4. Transfer speeds – Seriously.  Many don’t realize it, but data transfers happen a lot faster when you don’t have a camera sitting between you and the computer.  What may taken upwards of 3-5 minutes with a camera acting as the medium can often take less than 2 minutes with a straight connection to the media card.

So, there you have it, 4 reasons to use a card reader!  Need any more?  Got any of your own?  Think I’m wrong?  Please feel free to contribute your own experiences and share your own thoughts in the comments.  Until tomorrow, happy shooting all!

Framing your work

Framing your work can be an expensive proposition.  Once you get an archival mat, conservation glass, and a custom frame created for your print – you can start spending upwards of $100 for something as small as an 8×10 print.  Depending on what it is you want to accomplish though, you could easily be spending as little as $10 per print to mat and frame.  Here’s a few things to consider, and some explanations why:

Classics are called classics for a reason – they work!

I like classic looks, and the museum style frame suits that look – a thin black border, simple white mat, and picture inside there.  Not only does it keep focus on the image, but because I can buy these easily and in bulk, which helps keep costs down.  Also, it makes ordering new materials easier (these will never go out of style…)  Even if you end up going through a frame shop, getting a classic style can make it easier to match things up down the road.  So, what if classic is not your thing?  That’s cool too – but remember, the more off the beaten path you go in framing, the tougher it can be to duplicate and repeat down the road (which can also increase costs).

Be aware of the learning curve

Buying things in bulk means you will have to do a little of the legwork yourself.   For instance, say you buy 50 mats from some online reseller and save money there.  Congratulations – but do you know how to mount a print to a mat?  You can tape a print, hinge it, or even super glue it.  Each will have pros and cons, and your results will vary depending on how much you know before dipping your toes in the water – so read up on attaching prints to mats before deciding to DIY.  (Quick tip:  You’ll ne to stockpile various supplies depending on your eventual display method including things like hinges, foam core board, low tack tape, perhaps a few cans of spray-on adhesive and perhaps a few Exact-o blades if you are cutting your own mats to custom sizes.  Heck, they even make mat cutters that you can get at hobby shops!)

Some Supplies
Some Supplies

Don’t Go Overboard

Much like the mat work, framing can be tricky in and of itself.  Making your own mats can be initially be pricey to get all the tools you will need (see above) .  Framing is no cheap project either.  Making your own frames involves getting long lengths of the borders, cutting at precise angles, and making sure it all seams together cleanly.  It requires patience, attention to detail, and specific tools which can be a drain on the wallet (Have you priced a miter saw at Lowe’s or Home Depot?  Even the cheap ones aren’t real cheap!)  So, if you want to go the DIY route, know that some startup costs will be associated with it.

Storage Issues

Physical prints, physical mats, physical frames, physical glass pieces – all of these take space.  How do you store all this stuff and in some semblance of order?  First off – find an understanding and encouraging significant other?  Don’t have one?  Make that a requirement if you do!  The amount of space that is involved in storing not only the obvious stuff, but the not-s0-obvious stuff, can be staggering!  I have so many boxes of materials it really is ridiculous.  It helps to have a system though, and labels are always a good idea.

Shoeboxes make great sizes for lots of things

Never have enough storage

********

So, there’s my trifecta of tips for framing your work. It’s just a starting point, but will hopefully help when you decide to start framing your work for display.  The results can be rewarding, but like anything else,  with a little work, pre-planning and preparedness, you will be well on your way to having a gratifying gallery of imagery!

Some Prints on the Wall

Some More Prints on the Wall

Keep in mind though – I certainly do not have a corner on the tips and tricks associated with matting, framing, and displaying your work…there are many other elements to consider and be aware of.  Just peruse the comments here to see a sample of what I am talking about – oh wait, that means you gotta share your own tips, tricks and ideas in the comments too!  So, sound off – what else do people do when preparing prints for framing?  Any styles that work?  Any vendors to recommend?

That’s it for today…thanks for stopping in, and be sure to stop back again tomorrow for more photo goodness.  Happy shooting and we’ll see you then!

For the Love of Gravy Focus on the Eyes …. Please

I hear a lot of chatter out there about how many photographers are in the market, and how soccer moms with a camera are taking your clients. Are you sure they are taking your clients, or are you losing them because you are not trying to be the best photographer you can be? (sounds like the army!) Just because Digital SLR cameras are affordable doesn’t mean everyone can be an amazing photographer.  Your job is to be the best photographer you can be, and stand out among the others.  How, you ask?  Well, start with the basics as it builds a solid foundation:

1.  Focus on the eyes…please!

I see so many portraits where the focus is on someone’s arm, knee, elbow. Until the elbow is the window into the soul let’s try focusing on the eyes (yes there are exceptions… but the elbow usually isn’t it). By learning how to control your focus on your camera you can stop your camera from focusing on the closest thing to it (like the nose not the eyes)

2.  You look like your brother Yoda

Skin tones are usually not green, or orange. Proper white balance and exposure will fix this issue most of the time. I personally use a target to calibrate my white balance card (it has black/white/18% grey on it).  If you are still catching a color reflection from a nearby object or clothing, you can fix this in post processing. Some of the ways I suggest are MCP actions or PictoColor iCorrect Portrait

3.  Reach out and touch your neighbor

We have heard it over and over and over again: get closer to your subject. Unless you are photographing a wild animal, chances are they won’t bite. If you are capturing a family, they want to see their faces, not everything around them.  Same goes for product, the client is trying to sell the product, so show it off!

4.  Target called…they want their sign back

A.K.A. bulls-eye syndrome. Your image will be more interesting if the subject is not smack dab in the middle of the image. Play with the rule of thirds (hint, the focus points in your camera are conveniently placed in one of the thirds). What is the rule of thirds, you ask? Divide the area into thirds from side to side and top to bottom.  Place the subject on an intersection of the lines at one side or the other. Go try it!

5.  Get it right in camera

There is this cute little book that came in the same box as your camera. Read it. Learn it. Live it!  Knowing how your gear works will not only help you become a better photographer, but it will also benefit you in that you will spend less time working on post-production!  The less time you spend in post, the more you can spend shooting. The more you spend shooting, the better you get…  Alternatively, you could think of this in terms of music: “Just because you can buy piano, doesn’t mean you don’t still have to learn to play it!”   A lot of what you do in Photoshop can be done in camera.  After realizing I did the same thing over and over in Photoshop, I set my user-defined picture style. The contrast is bumped up and the saturation bumped up. That is 2 less steps I have to do in post which in turn lets me spend more time in the field and actually doing what I enjoy – taking pictures!

6.  Part of being a good photographer, is being a good editor

Here, I don’t mean post processing editing, I mean what are you going to even pull into post, and then what will you show your client and the world. I was recently teaching a private lesson, and my student said “I bet you never take a bad picture”. Well she was in for a surprise when I handed over my Compact Flash card to see the images I took that day. There were bad ones on there, but she will be the only person who sees them besides me.  Show only your best, and you will look like the best photographer you can be!

Andie Smith Photography

Andie Smith Photography

Andie Smith Photography

Andie Smith Photography

Andie Smith Photography

Andie Smith Photography

Andie Smith Photography

Thanks go out to Andie Smith for delivering such an amazing and well-received first “Guest Blogger” post!  More Guest Bloggers should be forthcoming.  If you are interested in becoming a Guest Blogger, please feel free to email me at: jason <AT> canonblogger <DOT> com!

Five Elements of Control: #1 Luminance

This week I am doing something special here on the blog – starting a week long series on the subject of Control.  We can control our photography in several different ways, and I’ve seen different outlets talk about each of these (and others) to a certain degree, but I’ve not seen many that address all of these elements collectively.  Since a discussion of all the elements that go into a photograph would be both exhaustive and likely impossible to touch on everything, it would probably be better to narrow that focus (pardon the pun) on some of the more salient elements to consider.  Today, the element of control that I’ll be looking to in more depth is:

Contrast/Luminance

Contrast, or luminance, can be described as the tonal range of light within a photo.  If the tonal range is broad, then that means we have an extensive range of tonality from the lightest point to the darkest point in the photo.  Likewise, a narrow tonal range will mean that we have a limited range of tonality from the lightest point to the darkest point in your photo.  Take a look at the following two photos and see if you can determine which one has a broader and a more narrow tonal range.

Santa Fe Church #1
Santa Fe Church #1
Santa Fe Church #2
Santa Fe Church #2

It should be pretty clear that one has a wider range of luminance to it than the other.  What’s exciting to learn here though is that this is the same photograph! That’s right!  I simply changed the exposure settings in ACR to output a different result.  Different tastes will look at each of these differently, and like one over the other for a variety of reasons.  What’s important to understand here though, more than anything else, is that all I’ve changed is the luminance.  The tonal range or contrast of luminance can have a powerful impact on a photo, either by how it limits and defines focus or by its range and extent of difference between high and low luminance points as we change from white to black.

So, why am I talking about luminance first?  Because it is probably the most important element to control.  After all, luminance (or contrast) deals with the principle of light!  Photography by definition means to paint with light ((look up the Greek roots photo and graphos)  Without understanding how to control for the element of luminance (a.k.a. contrast or light), the rest won’t really matter too much.  Rather than say more or less luminance is better or worse than the other, (because it really is a matter of subjectivity) I’ll simply leave you to ponder a few things between now and tomorrow:

  1. Which one do you like better?
  2. Why?
  3. What other elements of control can you think of?
  4. Finally, what other examples of the effect of luminance can you think of?  Got any you’d like to share?

Feel free to share your thoughts and sound off in the comments or with me directly via email.  Until tomorrow and the Second Element of Control, Happy Shooting!

Dealing with bad pictures

There’s no denying it – we’ve all deleted countless shots both off our camera and off our computers because they were just even to horrible to admit to publicly.  And while filtering out the chaffe from the wheat is a good thing, if we don’t learn from our mistakes, we’ll continue to get chaff and never be able to make bread (take great pictures)!  So, don’t just look at blurred photos and toss them instantly without thinking.  Don’t immediately delete out of focus subject matter, and most importantly don’t blindly drag your less than stellar work to the trash bin.

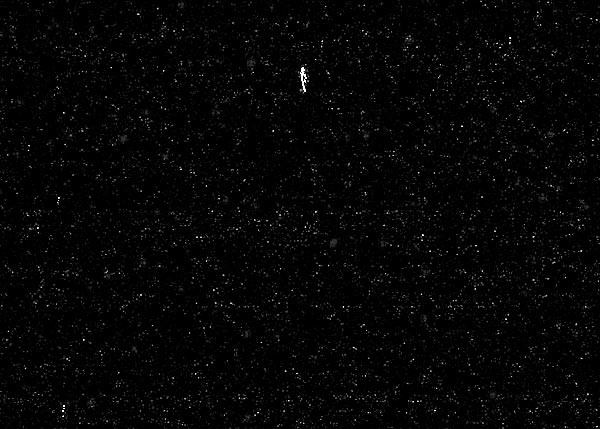
So wait – does this mean to keep our bad pictures?  For a short while – yes it does.  You certainly are not going to go back and create photo galleries for clients with their mouth firmly clamped onto a forkful of food, but in seeing bad pictures and recognizing what makes them bad, helps you to avoid errors in the future.  And to help illustrate what I am talking about, you’re going to see something here today that is a cardinal sin in photography – I am going to show you a terrible shot!  Take a look at this:

The Virgin Star Tracker Voyage

So, why is this terrible?  Well, it was taken from my recently built star tracker.  As you may recall from the DIY video on YouTube, the whole purpose of a star tracker is to minimize star trails…to keep the stars bright and in one location as your camera moves relative to their position in the night sky.  So, when I saw the above image, needless to say I was disappointed.  But in seeing not only the blurred star, I also noticed that the star was much more blurred than it would have been from even being on a stationary tripod.  This told me that the problem could be one of several things:

  1. There is a flaw in the design of my tracker, or…
  2. There is a flaw in the execution of the shot, or…
  3. There is a flaw in the design of the camera, or…
  4. There is a flaw in the design of the photographer!

So, back to the drawing board I went, hoping it wasn’t #4!  What did I do wrong?  Off to the web I went – first stop:  Wikipedia on Barn Doors.  As it turns out, I learned that while the barn door I built was the simplest in design, referred to more scientifically as a Haig Mount (characterized by a bolt or screw that rotates vertically as it pushes the one door up.  Advances in the mathematics show that if you tilt the screw and have it push the door up at an angle, you are using the Isocoles method, which translates to less shift as your exposures get longer.  Finally, the curved bolt mount minimizes shift even further.  As the details explain at Wikipedia though, the shift only occurs in exposures as your shutter length increases past the 5 minute mark.  Since I was doing a 30 second exposure, the design should not have been a factor.  Other links off of Wikipeda pointed me to a several sites on how to build better barn doors, using a different method, but one note struck a chord with me:

“The double arm mount shown in the photograph uses a 6mm (M6) threaded rod to drive it.”

The more I thought about it, the threads on the bolt I used were awfully thick, so one revolution in a minute likely pushed the top door more than it should have gone, thus causing the significant star trail.  The little jig in the line also told me I was not moving the screw smoothly and that I should probably motorize this if possible.  Clearly the project is growing more detail-oriented, and mistakes have been made.  But, as I (we) learn from mistakes, our chances of capturing better images only increases with time.  As I make the modifications, I’ll report back with more details, but some additional points to consider that I learned through all my additional reading if you’re interested:

  • Polar alignment is critical – this means you have to have some understanding of the stars and where they are in the sky (time to brush up on the astronomy class I took in college…)
  • If you want to build a DIY kit – an average to intermediate grasp of math and formulas helps because your dimensions are dependent on one another for proper configuration (I am going back to check my cuts and drilling points on the first kit, but I am happy to know I have some spare parts in reserve…)
  • Wider lenses are more forgiving on trails, and longer zooms are less forgiving – if you are just a hair off, that movement will be even more pronounced on a field of view that is narrow… (I was shooting on my crop sensor, with a t.4 TC and my 70-200 zoomed all the way in (448mm) – a pretty narrow field of view).

For today though, (and this holds true whether you are into astro photography, landscape, wildlife, portrait, event, or any genre of photography) the instructive point is to learn from your mistakes. As the old saying goes – those that don’t learn from the mistakes from history are doomed to repeat them.  I had an economics professor in college say something very similar to the class once too:  “I don’t care how many mistakes you make in this class – just don’t make the same one twice!”

So, look at your bad photos – find out why they did not come out well. Was it the camera?  Was it the subject?  Or was it the photographer?  Learn from your mistakes so you don’t repeat them!  Kind of an odd post for today, and for those that are not into astrophotography, I promise to return to  some content tomorrow that has a wider interest base.  But I figured that when I learn something, the whole point is to share that newfound knowledge with the reading and listening audience.  On that note, how about the rest of the CB faithful?  Anyone out there have any mistakes or goofs they learned from?  Share your mistakes if you dare in the comments!  (Or with me privately if you’d like to contribute, but remain anonymous – jason <AT> canonblogger <DOT> com.)  Thanks for stopping in all – keep on shooting and we’ll see you back here again tomorrow!  Happy shooting!

Grab the Feed

How to build a star tracker!

Rather than go through another hardware review today, I thought I would share a different kind of hardware with you – the DIY kind!  Over the weekend I embarked on a little project on building a device to track stars as they move across the sky (even though it’s really the earth that’s moving and not the sky).  Now granted, there are better ways to build star trackers, but many involve electronic motors, are more complex (in my mind anyway), and can get kind of costly (at least from what I’ve read).  So, I figured I’d start simple, and go from there.  Join me in this adventure in building my first star tracker for under $20!

It was a lot of fun and I learned a lot in doing it, both about other methods, some of the short comings of this approach, but for the cost, figured it’d be a good entry into doing these kinds of things for comparison sake.  Check out the main YouTube video that gives a narrative on the process and my finished result:

The reference material I used for building this leaf-style star tracker came from a professor at the Rochester Institute of Technology (sounds impressive enough to me!), so figured I should give credit here as well:  http://people.rit.edu/andpph/text-star-tracker.html

If you have thoughts, comments, feedback, or suggestions to either improve this one, on how you’ve made your own (or plan on making one), and even if you have shots to share made from DIY star tracker kits, please feel free to et me know via either the comments or email!  I will start a photo gallery for all shots shared and plan on updating that monthly with all the photos received, either via links in the comments or via email!

Happy (star) shooting, and we’ll see you back here again tomorrow!

P.S.  Don’t forget, we’ve still got the Wacom Bamboo Fun Giveaway going on all this month!  Share your shots in the Flickr thread and you’re entered to win this prize worth $100 retail!  Thanks go out to the folks at Wacom for contributing this awesome tool for blog readers and podcast listeners!

Grab the Feed

Teaching to Learn…

For those of you that don’t know – there is a cool little feature available for iPhone and iPod Touch users called AudioBoo, where you can record up to three minutes of audio soundbites and share online.  It’s a pretty neat little feature, and allows for short bursts of ideas.  I shared just such a recording (they are called “boos”) this evening after I left the Exposure Denver photo club meeting.  You can listen to the recording here or continue reading below my thoughts on the Exposure Denver experience!

Speaking of which, the gang from the group was so cool – everyone was so welcoming!  They asked me to come in and share some tips and insights on Lightroom, which I was quite flattered but honored to do. If you want to learn more about Exposure Denver, follow the link to their blog where they have news of upcoming events, activities and more.  These folks take it to the next level with regular galleries, themes, critiques, reviews, and yes, you can sell prints at the shows!  A lot of thought, time and preparations go into the group and everyone contributes!  It was quite an energizing and motivating dynamic and has me very excited in ways that I have not even explored yet photographically and creatively.  My head is literally bursting with possibilities.  And why is this?

Because I was thrust into a teaching role, on a subject I am (or was) admittedly not an expert in!  I have no idea how it all started anymore, but this further confirms what I’ve known from prior experience in another field – the best way to learn about something is to try and teach it to someone else.  It forces you to get up to speed, get current, and learn more than you did before.  This happens in three ways:

You do research to prepare your class note, talking points and handouts.  I learned so much just from pulling all these resources together.

Others in the class will know things you don’t.  Without fail, this always happens.  There is no way you can expect to know more than everyone else on a subject you are teaching unless you have 20 years of age and experience over the audience.  But I was not in front of kindgarteners this evening – these were peers (and several were even a few steps ahead of me).  We each brought value to the table and while some probably learned a lot from me – others schooled me!  (But in a good way!)

So, if you want to really get your fingernails dirty, dig into something and know it better than you ever did before:  try teaching it!  I did and learned more than I ever have before about Lightrooom.

Repost: Quality versus Quantity

I’ve got a few software reviews up my sleeve for both Windows and mac, but ratehr than rush them out the door prematurely, I’d rather postpone that material in the interests of sharing some rather thought-provoking content on the question of quality versus quantity.  I’d written this post before, and the first publication got a few interesting email responses – so we’ll see if the debate is still holding true.  Tell me what you think:  Does quality trump quantity or vice versa?  Here’s my take:

“Okay, I’m done.”

“That’s it? You’ve only been shooting for ten minutes!”

“Yep, got about 50 shots, I should have 4-6 proofs for you from that bunch.”

“So we’re done?”

“Pretty much…I mean I can keep shooting, but there’s really no point, it’ll just be duplicates of the same stuff.”

This was the dialog I had with a co-worker a  short fair time ago when I went to take pictures of her son for her. It is indicative of a mentality that exists in society…not only is size king, but so is quantity. If you were to take two photographers and set them side by side, who would you think is a better photographer: the one who took 40 shots or the one who took 400? Many of the general public would probably respond by saying the latter, without giving it much thought.

Yeah, I took 50 instead of 40, because I have not been a pro shooter for 20 years, so I gave myself a little bit more of a margin for error. Having checked ISO, white balance and histogram settings though, I was pretty confidant that all that was left was composition – so I went with my instinct for what would make a good composition, took 3 or 4 different angles and was done.  Ten shots of each pose was enough.  I have photographer friends who still take 25 shots of each pose with only negligible differences in lighting or facial expression.  Can you see it when blowing up to 200%?  Sure, but who looks at pictures that close?

Nevertheless,  photographers fall victim to this mentality of delivering a massive quantity of images. I know of several studios that just inundate their clients with hundreds of shots to choose from. They can’t understand why these clients never get any prints or very few prints from the studio. They think that people like to have a choice, and that the more choices you give them, the better. While the idea is not without merit, (because choice is a good thing) it can go to an extreme… and I think that’s where it’s going. The reason why they’re not getting prints done is because too many choices can also be paralyzing. If presented with 4 options, it is very easy to pick out which one you like best, whether it’s cars, cameras, televisions or photos. Presented with 400 cars, cameras, televisions or photos, the choice becomes more difficult and time consuming, primarily because you become concerned over picking the “wrong one”.

My perspective, in contrast, is to deliver just a select few shots. It makes the choices easier for the client. In a world where time is an increasingly valuable commodity, getting bogged down in sorting through hundreds of images trying to find one or two to print and hang can be more frustrating and lead to inaction. In essence it’s like you are transferring the process of elimination part of the work flow from your hands to the client. This has several downsides with minimal upsides. The one upside is that “Hey, the client chose this, not me.” can absolve you of responsibility for getting a bad shot framed. I would venture to ask though: why was a bad shot among the choices?

As I told a friend via email recently, it also comes to one of work flow management. Which would you rather deal with as a photographer – a work flow where you process 50 images or 500 images? The argument that “it’s digital, so what’s the big deal?” always seems to get under my skin a little bit. For me, the big deal is that some are going out there and not putting much time or thought into capturing the essence of a scene. They just lift the camera, point in the general direction of what they want and just fire away. I’ve actually heard the term “spray and pray” used for such shooters. The idea of slowing down and taking your time to both enjoy the moment and to really take into consideration all the nuances of things like lighting, shadows, and minimizing distractions has benefits. For me, the benefits far outweigh the downsides. Firstly, it is a much more enjoyable situation to be in. Not only do you have fewer images to process, but you can really take your time, pay attention to the detail, and get every nuance of the image pegged!

Secondly, you will probably find that you are less stressed yourself. You’re not worried about missing the shot because you didn’t have time to consider all the aspects – primarily because you are considering the nuances. Third, and most importantly, when you relax and aren’t stressed, your clients aren’t stressed either…a photographer and their subject often feed off each other. I have so much fun when taking pictures of subjects, I often forget that I am there for a specific reason – we’re enjoying the moment.

That’s right…we are enjoying the moment – client and photographer! We’re laughing, and having fun, and I just happen to have a camera in hand recording it. Yeah, the first shots are often always a little awkward for them, but once they see my mug grinning over the camera at them and laughing and joking around, the stress level decreases by a factor of ten! When your client is less stressed, they photograph better! They are more willing to strike goofy (in their eyes) poses! You can capture the shot!

So, that’s pretty much it: taking fewer shots will do three things for you:

  1. Cut down on post processing (both for quantity and quality)
  2. You stress less, and thus, your client stresses less.
  3. You increase your keeper percentage!

Having said this, I realize that there are some situations where you have to mass produce images. Another friend of mine talked about a basketball or softball tournament where they had to take pics of every person on every team over the course of a weekend. With 50 players per team and upwards of 30-40 teams, that is 2000 shots to process – and that’s a small regional event even if it’s only one shot per person. Take it on to a national event, and it just ratchets up another notch. While the quantity is there, it’s also a different shot every frame. This is also not a fine art or a studio environment. This is a very fast-moving, fast-paced environment and is not applicable to the type of photography I am talking about here.

I would venture to guess though that most of us do not fall in that category…we’re shooting far less than this on average, so the quality versus quantity rule does apply in most scenarios. Now, if only I could take that principle and apply it to the writing here on the blog!

Before signing off today, just a couple closing thoughts to share that are non-related to this article:

  1. Some link-love from two friends who are doing some cool 365/blogs (a picture a day for a year: very creative minds at work and so inspiring!
  2. Don’t forget the Numbers Contest – only 4 days to go for your chance to win a $500 software package:  Flickr Thread for submissions

Happy shooting all, and watch those apertures!

Grab the Feed

The iPod Touch Unboxing!

That’s right, my replacement podcast resources is finally here, and I share the unboxing with the viewers here tonight via YouTube:

Initial thoughts?  It’s pretty sweet – love the App Store, the WiFi, email access, twitter access, youtube, and so much more!  A few downsides though – no built in camera, and no microphone – I know it’s not for phone, but recording audio snippets would be ideal.  There are apps you can download but need a mic and with just the audio jack, not sure I am gonna be able to do one of the things I had been dying to do after getting this.  There may still be a way so Googling and researching to see.  In the meantime, we shall wait and see!  Look for a more detailed review of this in upcoming weeks!  Until then, just a couple reminders for everyone:

The Scott Kelby Worldwide Photowalk is this Saturday in cities all over the world.  There are still openings and it’s free to join.  You could win prizes too, so check for a city near you at www.worldwidephotowalk.com to see.  You can still join the fun if the group leader is okay with it, but if you are not registered, then you can’t contribute images or be eligible to win!

The OnOne Software Plugin Suite 4.5 Giveaway is going on for the entire month of July, but time is starting to tick against you as we are halfway through the month.  This is a $500 retail value and some lucky winner will walk away with this package for free!  Details and rules for participation are at the Flickr thread. If you own the software already, tell a friend as it’s an NFR copy.  If not, then chime in as the deadline will be here before you know it!