When is Your Creative Zone?

Windmills at Sunset in Pawnee Butte

We all have Circadian rhythms or body cycles that are tuned specifically to us…whether you identify that as being a morning person or a night owl.  This also applies to your creative rituals too though.  Because our body clocks all operate on a unique pattern of restfulness and alertness, we have different times when we are the most creative.  Our mind is able to focus on creative ideas and energies, and the distractions of the rest of the world aren’t nearly as distracting.  The windmills are out there and we tilt away at them with every fiber of energy!  Do you know when your creative zone occurs?

For me, that time often comes right around midnight.  If I am not too sleepy, or I power through the initial desire to just go to bed, my mind suddenly becomes much clearer, my vision focuses, and I get so much done from my creative space, it’s kind of eerie.  Tracy woke up once to find my literally typing a million miles a minute…the thoughts couldn’t get out of my brain fast enough.  After about 3-4 hours of it though, my entire body just shuts down.  The exciting thing though, is that I’ve been able to identify this creative zone.  I know if I need to get some writing done, or some post production work on photos, or anything creative – those are the hours when I get the most accomplished.

We’re all different though, some people have this rush of creativity in the morning, or in the middle of meals or other activities.  I’ve talked to so many people who still are unsure of when they really are at their creative best.  When people attend workshops and get immersed in a creative world, the ideas flow much more naturally.  The same holds for conferences, seminars, and any type of learning environment.  It’s like the mind knows that other creatives are around and the energy for learning and expression is much higher than what we are normally exposed to.  The trick comes in being able to identify when your creative zone normally happens when you are in that daily routine.  Is it right when you wake up?  After that first cup of coffee?  Right before you go to bed at night?  Or is it on those sleepless nights at 2am when your creative juices just start flowing?

When is your creative zone?

Masking in Photoshop Lightroom

Often when  I talk to people about their work flow one big question and the need to do some pixel based editing in Photoshop, one of the questions that often comes up is “Why can’t I do X in Lightroom?”

Most of the time, it involves answers that include explanations of pixel based editing versus parametric editing, and lots of other technical reasons as to why certain things can’t happen in LR.  But sometimes (and this is the best part), I find out they are adding to their work flow because it can be done in Lightroom!  One of the most common ones is masking effects.  When I show people this, I almost always get a “Holy Cow!” or some other variation on the “cow” part.

So, today I thought I’d share a quick tutorial on how to implement masking edits in Lightroom.  Let’s take a look at the base image I am using here – a boat dock on Raquette Lake in the Adirondacks of upstate NY:

Before the Mask

So, the dock here is a significant portion of the subject, but it’s way darker than the rest of the image, and really could be increased by a stop or two relative to the sky.  So, rather than round trip to PS, let’s see what we can do here.  I’ll start off with making a general masking selection of the entire area.  So I check the Adjustment Brush (near the top of the Develop Module on the far right hand side), and then at the bottom of the image (over on the left), there’s a box that says “Show Selected Mask Overly”.  I check that box.  Then I just start painting!

Masking a selection in Lightroom

It’s a prety broad brush I’ve used, so we need to clean it up, as some of the water got caught and that will leave an ugly halo effect if I don’t take care of it.  So, to get more detailed selections completed, I zoom in, and then switch to erase mode while still showing the mask.  This is in the lower options of the Adjustment Brush, on the right hand panel – see where it has “A”, “B”, and “Erase”?  Click the erase and start painting again to undo the mask:

Erasing a Mask
You, of course, will have to adjust the size, feathering and opacity of your brush to taste, and to accommodate your brushing technique as needed (hint:  Wacom tablets work better than regular mice or trackballs).  Once you’re finished with your refining of the mask, go ahead and uncheck the option to display the mask and see your results.

At this point you can actually do something else kind of cool – hover your mouse over the dot that is on display and then slide it to the left or right as you see the exposure increase and decrease for the selected area!  Pretty cool, eh?  This same technique works with other features in the adjustment brush, whether you are working on eyes, teeth, dodging, burning, or even skin softening.  The scrubby slider is a nice feature in here.  Then, finally, one thing I’ll do is make a side-by-side comparison of the image in a before and after mode to make sure my changes aren’t too garish or over the top (you can do a side-by-side comparison, top and bottom comparison and even split the screen between the two for a more detailed look):

Side By Side Options

Side by Side View
Side by Side View
Looks pretty good for this quick tutorial…and here’s the final image after our masking edits are done:

Adirondack Dock
Adirondack Dock
Now I grant you that this is probably not a portfolio image, but it hopefully was helpful in illustrating how you can mask and edit your photos inside of Lightroom without having to do the round trip as often to Photoshop!

Like this tip/trick?  Got any other comments, questions, or curiosities of how to leverage Lightroom more in your own work flow?  Sound off in the comments, and as always, keep on shooting!


Three Top Tips for Posing Your Subject

As the Spring weather comes upon us, so does the urge to get out and shoot more.  Models are also more willing to brave the warmer temps, so it’s easier to get some willing subjects.  As you start to venture out of the warm caves, here’s a couple tips to getting your subjects to pleasing postures:

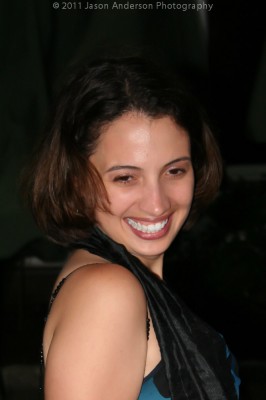
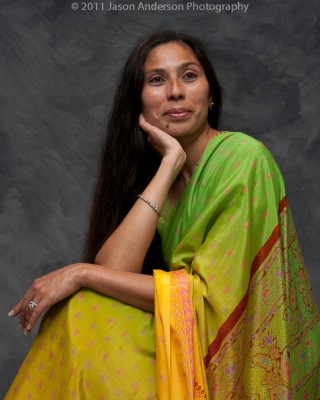
1.  Turn and Burn:  So many photogs want to get facial expressions but in doing so, forget that most of the time we never see someone’s full face toward us.  It’s usually more of an angled shot, and that’s why it’s often recommended to turn your model to one side.  Some models will swear that one side is better than the other, but when it comes to photography, my thought is not so much shooting their best side, rather shooting an expressive side!

Stand to the Side

2.  Breathe! – That’s right, so often when a model poses, the natural inclination is to “hold that pose” which subconsciously puts them in a state where they hold their breath.  Help them remember by even telling them to do so.  “Turn here, great, now chin up, awesome, and just a little to the right, excellent!  perfect!  Hold that pose….!  Oh, and don’t forget to breathe!  Take a deep breath and now exhale…fill those lungs with air!”  Not only will it surprise the model, but you may get a more natural smile – and if you’re lucky, even a laugh!

Posing Your Subject

3.  Encourage the lean! – When people start to get in posing mode, there is a tendency to lean forward.  Leaning into the front shoulder is common, as is leaning to accentuate cleavage for a woman.  If you think about it though, the forward lean does make everything look a little bigger!  That’s not always a desirable thing, so encourage your models to lean back just a tad.  Not too much as you don’t want them to fall over, but at least make sure their weight is shifted to the back leg.

Leaning Back a Tad

The other thing to remember, (kind of sneak tip for you), is that modeling rules work for both men and women, so even though the ones here are all women, many of the same rules apply!  There ya have it – 3 tips to get you started with subject posing and portraiture!  Got your own tips?  Share ’em in the comments!  Have a great weekend and happy shooting!

Turning Tasks into Photos

I had to bake bread for a work potluck today.  That’s ok, I like cooking, and it seems others do too, because most of the time the dishes I serve are some of the first things to disappear.  I decided last night to do something simple, but often popular:  banana bread!

When it was done, the house sure did smell good from the caramelized sugar, bananas toasting, and who doesn’t like bread?  (I know, I know – lots of carbs aren’t good for you…)  But, every once in a while it’s fun to indulge.  As luck would have it, this particular loaf of bread had some nice colors and tones to it, so naturally, I started thinking about my other hobby – photography!

With bread there’s so much you can do from capturing details, to using a shallow depth of field, to creative lighting and shadows, everything becomes a cornucopia of possibilities.  Here’s a few of my selects from just ten minutes of prep, 60 minutes of cook, and ten minutes of shoot time!

Banana Bread 1

Banana Bread 2

Banana Bread 3

Banana Bread 4

Banana Bread 5

Want a slice?  What tasks have you taken and turned them into photo opportunities?  The lesson learned here today (hopefully anyway) is to take something you have to do and make it something you want to do!  In this case, it was a win-win scenario for me, but what about you?  Sound off with your own fun-filled (or food-filling) photo projects!

Depth of Field Matters!

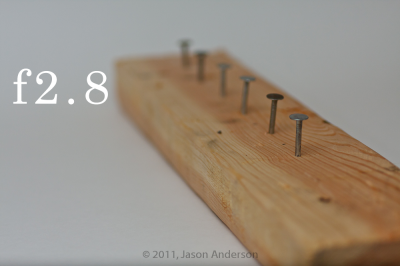
When we approach the topic of depth of field, most people nod along about how the composition can change pretty dramatically when moving between various apertures – but have you ever really studied the differences?  Take some time and do an exercise.  It’s not that difficult, and really seeing the differences in photos can totally lift the roof on your approach to composition.  For this exercise, I took a scrap piece of lumber, and nailed 6 framing nails into it about two inches apart from each other.

Step two was to set up the lighting, the tripod, and the “wood art” in a scene where i could adjust the aperture and keep everything else constant.  With my own little studio set here in the house, that was accomplished easily enough.  I set the focal point on the nearest nail, and dialed in the exposure I wanted.  Then, I switched to manual focus so as to not bump or have the camera try to shift it for me and dialed through the various f-stops.

Step three – simple post production:  camera calibration, white balance, and lens correction.  I also applied a 75 value to the sharpening slider from the detail panel, but did so universally.  So, with everything but aperture constant, here’s the results:

Aperture f2.8

Aperture f4.0

Aperture f5.6

Aperture f8.0

Aperture f11

Aperture f16


So, at this point you should have enlarged the photos above, and scrolled through the entire gallery so you can see exactly what is sharp at f2.8 all the way through f16.  By the time you get to the end, so much has changed and often gradually, it’s hard to see the difference.  But if you look at the f2.8 and f16 shots side-by-side – they are worlds apart compositionally speaking.  Now I grant you, nails hammered into a 2×4 piece of lumber 2″ apart is not the most artistic piece ever shot, but it hopefully illustrates what can happen to a photo simply by changing the aperture and keeping everything else constant!

WHere do you think creatively adjusting your depth of field would work?  Try to think outside the box here too.  A few ideas for starters:

  • A flower from close up…
  • A portrait shot, with background blurred
  • Macro photography – bugs and insects, computer chips and parts

There’s a whole world out there with plenty of opportunities to create gorgeous photos with only your creativity to limit you.  Where do you want to go today?

Enter your email address:

Delivered by FeedBurner

I Am a Teapot!

Nothing too fancy, just a short post today to share a particular “vision” I had.  Hopefully it helps to illustrate that even the mundane can be interesting if you think outside the box!

Teapot

For the inquisitive, this was shot with off-camera flash, using Radiopoppers.  The EXIF data:

Shutter Speed = 1/250th
Aperture = f/18
Focal Length = 70mm
ISO = 100
Flash = 580 EX II

Since EXIF data doesn’t record flash settings, I want to say that this was at 1/4 power, bare bulb (no diffuser, umbrella, bounce or anything like that).  The hint of yellow reflection off the background of the stove is likely due to bounce off the yellow color of the teapot itself onto the black metal on the stove.  It was an unintentional but cool side effect, so I left it in!

As the old saying goes: “Keep on shooting!”

And the book winners are…!

Last week Monday, the latest Learning Digital Photography podcast went out, and with it, an extra special bonus for the readers and listeners – not one, but two books from guest Nicolesy (a.k.a. Nicole Young)!  I just closed the post for comments, and counted up the replies…we had 22 unique commenters (excluding twitter references) for this post, making it one of the most popular ones ever!

I know, you’re all really here to find out who the winners are, so without further ado – comment submissions #6 and #10 are the lucky folks:

Comment Contest Winners

Thanks to everyone for their participation…and to Chris and Joe, if you could send off a quick email to me, I’ll make sure the folks at Peachpit get in touch to arrange fulfillment for you.  Once again, I’d also like to thank Nicolesy and Jason Cate for their participation in the show as well as Peachpit for their generous contribution.  It was a lot of fun, and the comment contest also ratcheted things up a notch too, so hopefully we can make these more of a regular occurrence with the podcasts.  With that in mind, are there any other authors, photographers, or folks you’d like me to bring on a show,?  Now’s your chance to sound off and get the folks on that you really wanna hear from!  Sound off (you knew it was coming) in the comments!

Happy shooting (and Happy Valentines Day for the romantically inclined out there), and we’ll see you back again soon right here – same time, same station!

Garbage leads to Beauty

Tuesday night is trash night in the Anderson household – and whether mild and comfortable, or sub-zero and bone-chilling, it’s my job to gather all the bags and roll things out to the curb on my appointed night.  Last night was no exception.  However, even in such mundane tasks as “taking out the trash”, one can find beauty and art if you are open to it.  Thankfully, I was on this night.

You see, not only is it trash night, but this also is going to be one of the coldest nights I can remember in Colorado – we are on pace to be at 17 below zero by morning!  Like I said – bone-chilling!  In our house, that translates to fires in the fireplace.  A bundle of wood costs around $3 and it heats the entire house to where we almost have to open windows.  So, we needed no encouragement to add the warmth of a fire last night.

Also, as an admitted “guy”, there is nothing more fun than poking and stirring a fire, whether it be in a fireplace or in a campsite.  So, my face was naturally glued to the fire for most of the evening.  Twist twist, poke poke.  Then a log here and there…and some old cardboard I tore up to throw out (remember, it was trash night).  The smell of the crackling wood and ash is still lingering in my mind too.  That, combined with a nice red vino made for probably one of the most relaxing evenings.

Fireplace Flames

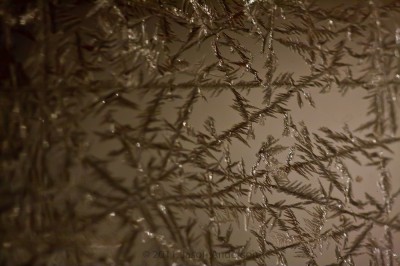
It was quite relaxing too…and even Tracy joined me for a few minutes of quiet time just gazing at the embers before finishing things up for the night (a.k.a. the trash).  The flames from the fire, still flickering inside my head, were doused by the chill of the air on stepping out to the garage.  The frost already on the door was right there, in my face, reminding me of how cold it actually was/is outside.  (Bone-chilling, in case you didn’t get that yet.)  And right then, it hit me – frozen snowflakes of ice on the window – with the light coming down behind it…just gorgeous!

Cold and Ice

When thinking about these two images, and how much I liked them, it dawned on me further that these are great examples of how juxtaposing themes can work really well together…and it all came from taking out the trash!  The point:  keep your eyes open, the next dose of inspiration can come from anywhere, even the most mundane task on the planet!  And wit an amazing contest going on now – this is as good a time as ever to keep your artistic eyes open!

The Live Learning Lab!

For a while now, my good friend Kerry Garrison (of Camera Dojo) and I have been working in concert with Nations Photo Lab to build a new interface up at their website for a learning resource guide, which will be serving up free monthly webinars!  With both myself and Kerry Garrison as hosts, we launched our first webinar yesterday with a sellout crowd of 100 people in attendance!  It was a lot of fun as we tackled several subjects relating to Lightroom and how to process your images.  I took on creative crop overlays and ND filters while Kerry handled the portrait retouching aspects of Lightroom.

The Live Learning Lab

Our schedule is the second Wednesday of every month so another will be forthcoming here in a few weeks for February.  We’ll be covering a lot more than Lightroom, including Photoshop, probably some photography composition techniques, and much much more.  We’re working on a guest host schedule too, so it’s worth checking out.  There’s no gimmicks, no fuss, no muss – just a way for the group to collectively give back to the entire community!  Each webinar is about an hour long (our first went about 15 minutes over), and they will all be accessible via instant archives immediately following the webinar too.  It’s great to view live because you can ask questions as you think of them, but if your schedule doesn’t permit, the archives will be available for your enjoyment too!


I Resolve To…

Happy Tuesday to all!  As we wind down the Year of the Tiger (2010 was the Year of the Tiger according to the Chinese Calendar), I find myself, as always, looking at the events of the past 365 days, and wonder to myself what I’ve done.  Have I accomplished my goals? Did I challenge myself in new ways?  What have I learned?  All of these questions are ones we should ask ourselves periodically.

Setting Goals
Setting Goals

While I answered yes to many of the questions, I did have to admit that I had not devoted as much time to the learning side of things.  After spending time on writing blog posts, taking pictures, going on shoots, recording podcasts, talking to vendors, and the whole schmear, I had only attended 1 workshop!  While the workshop was a phenomenal one (David Ziser’s Captured By The Light tour), it’s just one aspect of photography.

So,  2011 will hopefully be a year of learning.  I know it seems odd that the host of the Learning Digital Photography podcast and author of Canon Blogger is endeavoring to learn more, but that brings up a very good point that bears mentioning – we never stop learning! I had a colleague say something to me recently after we had several discussions about various aspects of the craft.  His words went something like “I could learn a lot from you about licensing and copyright.”  It reminded me that no matter who we are, or where we think we are in our craft, there is always going to be someone out there that knows more than us about something.  Whether it’s licensing, printing, composition, or any other topic – there is always more to learn.  And you can learn from anywhere!

With that in mind, one of my priorities in 2011 is to attend more workshops and seminars  From my perspective, when you stop learning, you’ve stagnated, and creativity begins to subside.  What a great opportunity to move forward with in 2011!  And it all came from a little introspection, and looking at my goals for 2010..it gave me motivation, desire, and a resolution for 2011!

As always, let’s turn the question out for the reading/listening audience.  What were your goals for 2010?  Did you reach your goals?  Are you happy with what you’ve done? What about 2011?  Any photography goals for the year?  Share your thoughts, views, visions and dreams in the comments or via email.  Don’t forget to keep on shooting!  We’ll see you back here again tomorrow for more photography goodness!