After posting about exposure triangle and how blurring water means decreasing aperture, I got a few questions about other ways to blur the water in your composition. So, here you go.
It seems that water always seems to attract attention in photography…whether it’s an ocean at sunrise, dew on a flower, or waterfalls gushing through a mountain stream, the impact that water can have on our imagery is very powerful. Harness that power to your own creative ends by recognizing 5 ways to blur it to your advantage:
Slow Down!
1. Slow that shutter speed down! Your shutter speed is the best way to blur water…taking things down to at least 1/4 of a second, if not longer. This is what I did in my last post about the exposure triangle. It’s still my favorite way of blurring water to a creamy smooth texture in photography.
Use a Tripod
2. Steady those shots – even without slowing your shutter speed, to seconds, keeping the camera stable to prevent shake when hand holding is near impossible, so please take and use your tripod! Of course, it goes without saying that when shooting at slower shutter speeds, it helps immensely to be solidly mounted on a good set of legs. Without getting into the pros and cons of various features and qualities of various tripods, if you are shooting a 10 second exposure of a beach at sunrise, you need legs!
Palmetto Statue
ND Filters
3. Sometimes even with slowing shutters and using tripods, it’s just not enough. So, you need to find another way to control the light. ND filters are the answer. I’ve seen a lot of people run into an invariably brighter exposure… and to combat extra ambient light in the scene, they use ND filters. These filters essentially prevent those extra rays of light from hitting your sensor. Polarizers can work too, but they are less effective as they can have some downsides to them including elimination of reflections, casting a specific tone on your entire image, and more. When in doubt, always use ND filters.
SC Pier at sunrise
As always, there’s more than one way to skin a can (or blur water)! More involve shutter dragging with fill flash, and lots of others. What ways do you use to blur and control waters’ appearance in your images? Sound off in the comments with tips and tricks of your own! Happy shooting all, and we’ll see you back here again next time with more photo goodness!
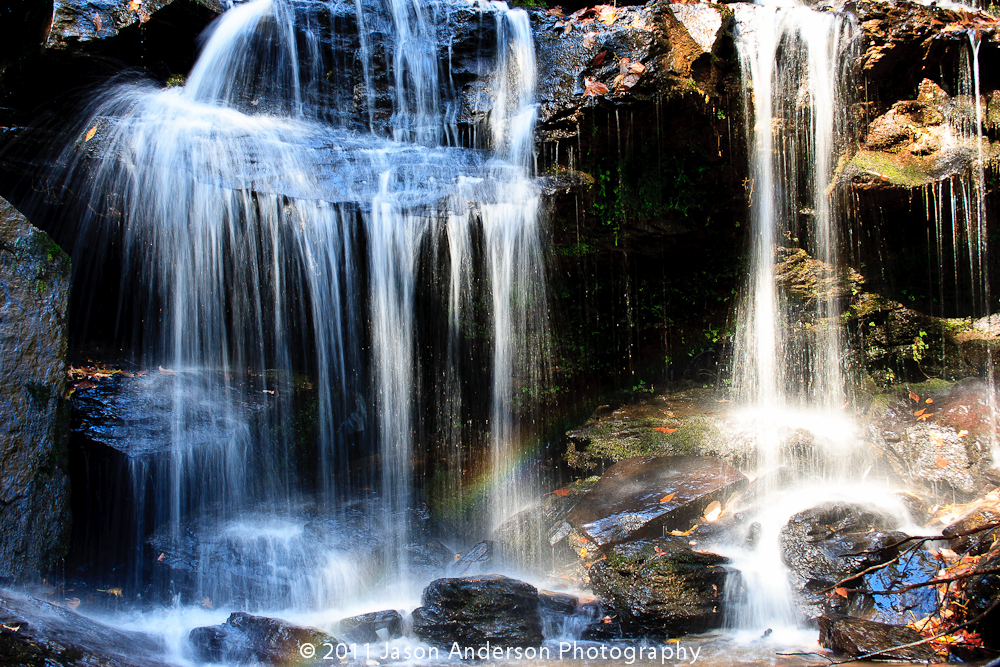
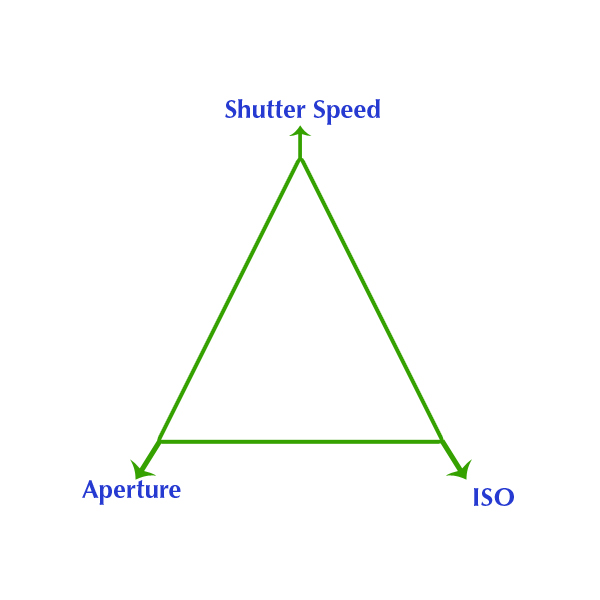
When we look at the elements of composition, the three that everyone constantly considers are shutter speed, aperture settings and ISO (or ASA in the old days of film). These three factors make up something called the Exposure Triangle.
Readers of the blog have seen this before, in my post about The Future of Photography. The rules of the exposure triangle (such that there are rules in photography…) state that if you want to keep the lighting the same in your shot, as you increase one factor, another must decrease proportionally, while the third is kept the same. What does that mean? Simple – let’s take scenario I encountered when on a photo shoot with some friends touring the waterfalls of South Carolina. While shooting, I saw a perfect scene to demonstrate how this would be manifested.
For our first example, let’s set set up our camera and take a picture of a waterfall. In order to hand hold, and easily compose things, we have the following settings.
A shutter speed of f 1/250
An aperture of f 4.5
And an ISO of 100
Fabulous – but in looking at the photo, we’re not crazy with how the photo looks. Something is off, and we want to change one of our settings to make for a better composition. I’d like to see the same photo but with some blurred water. Now in your own photography it could be something else, like a flower to be sharper throughout the entire depth of the frame, or the background of a portrait to be completely blurred. So, how do we accomplish that? This is where understanding what each factor does to the composition:
Shutter speed
Shutter speed controls how quickly the shutter opens and closes. The higher the setting, the faster the “action” is – so you can freeze something like a speeding bullet, a blade of a moving helicopter, or the wing of a hummingbird.
Aperture
The aperture is the size of the opening on your lens. Think of it like a hose that controls flow rate. You could use a really skinny hose that only lets a teensy bit of water through, or a fire hose that just gushes gallons and gallons. Now, as you open the aperture wider, and let more light in, you also do something called creating a shallow depth of field. And the more shallow your aperture is, the less focused things will be in the foreground and behind your subject.
ISO
The ISO is the noise or sensitivity setting for your camera sensor. This changes how sensitive the sensor is to light hitting it. Lower ISO settings make it more sensitive to light, higher settings make it less sensitive. Back in the days of film, this was done by using films of a certain ASA value (which ironically was referred to as film speed, but I digress…) But the fun thing to consider is that once you inserted film in a camera, you were stuck with that film setting until you finished every frame, so ISO adjustability in digital cameras was a HUGE advancement.
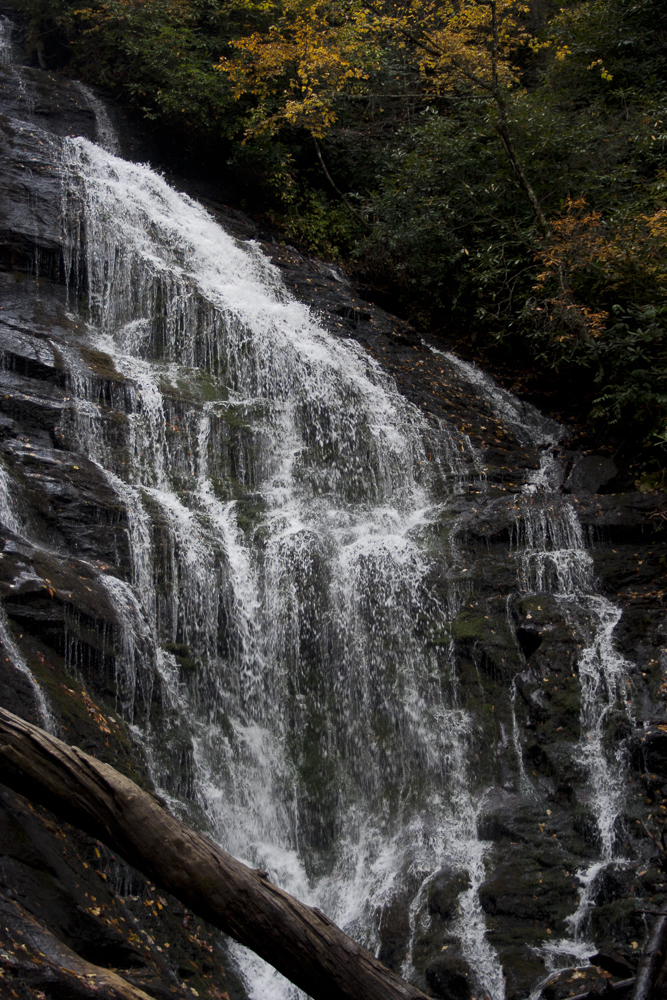
Okay, so now, back to our example photo. Now in our example, we want to make the water more blurred, so we have to slow the shutter down, not speed it up. Okay, so let’s do that:
New shutter speed = 0.5″ (one half second)
So, what’s going to happen? Well, because we are now letting the shutter stay open a LOT longer (0.5 seconds is HUGE, but we need that to really blur water)! As a result, more light is going to hit the sensor, and make it way too over-exposed, so we need to compensate for that by adjusting the other two controlling elements – aperture and ISO. Now in this example, our ISO is already as low as it can go, so our only option is to make our aperture opening much smaller:
A shutter speed of f 0.5″
An aperture of f 29.0
And an ISO of 100
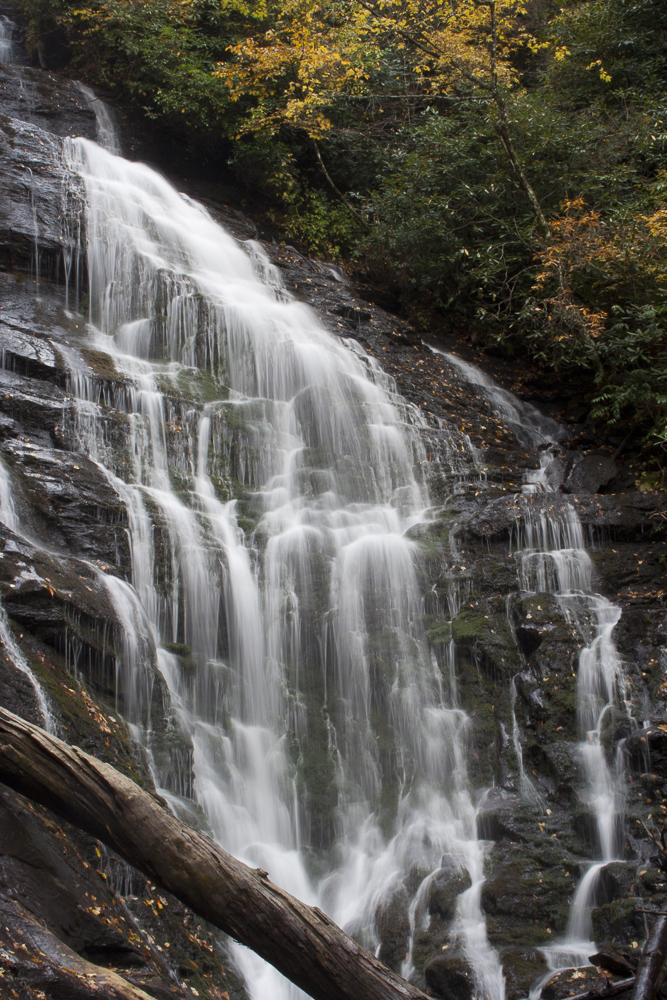
See how we did that? Now, this shot is going to have much more blurred water, and our exposure stays consistent. But, we’ve effectively made the same shot with a different composition!
See how the shutter speed and aperture will change the entire composition? Yes, I blurred the water, which was my primary goal, but look at the log in the foreground. Now it’s a little out of focus due to the shorter depth of field. Pretty fun stuff, eh? I should also mention now that since I slowed the shutter speed to half a second, there was no way I could hand hold that, so I mounted it to a tripod in order to prevent camera shake.
As a reminder, for a strict metadata comparison, that’s what happens when you account for the exposure triangle:
Shot 1
Shutter speed = 1/125th
Aperture = f 4.5
ISO = 100
Shot 2
Shutter speed = .5 seconds
Aperture = 29
ISO = 100
Happy shooting!
Author note: I was going to post this article in response to a question that came to me from Quora. Imagine my surprise when I realized I had never written a post in 10 years on something as fundamental as the Exposure Triangle! It may have been written and lost in the server crash from a few years ago, but thanks to Quora for giving me the reason to re-create it now!
Lately the internet has been teeming with people fixating on the latest iPhone release, and questions are coming through the woodwork asking the same question over and over. Everyone thinks they are coming up with an original question, just because they changed one word here or there, but essentially all these questions come down to smart phone cameras versus traditional cameras. I’ve answered the question so much via email, in forums, on Reddit, and in Quora that I finally said “enough is enough”. For all who want to ask the question, I am going to direct you to this post!
Smart Phone Cameras in a nutshell
Let’s break down this phrase a bit – smart phone cameras What does this mean? It means the phone vendors like Apple, Samsung, LG, Huawei and the rest are adding cameras as software applications to sit on top of these cell phones. I’ll say that one more time for clarity. At their core, these devices are cell phones. So, on that basis alone, why would anyone want to draw a comparison between an add-on feature to a device designed with photography in mind?
The answer lies in dollar bills. That’s it – money! Vendors want to sell more devices, and if the phones can’t really be improved (let’s face it, cell phones are merely a function of the network they are on), then sales plummet! Think about it – iPhones, Androids, and the rest all must be on a cellular network for their original designed purpose of making phone calls, right? So, off the top of your head, how many cellular providers can you name? Not regional ones. I mean Tier 1 providers! I came up with 4/5:
Verizon
AT&T
T-Mobile
Sprint
US Cellular (don’t really wanna count these guys, but ok…)
I think the phone makers agree:
iPhone Carriers offered
From the Apple iPhone 11 Splash page
Samsung carriers offered
The others, like metroPCS, Cricket, Go Phone, etc. are really just smaller ones that piggyback on the major providers networks (and many are actually owned by them!)
So, don’t fall for the hype. iPhones, Samsungs, and every device out there as far as their phone service goes, is only as good as the network it lives on. They can’t sell products that way, because the experience will be different for everyone, based on the network and where the customer lives relative to the towers. So, cell phone vendors try to stand apart by their add-ons. That is the only reason why every vendor tries to hype their accessory apps like cameras, computer speeds, and media storage aspects of these ridiculous tiny devices (of course tongue in cheek when you consider that these devices have more processing capacity than what we had when sending a rocket to the moon!).
But, everyone likes cameras, and photographs are a part of our lives. We are a visual society, so everyone wants a camera they can always have with them. Naturally, since we always have our cell phones with us, it’s sheer brilliance to make the camera feature the selling point.
But the cameras are crap.
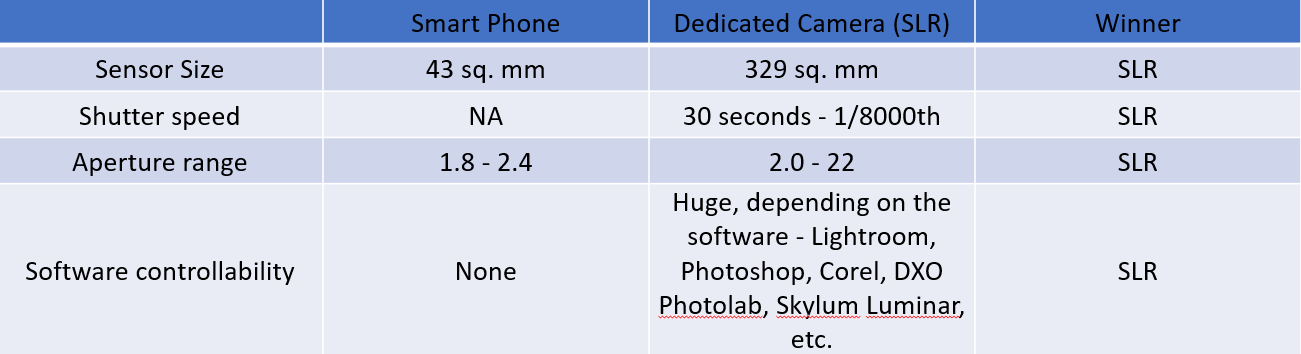
There, I said it. Cell phone cameras are crap compared to dedicated cameras. Don’t believe me? Check this out:
Here is a photographic representation of various camera sensor sizes ranging from a medium format camera, all the way down to the sensor sizes of point-and-shoot cameras, with their actual dimensions (courtesy of Wikipedia):
I don’t even see a cell phone camera listed, so off to Google I went in search of the actual dimensions of a cell phone CCD sensor for capturing images. Here’s what I found…
So, the sensor in a smart phone is about 7mm x 6mm in physical size. The author claims that’s “about the same as a 1/2.5″ sensor”. I actually think it’s closer to the 1/1.7″ range, but that’s miniscule…
A meaningless measurement from the outside looking in, but it looks to me based on the lens that the sensor is about 1/3 of an inch. Interesting that this sort of information is not readily available from Apple, Samsung, or other phone vendors. I wonder why?
The answer is because at the end of the day, the sensor on these cameras are teensy tiny miniscule little things that are crammed into the innards of a phone, trying to get you to buy into the fact that the CCD sensor of the phone (thus making it a “smart” phone) is better than the sensor of an SLR, or even a point and shoot.
I’ll go to my grave saying that it’s not better, and never will be. Simple physics prevents it.
Lenses
If you ask any photographer the question of what camera to buy (excluding talk of the smart phone cameras), invariably, they will tell you that it’s not the camera you buy into – it’s the camera system. More specifically, it’s the glass that matters. The reason for this is because the camera is just a box that houses the sensor, and it’s the lens that defines the clarity of the shot, your aperture range, and even the sharpness of the glass comes into play. I know photographers that refuse to by Tamron or Sigma glass because they claim it’s “not as sharp as Canon” lenses. I’ll leave that argument aside for now, because the point here is to highlight that even if we were to exclude the sensor as not being as much of a factor based on this concept, we need to now look at the lenses in these phone cameras.
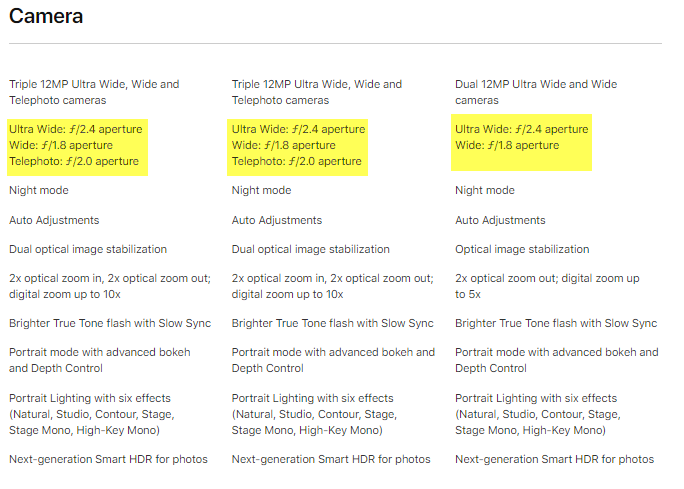
So, let’s do that for the iPhone 11:
That’s actually better than I would have thought, because most predecessor phone cameras had fixed or nearly fixed aperture sizes on their lenses. But a range from 1.8 – 2.4 aperture opening is impressive, as it’s nearly a full stop (read more about apertures and F-stops here) so I’ll grant that. Now let’s compare that to the absolute cheapest lens for a Canon lens at B&H Photo (I looked at the EF and EF-S lens mounts). I also could have picked Nikon, Pentax, or another maker, but I am CanonBlogger for a reason: 🙂
So, for $125, I can get a lens that goes from an f1.8 all the way up to f22? (That’s about a 6 full F-stop range by the way, for those of you keeping score..) A smart phone camera will never compete with that. Now, for the average Joe (or Josephina) consumer, what does that matter or mean? It means from a smart phone, you’ll always get images that look like this:
And never get images that look like this:
Now, with my rant over on the differences between the camera apps and sensors in phones versus the dedicated SLR and even point and shoot cameras, I need to clarify something.
Software
The way that phone cameras are able to get some apparently stunning imagery is not because of the camera – it’s because of the software. So, if you really want to compare apples to apples, the comparison should be between phone camera software and standalone software. And I will grant you that the software the developers at Apple and Samsung have done some amazing work as to what’s baked into the computational algorithms. The problem lies in the fact that it’s baked into the phone. We have no control over it.
Now, devil’s advocates will say “There’s an app for that” and sure, there are tons, but that’s not a fair comparison, now is it? Comparing a software app from a phone camera to a dumb SLR that has the sole purpose of capturing images makes no sense. So, if you want to get into a discussion of software comparisons, we can do that, but we need to make it an apples to apples comparison. Which one would you like to start with? We could start with a comparison to Lightroom, Photoshop, and others…
But if anyone tries to tell me that the hard baked software for photo editing in a phone can compare with Photoshop, Lightroom, or any of the above, I’ll… well, just don’t! 🙂
Printing
Does anyone print images anymore? I am not sure about that to be honest. With social media, Facebook, Instagram, Twitter, Snapchat, and LinkedIn (and probably a whole host of others that I am not hip to), we often are looking at images through this medium rather than by prints. So, my argument here could be meaningless, but…
Take a photo with a smart phone camera. Take the same photo with a point and shoot camera. Try to print them at your local print store. My guess is you’ll be able to print up to perhaps an 8×10 photograph from the cell phone. From the SLR camera – you can go billboard and poster sized effortlessly. Why? Because of the sensor and the pixels.
You see, cramming pixels more tightly together in a small teensy sensor is going to produce something called artifacting, which ultimately translates to bad pictures when you try to print to a larger medium. So, there’s that too…but again, perhaps I am long in the tooth because I don’t know anyone who prints photographs anymore. 🙁
Conclusion
So, there you have it – the full explanation as to why a smart phone camera will never truly compare with a dedicated camera. The SLR will always win. In any category.
What say ye all, interweb citizens of the world? Agree with my assessment? Hate it? Sound off as to why you like what I have to say, or where I am just flat out wrong in my preconceived notions. Otherwise, I’m ready – what’s the next question…?
With Apple and Android phones, the ability to take panorama photographs has really changed the landscape (if you’ll pardon the pun 🙂 ) for still photography in this genre. You can get some truly stunning results without the need to stitch several photographs together in heavy desktop applications like Photoshop anymore. Like anything else though, there are things you can do to increase your keeper rate, and things to avoid (unless you like deleting tons of photos). Here are Five Tips To Improve Panorama Photos:
Tip #1 – Make sure you scope out the scene all around you. Believe it or not, the iPhone panorama photo feature goes to nearly 300 degrees from left to right. This means you will almost be doing a complete circle. Is there anything on your left or right that you particularly want to be in the photo, or the draw of your photo? Make sure that you initially face that particular person or scene. Then turn 90 degrees to your left before you start shooting.
Denver Airport Panorama
(I wanted to make sure the plane on camera right was fully in the frame, and my first short, the pano ended right before the hallway on the right, so it looked like it was cut off…)
Tip #2 – Go slow! The iPhone will tell you to slow down if you start moving too quickly from left to right, but at that point, it’s likely too late. Stop the shot and start over. Don’t get impatient because your wife (or husband, or significant other or friend or whoever) wants to get to your ultimate destination. The amount of time it takes to completely capture the pano scene is about 15 seconds from left to right. Add another 15 seconds to review the image on screen before you leave the area (you may have to re-shoot). Finally, add another 15 seconds to your itinerary in case you really do need to re-shoot! Just as a buffer, I’d add a final 15 seconds in because…well, you never know! All in, that’s one minute of their lives that your S.O. will have to wait for you.
Tip #3 – Consider the lighting – If your scene varies a lot from dark areas to light areas, that will not bode well for capturing a pano with the iPhone. Why? Quite simply, it can’t capture the dynamic range of our eyes. Low light to bright light can be tough for the sensor to handle, and extremely low light scenes will introduce a lot of grain too. Most of the time, shots that result from these scenarios will be unusable. Exceptions to this would be city skyline shots. The bright lights will be blown out, and the skyline itself will be all in shadow, but that’s ok – that kind of contrast is actually a good thing for skyline shots!
dark pano – what not to do
(Clearly, the bright light of the lamp and the darker area of the living room made for a bad contrast between bright and dark areas here…this is a bad shot imho..pano or no pano! )
Tip #4 – Consider the framing from top to bottom. When shooting pano shots from the iPhone, you can’t rotate the camera to go into landscape mode – it must be recorded in portrait mode. This means you may get portions of your scene at the bottom, the top, or both that you might not otherwise want in a final photo. Re-frame accordingly as you conceptualize the shot!
Similarly, consider what’s off-camera to the immediate left and right. Is it the road you’re on or a coastline? Unless you take up several frames when viewing this kind of shot, it may end up looking a bit odd.
Finally, consider that you do not necessarily have to go the full range from left to right or right to left. Some the best types of scenes for panoramic photography are better off from perhaps just a little bit more than a standard picture. Here for example, an architectural shot, or perhaps a larger group of people. Everyone automatically presumes that panos are best utilized in landscape photography. While this is true, there are usages outside of that genre.
A while back I was up at Maroon Bells in Colorado, anticipating the peak of the fall colors. The lake there at the base of the Maroon Bells has become quite an idyllic scene for photographers of all levels to aspire to. So, I was not alone when I was there. Quite the contrary. The place was loaded with literally hundreds of photographers, bot from Colorado and even from places as far away as St. Louis (from those I talked to anyway).
One of the things that struck me was that from all the expensive gear out there, I saw many many people holding their cameras wrong. It honestly seemed like they knew more about the gear than about taking and making pictures. What do I mean? Simple. You can know all about the technical aspects of gear. You can learn what the maximum ISO settings are. Even get rock solid on frame rates, crop sensors, and all that techno-jargon pretty easily. All it takes is an internet connection and some time to memorize the numbers. But what you can’t learn online is good photography techniques.
Proper Holding Techniques
So, how do you hold a camera? Excellent question! This has been covered by many in the blogosphere, and inevitably, someone will likely say refer to Joe McNally’s “The grip” video. In this video, he talks about shooting hand held at slower shutter speeds, and introduces a grip technique for left-eyed shooters:
It’s got some great pointers in there, but many can get distracted by the “low light shooting” and the “left-eye shooters” concepts. Rest assured, there are elements of this whole approach that are universally applicable. Here’s some simple pointers:
1. Keep your arms tucked in – letting your arms go outside past your core body introduces instability…never a good thing when hand-holding.
2. Unfortunately for left-handed shooters, the camera vendors have designed cameras with the grip on the right side. This is the part where your fingers curl around the camera body, so just make sure your right hand is curled there. Most everyone gets this right…the part where there is a lot of variation is the left hand!
3. Keep your left hand under the camera and resting on the lens. Resist the urge to bring that left hand out to the side to turn the dial for zooming…you can do it with your hand on the bottom, and this way, you are providing more stability to the camera. The other upside is that by keeping that left hand under, you are also keeping your arms tucked in!
4. Stop using the LCD/Live Preview. I know, we all like a big screen and the bigger the better to see your shots…but so many people are migrating to using the live preview (especially when the camera has that articulating screen), and it’s introducing bad techniques. When you use the LCD screen – what happens? Your face goes back or your arms go out, and the camera becomes unstable. Keep using the viewfinder for as long as the vendors keep it on the camera! Keep your face planted up against that camera body…it helps with that whole stability thing!
A great way to test this is to take a shot using good technique and an identical shot using..well, a not-so-good technique. Compare the results and see what produces better results! Of course, some will likely chime in and ask “What if I don’t have an SLR?” That’s a great point, so if that describes you – make sure you come back later when I talk about how to hold a point-and-shoot camera (and a camera phone tutorial is coming too!) 🙂
Or, if you can’t wait to read the text (because let’s face it, we all wanna binge watch stuff these days anyway…)
I’m coming out of silence for Wordless Wednesday…primarily because so many people are asking me questions via email, Twitter, and FB to share details about the composition, post production, and other details. Instead of just spitting out metadata and other information, I’ve got questions and answers from now on:
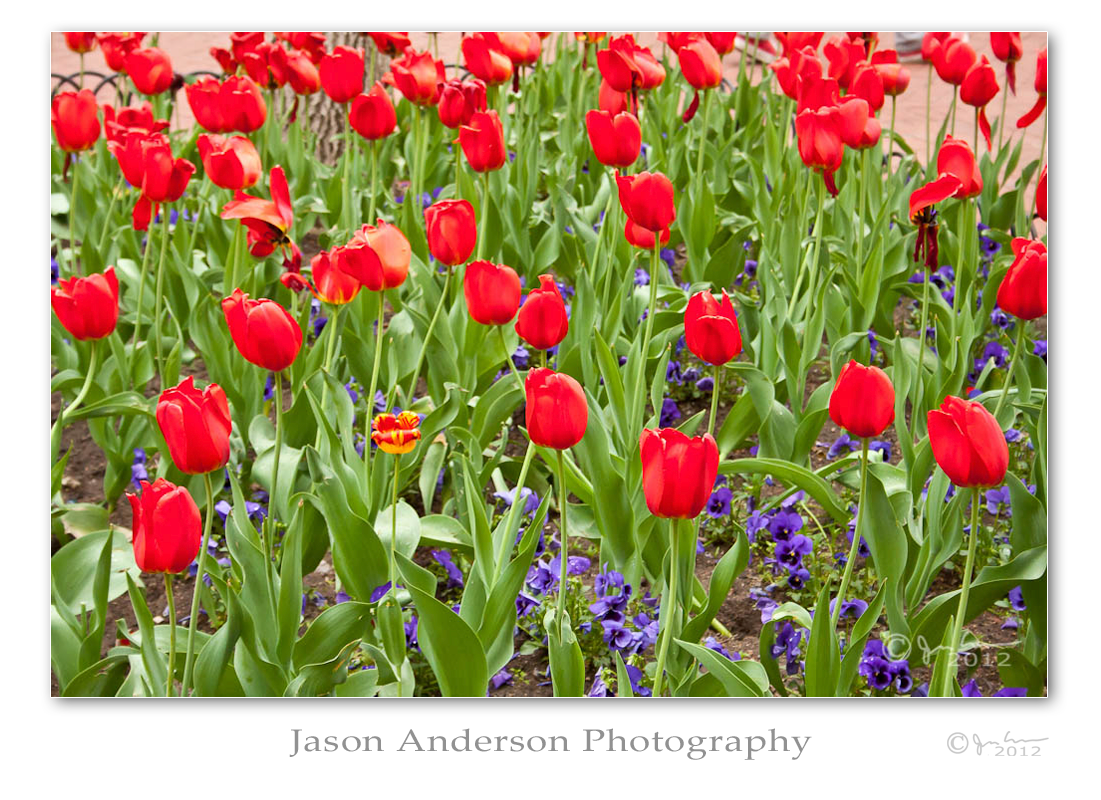
#1 – What rule of composition did I use and why?
I chose the Rule of Thirds for this shot, and specifically chose the lower left third to be the grabber. I didn’t want this to be an overpowering shot, for the eye to just enjoy the plethora of tulips…but the little tiny yellow and red amongst the larger red ones struck me for some reason, so I framed it to the lower left – thus giving more space for the eye to expand out from there to the rest of the scene.
#2 – Are any rules of composition broken?
Here, I don’t think so – in general, the Rule of Thirds applies, and the Golden K also applies if you look at it for more than a second or two…see the K lines appear in the red tulips? Kinda neat, eh?
#3 – What camera/lens combo did I use?
For this shot, I was on my trusty Canon 40D, and the lens mount was none other than the Canon kit 18-55mm (nonIS)! I went with the 18-55 mm lens because this is a very good lens for approximating the equivalent of what the human eye sees, and for this photo shoot, I wanted that effect.
#4 – What lighting did I use?
Here, there were no lights…it was au naturale: S=1/60th, f7.1, focal length = 50mm, and an ISO of 1250! (Yep, ISO 1250 – I was hand holding and wanted to keep it bright! The scene was actually much darker, because the sun was going down, and I really wanted the colors to pop! Depth of field was also important to me, because all the flowers needed to stay relatively sharp. Since I was shooting light and on the fly (no tripod or monopod), my only option for getting the brightness in the scene that I wanted was to push the ISO settings up to maintain correct exposure.
#5 – How did I process it?
I processed this in Lightroom, using just a few tweaks on the right panel: I had under-exposed a little (especially given the fading lighting conditions), so upped that by .76. I also set Clarity, Vibrance and Saturation to 50, +10, and +10 accordingly. These settings helped bring out more of the color and vibrance that I was seeing but was not in the default raw file. My sharpening and noise levels were also set to +73 and +50…the sharpening was up that high because,w ell, we always have to sharpen at least a little, and a went a little higher to help define that depth of field. Lastly, the noise levels were pushed up to help counter the impact of the ISO when I was shooting.
Hopefully this will help those of you who are interested in learning what I see with my eye and why I capture certain images. If you have more questions, or thoughts on improvement, feel free to share those in the comments!
We’ve been looking at the Rule of Thirds in photography for compositional approaches, and I commented on what seems to be a trend toward the former being more popular in portrait work and the latter being more popular in landscape type work. The idea makes sense as portraits have subjects within the picture, while with landscapes the subject IS the picture (the entire scene). Click here for the full blog post with examples.
Well, today, I am taking advantage of the open sourced nature of Wikipedia (all images link back to the Wikipedia pages they came from) for some well-known works of art that have survived the test of time to see how they measure up under the Rule of Thirds. The results are kind of interesting:
The first is from Picasso, from his Cubism work, titled Three Musicians…
A super-imposed Rule of Thirds grid is rather telling. While this construct is somewhat different, because of the style of Cubism, I found it interesting to see the lines that he painted also fell into roughly the same places as those of the Rule of Thirds. And the hot point in the upper left is kind of close to the “face” of one of the musicians. Does the rule of Thirds apply here? Given the linear composition, my vote is Yes – what’s yours?
Next up, is Van Gogh, with a painting titled “Street Scene in the Montmartre”:
Here, hot points are very much at play, with the people walking down the street, coming in at the lower left hot point, and the red splash of color on the windmill is very close to the upper right point. The fence line also roughly follows the lower third so elements of both compositional styles are present here. Does the Rule of Thirds apply here? I’d say yes! Do you agree?
Lastly, let’s take a look at one of the more abstract artists in history: Monet, and one of my favorite works of his, “Impression, Sunrise”…
The sun – pretty close to the upper right hot spot, and teh reflection in the impressionist waters, almost as in line with the right third line. The boater shadow, being an opposing color, stands out anyway, but it also helps the composition that the lower third intersects it to a degree. Remember, art is not an exact science, and creativity wouldn’t have variation if subjects were always right on the hotspot. Equally, it wouldn’t spark or inspire us to always place things on the thirds lines. These are guides, meant to help you compose in aesthetically pleasing and appealing ways. Does the Rule of Thirds apply here? Without a doubt, is my answer! Am I wrong? What’s your take?
These are but three single instances of works of art that have survived the test of time. There is so much history to art and its creative appeal, but I would venture to guess that much of it has some elemetns of composition in common throughout the ages. Yet, there will always be exceptions. That is the challenge for today – do you know any famous works of art historically that break the rules? What makes them work and why? Share your comments here in the blog.
A few other tidbits to share today outside of the main focal point (get it? 🙂 ):
Three more days to the Worldwide Photowalk, hosted by Scott Kelby and with tons of sponsors and prizes. Have you registered? Some cities still have openings so check cities near you – there’s still time to register! (It’s free!)
A fellow NAPP member had started a community forum thread asking about the graphics tablet pen as a useful tool, and Dave Cross stopped in to share that he made a blog post scheduled for yesterday. I made a mental note to stop over and read it – great thoughts, and definitely worth the 30 seconds (I read his blog daily anyway)!
Last, but not least, I got an email recently about this new site where photographers of any background can upload images of their lighting setups or other creative perspectives and setups with light to share with the community at large. It’s a great outlet and you can get some pretty incredible inspiration from it…the name is Light Test and coincidentally, so is the web address. Check them out here.
As a final note today, as I always like to share sources of creativity, I’d like to give some special thanks to Elizabeth Gast (a.k.a. Firgs), of Design by Firgs. She has been instrumental in helping me think outside my own box of creative limits, and in working hard to improve both the quality of work and how I present that work. Today, she featured me on her site as a “Hot Site!”. While I am always going to take the self-deprecating approach, here I must simply and humbly say thanks to her. Not only for the mention on her site today, but also for her instrumental help in helping me improve my own web presence with regard to branding and design styles (see my Twitter background for an example).
That’s enough for one day, doncha think? Happy shooting and we’ll see you back here again tomorrow.
A while back I teased about a forthcoming lens review (nearly 3 months ago actually, in the Teaser Alert), and after several project shoots, the holidays, and scheduling delays, I am finally getting my act together to bring you the latest gear review…that of the Sigma 50-500mm. As a word of caution, you should be forewarned that the Sigma line-up of lenses that I have reviewed has become quite extensive. Right away this should tell you two things:
Sigma has been quite generous with me in terms of making a variety of lenses available. They likely are doing this for a number of reasons, but primarily because they know that I will give a fair, honest, and 9 times of out 10, a positive review of their equipment.
I like Sigma lenses! It should be no secret by now that I do like their lenses. They are optically on par with what one would expect from lens manufacturers by todays standards. Heck, sometimes I think the optical quality even exceeds that of the main brands out there (of course here I mean Canon and Nikon). The price is almost always right on – sometimes the price tag is a little high for my taste, but the advantage that Sigma has is that they are what is considered a “third party lens”, and because of that designation, their pricing is a notch below comparable lenses made by either Canon or Nikon for equivalent glass.
So, when Sigma came calling (actually I called Sigma), with the 50-500, the game face was put on. Right off the bat, here Sigma has been more than generous because I have now had this lens in my possession for nearly 3 months! I’ve posted a few photos from this lens over the past three months, so you may see some repeated images here, but they serve the purpose of demonstrating the various settings that I have used to shoot and test this glass. Having set the stage, let’s get started with the review. In the past, I’ve talked about things in terms of Pros and Cons, listing first the things I like, then the things I was not as much a fan of. While it has worked to a degree, I am trying to make things more uniform in the review section, so will start adhering to some more concise points and then indicating whether it is a pro or a con. Ladies and gentlemen, I give you the
Sigma 50-500mm f4.5-6.3 Review
1. Focal Range: The focal range is how lenses are most commonly identified, and this is the measure of how much “zoom” there is in the lens. Here, the description says it all. This lens ranges from a widest point of 50mm to an impressive “zoom” of 500mm. On a crop sensor camera, that means you are looking at a range of 80 to 800mm! By any standard, this is a pretty wide range, encompassing a difference of nearly 700mm in focal adjustments. I am going to call this one a Pro.
2. F-Stop Range: The f-stop range is the measure of the minimum (or maximum depending on your way of thinking) aperture the lens can handle at various lengths. When dealing with a zoom lens, as you move further out, the elements have to compensate for the change in the length by increasing the size of the opening of the aperture, so you will see adjustments as the lens “zoom” increases. The Sigma 50-500mm is dialed in to a minimum aperture opening of f4.5 to f6.3. So, at the widest zoom of 50mm, the lowest aperture setting you can get is f4.5. Likewise, if you zoom this all the way out to 500, the minimum aperture is f6.3. So, don’t be misled by the numbers, shooting this lens at 500mm will not afford you the f4.5 that is capable at the widest setting any more than the f2.8 is available on a 70-200 at the longest zoom. When you have zoom lenses, there is a compromise in aperture capabilities that must be met when zooming out, and such is the case here. I did some experimenting at various focal lengths, and here are some apparent limits at different zooms:
Focal Length
Minimum Aperture
50mm
f 4.5
70mm
f 5.0
100mm
f 5.0
135mm
f 5.6
200mm
f 5.6
250mm
f 6.3
300mm
f 6.3
400mm
f 6.3
500mm
f 6.3
Given the technology of aperture limitations in zooms, I would say that the Sigma is on par with what the expectations would be for this range. To build this lens for any lower aperture settings would make the lens both heavier and longer. I don’t even want to think about what it would do to the price either! It’s not the greatest in aperture abilities, but it’s no slouch either. I’m going to have to thrown an “Even” flag on this.
3. Noise: I brought in the noise consideration based on my first Sigma lens I ever purchased, the 70mm Macro (f2.8) which did not have HSM. The inclusion of HSM in almost every lens since has been a Godsend. This holds true for the 50-500mm as well. It’s super quiet and has convinced me that I will never stray off the Hyper Sonic Motor (or USM on Canon glass, ever gain! ‘Nuff said. Pro
4. Size/Weight: My last big lens I reviewed here was the 18-250. It was a respectable weight, but this is by far the heaviest lens I’ve ever tested. Weighing in at a shade upder 4.5 lbs (that’s 1970 grams for you Metric folks), it can cause some serious arm strain after extensive shooting. I would recommend using either a monopod or a tripod for this lens whenever possible. It also bears mentioning here that due to the weight of the lens, you want to support it in the provided collar. Supporting the rig by the camera can result in some serious shear force, which can rip the lens right off the camera. Other size considerations involve the length of the lens both fully closed and fully extended. This will draw some eyes at either end…whether it be the short side (8.5″) or the long side (12″)! Here’s a comparison shot with it next to several other lenses so you can get an idea of its relative size:
Another consideration to take into account about this size is the filter required. For those interested in using the ND filters to protect front elements, you will need a 95mm filter to cover this – not a cheap thing to purchase by any means. Ultimately the size/weight considerations really will depend on your personal ability to handle it effectively. For me, most of the time it was not a factor, so I’ll acquiesce and call it a Pro.
5. Build Quality: In line with expectations, the Sigma quality showed here. Their now easily recognizable textured exterior exudes professionalism, and just feels good in your hands. Given the weight of the lens, you don’t want to hold this gingerly, but at the same time, if the body took a slight bump from another lens in your bag, the “other lens” would likely bear the brunt of it. No questions here. It’s a Pro.
6. OS/IS/VR: Due to the limited aperture range, and the weight, the presence of OS is invaluable. Using the OS allows you to keep your aperture value low, allowing for bother faster manipulation and shorter shutter speeds, as well as some nice bokeh in the background when your distances are good. What was extra nice about this is the ability to toggle between the vertical and horizontal planes to control vibration in different circumstances. When I was on a monopod, I switched to OS 2 to help control vertical (or up and down) vibration. When shooting handheld, I was on OS 1 most of the time, under the premise that my own face, body and camera holding helped to minimize the vertical and thus needed more help with horizontal. When I was on a tripod, I turned it off per normal procedures for when using OS/IS/VR. In my book, having versus not having OS/IS/VR is definitely a Pro.
7. Cost: The average retail market for this lens is approximately $1500. Given the focal range, the aperture range, and other considerations thus far, it seems to be pretty competitive. The Canon lens with the longest zoom range is their 100-400 and that factors in at $1800. Nikonians can salivate over their 80-400 for $1850. Both price in over the Sigma lens, and it still gives an extra 110-150mm of variable range. For my own personal budget, that’s a tougher call because while I would love to own this lens – I would have to sell something else to do so, and am not sure I want to dispose of anything else in my camera bag at the moment…the jury is out on this for me personally, but for those interested in purchasing any time soon: Pro
8. Image Quality: Image quality is always subjective to the viewer/shooter, so here I will just let everyone defer to their own tastes by sharing a few sample images taken over the last few months:
Kissing Squirrels
Chopper Series
Miscellany:
Other features that bear mentioning here include the locking mechanism and the focusing rings. I thought about including the latter in the build quality, but decided to bring it in here for discussion. First, the locking mechanism is a handy feature to have for keeping the lens locked in place to prevent lens creep. The idea is a good one, but for this particular lens, it would not lock in the “zoomed” position, where I would have thought lens creep would be more of an impact, than in the “closed” position. Having said that, from the lunar shots I did (as shown above), the fully extended lens did not experience much, if any, creep. This could be because the lens was recently brought back from a service stop where knobs and buttons and toggles were all tightened and such.
This brings me to the focusing rings. The rear focusing ring is the one used for fine tuning and the front ring is for zoom. This was an adjustment for me as my other zoom lenses have these rings reversed (where the zoom is on the back ring and the focus is on the front ring). it forced me to change my style of shooting a little, but since I was working off a lens-mounted setup most of the time rather than a camera-mounted setup, my shooting habits were already being adjusted anyway. The last part is that the zoom ring did seem a bit tight to move. Whether this is by design or because of the recent factory adjustments, I am not sure, but it was just a tad stiff to adjust.
Summary:
All in all, the Sigma 50-500mm is a great lens. It stood up for the challenges of both wildlife and aerial photography, as well as lunar and even a portrait shot of the canine companion. The compression it exhibits at the far end (which is characteristic of these long zooms) is to be expected, but I would probably not be using this for landscapes unless I was in a pinch and had no other lens with me. Still, it could be done, depending on what kind of landscape you are trying to capture. The zoom really had no noticable effect on image quality without going into some serious pixel peeping, and thus, meets or exceeds all criteria that I can think of. I would definitely make a positive recommendation on this lens for either a wildlife or sports shooter where distance from subjects is often greater than 10-15 feet. (The minimum focusing distance at 500mm is something like 6 feet!)
That does it for today – I hope you enjoyed the review and photo gallery from the Sigma 50-500. Here’s the final results/scores I give the lens:
Category
Score
Focal Range
8
F-Stop Range
7.0
Lens Motor Noise
8.5
Size/Weight
7
Build Quality
9.5
Optical Stabilization
8.0
Cost
7.0
Image Quality
8
Have you shot with this lens? Share your own thoughts in the comments or with me via email. Likewise, if you have a lens you would be interested in having me review, feel free to drop me a line or share your requests through the comment area as well. Special thanks to Sigma for giving me such an extended testing period to review the lens, and we’ll see you here again soon! Happy shooting!
The subject of today’s post: The Sigma 18-250mm lens review! You read that right – Sigma has a lens that covers the range of 18-250. This allows you to go from relatively wide angle shots at the 18mm end to zooming pretty far in at 250mm on the opposite end. But, is the quality really there?
I took the lens through its paces over the weekend and here’s what I found out about the Sigma 18-250! In the interests of full disclosure, I should also note that this was actually requested by myself for review, and that I am not being compensated in any manner by the good folks at Sigma. So, this is, in fact, a loaner and I am required to send it back no later than June 26th. Since I will be busy next weekend, decided I should get the review shots done with this weekend so the lenses can be shipped back on schedule.
Pros:
Weight – this has a nice solid feel to it. With I think a total of 13 elements in here, it’s no surprise that it doesn’t feel the slightest bit flimsy. The weight adds a certain durability, but I still took things carefully as this is only on loan from Sigma for the purposes of this review. Compared to the 70-200, it certainly felt heavier, but I am not sure what the comparative weights are. All in all though, I think the weight is a good thing.
Noise – Excellent! My prior experience with Sigma is my own 70mm Macro, which does not have the HSM (hypersonic motor). That thing is NOY-ZEE! This, on the other hand, rivals the USM operation of Canon lenses. Compared to the 70-200L glass I own, the two are pretty close to each other in terms of silence in operation. The test I did for this was switch focus to manual, then take the lens all the way out to the opposite end of its last focus point. I then switched it back on to AF and listened for the motor operation. Sure, I could hear it when listening, but man was it quiet!
Range – This is without a doubt, my most favorite element (bad pun) of this lens. The fact that I could go from wide angle work to close up work with such ease makes this an ideal lens for things like photo walks (which are becoming more and more popular), or for just a go-to lens on a regular basis without having to switch out.
OS – Optical Stabilization – the equivalent of IS on Canon lenses. While I don’t own a Canon IS lens for direct comparison, I will say that it went a full stop faster than my 70-200mm CanonL f4.0 did at the same focal length/light. In a day and age where fast glass is becoming pretty much the standard, I would say this meets the mark.
Size – This lens is remarkable compact – standing at almost half the height of my 70-200 comparison lens. Think about that – a wider range of zoom and half the length. I can store this vertically in my bag, saving precious cargo space for other accessories and accouterments. Alongside would be the 70mm Macro, the 10-22mm, lensbaby, flash and other such items. Very tempting for that reason alone.
Feel – The signature brushed metal feel of Sigma lenses is present here and it just exudes “cool” and “professional”. No bells or whistles, no fancy L rings or anything, just brushed smoothness. Gotta love it!
Image Quality – The bugaboo, the real deal, the end result – the pictures! So how does it stack up? Pretty well actually, but rather than wax on, I’ll just share some images I took for you to judge the IQ – just remember to distinguish IQ from compositional quality! 🙂 Here’s the results…
Cons:
Weight – Yes, I am listing weight as both a pro and a con – the weight did get to me after a while of shooting on the 40D. While it’s durability is not in question at all, the heaviness can get on your wrist and forearm. I should put this qualifier out that I am still recouperating a tender arm from our move last July, which I am for the most part over, but it still flares up with extended use. So, things like shooting for a day can wear on me. Lighter is always better, but if I had to choose between durability and lightness, the former would win every time. Take what you wish from this con then…’nuff said.
Cost – It retails at B&H for $529, which is always a big price tag to swallow no matter what you are buying. Then again, when you look at a comparable lens from Canon that has the OS/IS built-in, the Canon counterpart goes for almost twice that at $1025 (and you still don’t get the same range of focus). While it may be a lot to pay on first glance, you really are getting quite a bit of bang for your buck.
Truth be told, I couldn’t find much else to nit on. I also liked the fact that they made this lens so you can put the lens hood on while also leaving the cap able to attach. Don’t ask me why, but I like that… Believe it or not, the lens also performed fairly well with portrait work too. I did a few test shots with yours truly as the subject and even got one I liked! So, would I recommend this lens? Absolutely! To see a complete gallery of photos I took this weekend, including the portrait ones, and even a few of the moon last night with a TC attached), follow this link:
Well, that should be enough content for the day (I know, my reviews are long-winded), so get out and shoot (with a Sigma if you like! 🙂 ), and we’ll see you back here tomorrow. Happy Shooting! Don’t forget – would love to hear reader thoughts and ideas for product reviews – let me know in the comments or via email!
After a while, landscapes are really just a matter of metering your light, exposing correctly, and composing to position lines in appealing perspectives. The same goes for many other types of photography too. Whether you are talking about candid street photography, event photography, and even architecture – it’s all about timing, composition, and exposing for the light.
Portraiture though, brings a unique set of circumstances to the table though. The timing is much more controlled, lighting is managed more strictly, and little is left to chance. Yet, even in these controlled environments, many photographers have trouble because of the fears associated with guiding and instructing people on how to pose. It’s understandable, considering all that goes into posing your subjects, as well as the fact that some subjects aren’t the best at being guided.
To those ends – here’s some basics to start with in posing your subjects. For starters, focus on the face – it’s what we all gravitate toward anyway, and body posing can be very complex depending on a persons body style. By focusing on the face, you can really highlight that which we all look at anyway. Here’s the simple secrets to posing a persons’ face: Continue reading “The Basics Behind Posing Your Subjects”→


")

