The Rule of Thirds Really Does Work!

When it comes to composing our images – we are always looking for new ways and angles to capture things.  Often though, sometimes the traditional methods work too though.  In fact, I would venture to guess that if shown 100 pictures where the standard rules of composition were followed, and then 100 pictures where standard rules were deviated from, the former would have more shots that found a widespread appeal.  The rationale?  Standard rules usually will work – that’s why they are the standards.  Things like the Golden Mean, the Rule of Thirds, and Sunny 16 are all basic rules of composition and exposure, and if you want to ensure things “just work” – traditional rules really will work the majority of the time.

For the purposes of this post, I am going to talk about one of the most basic rules – the Rule of Thirds.  The Rule of Thirds (or ROT) basically says that if you divide your image area up into a grid, where the horizontal andvertical areas are divided equally into thirds – you will get cross-sections that define where your points of interest should be – often called hot points.  Here’s a diagram to help demonstrate:

rotgrid1a

So, here the frame is divided (roughly) into thirds both vertically and horizontally.  Where the lines intersect, I’ve created red circles to indicate the “hot points”.  These are your points of interest.  If all else fails, placing your subject matter in these areas (or close to them) will dramatically improve your composition.  Here’s a great example:
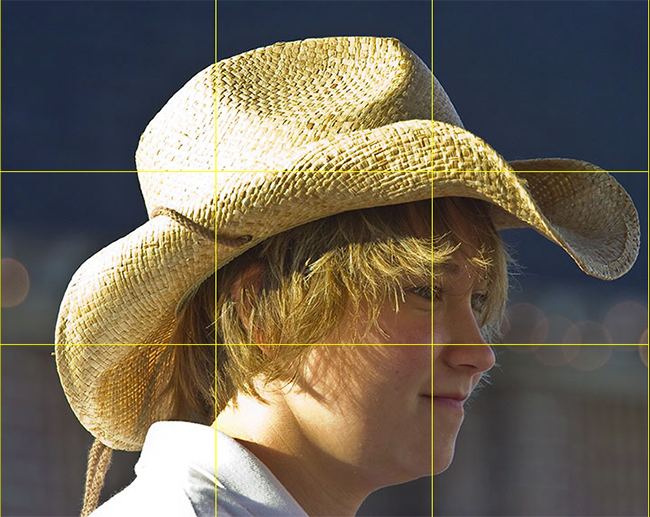
rotgrid2

Here’s a shot of a carriage girl I took back in Charleston.  See where the cross-sections are?  I changed the color of the grid to make it easier to view – so you can tell that her eye is right on the marker for the right-most third grid line.  This really helps the composition that her eye is there instead of elsewhere (often times, there is a tendency to place the eyes closer to the center of the frame – resist that temptation to give your shots that extra oomph!).

In fact the ROT concept s such a well-known standard, the folks over at Adobe have incorporated that element into their crop tool – so that you can crop your images to adhere to this rule.  Since I will likely get someone to ask – you can create this ROT grid in other variants of Photoshop (CS family), but going to your application preferences and selecting the Grids, Guides, and Slices option.  In there, change your grid size to display lines every 33.3% and number of grids to 1.  Then choose a strong color so that when you display the grid – you can see it!  Click OK and you are done – from now on, to show the ROT grid when cropping or editing in the CS family – simply use the CMD/CTRL key and the apostrophe ( this doohickey  ‘   ) to toggle the grid on and off.  Here’s a capture of the area you need to make the changes:
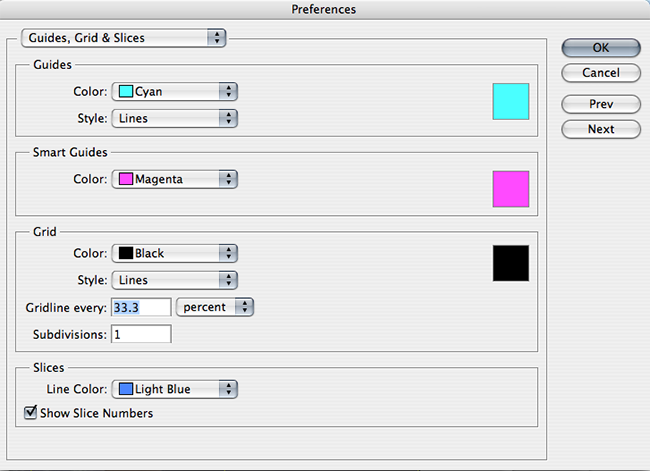
rotgrid4

There you have it – the Rule of Thirds grid – what it means and how to use it!  Any other rules of composition you would like explained?  Feel free to email, share your thoughts, ideas, suggestions and feedback in the comments or privately (if you rather would preserve anonymity).  In the meantime, go out, take some shots and practice visualizing that ROT grid in camera – that’s what will turn your snapshots into great shots!  Getting it right in camera!  Happy shooting and we’ll see you back here again tomorrow!

Adobe’s DNG Converter

For many of us, an upgrade of one element in our tool kit comes with many unforeseen consequences and additional expenditures.  Just as a new camera body can necesitate the need for larger memory cards, hardware upgrades can also come with software upgrades.  The reason?  Camera file formats!  As camera vendors develop new proprietary formats for their raw file formats (CR2 for Canon and NEF for Nikon as the two predominant players in the game), the need has always existed to update your software to accommodate the new formats for body upgrades.

The best example of this was when I did my upgrade of the Canon XT to the Canon 40D just last year (or was it two years ago now?)…at the time I was using Adobe Photoshop CS2 to process my files.  Well CS2 development stopped as CS3 development started.  My Canon 40D was stuck in between application life cycles, and as a result, I was no longer able to process my CR2 files from the 40D natively in CS2.  Granted, I did upgrade to CS3 because of my interest in the field, but for those that either may not be interested in the software upgrade, or cannot afford to upgrade, there is a free alternative from Adobe – the Adobe DNG converter.

This is a really cool utility and it gets updated on the same schedule as the Adobe Camera Raw utility that is unique to the image-editing applications of all Photoshop applications (CS4, LR, etc.).  The Adobe DNG stands for a Digital NeGative so it may help to think of this as a way of preserving your original data, yet still making it accessible, regardless of what other developments happen in the software world down the road.  I know, we all think that Adobe will be around forever, but the same was also thought of Kodak 20 years ago – and now those Kodak CD’s are becoming difficult to manage.  With that little nugget, it may be useful to consider the Adobe DNG option.  Additionally, the Adobe DNG negative has been submitted to the ISO standards setting organization for acceptance as a universal conversion utility, and are releasing it under the GNU licensing, so it will hopefully always be available for anyone.

With the stage set then,  for those who are not able to or not interested in upgrading, here is a brief tutorial of the Adobe DNG converter (in it’s current iteration as of 4/27/09), with screenshots.  If your folders of images look like this:

dng6

Then the Adobe DNG Conversion Utility may be for you.  It starts pretty easily…you can download the Windows or Mac versions of it from here:

Windows DNG Converter

Mac DNG Converter

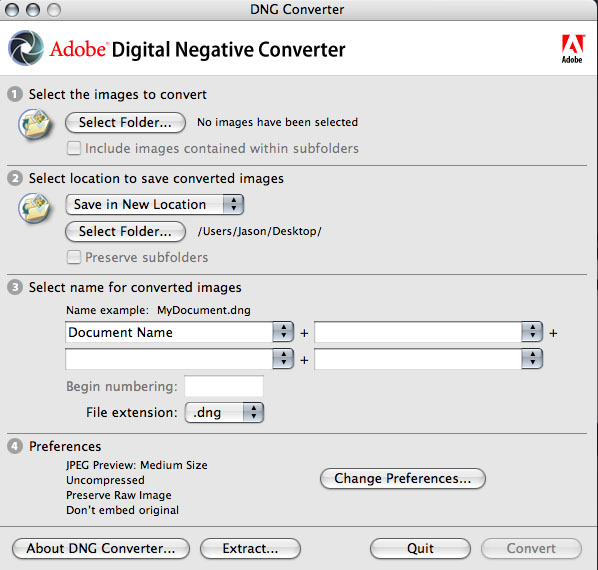
Once you download and install this utility (did I mention it’s free?), start the application to get this screen:

dng1

First off, specify the path where the images are that you want to encapsulate into the DNG format.  You can specify one folder, or you can specifiy a folder and all its sub-folders (in case you want to convert an entire library or set of images at once).  Then specify the output folder and naming convention you want to use.  Once that’s been decided, it’s time to select your preferences for how you convert your images.

dng2

Click on the “Preferences button” to specify how you want to conversion to occur:  Do you want full size conversions or do you want to reduce the image resolution sizes for smaller storage requirements?  (I always choose full size for maximum flexibility.)  What about compression?  Adding compression can further reduce the footprint that each DNG file has on your hard drive.  (It’s a judgement call, but I choose not to compress, again to maximize flexibility down the road.)  What about conversion methods?  You can convert to a linear format, but I don’t like this option because it’s a one-way street (you can’t go back).  Last but not least, what about inclusion of the original raw file?  In most cases I would actually recommend that.  It may increase file size, but this way you have access to the original raw date if your software needs ever change and you have access to software that can better handle the raw data you currently may not be able to manage.  All these are things to consider.  Hopefully, this short explanation of your options and the pros/cons will help in deciding how to proceed.

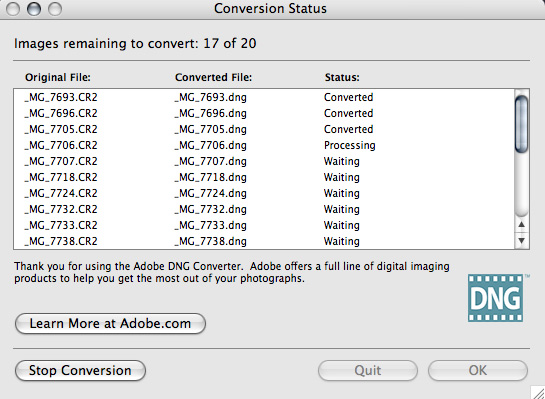
From here it’s pretty straightforward – you’ve specified everything from your input folder to your output folder, naming conventions, and conversion preferences, so now, simply click the button on the lower right to start the conversion process.  You will get a dialog window showing you the progress:

dng3

If you like, you can always click the button in the lower left to stop or abort the conversion process in case you specify the wrong folder or for some other reason.  Once the process is complete, the window will show all converted images.  Simply click “OK” to close the DNG converter utility from that window, as shown below:

dng4

Finally, open the destination folder, and voila!  Your image files will now have thumbnail previews again:

dng5

There you have it, your files are now prepped for one of the easiest, simplest, and most cost effective ways (did I mention this is free?) for both management, archiving, and accessibility – 3 very important things to consider in your image management workflow.

Granted, as with anything else, the Adobe DNG converter utility is not for everyone, as we all have work flows that call for different approaches.  So, what approaches do you use?  Feel free to share your own thoughts, processes, and suc in the comments or via email.  Happy shooting and we’ll see you back here tomorrow!

Black and White Conversion Options

About a year ago, I put together a list of my top five favorite ways to convert images to black and white.  As technology has advanced though, more options have become available, and I have learned a lot more.  So, in the spirit of keeping the blog topics up-to-date and current, I would like to re-visit this here today.  (This is also coming on the heels of the Black-and-White issue I finally finished of Rangefinder Magazine!)

  1. Camera Raw Conversion – If you aren’t working in camera raw, here is a big reason to think about it – converting images to black and white in camera raw allows you to make a conversion while retaining access and malleability to all image data. The camera raw dialogs that you should use to make conversions here include the saturation slider, then exposure and shadow sliders, followed by the Brightness slider. Don’t forget to play with the contrast slider a little to enhance the effect as desired. Last but not least, for advanced adjustments, the calibration tab can have effects similar to the Channel Mixer.
  2. Black and White Conversion – With Photoshop CS3 and now in CS4, the good folks over at Adobe have added a Black and White conversion  option in the image adjustments menu.  This is pure gold because you can duplicate the image before making adjustments and apply the effect to it’s own layer.  You can also add back in tonal values for specific b/w effects that previously were pretty much out of reach without many many edits, layer adjustments, masks and much much more.
  3. Channel Mixer – with your image open in Photoshop (7.0 or higher), you can select a specific color set you want to remove from or add emphasis to in an image. The traditional color sets or red, green and blue are available, as well as a constant (think brightness), and a check box for monochrome.
  4. Hue/Saturation Adjustment – whether as a dedicated layer, or directly to an image, the Hue/Saturation allows you to account for different intensity levels of a wide range of colors, from Red, Yellow, Green, Cyan, Blue, and Magenta. You can also adjust the range of color within one of the default ranges for each set by adjusting the left and right limiters of the color wheel at the bottom of the dialog window.
  5. Grayscale Conversions – most black-and-white images aren’t true black and whites, because a little color from a specific range is added back in for emphasis. To make an image truly a b/w, it would only have a range of black and white. This can be done using the grayscale option in Photoshop. Often, this is used as the last step in a digital approach to black and white photography so that saturation and brightness level loss is minimized.

So, what have I added and what have I removed?  The Black and White conversion method is the latest addition, and I jettisoned in-camera conversions.  While pretty much all cameras have the in-camera option to take images in black-and-white, as I have crawled my way up the learning curve, I am cognizant of the fact that if you lose image data in-camera, there is no getting it back afterward.

Well, that’s it – the new and improved post on Black and White conversion options!  If you’d like to read the original post, that can be pulled up from the archives here.  In the meantime, feel free to share your favorite techniques for black and white conversions here in the comments or via email.  As always, Happy Shooting and we’ll see you back here again tomorrow!

News, Artists, and Inspiration

Welcome to the show notes for week #17 of Learning Digital Photography.  Here’s the show notes for this week’s podcast…

First off, I’ve done some further tweaking to give a little more consistency and structure to the show for your listening pleasure.  The three segments that I am going to try to regularly stick to will be:

  1. News, Events, and Information from around the community and industry – here I’ll share nuggets, information, and other useful snippets from the most recent days and weeks of activity within the photography community.  Sometimes I’ll share information that’s available elsewhere, and other times I’ll offer my own perspectives on the news and events that shape the industry.
  2. Authors and Artists from within and related to the industry of photography are also an area I would like to devote some time to since the Thursday Thoughts series has not seen much attention lately (not that I am planning to either – I think it’s just on sabbatical!), and I had the good fortune of actually sitting down with an area professional recently which provided a source of inspiration for this weeks show.
  3. Sources of Inspiration – As artists I think we are always searching for and discovering new sources of inspiration.  Often these can come from well known venues such as photography magazines, galleries, and the like, but I am not adverse to featuring unusual or new sources either.  This week, I will be featuring an unusual source of inspiration, so make sure you stop in for this segment too!

To find out why these links are all up and on the blog, make sure to stop over to Personal Life Media and grab this weeks show! For the link grabbers, here you are:

That’s it for today all! Enjoy the show, and we’ll see you back here bright and early tomorrow (well, maybe not so early, as I still have an on-going problem with the sandman! LOL) Happy shooting!

P.S. I am still including a copy of the show locally, so you can grab it from here if you like too. Don’t forget, we still have a poll going on re: Twitter and Blogging, so if you’ve not voted yet, vote here!

[display_podcast]

License Lockout

First off, a bit of quick news about the blog in general:  the layout has changed.  Can anyone tell the difference?  It’s a rather significant one, so hopefully it won’t go unnoticed! 🙂  Chime in and that’s your chance at winning the Think Tank Photo Streetwalker bag I reviewed a few weeks ago right here on the blog!

So, back on today’s post topic, as part of my maintenance routine that I recently posted, last evening I was doing some of my extended “IT” maintenance on my Windows computer.  As a part of that maintenance, I was trying to optimize my hard drive performance, and thus resorted to cleaning out temp files, cache files, history files, restore points, and other sundry stuff.  A defrag procedure on the hard drive, and I was back up to some pretty screaming speeds again.  Puffing out the chest at getting a 5 year old Dell running a 2.4 Ghz Celeron processor, Windows XP, and 2 GB of RAM to move that fast without over-clocking, I checked off on what I thought was a job well done.

Then I opened Photoshop:

CS3 Error

Uh oh – it seems I cleaned things out a little too much.  Well, since I have diligently kept all my media, documentation, license#’s and other information in multiple places, I was easily able to find the needed materials to re-install.  But, here’s the thing – that would require importing all my actions again, re-installing other elements like Noise Ninja, and then also go in and customize all the features I like (scrolling with my mouse to zoom in and out of the image, curves menu with more lines, etc.)  Who wants to do all that?  Well, not me!  So, off to Google I went.

That five minutes on Google doing some research saved me probably two hours of software maintenance time.  Adobe has a neat little utility that can be downloaded and run when things like this happen to restore your licensing info without having to go through the entire re-installation.  Not sure what it does or how it does it, but the utility is very handy, so I thought to share it with the reading audience today.  Here’s the download link, and supporting reading materials.

Licensing Service Update

The underlying point here though, is that even the extensive maintenance I itemized the other day does not cover everything.  Go into Photoshop, copy your preferences down via image pastes into a Word doc or other such format.  Make a copy of your plugins folder external to PS – the same goes for Actions, noise removal, automation tasks, brushes, etc., etc., etc.!  With as advanced and complex has an application like Photoshop has become – you can save a ton of time if you take some proactive measures.

What do you save from your Photoshop configuration settings?  Share your ideas in the comments!  As always, thanks for tuning in, keep on shooting, and we’ll see you back here tomorrow – Thursday Thoughts returns again with Chris Breedlove!

The Meat is in the Maintenance

With another week come to a close, I got a late start in recording and putting together the podcast for today, so it’s going up a tad late.  However, as the old saying goes, good things come to those who wait.  This week, I look at some of the photo news, relevant to Canon users, photographers, and just some good old news tidbits.  In the “meat and potatoes”of the week, I look at what should be included in an extensive maintenance schedule for any photographer, including cleaning, software, firmware, batteries, data, backups – literally the whole schmear!  It’s quite the meaty helping on maintenance, so be sure to bookmark, download, listen, and whatever it is others do when enjoying podcasts as this is sure to be useful info for lots of people!

I also remind everyone of how you can win a Think Tank Photo Streetwalker!  This is a $150 value bag, and there are still a few opportunities left to participate in the random drawing.  Make sure you tune into the third segment to find out how (sorry, but only domestic US residents are eligible…) this can be yours for a simple song!  (Hint:  Make a post to the blog and you will probably be entered to win!)

Finally, I take a few listener questions from Josh and LaRae (thanks for the comments and email), as well as your weekly photo tip.  I made same changes to the recording process that I think have cleaned it up quite a bit, so I’d really like to hear some feedback on what people think of the difference in audio quality this go around!  Please don’t be shy, and make sure you let iTunes know they’ve dropped the feed!

Have a good weekend everyone.  Happy shootin, and we’ll see you back here Monday morning!

When it rains, it pours!

After my post on Monday, with the Best 8 of 2008, CB saw quite a bit of activity, first from some very generous links back from none other than Scott Kelby and Jeff Revell of Photoshop Insider and Photowalk Pro fame. Then, when I did the piece on Tuesday titled “Is Film Making a Resurgence?” based on several discussions and news events, that also saw a fair number of comments. All this came on the heels of a career switch that has me transitioning from the private to the government sector which means condensing about 6 months of work projects down into two weeks.  This means I missed making a few noteworthy photo-related announcements that are both specific to CB and to the photography community at large.   From a blog visibility perspective, that was totally the worst time to not even make a post for teh day, but there was nothing to be done about it.   I guess the old saying is true:  When it rains, it pours! So, here’s a few announcements and belated photo-related news events to share for the remainder of this week.

From the Canon Blogger news front:

  • Canon Blogger has been picked up by Personal Life Media (the same folks that host Digital Photography Life and Camera Dojo).  This means future podcasts will be uploaded to their service, which will do a number of things for the podcast.  First and foremost, they will optimize the audio quality for the listening audience.  Second, they are also going to fix some podcast feed issues that I didn’t even know I had so that the show comes up better in your favorite feeds like iTunes and the like.  We’re also going to update the graphics to give the CB podcast a little bit of a sexier and professional look.  It’s quite exciting to see that there has been enough interest to warrant this kind of leap forward.  It does mean this week will be the second in succession with no show, but as we flesh out the details and get all the archived content uploaded, we can move forward with new shows!
  • Due in part to the holiday schedule, and to the subsequent flurry of personal and professional activity, the What’s This series and the Thursday Thoughts Series took a brief hiatus this week.  Yesterday was just insane at work, so I didn’t even get a chance to post to the blog saying I wouldn’t have time to post, so Wednesday was both figuratively and literally a No Blog Wednesday!  I should be back to a regular and more predictable schedule with those next week.
  • As you may recall from my last podcast of 2008, I announced that Think Tank had generously donated their new StreetWalker bag to CB for a review.  I have been putting it through its own paces over the last couple weeks and am now working on the finishing touches of my first official product review.  That should be coming out some time next week.

In the rest of the news:

  • Fellow blogger and photographer, Jason D. Moore made a bit of a splash the other day when he announced a new interview series he is doing that is leading off with an impressive list of folks including John Nack, (if you don’t know who John Nack is, welcome to the world photography and Photoshop – he’s the cheif  Product Manager for Adobe Photoshop !),  Larry Becker (of NAPP notariety), Jeff Revell, (Photowalk Pro) and several other notables.
  • Photo-restoration as a craft gets a jolt!  Fellow NAPP members Mitz and Janine both have some excellent posts on what it takes to be effective with photo restoration work.  While I knew from my own amateur efforts that it’s not easy (and definitely a craft that takes time to develop), these two bring awareness to the next level with the thoughts they share on their blogs.  Definitely worth reading when you have time.  Mitz can be found here, and Janine can be found here.

Well, is that enough content for one blog post?  I hope so…sorry if things went on for a while.  More tk!  So, until tomorrow, happy shooting – hope all your shots are good ones!

Friday Format Frustrations

Recently I purchased the Canon FS-100 camcorder as I’ve become interested in trying my hand at a little videography (nothing too fancy, just some home movies for sharing with family and friends, but I admit, the idea has been in my head that the option to record things for the blog might also be of tangential use as well.

When I got the camcorder, I also picked up a SD flash card (2GB) so I could play around with it and test both the recording quality as well as see how the video gets output.  All in all, it wasn’t too bad.  Canon gave some pretty basic software of course, which only output to mpg, but a purchase of Adobe Premiere Elements was in my sights as well too, so the software wasn’t too much of a deal breaker.  I did find that a mere 2 GB card did not give me nearly enough record time if I wanted to keep any kind of quality.  So, I went out and got a great deal on a 16 GB SDHC card from my favorite gear site, Newegg!

Well, I get the card delivered and recorded some video on it (I can record up to 22 hours worth of video now), but when I take the card out to transfer to the computer via my card reader – no dice!  What gives?  It turns out the SDHC card format is incompatible with 1st gen card readers.  Yup, that’s right, you need to replace your card readers with ones that are capable of reading these newer formats (which apparently are configured slightly differently than their earlier SD counterparts).

Here’s the kicker – because I shoot with Canon SLR’s, the flash media type I am most used to is the CF variety, so SD versus SDHC compatibility concerns weren’t high on my list when purchasing a card reader!  Looks like they should have been.  So, if I want to keep all my media accessible on a single card reader, the piper must be paid.  So, (insert special sardonic tone here), special thanks go out to Lexar and Sandisk and Kingston and all the media developers for advancing the media card technology for these higher capacities…they sure are helping you… er us with your… er our needs! (end sardonic tone here).  Oh well, lesson learned and now thusly shared with the reading/listening audience.

In a little bit of blog business, I’ve added a comment feed to the blog for anyone who would like to follow comments, you can see who’s been active (and even see your own name up in lights if you are into that sort of thing!).  A new poll should be coming up some time this morning too:  What’s your role in holiday photography?

To end things for the week on a high note, here’s another one of the weeks greatest clips from What the Duck (and for what it’s worth, this week as really tough to choose as I laughed heartily at all of them):

Happy shooting this weekend!  I hope all your shots are good ones, and we’ll see you back here again on Monday.

Feathered Friday…

A happy feathered Friday to all!  Permit me to explain…recently the subject of egrets became a popular tangent in a photo forum that I actively participate in, and after some fun dialog, I shared a few shots from work I had done in the past in capturing these amazing animals.  They really are quite beautiful, and on a whim I went through two shoots that had a lot of egret shots and quick processed theb into an Adobe Photo Gallery.  Since I don’t believe I’ve shared these shots previously, here are some shots for your fine friday!  (If you click on the links embedded with the picture, that should take you to dedicated album pages where the web galleries are for each shoot…)

Also as a reminder, today is the last day to participate in the contest poll – we’re sitting right at 19 votes thus far, so do stop in to the blog and share your thoughts by participating – it’d be super cool to see that vote tally get up over the 30 mark!

We got our first wave of snow overnight last night, and the dusting was just enough to remind me of how beautiful the winter months can be.  Once we’re completely settled in and I am back out shooting more often, I have a feeling the blog will be a venue for much of this photography.  So, there’s a prediction of things to come.

I’ll leave this Friday on that note, along with your weekly episode of What the Duck:

Enjoy the weekend, Happy Shooting, and we’ll see you back here Monday morning!

What do Photo walks and software cycles have in common?

Tune in to this week’s episode of the Canon Blogger Podcast Series, Episode #58, from either the blog or your feed readers today!  I also tackle a few listener questions, and offer up a photo road tip for the listening audience.  So, pick up the feed today, or stop in to the blog to not only download the show, but also to see the other content that isn’t in the daily feeds (things like the Online Photography Test, Colors and Textures Galleries, polls and more!

As I tinker a little with the audio quality of the show and try to make things more seamless and enjoyable, you’ll notice I am pushing the show out in segments, with some music to break things up in little snips between the subject material.  If you like it, chime in via the comments section of the blog.  If you don’t like it, well…chime in via the comments section of the blog.  If you are ambivalent, well…chime in via the comments in the blog.

Hmmm…seems like someone would like to hear what the listening audience thinks of the changes in the format for the audio podcast.  And it also seems that the feedback can easily be done via:  the comments section of the blog!

If you’ve listened to the show and are still yearning for more, please stop by fellow podcasters Scott Sherman and Michael Stein’s new podcast series:  Digital Photography Life.  Formerly, these guys hosted the Digital Photography Show on another network and they’ve since moved on.  Their first show on the new network mis up and ready for your listening pleasure, so do stop over and give it a listen – great to have them back on the air!  Their podcast can be found here:  Digital Photography Life