The Exposure Triangle – A Primer

When we look at the elements of composition, the three that everyone constantly considers are shutter speed, aperture settings and ISO (or ASA in the old days of film). These three factors make up something called the Exposure Triangle.

Exposure Triangle

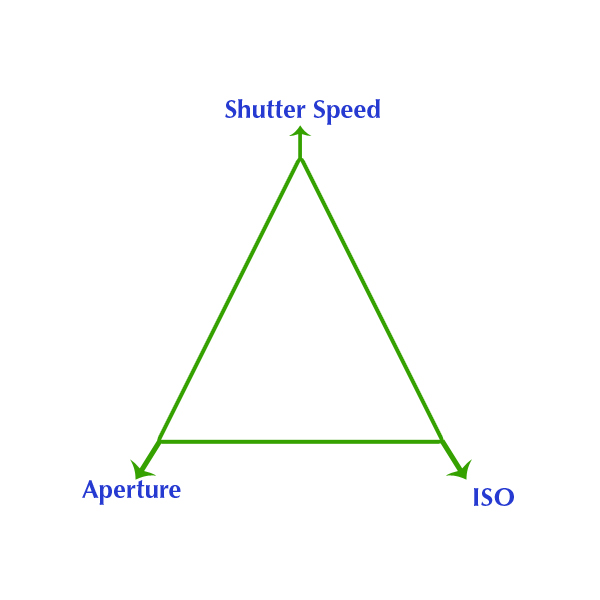
Readers of the blog have seen this before, in my post about The Future of Photography. The rules of the exposure triangle (such that there are rules in photography…) state that if you want to keep the lighting the same in your shot, as you increase one factor, another must decrease proportionally, while the third is kept the same. What does that mean? Simple – let’s take scenario I encountered when on a photo shoot with some friends touring the waterfalls of South Carolina. While shooting, I saw a perfect scene to demonstrate how this would be manifested.

For our first example, let’s set set up our camera and take a picture of a waterfall. In order to hand hold, and easily compose things, we have the following settings.

  • A shutter speed of f 1/250
  • An aperture of f 4.5
  • And an ISO of 100

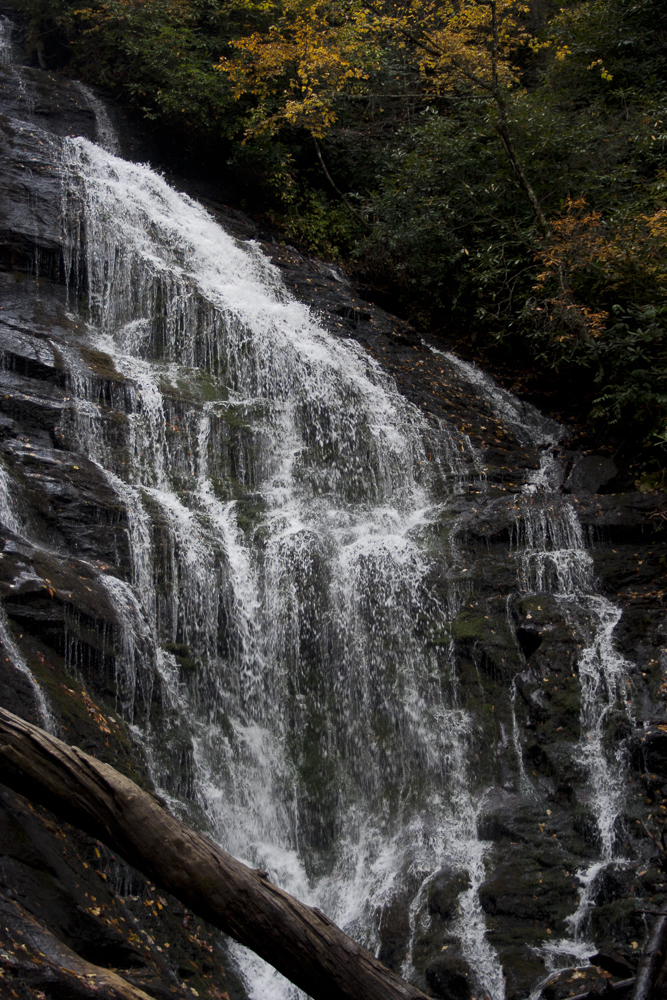
Fabulous – but in looking at the photo, we’re not crazy with how the photo looks. Something is off, and we want to change one of our settings to make for a better composition. I’d like to see the same photo but with some blurred water. Now in your own photography it could be something else, like a flower to be sharper throughout the entire depth of the frame, or the background of a portrait to be completely blurred. So, how do we accomplish that? This is where understanding what each factor does to the composition:

Shutter speed

Shutter speed controls how quickly the shutter opens and closes. The higher the setting, the faster the “action” is – so you can freeze something like a speeding bullet, a blade of a moving helicopter, or the wing of a hummingbird.

Aperture

The aperture is the size of the opening on your lens. Think of it like a hose that controls flow rate. You could use a really skinny hose that only lets a teensy bit of water through, or a fire hose that just gushes gallons and gallons. Now, as you open the aperture wider, and let more light in, you also do something called creating a shallow depth of field. And the more shallow your aperture is, the less focused things will be in the foreground and behind your subject.

ISO

The ISO is the noise or sensitivity setting for your camera sensor. This changes how sensitive the sensor is to light hitting it. Lower ISO settings make it more sensitive to light, higher settings make it less sensitive. Back in the days of film, this was done by using films of a certain ASA value (which ironically was referred to as film speed, but I digress…) But the fun thing to consider is that once you inserted film in a camera, you were stuck with that film setting until you finished every frame, so ISO adjustability in digital cameras was a HUGE advancement.

Okay, so now, back to our example photo. Now in our example, we want to make the water more blurred, so we have to slow the shutter down, not speed it up. Okay, so let’s do that:

New shutter speed = 0.5″ (one half second)

So, what’s going to happen? Well, because we are now letting the shutter stay open a LOT longer (0.5 seconds is HUGE, but we need that to really blur water)! As a result, more light is going to hit the sensor, and make it way too over-exposed, so we need to compensate for that by adjusting the other two controlling elements – aperture and ISO. Now in this example, our ISO is already as low as it can go, so our only option is to make our aperture opening much smaller:

  • A shutter speed of f 0.5″
  • An aperture of f 29.0
  • And an ISO of 100

See how we did that? Now, this shot is going to have much more blurred water, and our exposure stays consistent. But, we’ve effectively made the same shot with a different composition!

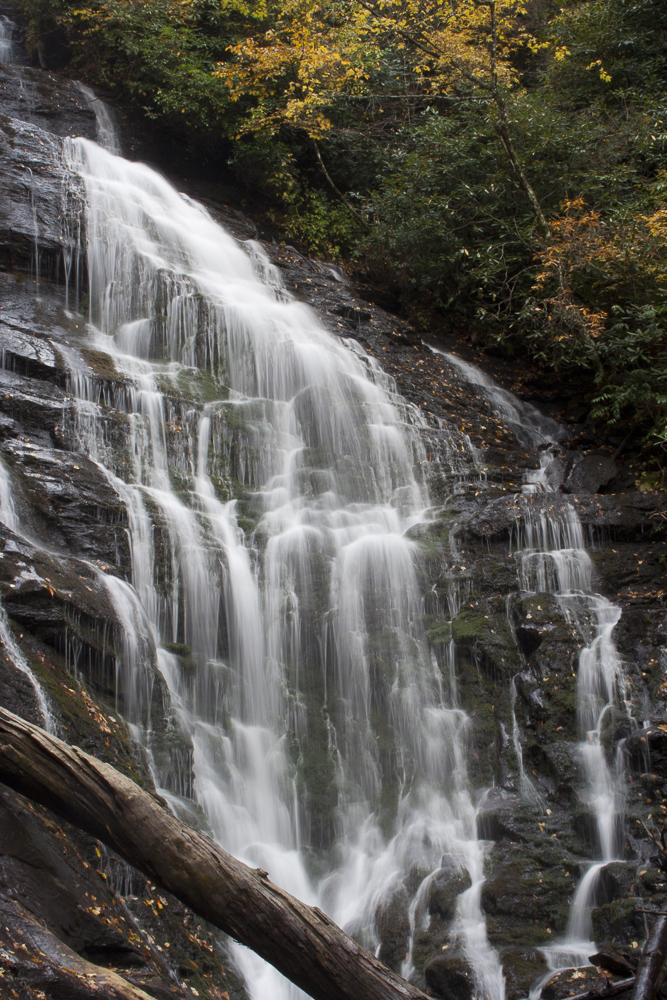
See how the shutter speed and aperture will change the entire composition? Yes, I blurred the water, which was my primary goal, but look at the log in the foreground. Now it’s a little out of focus due to the shorter depth of field. Pretty fun stuff, eh? I should also mention now that since I slowed the shutter speed to half a second, there was no way I could hand hold that, so I mounted it to a tripod in order to prevent camera shake.

As a reminder, for a strict metadata comparison, that’s what happens when you account for the exposure triangle:

Shot 1

  • Shutter speed = 1/125th
  • Aperture = f 4.5
  • ISO = 100

Shot 2

  • Shutter speed = .5 seconds
  • Aperture = 29
  • ISO = 100

Happy shooting!

Author note: I was going to post this article in response to a question that came to me from Quora. Imagine my surprise when I realized I had never written a post in 10 years on something as fundamental as the Exposure Triangle!  It may have been written and lost in the server crash from a few years ago, but thanks to Quora for giving me the reason to re-create it now!

The Smart Phone Versus the SLR?

Lately the internet has been teeming with people fixating on the latest iPhone release, and questions are coming through the woodwork asking the same question over and over. Everyone thinks they are coming up with an original question, just because they changed one word here or there, but essentially all these questions come down to smart phone cameras versus traditional cameras. I’ve answered the question so much via email, in forums, on Reddit, and in Quora that I finally said “enough is enough”. For all who want to ask the question, I am going to direct you to this post!

Smart Phone Cameras in a nutshell

Let’s break down this phrase a bit – smart phone cameras What does this mean? It means the phone vendors like Apple, Samsung, LG, Huawei and the rest are adding cameras as software applications to sit on top of these cell phones. I’ll say that one more time for clarity. At their core, these devices are cell phones. So, on that basis alone, why would anyone want to draw a comparison between an add-on feature to a device designed with photography in mind?

The answer lies in dollar bills. That’s it – money! Vendors want to sell more devices, and if the phones can’t really be improved (let’s face it, cell phones are merely a function of the network they are on), then sales plummet! Think about it – iPhones, Androids, and the rest all must be on a cellular network for their original designed purpose of making phone calls, right? So, off the top of your head, how many cellular providers can you name? Not regional ones. I mean Tier 1 providers! I came up with 4/5:

Verizon

AT&T

T-Mobile

Sprint

US Cellular (don’t really wanna count these guys, but ok…)

I think the phone makers agree:

iPhone Carriers offered

From the Apple iPhone 11 Splash page

Samsung carriers offered

The others, like metroPCS, Cricket, Go Phone, etc. are really just smaller ones that piggyback on the major providers networks (and many are actually owned by them!)

So, don’t fall for the hype. iPhones, Samsungs, and every device out there as far as their phone service goes, is only as good as the network it lives on. They can’t sell products that way, because the experience will be different for everyone, based on the network and where the customer lives relative to the towers. So, cell phone vendors try to stand apart by their add-ons. That is the only reason why every vendor tries to hype their accessory apps like cameras, computer speeds, and media storage aspects of these ridiculous tiny devices (of course tongue in cheek when you consider that these devices have more processing capacity than what we had when sending a rocket to the moon!).

But, everyone likes cameras, and photographs are a part of our lives. We are a visual society, so everyone wants a camera they can always have with them. Naturally, since we always have our cell phones with us, it’s sheer brilliance to make the camera feature the selling point.

But the cameras are crap.

There, I said it. Cell phone cameras are crap compared to dedicated cameras. Don’t believe me? Check this out:

Here is a photographic representation of various camera sensor sizes ranging from a medium format camera, all the way down to the sensor sizes of point-and-shoot cameras, with their actual dimensions (courtesy of Wikipedia):

I don’t even see a cell phone camera listed, so off to Google I went in search of the actual dimensions of a cell phone CCD sensor for capturing images. Here’s what I found…

From https://improvephotography.com/55460/what-is-the-focal-length-of-an-iphone-camera-and-why-should-i-care/ )

So, the sensor in a smart phone is about 7mm x 6mm in physical size. The author claims that’s “about the same as a 1/2.5″ sensor”. I actually think it’s closer to the 1/1.7″ range, but that’s miniscule…

A meaningless measurement from the outside looking in, but it looks to me based on the lens that the sensor is about 1/3 of an inch. Interesting that this sort of information is not readily available from Apple, Samsung, or other phone vendors. I wonder why?

The answer is because at the end of the day, the sensor on these cameras are teensy tiny miniscule little things that are crammed into the innards of a phone, trying to get you to buy into the fact that the CCD sensor of the phone (thus making it a “smart” phone) is better than the sensor of an SLR, or even a point and shoot.

I’ll go to my grave saying that it’s not better, and never will be. Simple physics prevents it.

Lenses

If you ask any photographer the question of what camera to buy (excluding talk of the smart phone cameras), invariably, they will tell you that it’s not the camera you buy into – it’s the camera system. More specifically, it’s the glass that matters. The reason for this is because the camera is just a box that houses the sensor, and it’s the lens that defines the clarity of the shot, your aperture range, and even the sharpness of the glass comes into play. I know photographers that refuse to by Tamron or Sigma glass because they claim it’s “not as sharp as Canon” lenses. I’ll leave that argument aside for now, because the point here is to highlight that even if we were to exclude the sensor as not being as much of a factor based on this concept, we need to now look at the lenses in these phone cameras.

So, let’s do that for the iPhone 11:

That’s actually better than I would have thought, because most predecessor phone cameras had fixed or nearly fixed aperture sizes on their lenses. But a range from 1.8 – 2.4 aperture opening is impressive, as it’s nearly a full stop (read more about apertures and F-stops here) so I’ll grant that. Now let’s compare that to the absolute cheapest lens for a Canon lens at B&H Photo (I looked at the EF and EF-S lens mounts). I also could have picked Nikon, Pentax, or another maker, but I am CanonBlogger for a reason: 🙂

So, for $125, I can get a lens that goes from an f1.8 all the way up to f22? (That’s about a 6 full F-stop range by the way, for those of you keeping score..) A smart phone camera will never compete with that. Now, for the average Joe (or Josephina) consumer, what does that matter or mean? It means from a smart phone, you’ll always get images that look like this:

And never get images that look like this:

Now, with my rant over on the differences between the camera apps and sensors in phones versus the dedicated SLR and even point and shoot cameras, I need to clarify something.

Software

The way that phone cameras are able to get some apparently stunning imagery is not because of the camera – it’s because of the software. So, if you really want to compare apples to apples, the comparison should be between phone camera software and standalone software. And I will grant you that the software the developers at Apple and Samsung have done some amazing work as to what’s baked into the computational algorithms. The problem lies in the fact that it’s baked into the phone. We have no control over it.

Now, devil’s advocates will say “There’s an app for that” and sure, there are tons, but that’s not a fair comparison, now is it? Comparing a software app from a phone camera to a dumb SLR that has the sole purpose of capturing images makes no sense. So, if you want to get into a discussion of software comparisons, we can do that, but we need to make it an apples to apples comparison. Which one would you like to start with? We could start with a comparison to Lightroom, Photoshop, and others…

But if anyone tries to tell me that the hard baked software for photo editing in a phone can compare with Photoshop, Lightroom, or any of the above, I’ll… well, just don’t! 🙂

Printing

Does anyone print images anymore? I am not sure about that to be honest. With social media, Facebook, Instagram, Twitter, Snapchat, and LinkedIn (and probably a whole host of others that I am not hip to), we often are looking at images through this medium rather than by prints. So, my argument here could be meaningless, but…

Take a photo with a smart phone camera. Take the same photo with a point and shoot camera. Try to print them at your local print store. My guess is you’ll be able to print up to perhaps an 8×10 photograph from the cell phone. From the SLR camera – you can go billboard and poster sized effortlessly. Why? Because of the sensor and the pixels.

You see, cramming pixels more tightly together in a small teensy sensor is going to produce something called artifacting, which ultimately translates to bad pictures when you try to print to a larger medium. So, there’s that too…but again, perhaps I am long in the tooth because I don’t know anyone who prints photographs anymore. 🙁

Conclusion

So, there you have it – the full explanation as to why a smart phone camera will never truly compare with a dedicated camera. The SLR will always win. In any category.

What say ye all, interweb citizens of the world? Agree with my assessment? Hate it? Sound off as to why you like what I have to say, or where I am just flat out wrong in my preconceived notions. Otherwise, I’m ready – what’s the next question…?

Pano Testing

A while back I was doing some testing of new software for displaying larger panoramas on the blog here and came across a site called Momento360. Has anyone heard of this company before? I bet there are some truly spectacular photographs on display there but I’ve not uploaded enough to try to start finding others and sharing! So, in a lame attempt to see how well my photographs convert and then show up when shared, I thought I’d give it a try:

[momentopress url=https://momento360.com/e/u/88c5e3d1c5804283bd1558b79dddcde1?utm_campaign=embed&utm_source=other&utm_medium=other]

This photograph was taken a few years ago when I was down in Panama going from the one side to the other, and we hit the lake at the top between the locks. It was an amazing trip, but am not sure the photograph really conveys it well enough. That said, what I am more interested in right now is the user experience.

Did this work for you when you viewed it? If so, did you view it on a desktop computer, a laptop, or a mobile device? Were you in an app or on a browser like Safari, Chrome, or other? Let me know your experiences here…

Additionally, do you have any particular software programs that you have used for photographing and then sharing panorama photos in your social media streams? What has worked (or conversely, not worked) for you?

Finding Clients…

I don’t often use the blog as a venue for talking about photography business, but recently many colleagues have asked me about how I approach things here, in terms of finding sponsors for contests, giveaways, workshops, and all the content that gets delivered here.  I should preface my comments by saying that the blog, my photography, writing, and podcast endeavors are not my primary source of income.  I should also probably say that I’ve gotten more wrong than right in my style and approach over the past 11 years.

Having said that, I am starting to get more right than wrong lately, and the portion of my income that is generated by the blog, podcast, and writing has seen something of an increase relative to my “real job” revenue (in IT).  So, what’s been my secret to “finding clients”?  Here are 4 methods I’ve used the most to attract people to the blog, the podcast, the contests, and my writings:

#1 – Be personable

With so many people out there that offer products and services, there’s bound to be someone that can do exactly what you do.  Or, they can do it better.  For the same price!  Or less!  Or free!  How can anyone expect to compete with that in today’s day and age?  It should come as no surprise to most that what sets you apart from others isn’t your service, it isn’t your product, marketing, revenue, client list or anything like that – at the end of the day what sets you apart is you! People will come to you because they like your approach, your personality, and how you treat them.  In my case, that means people come to listen to the podcast, or read because they like my attitude as much as my content.  The same holds true in your business – so rule # 1 is to be yourself!  I do that by socializing with fellow photographers through meet-up outings (like photo walks), user groups, and basically staying engaged and connected with my peers and colleagues (which I know I should do, but have been slacking a lot lately).

#2 – Be reachable

Let’s face it, with Twitter, LinkedIn®, forums, websites, email, instant messaging and smart phones all giving us 24/7 access to whatever we want anymore comes with a price. 

Social Media

With our access to others comes a certain measure of reciprocity, which means others also expect some measure of access to us.  While you don’t have to give answers or respond to inquiries within seconds or minutes – make it a general rule to respond to people within 24 hours during the work week. After all, with e-commerce moving at lightning speeds, not responding to an email or message in a timely manner can be a deterrent as much as anything else, so be reachable!

On weekends if you prefer to shut off, that’s fine, but let people know.  On Friday, set up an out of office message and say that.  “I’ll be spending the weekend with the family – looking forward to the down time.  I’ll be back on Monday!”  This lets people know that you like to hear from them, and will respond, but that it isn’t as immediate as you normally are.

#3 Be approachable

I spent an afternoon with someone a while back who was pretty well known in local circles.  The subject of conversation was photography of course, and in the course of discussion just got a sense that this person not only was well-known, but knew it.  I wasn’t talked down to by any means, but I got the distinct impression that I should be “honored” to be graced with his presence and flattered that he gave me a few hours to talk.  While it was all well and good, the conversation made it seem like I should be quick, get to the point and don’t waste time.

Clock

While we all have multiple commitments, and are moving at what feels like the speed of light just to keep up, it often can come across as an attitude.  Make sure when you are with colleagues, clients, or potential clients (because you know to treat everyone the same, right?), that you slow down, listen as much as you talk, and pay attention to cues that you might be giving off the wrong vibe.  This guy was so engrossed in talking about his latest project he just assumed that I was interested, would be flattered to even be considered for inclusion in it, and didn’t realize that I hadn’t talked for almost 20 minutes.

Suffice to say, he was a little surprised when I did the wrap up.  “Well, thanks for your time, it was fun talking to you. I’ll have to pass on the project right now as I’ve got too many other ‘irons in the fire’, so to speak.  If I have more time next year, I’ll let you know then.”

#4 – It’s okay to not know everything

There is nothing wrong with showcasing and highlighting your strengths and minimizing your weaknesses in anything whether it be a pitch to a potential client, or even showcasing your body of work or resume to a potential employer.  It is another thing altogether though, when in discussions to say “I can take care of that” to any question that comes up.  If your knee jerk response is to say yes to everything, you could be in for a serious problem come delivery time and they realize your InDesign® skills are far inferior to your Photoshop® and photography skills.

Clients can (and will) ask for the world. 

It’s important to keep them on track and your time scheduled carefully.  Taking on anything and everything to get the gig will not only reduce your total revenue for the job in terms of labor hours, but quality will suffer, and the client will often leave unhappy.  Unless you want scores of unhappy former clients giving less than stellar feedback, because you promised ABC and D, but only really gave them A and B, it’s a good idea to not promise the world.  In my experience it’s always better to under-promise and over-deliver rather than the other way around.

5 Tips for Better Pano Photography

With Apple and Android phones, the ability to take panorama photographs has really changed the landscape (if you’ll pardon the pun 🙂 ) for still photography in this genre. You can get some truly stunning results without the need to stitch several photographs together in heavy desktop applications like Photoshop anymore. Like anything else though, there are things you can do to increase your keeper rate, and things to avoid (unless you like deleting tons of photos).  Here are Five Tips To Improve Panorama Photos:

Tip #1 – Make sure you scope out the scene all around you.  Believe it or not, the iPhone panorama photo feature goes to nearly 300 degrees from left to right.  This means you will almost be doing a complete circle.  Is there anything on your left or right that you particularly want to be in the photo, or the draw of your photo?  Make sure that you initially face that particular person or scene.  Then turn 90 degrees to your left before you start shooting.

Denver Airport  Panorama
Denver Airport Panorama

(I wanted to make sure the plane on camera right was fully in the frame, and my first short, the pano ended right before the hallway on the right, so it looked like it was cut off…)

Tip #2 – Go slow!  The iPhone will tell you to slow down if you start moving too quickly from left to right, but at that point, it’s likely too late.  Stop the shot and start over.  Don’t get impatient because your wife (or husband, or significant other or friend or whoever) wants to get to your ultimate destination.  The amount of time it takes to completely capture the pano scene is about 15 seconds from left to right.  Add another 15 seconds to review the image on screen before you leave the area (you may have to re-shoot).  Finally, add another 15 seconds to your itinerary in case you really do need to re-shoot!  Just as a buffer, I’d add a final 15 seconds in because…well, you never know!  All in, that’s one minute of their lives that your S.O. will have to wait for you.

Tip #3 – Consider the lighting – If your scene varies a lot from dark areas to light areas, that will not bode well for capturing a pano with the iPhone.  Why?  Quite simply, it can’t capture the dynamic range of our eyes.  Low light to bright light can be tough for the sensor to handle, and extremely low light scenes will introduce a lot of grain too.  Most of the time, shots that result from these scenarios will be unusable.  Exceptions to this would be city skyline shots.  The bright lights will be blown out, and the skyline itself will be all in shadow, but that’s ok – that kind of contrast is actually a good thing for skyline shots!

dark pano - what not to do
dark pano – what not to do

(Clearly, the bright light of the lamp and the darker area of the living room made for a bad contrast between bright and dark areas here…this is a bad shot imho..pano or no pano!    )

Tip #4 – Consider the framing from top to bottom.  When shooting pano shots from the iPhone, you can’t rotate the camera to go into landscape mode – it must be recorded in portrait mode.    This means you may get portions of your scene at the bottom, the top, or both that you might not otherwise want in a final photo.  Re-frame accordingly as you conceptualize the shot!

Similarly, consider what’s off-camera to the immediate left and right. Is it the road you’re on or a coastline? Unless you take up several frames when viewing this kind of shot, it may end up looking a bit odd.

Finally, consider that you do not necessarily have to go the full range from left to right or right to left. Some the best types of scenes for panoramic photography are better off from perhaps just a little bit more than a standard picture. Here for example, an architectural shot, or perhaps a larger group of people. Everyone automatically presumes that panos are best utilized in landscape photography. While this is true, there are usages outside of that genre.