Okay, so it’s lame segue alert day, as our late return last night really didn’t give me time to get my act together for a post today (clearly as it’s already 6:30pm MDT). Thus, another NBP (no blog post) day is upon us. Hopefully by tomorrow my act will be together again and we’ll have a new podcast, with loads of photography goodness to share. Happy shooting and I’ll be back on top of things tomorrow…
Month: April 2009
On the Coast of Somewhere Beautiful…
A short vacation means that I’ve not had much time to generate any photo-related content, but hopefully the title will be a hint of things to come, so be sure to stop back in Monday for some photo goodness and other news and events. In the meantime, enjoy the weekend, and have a Happy Easter. On that note, enjoy a Friday funny courtesy of What the Duck!

Happy Shooting!
Thursday Thoughts with Kevin Mullins
For those of you that visit the blog regularly, you know that Kevin has been a regular supporter through his kind, thoughtful, and well, supportive comments for the last few months. We all know that reading blogs of others and commenting there is a good way to not only learn but to also generate traffic for your own interests.
Well, this week I am calling Kevin out, because he definitely is worthy of your traffic. Kevin Mullins is an outstanding photographer, based out of Malmesbury Wiltshire (that’s in England, across the pond, or the UK for the geographically challenged…) He’s had reviews done by friend-of-the-blog, Jason Moore, and most recently has launched a photography website for his wedding photography. So, first off, welcome Kevin, and thanks for agreeing to come on the Thursday Thoughts Series.
Thanks’ very much for inviting me on here Jason. It’s a great privilege.
Q: I don’t know why people keep saying that, but thanks I guess. It’s just fun to be learning from everyone thus far that’s been willing to contribute, yourself included. But anyway, I digress…starting things off, I’d like to talk a little about your Wedding Photography – as you stated on your blog, wedding photography is your passion, and that is evidenced by the work you have put in thus far. With so many areas to choose from, why did wedding photography stand out for you as a career path? Well, it kind of “just happened”.
A: I have been taking photographs for a long time but around two years ago I knew that I wanted to make a career from photography. I’ve often looked at wedding photos and thought “I could do that”, or, more often “If I was taking that shot, I would do it like this…”. The interest continued to grow and I started forming my own style of shots in my head. Contemporary artists such as Crash Taylor and Jeff Ascough really inspire me and I am in awe of the way they deal with light and composition in a wedding shoot. Having your own style is key, and whilst those guys inspire, its building my own style that is really important to me. I really want to give the bride (and groom) some photographic memories that they will cherish and will become a family focus point for years to come, but don’t just look like all the other photographs out there.
Q: You have a definite journalistic flair in how you create your images, specifically as evidenced by the series from Andrew and Katherine’s photos, as well as those from Marie’s wedding (I love that shot of her under the arched trees). You’ve mentioned Cartier-Bresson, Crash Taylor and Jeff Ascough as inspirational sources. Any particular insights you’ve gained from these folks?
A: Cartier-Bresson’s imagery is just astounding. His use of geometry and shape in photography is out-of-this-world. I have read his biography recently and to get an insight into his thought process is intriguing to say the least. The “modern masters”, such as Crash and Jeff are the people I look to now for inspiration and technique. Both of them run very informative blogs with great great images that people like me can look at, disseminate, and learn from. They are somewhat different in styles themselves so I look to Jeff’s work more for the documentary and natural-light experiences, and Crash for his awesome signature portrait shots of the bride and groom. There are so many talented photographers out there and the internet opens up such a huge avenue for learning from them.
Q: So, how have you adapted techniques from these resources to come up with your own “look”? Or, better yet, do you have any particular images that you feel uniquely define your approach and/or style?
I aim to develop my own style of wedding photography and the new 5D MK II helps me do that to some extent. I’m using purely natural light (the high ISO capability of the modern cameras lends to this type of photography.) and I try and use my 85mm lens as much as possible. This lens is so sharp and the style I am trying to achieve uses a lot of depth of field. This lens is f1.2 at its widest point and so it really helps in that respect. Here are a few of my favorites:


Q: As a fellow member of NAPP, how much have you developed your style from the support content and materials in sites like NAPP and other photography communities?
A: To be honest, whilst I am a member if NAPP, I don’t use their forums as much as I should. It is a great resource though, and the magazine and techniques online are very useful – especially when new versions of Adobe software come to the market. I do use Kelby Online Training and I think that is a great resource. I try and put aside an afternoon a week to “train myself” – although this isn’t always practical as I also run my own web development firm. I find the POTN (Photography on the net) forum useful when researching gear and also for keeping an eye on other peoples work. I also find the SWPP forum in the UK extremely useful as there are a lot of very knowledgeable people there too. I really find most of my inspiration from trawling the net and finding great wedding photography.
Q: I already know the answer to this, but I would imagine the readers may want to know – what kind of gear do you shoot with?
A: I was lucky enough to get a Canon EOS 5D MkII back in December last year. It arrived on the 2nd December just in time for a big family birthday celebration which was great as I got a chance to practice with it. I have a number of Canon and Sigma lenses too but my favorite lens of them all is the 85mm f/1.2. It is simply magical. I also have a 100mm macro, 16-35mm, 24-105mm and 70-200mm which hopefully covers all my bases. I haven’t really looked at the HD video on Mk II yet, but I am beginning to see some “fusion” wedding photography out there which is a mix of video and stills and this is something I would like to look at in more depth as the technology progresses. That said, stills will always be my No1. priority.
Q: Since your style journalistic in nature you obviously will take a large number of photos during any event, whether pre-wedding or the actual wedding day. What kinds of numbers do you typically return from an event with? How do you handle your post processing? (Computer/software/etc.?)
A: I actually did a wedding shoot recently and I took in excess of 1500 shots, of which I will probably sift down to 250-300. I would expect the Bride and Groom to select anything between 50 and 150 for their package. I do all my first phase processing in Lightroom now. It’s such a good tool for cataloguing and doing bulk adjustments. Anything more detailed such as spot removal I will still do in Photoshop. I would love to see Adobe integrate Lightroom and Photoshop to truly marry the non-destructive workflow experience. I am off to a two day seminar with Jeff Ascough at the end of the month and hopefully I will gain an insight into his post-processing workflow as I know he uses Photoshop heavily to create his stylized shots.
Q: Could you also explain a little more about the idea behind the “pre-wedding” shoot you discuss on your website?
Pre-wedding shoots are quite common here (I’m not sure about in the U.S). Typically you spend an afternoon or so with the bridge and groom a couple of months before the wedding taking some natural portraiture shots of them. The idea, really, is to get to know the couple more. The last thing anybody wants on the big day is for any uncomfortable scenes between the photographer and the bride and groom. The pre-wedding shoot gives us a chance to get to know each other more and also to go through some ideas of poses and how to work in front of the camera. It gives me a chance to identify what types of shots I can encourage them to do on the day, and what will be the limits. Some couples are outgoing and excitable in front of a camera and some simply want to get the process out of the way so it is important to gain that knowledge well before the big day. If we can, I intend to do the pre-wedding shoots at the venue of the wedding. That way, we can all scout the area together and look for great places and light at the venue and, essentially, rehearse for the big day! The pre-wedding shoot is part of the wedding package, but if the bride and groom want to buy any prints or a frame or even a mini-album after, then even better!
Q: Oh, and since we talked about photo gear and computer/software preferences, I would be remiss if I didn’t ask this: Chocolate, Vanilla or Strawberry?
A: Chocolate every time. My wife bought our nieces some Easter Eggs and they lasted less than 24 hours in our house. We ate them and will have to buy the kids more now!
Q: We all know you’re a regular contributor to Canon Blogger – what about other online resources? Are there any that you find particularly useful that you’d like to share with the blogosphere?
A: I”ve mentioned a few in the article already, but I think some of the sites that are great are:
- Crash Taylor Interviews
- POTN
- Kelby Training
- Damien Lovegrove’s blog is an excellent resource both business and photographically
I have quite a few blogs in my reader (such as Canon Blogger, Michael Palmer, Jen Rinaldi etc), that I like to visit each day. I comment when I think it’s appropriate and appreciate it when people comment on my blog too. All of these blogs are part of the fabric of my learning and I’m always on the lookout for other blogs that inspire and keep me focused.
Q: Last but not least – any final thoughts you’d like to share on the state of the industry, thoughts on the future of photography, or other “words of wisdom”?
A: Well, I rely on others to give me wisdom, but if I had to look to the future I would say that we will be seeing a lot more video and still fusion work going on over the next five years or so. The latest Canon announcement (the EOS 500D) will bring HD video to the consumer level DSLRs which infers that it is here to stay. Oh, and I definitely recommend moving out of London to the countryside! It has a great effect on your well being 😉
Excellent advice, thanks Kevin! That about wraps things up here so don’t forget to stop over at Kevin’s blog.to see and enjoy his particular vision and style of work. In the meantime, tomorrow might be another “no-blog” day because I am doing a little bit of travelling – depends on how soon I can get home. So, happy shooting all, and if I don’t get home in time for another post, have a great weekend!
No Blog Wednesday
Sorry all – but be sure to stop in tomorrow for a really exciting Thursday Thoughts session – my first interview “across the pond” with Kevin Mullins!
Happy Shooting!
Artist Statement Appeal – the power of the pen
On this weeks show, I take a look at the power of the pen – the artist statement. For those of us with aspirations of sharing our work with others via art shows, galleries, and contests/competitions, the value of the artist statement can make the difference between getting into a show, gallery or other event and buying a ticket. So, if you want to learn what the artist statement is, how to write one, and things to consider, this is the show for you. Here’s the show notes:
- News Links –
- Artist Statement Resources
Another news item I forgot to mention in the podcast is an upcoming web seminar series for photographers, free, from Adobe. Here’s the dates:
- Photoshop: April 23rd
- Lightroom: April 9th and May 7th
- Both: May 14th
Link for more info and to register is here
Make sure you stop in and grab the podcast from the good folks over at Personal Life Media, and visit our show sponsor Lensbaby if you are thinking about the Lensbaby Composer. Diggs from PLM and reviews from iTunes are encouraged, welcomed, and appreciated! Happy shooting all and we’ll see you back here tomorrow! 🙂
Don’t forget, you can email me from the show link with any questions, comments, feedback or thoughts, as well as share comments here, and reviews on iTunes. For those without iTunes or Zune, I can provide an mp3 version of the show on request.
Double your laptop storage in ten easy steps!
So, I’ve got the Macbook Pro with the factory default 150GB hard drive. Sounds like a ton of space, right? Well, we all know how quickly that amount of storage can get sucked up these days. So, I considered buying a new laptop drive, buying the latest iteration of the Mac OS and just building one from scratch again. But then I realized, I have lots of storage being eaten up in the drive already by means of exactly that – the OS, the applications, and everything it needs to run. Then it dawned on me – why not just add a second drive?
I bet you are asking, “Ok, Ace, where you gonna add a second drive?”
Well, here’s an easy way to add a second drive to your laptop in 10 easy steps:
1. Buy a USB drive (I got mine at Best Buy – they price matched Newegg which was in and of itself a jaw-dropper but I digress)… but the point here is that addtional storage is cheap! Less than $80 bucks for 320 GB

2. Buy a strip of two-way Velcro tape. I happen to have some from other projects, but at most it’s $5

3. Before messing with the physical setup, plug the drive in and configure as desired. For mine I re-formatted to a Mac partition (journaled), then created folders for my music library and my working photo library on the Mac.
4. I then moved all the data over for the above folders from the pre-existing OS drive.
5. Position new USB drive on back-side of laptop monitor to see where it best fits according to your USB layout – I happened to like mine on the left, as shown:

6. Wrap USB (or Firewire) nice and snug – I used another velcro strip to keep it tightly wrapped.

7. Cut one or two pieces of two-way Velcro, and place one in the middle, and the other one near the top or bottom. (I started with one and added the second):

8. Peel the backing and affix to the USB drive. With the other side still stuck, peel the backing off the second two sets and affix to the back of the monitor.
9. Plug mini-USB (or Firewire) and USB ends of cable back in. (I’d already done it to ensure the slack of the cable was how I liked it, but you can do this afterward too if that makes things easier for you…)
10. Open monitor top, and voila – you have a laptop with two drives!

For the record, I saw someone once with a setup like this, so it’s not completely an original idea. The onyl difference was that he had two of these bad boys connected – a Dymo label printer had identified each as a Time Machine drive and a Files drive. For the cost/size/weight and portability, it’s really not a bad idea. When they fill up, just buy a new drive and port the data over, or even just archive and store in a tupperware shoebox if you prefer.
So, there’s a neat little idea for you this Monday. Happy shooting and we’ll see you back here again tomorrow.
The train rides again (take two)…
For today’s post you’ve got a special treat coming, because the train rides again! If you recall, earlier this week I posted the results of a little miniature project where I tried some varying depth of field, angles, and such on a model train. The project results didn’t yield anything breath-taking in picture, but I did learn where the best areas for focusing are on trains. I found out what appealed to me, what appealed to others, and filed it away.
Then, as luck would have it – I had my camera with me today on the way home from work (there were some other trains I wanted to capture on my way in – but the clouds and lighting weren’t as conducive as I’d hoped – plus I would have been late…). A now-defunct set of boxcars were sitting on an unused rail near the house, and as I was driving down the access road, I saw this scene with new appreciation. I felt compelled to stop and try my hand at a life-sized model!
The results are much better in my opinion. The new problem – post processing. As I always try to keep an open mind, after a little post work on exposure, sharpness and levels I said to myself “Wonder how this would look as a black and white…” How is this a problem, you ask? I like both! So, it’s the new poll here – which do you like?


Feel free to share your thoughts on which should be the “keeper” and why in the comments! Meanwhile, enjoy my latest choice from WTD as we head into the weekend…

Happy Friday and Happy shooting! We’ll see y’all back here on Monday! 🙂
Thursday Thoughts with… Rob Weiher
Hey all, here’s what’s shakin’ for this Thursday. Another “Thursday Thoughts” edition is ready, but me and the guestk, Robert Weiher, took a little bit of a different tack on thi go around, primarily because of how I came across Robert, and what he’s doing for a current project. See, Robert is a fellow NAPP member, and has started a 365 blog as a project for 2009. After seeing a few of his comments appear here, my logs pointed me back to him (it always pays to watch your comment links as you never know where the next gem may come from). Robert’s space is definitely a gem, and I thought it might be fun to take the Thursday Thoughts on a different tack this week. So, without further ado, here’s the latest edition with Robert Weiher!!!
Q: Hi Robert, and thanks for taking the time to sit down with me to share your thoughts and insights here. First off, since we’re doing things a little differently, let’s start with your 365 project. Could you explain what a 365 blog is, and what was your motivation for starting this project?
A: Hi Jason, thanks for having me. A 365 blog or project is basically just taking at least one photo a day and in my case posting and writing a little about it. My motivation to start one was to get me using my camera again. I was in a rut and had hardly used my camera in four months after coming home from a long vacation and finding very few good photos out of several hundred taken on the trip. I was finding myself spending more time in Photoshop trying to fix photos and was getting frustrated with the taking the photo part. To help get motivated I signed up for a weekend seminar on lighting and photographing artwork. The instructor happened to be a national portfolio reviewer and he did a short review of some of my work and gave me some great feedback and some tips to get going again. One was to sketch with my camera, which meant to just go out and take photos. He said to not worry about subject or lighting…just take a photo of anything of interest and then use these to refer back to for more creative ideas. This got me started down the road towards the project.
Q: Do you look for particular themes or have specific ideas in mind for each day that you have mapped out, or do you approach each day from a “whatever comes my way” mentality?
A: I originally started out thinking I was going to take around an old pair of my army boots and use them as a prop around the old Army base I live on. This lasted about three days when I realized if I wanted to continue on with the project I was going to need to be more flexible and that lead to a much more free form mentality.
Q: And what kind of gear do you shoot with (Canon, Nikon, Pentax, Sony, Olympus, etc.)?
A: Canon 30D
Q: What about post-processing gear (Mac, PC, Linux, etc.)?
A: PC and when I post process Photoshop CS3 and Adobe Bridge.
Q: And of course, the Chocolate/Vanilla/Strawberry question?
A: As a kid I loved the chocolate/vanilla swirl cones but if I had to choose it would be chocolate.
Q: Oooh, I’d forgotten about the swirl! I loved that too. Anyway, back to photography – how long have you been shooting?
A: Since October 2007 after my wife, parents and sister chipped in to buy me my first digital camera for my 40th birthday.
Q: So, about a year and a half now – well, you’ve got a great eye, and your knack for composition is really evident! One shot in particular that I liked was done recently, on day 83 where you not only did your daily post, but also the setup with your homemade light box. Are there any shots in particular from the project that stand out thus far for you? (I know the bronze leaf was a popular one…)
A: Day 66 or Red Tulips. Pretty much the first photo that made me pause and go “wow” that turned out nicely.

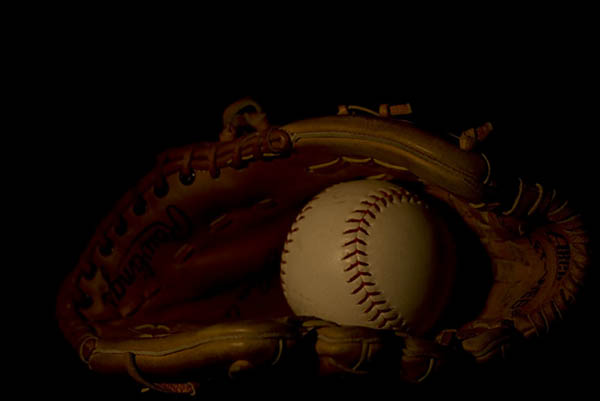
I also like Day 73 or The Day I Retired My Baseball Glove. I was a huge baseball fan as a kid and played nearly year round. As an adult I played in different softball leagues over the years but hadn’t played for about 12 years before last year. My body took a beating so decided to retire the ball and glove and even though I didn’t mention that in my blog several comments were made about the emotion of the photo and that made me feel good that I was able to get that across in my photo.
Q: Very nice. Both are excellent and powerful images! So, you’re about a quarter of the way through this project – any ideas for new projects that have come up you’re going to be pursuing?
A: Right now my focus is to finish this project but start expanding into areas I haven’t touched on yet, like portrait. Part of the project was to also find out what style interests me so I want to explore all the styles I can. Not that I feel I need to limit myself to a specific style after my project is done but would like to figure out if there’s something that interests me the most. At the moment still life has caught most of my attention.
Q: I’ve not seen a “for sale” sign on your blog…have you considered hanging out a shingle and actually putting some prints up for sale? If someone wanted to purchase any prints from you, would you be open to that?
A: Sure I’d be open to selling some of my prints. It’s been on the back of my mind and have explored opening a SmugMug account to host a portfolio of my best work. I hadn’t touched on it yet but all the photos on my blog are unedited, straight from the camera so I may need a little post work.
Q: Any final thoughts on the project, photography in general, that you’d like to share?
A: I think in the 3 months I’ve been doing this project I’ve come to realize one thing. No matter how many books and magazines I read, podcasts I listened too or websites I visited prior to January 1, 2009 I was not going to learn to be a better photographer until I put my hands on my camera and took as many photos I could a day. Not that having all those resources available is a bad thing…I just felt like I was approaching information overload. I decided to approach my project using Shoshin, or the Beginner’s Mind, which is having an attitude of openness, eagerness, and lack of preconceptions when studying a subject.
I put away the books and picked up the camera and made it my goal to make the best possible photograph in camera as I could. No post work so all my photos posted to my blog are straight from the camera and if I have issues with the photo I write about what I would do differently and highlight mistakes I made, such as forgetting to check my white balance setting or to make sure the horizon line is straight. Things that could easily be fixed in Photoshop but also just as easy to fix in camera. I also stepped outside my comfort zone and put myself out there for critique and feedback. This has helped immensely and I’ve made some great contacts via Flickr, Twitter and the blog. I still struggle with the putting myself out there more part but I think everyone wanting to become a better photographer should search out a community they feel comfortable in and ask for some feedback. The photography and Photoshop community are about the nicest and most helpful people you’ll ever find. I just hope to be able to be as helpful one day as everyone else has been for me.
Once again thank you Jason and thank you for being part of this great community.
The pleasure is all mine Robert. Thank you so much for agreeing to take part in the “Thursday Thoughts” series, and I’ll be keeping an eye on the project as you go forward with the rest of it from here. It’s been quite the enjoyable approach, and I’d like to wish you all the best going forward (us Canonite’s have to stick together! 🙂 )
Please take a moment to stop over to Robert’s 365 project at Unqualified to Blog as well as his Flickr Photostream and share your thoughts with his work over there. Then, as Robert said, reading blogs and listening to podcasts isn’t going to do it all, so don’t forget to get out there and keep on practicing for real! Happy shooting and we’ll see you back here tomorrow.
Blur, Baby… blur!
Hey all, this week’s show is done and boy are you in for a treat! Not only is there some pretty ground-breaking news from the computing world, but the theme for this podcast is blur! I take a (hopefully) clear look at different types of blur you can get in your images, what can work, what will not work, and how to correct for different types. Got some great listener questions and answers that tie in very nicely to the theme, and as, always the photo tip of the week. Here’s the show notes:
News Links – HP Z800 Specs (listen to the show to find out why this is so amazing it’s the only news story!)
Focal Length/Crop Factor/Shutter Speed settings –
- 50mm converts to 85 crop factor, which means a shutter speed of 1/100th
- 100mm converts to a 160 crop factor, which means a shutter speed of 1/160th
- 150mm converts to a 240 crop factor, which means a shutter speed of 1/240th
- 200mm converts to a 320 crop factor, which means a shutter speed of 1/320th
- 300mm converts to a 480 crop factor, which means a shutter speed of 1/480th
- 400mm converts to a 640 crop factor, which means a shutter speed of 1/640th
- 500mm converts to a 800 crop factor, which means a shutter speed of 1/800th
- 600mm converts to a 960 crop factor, which means a shutter speed of 1/1000th
Listener Questions:
- DOF Preview button
- Battery Length
- Portrait Lenses
Be sure to stop over to the good folks at PLM to get the podcast, and check out the Lensbaby Composer – a great resource for managing blur in your photos! Happy shooting all and we’ll see you back here tomorrow!