Comparison photos from 10-22mm

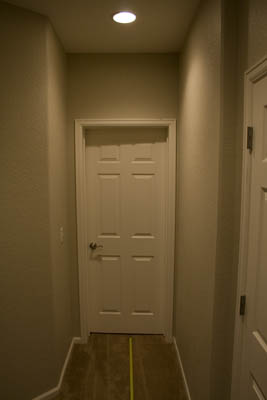
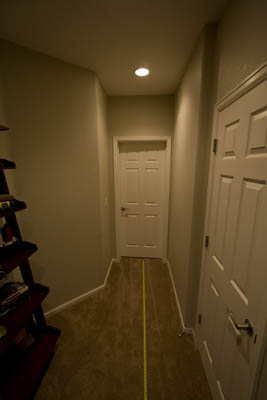
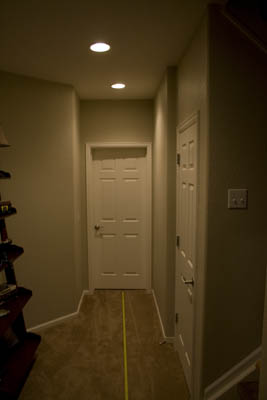
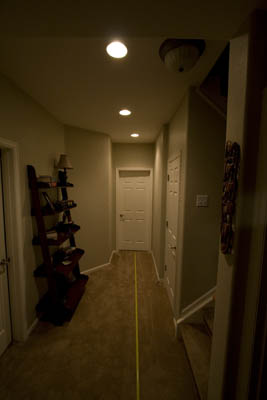
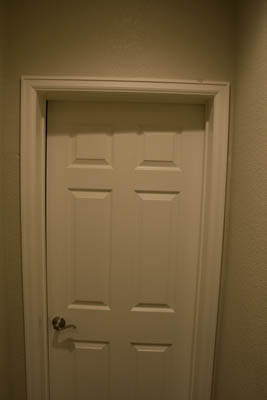
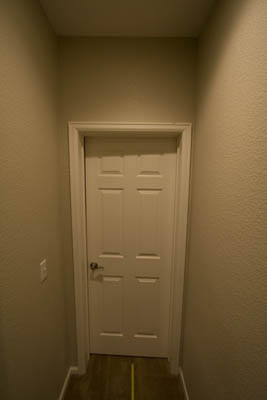
Earlier this week on the blog, the 10-22mm Canon was reviewed, and in the comments, Julie asked if I could provide some comparison shots.  So, in the interests of demonstrating the perspective change (and provide a few sample shots of things I thought came out well), here’s a plethora of photos.  First, the comparisons… all shots were done at 1/50th, f5.0 and ISO 800 from a range of 5 feet, 10 feet, and 15 feet, and pointed straight on at the door.  No post processing was done in order to preserve as “raw” a comparison as possible…

At 5 feet on the kit 18-55mm

_mg_9396

Now5 feet  with the 10-22mm:

_mg_9397

Notice how much more of a range of view the 10-22 has even at 10 feet?  So much more can be seen now both high and low (notice the tape measure I have in there for scale?)!  Moving right along…

Here’s 10 feet on the kit 18-55

_mg_9401

And the 10-22 at 10 feet:

_mg_9398

Again, even more range of view both top to bottom and left to right (see the book case?)  But as we go wider the differences get even more pronounced!

Finally, the kit 18-55 at 15 feet:

_mg_9400

And the 10-22mm at 15 feet:

_mg_9399

So, you can see why wide angle lenses work well in real estate, eh?  Wide angles are particularly useful in capturing architecture, and their prominence in this specific field is very well known!

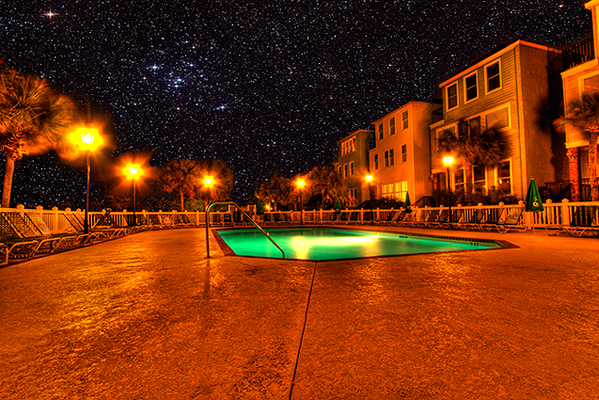
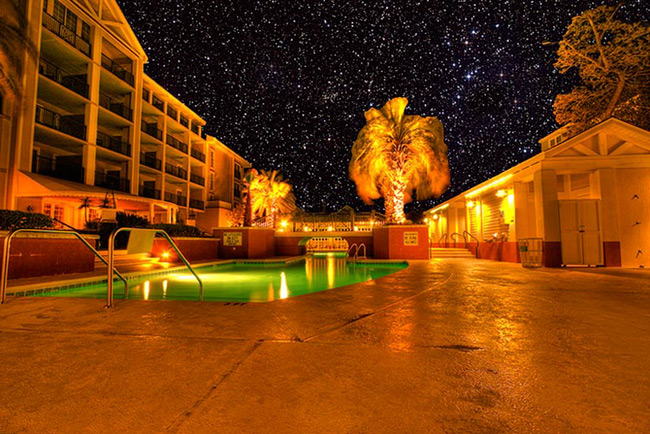
Other genres of photography can benefit from its use though.  Remember the HDR shots I put up last week?  These were both taken with the wide angle:

final_hdr_blog1

2a_blog

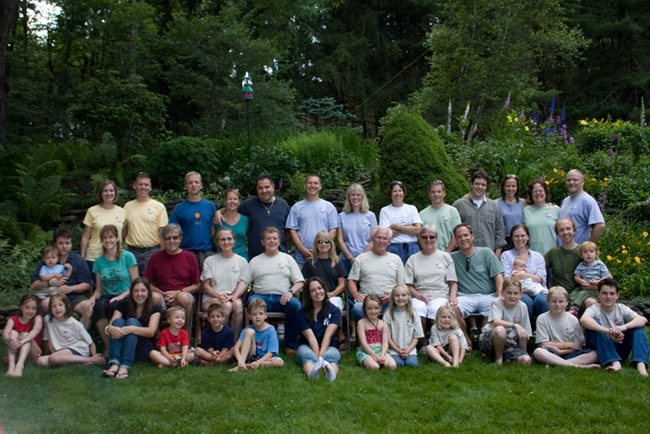
So, landscapes can also benefit from using a wide angle lens.  But what about portrait work?  Here is where the “group” mentality can come into play.  Here’s a shot from a family reunion I took after acquiring this lens (that’s me on the far side, camera right):

gang_web

You want to be careful about using it for close-up portrait work though, because distortion can work against you, producing unflattering looks (I am intentionally using a super small file size here because it’s really not flattering at all if used wrong):

bad_wide

But of course, this is how the now famous “dog” pictures were developed, so you can try it yourself for unique looks:

moo_wide

So, that’s the ups and downs, the los and highs, the pros and cons of the 10-22.  In closing, here’s a parting shot I took from the island in SC where we were having family photo ops and fun!

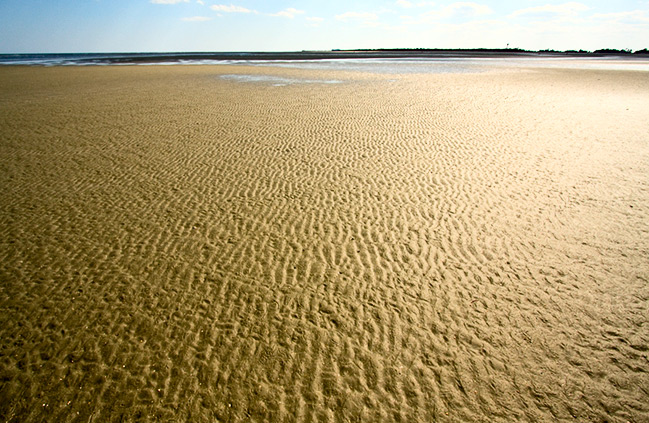
wide1

Try getting that without a wide angle!  🙂  Happy shooting and we’ll see you back here tomorrow!

The Rule of Thirds Really Does Work!

When it comes to composing our images – we are always looking for new ways and angles to capture things.  Often though, sometimes the traditional methods work too though.  In fact, I would venture to guess that if shown 100 pictures where the standard rules of composition were followed, and then 100 pictures where standard rules were deviated from, the former would have more shots that found a widespread appeal.  The rationale?  Standard rules usually will work – that’s why they are the standards.  Things like the Golden Mean, the Rule of Thirds, and Sunny 16 are all basic rules of composition and exposure, and if you want to ensure things “just work” – traditional rules really will work the majority of the time.

For the purposes of this post, I am going to talk about one of the most basic rules – the Rule of Thirds.  The Rule of Thirds (or ROT) basically says that if you divide your image area up into a grid, where the horizontal andvertical areas are divided equally into thirds – you will get cross-sections that define where your points of interest should be – often called hot points.  Here’s a diagram to help demonstrate:

rotgrid1a

So, here the frame is divided (roughly) into thirds both vertically and horizontally.  Where the lines intersect, I’ve created red circles to indicate the “hot points”.  These are your points of interest.  If all else fails, placing your subject matter in these areas (or close to them) will dramatically improve your composition.  Here’s a great example:

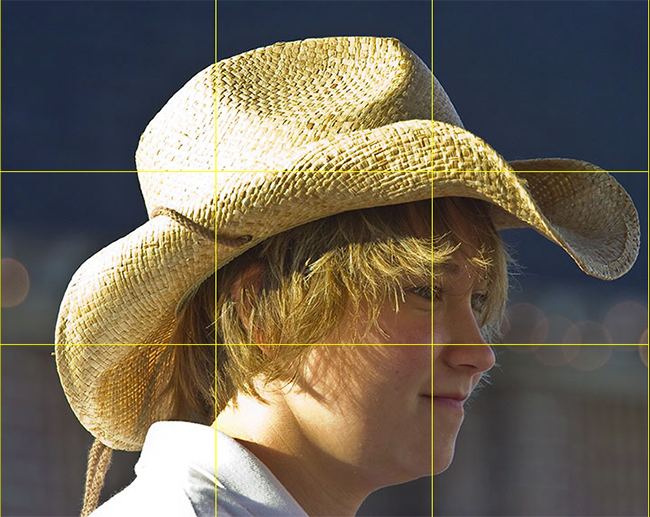
rotgrid2

Here’s a shot of a carriage girl I took back in Charleston.  See where the cross-sections are?  I changed the color of the grid to make it easier to view – so you can tell that her eye is right on the marker for the right-most third grid line.  This really helps the composition that her eye is there instead of elsewhere (often times, there is a tendency to place the eyes closer to the center of the frame – resist that temptation to give your shots that extra oomph!).

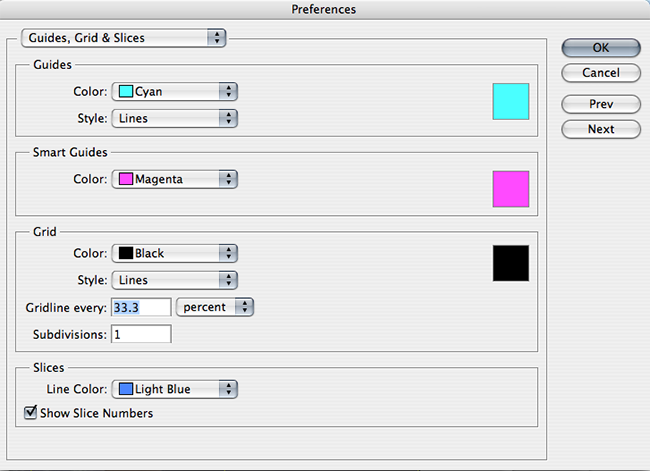
In fact the ROT concept s such a well-known standard, the folks over at Adobe have incorporated that element into their crop tool – so that you can crop your images to adhere to this rule.  Since I will likely get someone to ask – you can create this ROT grid in other variants of Photoshop (CS family), but going to your application preferences and selecting the Grids, Guides, and Slices option.  In there, change your grid size to display lines every 33.3% and number of grids to 1.  Then choose a strong color so that when you display the grid – you can see it!  Click OK and you are done – from now on, to show the ROT grid when cropping or editing in the CS family – simply use the CMD/CTRL key and the apostrophe ( this doohickey  ‘   ) to toggle the grid on and off.  Here’s a capture of the area you need to make the changes:

rotgrid4

There you have it – the Rule of Thirds grid – what it means and how to use it!  Any other rules of composition you would like explained?  Feel free to email, share your thoughts, ideas, suggestions and feedback in the comments or privately (if you rather would preserve anonymity).  In the meantime, go out, take some shots and practice visualizing that ROT grid in camera – that’s what will turn your snapshots into great shots!  Getting it right in camera!  Happy shooting and we’ll see you back here again tomorrow!

Adobe’s DNG Converter

For many of us, an upgrade of one element in our tool kit comes with many unforeseen consequences and additional expenditures.  Just as a new camera body can necesitate the need for larger memory cards, hardware upgrades can also come with software upgrades.  The reason?  Camera file formats!  As camera vendors develop new proprietary formats for their raw file formats (CR2 for Canon and NEF for Nikon as the two predominant players in the game), the need has always existed to update your software to accommodate the new formats for body upgrades.

The best example of this was when I did my upgrade of the Canon XT to the Canon 40D just last year (or was it two years ago now?)…at the time I was using Adobe Photoshop CS2 to process my files.  Well CS2 development stopped as CS3 development started.  My Canon 40D was stuck in between application life cycles, and as a result, I was no longer able to process my CR2 files from the 40D natively in CS2.  Granted, I did upgrade to CS3 because of my interest in the field, but for those that either may not be interested in the software upgrade, or cannot afford to upgrade, there is a free alternative from Adobe – the Adobe DNG converter.

This is a really cool utility and it gets updated on the same schedule as the Adobe Camera Raw utility that is unique to the image-editing applications of all Photoshop applications (CS4, LR, etc.).  The Adobe DNG stands for a Digital NeGative so it may help to think of this as a way of preserving your original data, yet still making it accessible, regardless of what other developments happen in the software world down the road.  I know, we all think that Adobe will be around forever, but the same was also thought of Kodak 20 years ago – and now those Kodak CD’s are becoming difficult to manage.  With that little nugget, it may be useful to consider the Adobe DNG option.  Additionally, the Adobe DNG negative has been submitted to the ISO standards setting organization for acceptance as a universal conversion utility, and are releasing it under the GNU licensing, so it will hopefully always be available for anyone.

With the stage set then,  for those who are not able to or not interested in upgrading, here is a brief tutorial of the Adobe DNG converter (in it’s current iteration as of 4/27/09), with screenshots.  If your folders of images look like this:

dng6

Then the Adobe DNG Conversion Utility may be for you.  It starts pretty easily…you can download the Windows or Mac versions of it from here:

Windows DNG Converter

Mac DNG Converter

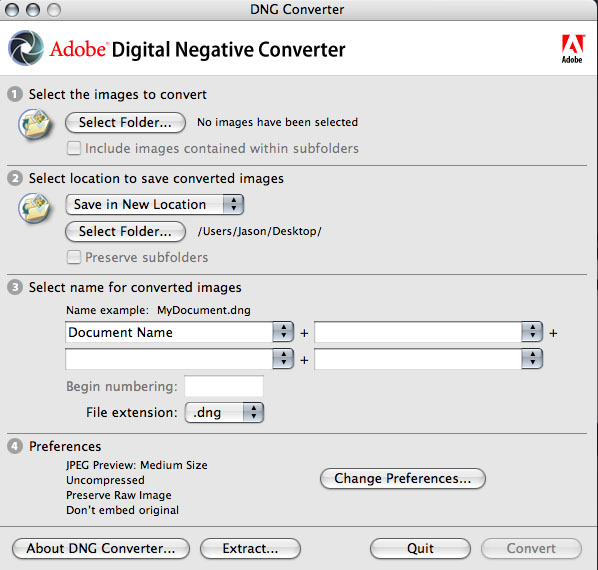
Once you download and install this utility (did I mention it’s free?), start the application to get this screen:

dng1

First off, specify the path where the images are that you want to encapsulate into the DNG format.  You can specify one folder, or you can specifiy a folder and all its sub-folders (in case you want to convert an entire library or set of images at once).  Then specify the output folder and naming convention you want to use.  Once that’s been decided, it’s time to select your preferences for how you convert your images.

dng2

Click on the “Preferences button” to specify how you want to conversion to occur:  Do you want full size conversions or do you want to reduce the image resolution sizes for smaller storage requirements?  (I always choose full size for maximum flexibility.)  What about compression?  Adding compression can further reduce the footprint that each DNG file has on your hard drive.  (It’s a judgement call, but I choose not to compress, again to maximize flexibility down the road.)  What about conversion methods?  You can convert to a linear format, but I don’t like this option because it’s a one-way street (you can’t go back).  Last but not least, what about inclusion of the original raw file?  In most cases I would actually recommend that.  It may increase file size, but this way you have access to the original raw date if your software needs ever change and you have access to software that can better handle the raw data you currently may not be able to manage.  All these are things to consider.  Hopefully, this short explanation of your options and the pros/cons will help in deciding how to proceed.

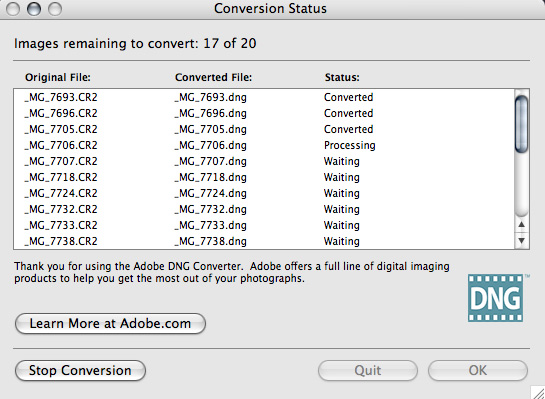
From here it’s pretty straightforward – you’ve specified everything from your input folder to your output folder, naming conventions, and conversion preferences, so now, simply click the button on the lower right to start the conversion process.  You will get a dialog window showing you the progress:

dng3

If you like, you can always click the button in the lower left to stop or abort the conversion process in case you specify the wrong folder or for some other reason.  Once the process is complete, the window will show all converted images.  Simply click “OK” to close the DNG converter utility from that window, as shown below:

dng4

Finally, open the destination folder, and voila!  Your image files will now have thumbnail previews again:

dng5

There you have it, your files are now prepped for one of the easiest, simplest, and most cost effective ways (did I mention this is free?) for both management, archiving, and accessibility – 3 very important things to consider in your image management workflow.

Granted, as with anything else, the Adobe DNG converter utility is not for everyone, as we all have work flows that call for different approaches.  So, what approaches do you use?  Feel free to share your own thoughts, processes, and suc in the comments or via email.  Happy shooting and we’ll see you back here tomorrow!

Hardware Review: Canon 10-22mm

Happy Monday to all!  Today is an exciting day here at the blog, because a new schedule of sorts is going to start, both to make reading more enjoyable, and to make writing more planned and easily executed.

The reason behind the new flow is due to many listener questions asking a wide variety of questions, ranging from hardware questions to software questions, technical questions, work flow questions and the like.  So, in the interests of providing answers to each of the wide subject matter areas, here’s the new schedule:

  • Monday: Hardware – I’ll take a look at hardware components, ranging from lenses to bodies, attachments and accessories.  This could come in the way of a review, a summary, or other commentary.
  • Tuesday: Software – many elements of photography involve using software, whether it be organizing your library of images, to managing that library, and editing idividual photos.  Here is where I’ll take a look at software reviews, editing tips and tricks, considering work flows,and other similar subjects.
  • Wednesday: Composition – As with anything else, you only get better when you practice what you preach.  We can only learn so much from reading – and today I’ll focus on the “doing”.  How to take better pictures, what elements of composition work, what elements of composition don’t work, what to look for, what to avoid… things of that nature.
  • Thursday: Free-for-all – Who knows what may happen – I’ve been doing the “Thursday Thoughts with…” series, and this may happen from time to time – I’ll keep everyone on their toes with this post! (This will probably also be the post that includes show notes for the weekly podcast hosted over at Personal Life Media, Learning Digital Photography.)
  • Friday: Weekly wrap-up – news and events of the week, notable items of interest to photographers, and the occasional note with blog announcements, and other administrative types of things.

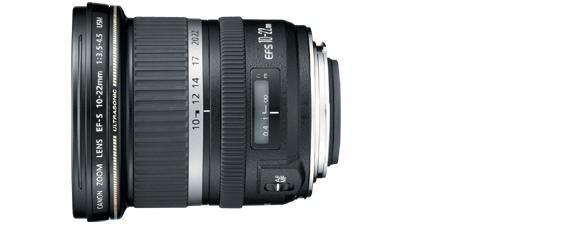
So, in kicking things off, here is the first installment of a look at some of the hardware in my own gear bag (since many of you dear readers have asked about that stuff specifically).  This week, I take a look at the 10-22mm lens from Canon.

ef10-22_586x225

This lens has been the premiere wide angle lens for quite some time, as the widest non-fisheye available on the market.  Only recently have Sigma and now Nikon added this specific range to their inventory of available lenses.  I absolutely love this lens and have used it for everything from landscape work to architecture work, and even some portrait work when I am going for a unique look.  In general you won’t use a wide angle lens for portrait work because of the distortion that can occur when you get up close.  This distortion can work to your advantage if that is the look you are going for though.  Alternatively, if you have a larger group of people, a wider lens may be required to fit everyone in the scene.

Fitted with the well-regarded USM feature for Canon lenses, I also love this lens for it’s whisper quiet and fast focusing.  You almost can’t even hear it as it locks in on your point of focus.

On the downside (if this can be considered one) – because it is an EF-S lens, this will not work on the full frame cameras.  So, shooters using the Canon 1Ds series (Mark II or III).  While full-frame lenses may be the future of digital photography, there are enough people out there with the Rebel series, and the family of 20D-50D bodies that can really take advantage of this lens.  I have to give this lens two thumbs up!

ETA:  Update:  I had inadvertently made the notation that the 10-22mm is an “L” lens from Canon.  This is not the case – thanks go out to Bill for detecting this.  While it was a typo, the disctintion is an important one because Canon designates their high end glass with the letter “L”.

Are you prepared for Spring to… spring?

jasonanderson_spring2

Spring represents a time of earnest and excitement for many photographers – the dreary days of winter have faded, and the sun, colors, and excitement to get outside can inspire many of us to take off for the hills – gear in hand and ready to shoot!

The problem arises when Spring…springs!  This means sudden rainfall, and moisture is no friend to camera gear.  With probably at least a couple thousand dollars invested in gear for most of us – are you prepared for the showers that come with Spring ventures?  Here’s a couple things I keep in my camera bag during Springtime in particular:

  1. Dessicant – this chemical comes with pretty much everything these days – and you can even purchase bags of it for use to absorb moisture.  Put a few of these in your bag to help protect from drops of dew
  2. A towel – we all have microfiber clots, and these are great for glass, but what about a good old fashioned towel to brush off moisture if it comes in contact with your gear?  A small dish or hand towel can save your bacon, not to mention a $1000 body (or lens)!
  3. A poncho – makes protecting and caring for your gear a lot easier if you are dry too!
  4. Plastic bags – I get the 2-quart sized bags and put my lenses in that before stashing in my camera bag  Just another layer of protection in a multi-layered defense against moisture!
  5. Change of clothes – whenever I go out anywhere, I have a change of clothes in the car – in cold weather, it’s a pair of jeans and a t-shirt/flannel shirt, in summer a pair of shorts and t-shit, and spring jeans and a shirt

These may seem like common sense types of things, but how many do you really have laid out for when you go on an outing?  Take stock of your Spring preparedness and plan proactively if you can – it could save you many many hassles and frustrations in the long run!

Nine is better than none…

I had been working on a list of some of the more popular listener/reader questions and some answers to share for the podcast this week.  Since it is late getting out (notice the lack of a post at all yesterday), I thought it might be helpful to share an abbreviated list of some of the Q&A here…

1. What color space should I shoot in with my camera, Adobe RGB or sRGB?

A. Neither, shoot in Raw! Since defining a color space is only applicable if you are shooting in jpg rather than raw, if you shoot in raw, color space won’t matter. However, if you absolutely must shoot in jpg (or if you prefer to due to massive amounts of images for easier mass processing), use the widest possible gamut when you start for maximum flexibility. In this case, that means Adobe RGB. If your camera offers the Pro Photo color space, that is even wider so choose that if available. However, the best answer is to shoot in raw, and then specify your color space during post production.

2. What is the difference between full frame sensors and cropped sensors?

A: Full frame are built to mirror the traditional size of 35mm film, so the mirror is 24x36mm

3. What does “Bulb” mode mean on your camera dial?

A: The term “bulb” is a carryover from days of film when flashbulbs would have to be triggered manually after the shutter was opened but before it was closed. The process was to open the shutter, fire the flash, then close the shutter. Since advances in technology now allow us to fire flashes automatically as the shutter is also tripped, we no longer need to manually actuate the shutter in order to allow a flash to fire. However, we still may want to manually control how long the shutter stays open, so that feature persists.

4. What’s the difference between Lightroom and Photoshop?

A: I get this question a lot. At a fundamental level, Photoshop could be considered a pixel-based image editor where you have the ability to alter or edit the actual pixels of the image. Lightroom, on the other hand, is a vector-based editor where the information does not alter or edit the actual pixels. Lightroom would be considered more of a photo management software tool. While the latest developments have incorporated more features of photo editing in addition to the management tools, at its basic level, Lightroom is still a vector-based program, where changes are not made to the actual image, but to how vector based criteria are applied to the image.

5. What’s the difference between metadata and exif data?

A: Not much. When we talk about one set of data in this capacity the two terms are often used interchangeably. However, if you want to get technical, exif data refers to information about the shot such as shutter speed, aperture, ISO settings, camera body, etc. while meta data is more about other information like photographer name, location of photo, image editor used, tags that are applied for searchability, copyright information and other information that can be inserted into the tag fields for images.

6. What is geo-tagging?

A: Geo-tagging refers to adding the geographic location information to your photos, usually as a set of meta data tags. This practice has become more commonplace as GPS (global positioning system) units have come down in price and both hardware and software have seen developments where the information can be applied to images either directly in camera (from a GPs unit that is attached to the camera), or where it can be added afterward via special software programs.

7. What is sync-speed?

A:  Sync speed refers to the fast shutter speed you can set your camera to and not get the typical black bars from the shutter closing before the flash is finished firing. Typically the sync speed is 1/250th of a second, but with the development of high-speed sync, this traditional rule of thumb will likely become rapidly obsolete.

8. What color space should I save to?

A:  Another very common question – and the answer does depend on how you will be outputting your images. Because most web browsers are not color-space aware, they will default to the web norm of sRGB as it has the narrowest color space. So, if your output is to the web, sRGB is your best bet. If you are outputting to a printed version though, Adobe RGB is the best option. More and more though, as printers are able to print to wider gamuts, Pro Photo is becoming more feasible as well. However you plan to output your images though, it’s always best to work in a color-calibrated environment, so make sure you calibrate your monitors and printer profiles for consistency!

9. Which is better, APS-C, CMOS or full-frame sensors?

A:  None of these sensor types are inherently better than any other – but they serve different purposes. The full frame sensor is the digital equivalent of a single frame of 35mm film (although technically it is just a smidge smaller). An APS-C sensor is often referred to as a crop-sensor and generally has a crop factor ratio of either 1.5 or 1.6 depending on the vendor. APS-C stands for Advanced Photo System, type C and is just one of several different ways of building crop factor sensors. Other ways include the CMOS sensor and the CCD sensors (which mean Complementary Metal Oxide Semiconductor and Charge Coupled Device, respectively). The differences here are more in the manufacturing process, and really are technical considerations that most photographers shouldn’t even worry about. The only difference that 99% of photographers need to concern themselves with is whether they want to shoot full frame (where one substantial benefit is that due to the lack of a crop factor on their lenses, so wide angle lenses are really that wide) or on a cropped sensor (where one benefit is that zooms have an effectively longer zoom). Analyzing past this level is really something beyond the scope of most photography. With the differences explained you can hopefully see that one is not inherently better or worse than another – just that there are pros and cons for each, and those must be weighed against your needs.

If anyone has any questions that are not covered here, feel free to email or comment.  Thanks for all your continued support.  As always, happy shooting and we’ll see you back here again tomorrow!
Experimenting with Photomatix and HDR

For a while now I’ve been meaning to devote some time to experimenting with HDR – specifically comparing Photomatix and Photoshop in their production of HDR photographs.  The industry preference toward the former is there for a very good reason.  Photomatix produces much better results.  Just look at this final shot (be sure to click the image for a larger view – the blog restrictions on size really don’t do it justice):

final_hdr_blog

Now, in the interests of full disclosure, I did do some additional post processing work even after the HDR processing to get the above results.  But Photomatix was superior for a number of reasons.    For starters – Photomatix gives you options in what type of output you want.  Here are the two results, side-by-side, that I got from Photomatix:

sidebyside

The first was the result of  processing from the Tone Compressor tab and the latter of Details Enhancer tab processing.  As you can see, the first produced a smoother sky, but left the foreground a little flat, while the latter had more texture and, well… dynamic range to it.  So, I decided to go with the latter in my post processing.  The Photoshop alternative, however, produced something even less desirable than either of the above.  Take a look:

ps_hdr

Not only are the luminosity levels less interesting, but there’s literally no tone curve application.  No color, no tone curve mapping, and decidedly no interest when you consider the options from Photomatix.  I am in the process of putting together a tutorial of how I got the final result, so be on the lookout for that in the next few days.  In the meantime though, I’d like to take a moment to say “Thanks” to fellow NAPP member,  Elizabeth Gast (a.k.a. Firgs,) for the kind thoughts she has over on her blog – Design by Firgs – where she talks up a shot I took a while ago that is premiering on hew new series “Accidentally Awesome” today, so be sure to stop over there and give her a shout-out!  Until tomorrow – Happy Shooting!

Portraits, Promotions, and Planning

This week’s podcast episode should be available shortly over at Personal Life Media.   You’ll want to listen when you really can dedicate the 25 minutes as it’s a pretty rapid fire show this week.  A couple learning opportunities presented themselves to me recently and I wanted to share these before they got too fuzzy.  As a result, I didn’t really get into the news of the last week, or address any listener questions.

So, the show notes will be pretty short and sweet, but here they are:

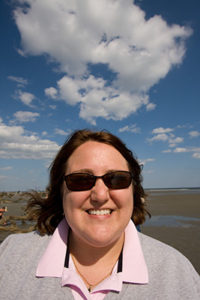
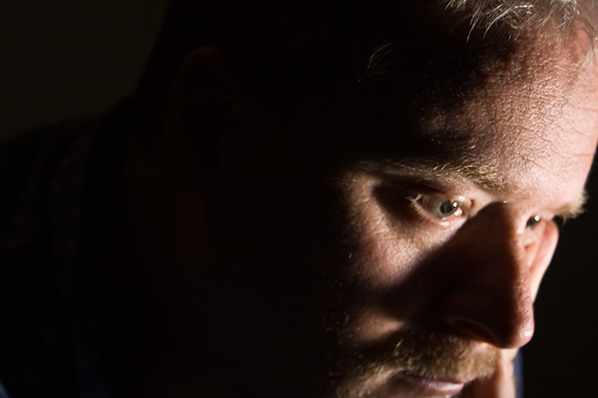
First up, I took a moment to challenge the listening audience to take a whirl at self portraiture.  In the interests of sharing efforts in that vein myself, here was one of the better ones from last night:

selfportrait

I also took a look at the idea of self-promotion, and that the listening audience should not be following my example thus far.  Use your blog to promote your work!  That’s what blogs are for – and never sell yourself short!  For all the details, make sure to catch that segment.

Last but not least, when you are involved or asked to participate in a photo shoot of some sort, take ownership to the extent that you are able in the planning and logistics – it will only help you in the long run.

It’s a busy day, so not much time for the other incidentals – happy shooting and we’ll see you back here again tomorrow!  Diggs, reviews, and such (as always) are appreciated and encouraged!
No Trumpts, No Fanfare, Nada

As I was sorting through the CB archives for some content to update for todays post, it dawned on me that I blew right past post #400 without even a mention of thanks to anyone.  So, at post #411 (see, I really blew right past it), let me take a moment to give some belated thanks to the listening and reading audience for the past two plus years…

Your comments, feedback, emails, insights and thoughtful notes over this time have been very helpful and motivating in keeping the ball rolling, often through some rather tedious times.  I’ve had people share efforts to increase visibility through iTunes reviews, Digg promos, generous donations for offsetting bandwidth, Tweets and Re-tweets, pretty much the whole schmear!  It truly is humbling to see the amount of support I have received in this continuing journey, and today I would just like to say:

THANKS!

Happy shooting and we’ll see you back here tomorrow!
Cactus, Trigger, Zebra, Oh My!

Remember the old game of password where you said a related word to one on your card to get your partner to guess it?  Well, here goes:  What do the words cactus, trigger, and zebra all have in common?  If you answered “flash photography” you’d be right!  As you may have realized, that does mean that the podcast will not come out today – I simply didn’t have time to get all my thoughts and notes together.  So instead, here’s a review of sorts that I did just earlier this evening.

A while back I decided to ditch the Canon ST-E2 wireless trigger for a number of reasons – those being:

  1. It relied on line-of-sight
  2. It didn’t have a very good range
  3. It wouldn’t work with non-Canon gear

I, like many others, have been salivating over the new developments in radio trigger technology.  And, at my last job, I had access to multiple lights, strobes, and such for experimentation.  So, in order to do said experimentation, I decided to invest in some Cactus Triggers that I purchased off an online web vendor (I forget the vendor off the top of my head – search the archives and I am sure it’s there…).  Much to my chagrin though, it would not work with my Canon 550EX flash.  So, when I left my previous job, it was back to the ST-E2.  In order to spur some motivation to invest in some more serious lighting gear on my own, I decided to sell the ST-E2 to fund the purchase of some Cyber Syncs.

Long story short, I ended up with no off-camera method to trigger my one flash unit.  So, I was back on-camera.  Needless to say, ambient light photography was a large focus for that time period.  Well, after the economy stabilized a little for the household with my state job, I decided to invest in the Cyber Syncs – but as a measure of insurance, wanted to make sure the devices would work in my 550EX (the 550EX does not have a sync port).  So, a quick email to them revealed that a neat little device from the folks over at Flash Zebra would make the Cyber Syncs compatible.  A mere $14 later and the device arrived late last week (while I was in SC).  So, next month the Cyber Syncs will be making their way to my doorstep.

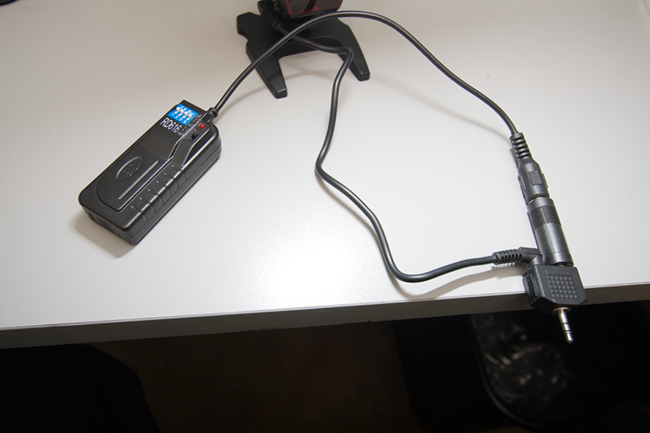
In the meantime, I have these Cactus triggers, and I thought with the inclusion of a sync port, perhaps I could jerry-rig something together.  With the sync port going out to what looks to be an RC-mini, and the receiver also going out to an RC-mini, I needed a way to join two RC-mini’s together.  A quick dig through my various buckets of cables and connectors revealed a dual mini that is normally used to connect to headphones to a single audio.  Worth a shot, since it’s only about $50 total invested.  I connected everything together to get this:

lightcables

On your left is the trigger that came from Cactus, to the RC male.  A reducer on that took it to an RC-mini male.  In the center is the well-hidden PC-sync device that came from Flash Zebra.  (For a better picture, see below…)  A female sync port on that was able to connect to the male sync port that was included with my Cactus gear.  That also went to an RC-mini male.  These are both connected on the right to the y-connector that you would typically see two headsets connect to the same audio source.  The technology is the same, so it’s worth a shot right?  (No pun intended…)

I fired off a test shot from the 40D and it worked!  So, how well would it work?  What kind of reliability would there be?  I took the flash into the next room and fired the trigger from a further distance away…about 20 feet.  Flash!  Then I took the trigger around the corner and fired it.  Flash!  How cool is that?  Another set of tests was needed.  One where radio waves wouldn’t bounce all over the place – outside!  If you recall, I interviewed Scott Eccleston from Weekly Photo Tips a while back, and a recent post of his armed me with a good testing method of the Cactus triggers.  Armed with the inspiration of this video, I enlisted the aid of my wife and took to the great outdoors.

I began with a fresh set of batteries in both the trigger and receiver, as well as the flash.  Starting from ten steps away from the flash, I tripped the shutter – flash!  Twenty paces – flash!  Thirty paces – flash!  Fourty paces – nada.  Hmmm…tried again – nada.  So, I moved back to 35 paces – still nada.  A couple steps closer and it flashed again.  About four more tests at this distance and I had 100% flash rate.  Starting back to my wife, I counted the paces, 1-2-3… all the way to 33 paces.  At an average gait of 3 feet per pace, that’s an outside range of 99 feet!  Considerably better than the ST-E2 and at a third of the price!

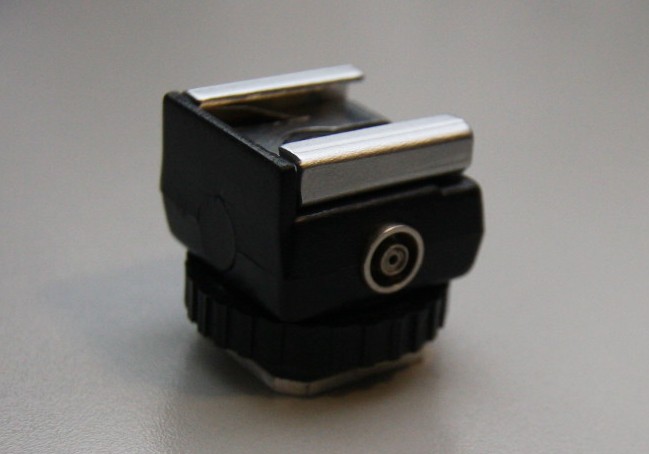
For posterity’ sake, and since I am in a very casual way reviewing the PC-sync adaptor from Flash Zebra, here’s a better shot of just that device.

zebra

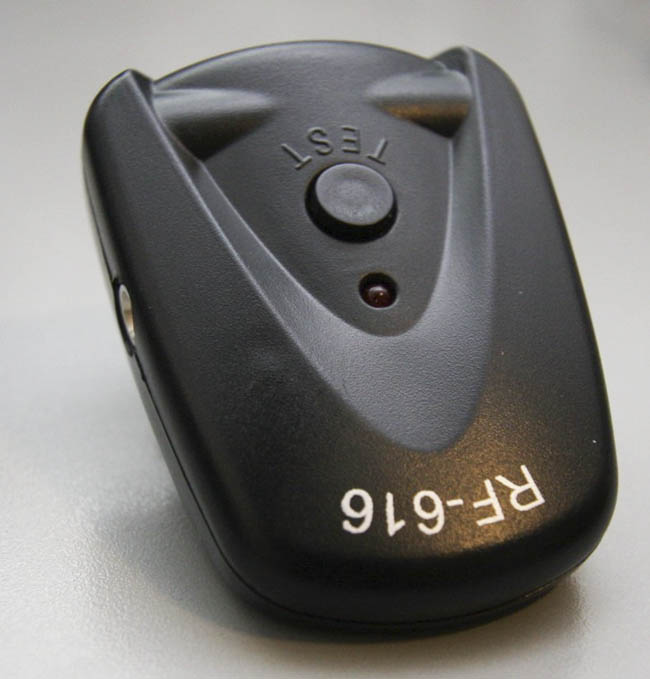
Also for posterity sake, here’s a view of the trigger that attached to the hot shoe of the 550EX:

trigger2