Another Photo Finish Friday

With another Friday coming to an end, I am squeaking this one in under the wire too. After a deluge of rain delayed dinner and a few other odds and ends, I find myself finally sitting down to write the Friday post at 10:47 pm. Thankfully, the details are all worked out in advance so it really requires no additional work on my part.

As promised, my latest web gallery is up and viewable on the photo site directly at this link here: A Day in the Park, but a few previews of the ones I really loved have lightbox versions below:

One of the boys

Another One of the boys

Also of interest, and just in time for the weekend, the latest installment of the TOP test has been compiled and published. I still have a few questions to finish, and 2 of these I am culling from my image library for samples, so you will have to examine pictures this go around – so it’s real life shots that need evaluation, not just textbook definitions…although there’s plenty of that too. Hopefully this one will be a little more challenging, so take it and share your scores today: Top Test – Advanced Photography Exam

The portal page is also new, and the original exam page has almso moved relative to the folder structure movement from outside CB to inside CB (makes tracking easier)…Enjoy the exams and let me know if you have any ideas (An Expert or Pro level exam is also something I am considering compiling but I really would need some pros help in putting that together).

Until Monday then, here’s your weekly installment of WTD;

What The Duck

Until Monday, then, enjoy the weekend, happy shooting, and watch those apertures!

Geographic Composition

Jason Moore has a weekly feature on his blog, titled Geographic Composition. I was invited to join in that weekly activity, and am honored to do so. This week, my first in participating, the theme is “Yellow.” Stop over to Jason’s blog to see the entire grouping of shots…

Triumph Motorcycle

In other news, the TOP test will be officially moving to within the domain for Canon Blogger this evening. With the migration comes a new portal so you can take tests of different difficulties. The Basic Photography test is the one that has been out and in place for about a month now. The next test, nearing completion, is the Intermediate Test. Questions are more difficult, and should challenge you in new ways, including evaluating actual pictures! I am still working on some questions for it, so it’s not completely finished, but I will likely have at least a partial version available for beta testing, so more on that tomorrow once the migration is done (including a link to the new URL).

Finally, the photo shoot from last week has been assembled into a gallery of images and published on my photography site. Stop over there to take a look at the featured pictures. It was a lot of fun and the kids were really great to work with!

Not much other news, so until tomorrow, happy shooting and watch those apertures! 🙂

You Want Fries With That?

We live in a world of super-sizing everything:

From sodas to coffee, fries, meals, cars, and houses, bigger always seems to be better. This is no different in photography. From larger bodies, to larger bags to more Megapixels, we are constantly in pursuit of something “bigger and better.” The idea behind all of this is that the bigger the camera is, or the more megapixels you have, the larger you can print (or the more you can crop and still get a decent print). This is true for the most part. Higher MP counts translate to higher sensor resolution (note that the sensor size isn’t changing, just the resolution). The higher sensor resolution then ultimately translates to higher print sizes. Serious photo enthusiasts know though, that it’s not in the megapixels, the sensors, the cameras, or even the lenses. Truly great prints come from capturing something unique and wonderful that you see with your own eye. Having said that, we are still obsessed with creating the biggest prints we can – after all, the larger the print, the more we can “wow” our clients, right?

Sensor resolution is, by and large, the single most important determinant of how big you will be able to print a particular image. It’s a simple matter of math, native print size will vary as a function of the number of pixels on the sensor. You may get more noise has MP counts ratchet up on identical sensors, but the more pixels you can fit, the larger you can print.

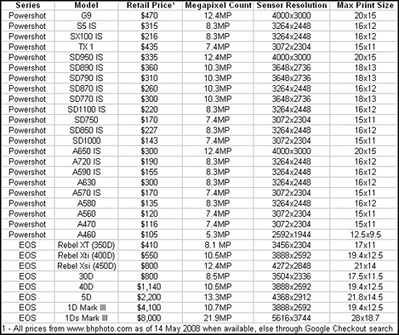
So, that only makes one wonder – what are the maximum print sizes for various cameras? No one tells you that. You can read all about the Digic III sensor from Canon to Nikon’s CCD sensors, and onto the 4/3rds sensor from Olympus. You can also find out everything from the MP counts to frame rates, lens mounts, and a host of other information, but I have yet to find a vendor that publishes a maximum print size in terms we can understand. Instead, they just give us the sensor resolution. But that doesn’t help. We need to know how that resolution translates into prints! Paper sizes aren’t measured in pixels, they are measured in inches! Well, no fear, I’ve taken care of all the legwork and put together a spec sheet for all the cameras currently listed in Canon’s product line. So, without further ado, here are the current Canon cameras, replete with model, current retail price, MP count, sensor size, and max print size. Enjoy!

Canon Camera Print Sizes
Got a camera other than Canon or an older model? Well then, unfortunately it’s a little trickier for you, because you actually need to know 2 things. First, it’s helpful to know that as a general rule of thumb, your maximum print size is proportional to your sensor resolution. Second, you need to know your sensor resolution. To figure out your maximum print size, divide your sensor resolution by 200. For example, the Nikon D80 has a sensor resolution of 3872×2592. So, the max print size would be 3872/200 x 2592/200, or 19″x12″. This is, of course, only taking into account the native resolution of any sensor. Up-sizing programs can adjust for this, but that would no longer be a native measurement.

P.S. I do have this as a worksheet in a larger Excel workbook…other sheets include the Canon lens list, a sunrise/sunset calendar, and bunches of other goodies. If anyone is interested in that, drop me an email! Good stuff in there…

Noise, Lighting, and Links – Oh My!

In lieu of a video tutorial today, I’ve recorded an audio podcast. The primary reason for this is because the tip I want to share involves a technique I don’t really have a good sample shot in my library to show you how to apply the technique. So…tune in to this special audio episode for Canon Blogger.

Show notes include information on:

  • I will have a new gallery of photos out on my photography gallery site tomorrow.
  • Selective Noise Reduction
  • A DIY Backlight (how to make your own)
  • Not one, but 2 videos on lighting gear from www.prophotolife.com
  • Jason Moore is off to France, with kudos on his way out from Photoshop User TV
  • Don’t forget to check out Jason’s Geographic Community Composition on Thursday of this week (the 15th)

Happy shooting and we’ll see you back here again tomorrow!

Just another manic Monday

You know I had to do it eventually…

Although, this week it could not be more true…I was on the first item of a “honey-do” list yesterday, upgrading the thermostat, and could not get things reconnected.  Since it was a Sunday at 7pm the odds of getting an HVAC tech out was just not an option.  As the temperature went up throughout the house, it had similar effects on my processing…I actually had to shut dwon after a thermal warning from the main PC.  So, today after work, I had an HVAC tech out to fix the A/C, and resumed my post processing.  With another 200 or so shots to go through for the shoots that I have CD’s due for tomorrow.  With the evening meal behind me and an early start tomorrow, I really am not going to have time for a regular post  today, so to catch up on the news, stop over to Jason Moore‘s site for the latest in the last week.

If the blog links are not your style, some excellent reading fodder can also be found over at The Online Photographer – there actually was an excellent article there over the weekend that talks about the increasing use of advertorials in magazines.  Very similar to the idea I talked about recently that the “fluff” in magazines is starting to out-weigh the content.

As always, enjoy the week, and don’t forget to trip that shutter occasionally – happy shooting, watch those apertures, and we’ll see you tomorrow!

Friday Flights of Fancy

I was out on a shoot Wednesday and in setting up, I realized I forgot my White Balance card. I always used my WhiBal card to get accurate settings – it’s the cornerstone of my entire workflow! I was sweating bullets…what would I do?

Well, I’d read about white balancing en masse off the eyes, so thought it might work out. But, with the sunny afternoon, pupils were dilated, and kids were squinting, so…I went with the next best thing – their teeth! Turned out to work okay, and I’ve got about 20 shots to share with the mother at work on Monday. In light of my “success” at setting white balance off a subject’s teeth, I thought I’d share that tip with the readership this Friday – take flight in charting new waters – shoot without a white balance card and just use what nature gives you.

Since I’ve not gotten the model releases signed by the mother yet, I can’t make a gallery of images, but I expect to have those on Monday, so stop back in to see the full gallery by then.  For some reason I can’t get to WTD so will add my “Friday Funny” later.  Alternatively, you can just stop over to www.whattheduck.net to enjoy the humor – I hit it every Friday and read the entire week.

Finally, I’d like to close this week out with a challenge – show me your shots!  Let’s see everyone get out there and take pictures.  Email me pictures taken from the theme for the week (or email me a link and I can download that way), and I’ll put a montage together here on the blog.  With me being a Canon shooter, I figured it would be fun to start with a related theme – RED.  So, show me shots with something red – anything you want, and I’ll put a gallery together of all of them and offer some thoughts and feedback on all contributions in a post the following week.  So, the dates that I’ll take shots starts today, and will end next Thursday at midnight.  Please re-size your shots to 800px on the longest dimension before sending.

Thanks for tuning in, and don’t forget to get out and shoot this weekend – remember the theme is RED!  Happy shooting and watch those apertures! 🙂

Depth perception…

Depth of field, or DOF, seems to be a common area for discussion in photography, primarily because it is often subjective. What you choose for your depth of field in any particular image will have an impact not only on what is in focus and out of focus, but also on the impact the image has on the viewer. If your DOF is too shallow, a viewer may find the lack of a strong area of focus a turn off. Meanwhile, others may find the abstract nature of soft DOF appealing. Surely, DOF discussions are very much like opinions – we all have our own.

Having said that, there are some times when you would want a wider or a more narrow DOF depending on your subject matter. So, on that basis, it helps to understand how we can control our DOF. As I thought about this post, I came up with a total of:

Seven Tips to Control Depth of Field

  1. Aperture adjustments – the most obvious way, increasing aperture (decreasing the f-number or widening the opening) reduces your DOF, while decreasing the aperture (increasing the f-number or narrowing the opening) increases your DOF.
  2. Focus into the scene – by positioning the main point of focus into the scene, you can enjoy an increased range of focus for your DOF as a certain portion in front of, as well as behind your fosucing point will also be as sharp as your specific point.
  3. Parallel Planes – another one that is rather unique to macro photography, but when working with extremely shallow DOF values, it can help to keep your subject in focus if you position your camera back on the same plane as your subject. If you are not on the same plane, your subject will fall out of focus as it recedes toward the background and/or as it gets closer to the foreground.
  4. Use a tripod – especially useful in macro photography when you have a very shallow DOF – even the slightest of movements will result in a blur even within your specified DOF area, so stabilize the camera with a tripod when opening up the aperture
  5. Hyperfocal Distance – Jeff Revell dedicated an entire post to this the other day, so go to PhotowalkPro to read more about it. I kind of alluded to it in #2, but the more detailed answer will give you a better grasp of where to focus and how to achieve HFD
  6. DOF Preview Button – all shots in an SLR camera are viewed at the widest aperture opening so we can compose our focus point where we want it. However, the DOF preview button will stop down the aperture blades to out final aperture setting for us to give a preview of the range of sharpness through our image. Probably one of the least used tools on your camera (don’t worry, I forget to use it all the time too!)
  7. Change the focal length – your depth of field is also a function of the focal length of your lens. Longer focal lengths will be less able to produce a wider DOF (image is sharper throughout), while wider angle lenses typically can produce a wider range of sharpness to extend your DOF. This is partly why a wide angle lens is recommended for landscape photography.

Digital Frames

Too often we take our work and share it out on the web in galleries, on blogs, and at various community forums to see the background colors don’t really do our shots much justice. I’ve seen forums with blue background colors, others with yellow, and much much more. This has the net effect of casting a hue across every image in that space. Your images take on that hue to a certain degree, and it can often negate an image more than many realize.

Forum administrators and bloggers are starting to realize that neutrals are the best way to go, but there are still some web outlets that hang on to some rather outlandish color schemes. To accommodate the creative (and sometimes sensitive) differences that exist, it can often help to present your images with some digital framing. That is the focus of this weeks’ tutorial, and I share a rather simple but effective technique to create a digital frame to enhance or accentuate and draw attention to your imagery.

As I mention at the end of the post, there are some automated ways to create digital frames via plugins and actions. The one I reference can be found at www.atncentral.com People labor often in anonymity and share their work with the world and give it freely for others to use. Enjoy the benefits of generous folks and for those occasional ones that ask for donations, kick in a buck or two – it always helps to keep the creative spirit alive. In the meantime, keep on shooting (happily), and watch those apertures (carefully)!

Flash Version: Digital Framing

PlayPlay

PlayPlay

Day swap

I was having some issues with the post production and rather than hold off until late tonight to release the tutorial, I figured it’d be better to just swap Tuesday and Wednesday’s posts, so today is an early edition of my week around the web:

  • Jason Moore did his weekly round-up, and also saw his 600th post – congrats Jason!
  • Andrew at Visual Realia has a really great take on the theme of flowers and dewdrops – check it out for some inspiration!
  • I read up on the Copyright Law and Orphaned Works Act pending in Congress. Not good for us – good for corporations. Read up and submit your works today!
  • Thanks go out to Lisa, from Sage Family Studios, who is a fellow NAPP member for mentioning this in those forums.
  • Mark Brian, (sorry Brian, I am always wanting to call you Mark for some silly reason) from Professional Snapshots, has an image that will melt your heart (congrats again mark), and a Layers book review (by Matt K.) to make you green with envy (I want the book now).
  • The Online Photographer did an article on the sadness following the Kentucky Derby. If you are a softie like me, be warned, kind of heart-wrenching, and my heart goes out to the owners.
  • For fellow bloggers, this may be of most interest, as I finally took some time to read ProBlogger. I still have my work cut out for me! Definitely worth a read (or twenty) if you have the time – lots of ways to improve your niche, writing, style, professionalism, and much more!

Finally, it is worth noting that Dubai seems to be the hot spot lately. many of the most active and visible blogs on the web including the likes of Scott Kelby, Jeff Revell, Joe McNally, and now David Hobby, along with other notables have been visiting a growing body of budding photographers in the area. Some gorgeous and inspiring works have been posted over the last few weeks on all these guys blogs. Go check them out for a major dosage of creative inspiration here, here, here and here. If you stop in, take some time to share your thoughts with them – if you think I work hard at blogging and photography, it’s a drop in the bucket compared to these guys, both in breadth and depth! Amazing stuff out there…

Well, that should keep you tied over until the tutorial can get wrapped up tomorrow afternoon (I’ll forgo a morning post since this is going up later than normal). Until tomorrow; Happy Shooting and Watch those apertures!

Now is the month of Maying

There is an old saying that goes something along the lines of “April showers bring May flowers.” While this is generally a principle that holds true, in the photography world, it is also the time when things start really hopping. Below is a list of just some of the activities that drive the photography industry as we move into late Spring and early Summer:

  1. Wedding season kicks into high gear (wedding photographers)
  2. High school and college graduation parties are scheduled (which is great for portrait photographers)
  3. Engagements are announced (with anticipation of #1 the following year) (portrait photographers again)
  4. Family portraits are planned in conjunction with all of the above (portrait photographers yet again)
  5. A new season of sports swings into gear such as baseball, soccer, lacrosse, swimming, and countless other summer leagues (great for sports shooters)
  6. Mating seasons begin for birds (nature photographers)
  7. Rivers, streams, and waterways are teaming with new life (landscape photographers are just ecstatic)

Continue reading “Now is the month of Maying”